Thursday, January 30, 2014

Galician octopus tapas 蛸のガリシア風タパス

As I mentioned earlier, with a whole octopus in the house, we had a lot of octopus eating to do. As a result I had to come up with something totally different from my usual recipes. I was thinking of making "tapas" and looked for recipes. There are many "Galician" octopus recipes. Although they are essentially boiled octopus eaten with paprika and olive oil, how to boil the octopus ranges widely from just boiling it in plain water to boiling it in highly seasoned broth. I took a middle-of-the-road approach heavily influenced by Chef Eric Ripert's recipe.


I started with two legs of boiled octopus. I added salt (1/2 tsp), Fino sherry (1/2 cup), lemon (1/4, juiced), black pepper corns (5) and smoked paprika powder (1 tsp), and crushed garlic (2 cloves) into the water (3 cups) (below picture, left). I put on an "otoshi-buta" 落とし蓋 and then a regular lid and cooked it on a very low simmer for 1 and half hours (Picture below right).

Spanish octopus

When it cooled to room temperature, I sliced it rather thickly and sprinkled on smoked paprika powder and a good amount of good fruity olive oil (the first picture).

This was not bad but despite the long cooking, it was still a bit chewy. Initially I tasted some bitterness while it was hot, but the bitterness disappeared when it cooled to room temperature. Two of us quickly consumed the two good sized legs.  I don’t think I will buy octopus just to make this particular dish but if you should find your self in the position of having an excess amount of octopus, this is a good dish to try.

Monday, January 27, 2014

Japanese winter stew with octopus legs たこ入りのおでん

I posted that we got 2lb whole octopus for the New Year. I made this Japanese winter stew or "oden" おでん with the octopus. The way oden was made is exactly the same as my previous post, but I added the tips of the octopus legs on skewers to the oden. When octopus legs are cut for sashimi or other use, the tips remain. I usually cut the tips into small chunk or "butsu-giri" ぶつ切りand dress them with "sumiso" 酢味噌. I serve them as contrast in texture with the sliced octopus. This time, I decide to use the tips of the legs in oden.

As I add items to the oden pot, I usually end up having too much oden. So I restrained myself and did not add any fish cakes just the octopus legs, boiled eggs, tofu, daikon, konnyaku 蒟蒻, and shiitake mushroom.


This one small serving with a dab of Japanese hot mustard. Since I left the octopus legs for long time in the pot, they were rather tender and also imparted a nice “fresh ocean” flavor to the broth.


The picture below shows how I cut the tips of the legs and then skewered them. You do not have to skewer them but it looked nice and it prevents them from curling up when they cook.


This is a very good way of using tips of the octopus especially on a cold winter day.

Friday, January 24, 2014

Oyster Stew 牡蛎のシチュー

Oyster stew for Christmas eve dinner was a tradition for my wife’s family since she was a young girl. At some point, I do not know when, oyster stew became our Christmas eve dinner tradition too. It probably started when we lived in California and had access to large plump Pacific oysters. In any case, I made oyster stew from shucked oysters sold in a jar last Christmas eve. These oysters are not anything like the Pacific oysters we used to get but they are certainly good enough to enjoy.


The ultimate oyster stew especially when you can get high quality oysters (i.e can be eaten raw) is to heat up cream, butter, and the oyster liquor and poach the oysters briefly in the mixture then season with celery salt (so call Grand central station style). My recipe is more like oyster chowder but with enough butter and cream to make it still rather decadent.

Oyster: I use 12oz jar of shucked oysters which contained about dozen small to medium sized oysters.

I finely chopped onion (1 medium), celery (1-2 stalks). I sautéed them in a stew pot with melted butter (1 tbs) for a few minutes and added chicken broth (2 cups, the Swanson no-fat, reduced salt, kind), oyster liquor from the jar, and water (1 cup). If I had clam juice, I would have used that instead of chicken broth. I then added peeled and cubed white potatoes (2 large) and carrots (2-3, peeled and cut into similar size as the potatoes). When all the vegetables were cooked (15 minutes), I turned down the flame and added cream (I used light cream, about 1 cup). I brought the liquid just to the start of a boil, I added the oysters and gently cooked for another one minute. I tasted the stew and adjusted the seasoning (Kosher salt).

I served the stew with chopped Italian parsley and freshly ground white pepper. With the butter and cream, this is certainly rich enough for us. Even reheated the next day, this was not bad at all.

Tuesday, January 21, 2014

Candied duck liver and gizzard

The whole duck we rotissed for Christmas, came with most of its parts—the liver and gizzard tucked in its cavity. I decided to use these in a small appetizer which was inspired by the dish we had at Nojo restaurant in San Francisco. I think, for my first try, this was quite a success but it was a bit too sweet and I will need to further modify the recipe.


Duck liver and gizzard: For the liver, I removed any veins and fat from the surface and cut it into small bite sized pieces. For the gizzard, I removed the silver skin and sliced it rather thinly against the grain of the muscle.

Deep frying: I essentially made tempura. I first dredged the liver and gizzard. I made a rather thick tempura batter with cold water, cake flour and small amount of potato starch. I deep fried (350F vegetable oil) the pieces for a few minutes until they were cooked through and the crust was crispy and golden brown.

Sauce: I added honey (1tsp) and maple syrup (1/2 tsp) and water (2tbs) in a small frying pan over medium flame. After the honey and maple syrup blended, I added hot sauce (Sriracha). I added about 1/2 tsp but the amount is arbitrary and to taste. As the sauce reduced and thickened, I added the fried duck liver and gizzard and coated all the surfaces with the sauce (see the below picture).


This was quite good. The crust was very crispy and provided a nice crunch in contrast to the softness of the liver. Although the dish was a bit too sweet from the sauce, there was a nice slow heat from the Sriracha. The liver was good without any gamey flavor. I am sure I can do this with chicken livers. The gizzard was firm but added a nice contrast in texture to the liver. My wife usually does not like gizzard but this one she liked because of the thin slice. I may have to drizzle the sauce over the fried liver to make it less sweet next time.

Saturday, January 18, 2014

Christmas rotissed dry-cured duck クリスマスのローテッサリーダック

Although Christmas is long over I am just getting around to posting this Christmas item. We are not particularly fond of turkey for the holidays (or, for that matter, any occasion). We usually substitute chicken for the turkey on Holidays but, for a change, we decided to try a whole duck this Christmas (We tried a goose many years ago and did not particularly like it). We also wanted to try our newly acquired  
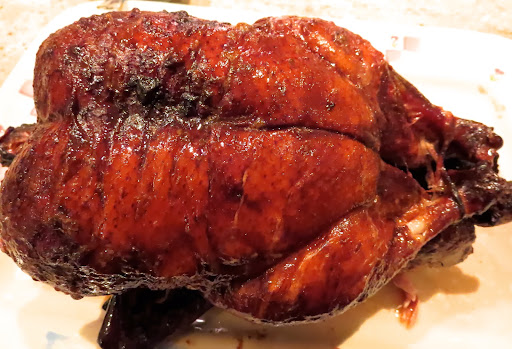
Rotisserie device for our Weber grill. After looking through some duck roasting recipes, I decided to do the salt dry rub cured method. The golden brown rotissed final product is shown below.


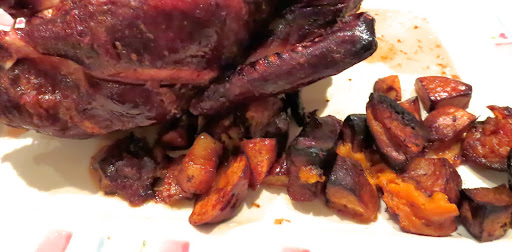
We also cooked potatoes (sweet and regular) in the drip pan (shown below).


Both the duck and potatoes (especially sweet potatoes) were excellent. The skin of the duck could have been crisper but the meat was moist and succulent. The self basting process by rotissing really made a difference.  As a test run and to compare my usual indirect method of cooking vs. rotissing, we first rotissed two chickens . My usual indirect method in Weber often makes the chicken legs a bit over cooked and dry. With the rotisserie method all the meat was uniformly cooked. The legs were not dry but very tender. The breast was ridiculously succulent. The only draw back was that the skin which is lovely and crisp using the indirect heat method (and is one of our favorite parts of roasted chicken) was not the least bit crispy and actually not particularly appetizing.

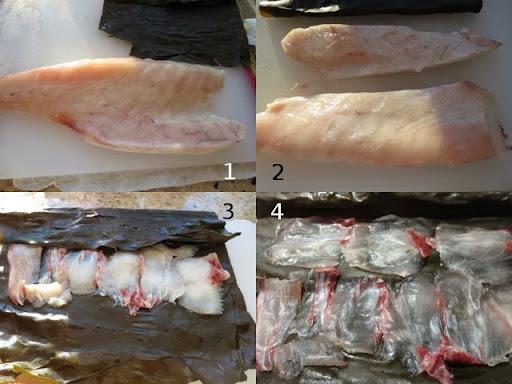
Preparation of the duck: I washed and pat dried the whole duck 2 days before Christmas. I rubbed about 1/2 tsp of Kosher salt each in the inside of the cavity, on the breast and legs, and on the back and wings. I placed it on a rack with a drip pan underneath. I placed this uncovered in the refrigerator for 2 days (#1).  After two days curing and drying in the refrigerator, some fluid dripped down and the skin looked "dry" especially on the breast side (#1). Using a tip of the knife, I pricked the skin of the breast to ensure rendered fat will flow out easily. I pushed through the rotisserie rod and secured the duck with prongs (#2 and 4). I used my usual indirect heat setting with two baskets on the side filled with lit charcoals (I used hardwood lump charcoal). I added soaked hickory chips to the charcoal baskets and turned on the rotisserie (I used the weight on the handle to balance the load so that the rotisserie turned smoothly). I doubled the drip pan, using a corrugated pan on the bottom and a flat bottom one on the top. I poked several holes in the upper pan and put in some potatoes (cut up in bite sized pieces). This was so that the duck fat could dip down and baste the potatoes then drip on through the holes in the top pan to prevent the potatoes from being soaked in the fat. The excess fat accumulated in the bottom pan—and there was a lot of it! (#4). We could have saved it for other recipes but didn’t “for health reasons”.


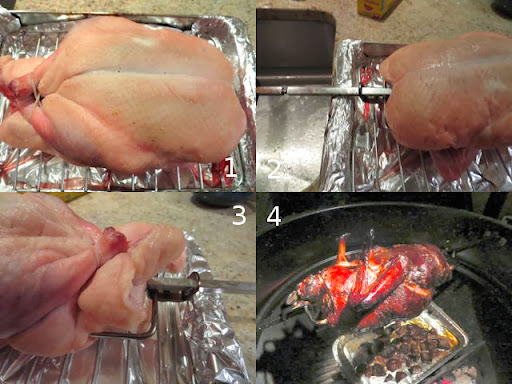
I cooked everything for 1 hour and 20 minutes and the meat in the thickest portion of the thigh reached 175F.

The duck fat dripped on the potatoes as they cooked so they were basted but not submerged by the fat. They were delicious—particularly the sweet potatoes. They were crispy on the outside and soft and sweet on the inside. They had a lovely smoky flavor. The duck was also very good. Like the chicken everything was uniformly cooked. The legs were very tender and were similar to duck legs we have eaten that were cooked using a 
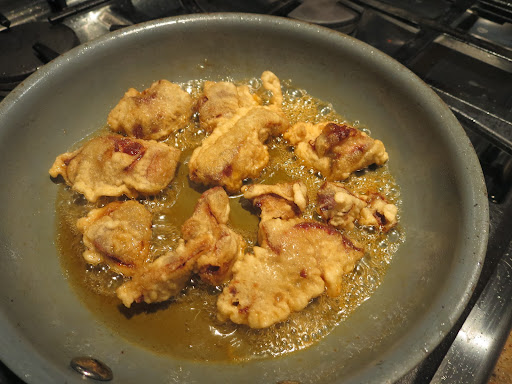
confit method. The breast was lovely and succulent. Again, like the chicken, the skin was not crispy. Nonetheless, the next day my wife heated some of the duck leftovers including the skin in a frying pan. Amazingly the skin crisped up very nicely. Maybe that is a solution to the “crispy skin” issue with rotisserie cooking. We really liked the rottissed duck and the potatoes cooked with duck fat dripping on it. It was a feast worthy of a Holiday.

Wednesday, January 15, 2014

Kampachi cured with Kelp カンパチの昆布締め

Kampachi カンパチ is usually called "Amber jack" or sometimes "young" hamachi ハマチ which is young "buri" ブリ but appears to be different from the Hamchi/Buri family—confusing?. The taste of the meat is similar to Hamachi, albeit more delicate. We got this kampachi from a source that is new for us called "Fish for Sushi". I made "Kobu Jime" 昆布締め or kelp cured kampachi. This preparation results in a kampachi with a firmer texture and subtle but definitively  enhanced "Umami" flavor 


The kelp-curing technique is commonly used for white meat sashimi fish especially flounder but I thought it will be interesting to use it for kampachi. After thawing the fish completely (#1), I divided it into the loin and belly parts (#2). I thinly sliced the loin meat obliquely to get thin but larger pieces. I wiped the surface of the dried kelp sheet with a wet paper towel and placed the slices of kampachi on it (#3). I folded the kelp to completely cover the slices. I wrapped the kelp packet in plastic wrap and placed it in the refrigerator for several hours. When I opened it, the kampachi slices were almost transparent and the texture was firmer since the water had been drawn into the kelp and umami from the kelp infused into the fish (#4).


This is certainly a worthwhile preparation for kampachi.

Sunday, January 12, 2014

Super-frozen Bigeye tuna sashimi and Kampachi 超冷凍メバチ鮪とカンパチのさしみ

As I mentioned in the boiled octopus post, we got super-frozen bigeye tuna and kampachi from a new place called "Fish for Sushi". The picture below shows the sashimi I served for New Year's eve along with the octopus we got from them.

The picture below is what I served in the evening on New Year’s day. Instead of regular daikon garnish I served daikon namasu 大根なます with ikura and also added kazunoko 数の子 with bonito flakes.

The fish came in a styrofoam box with plenty of dry ice.  The left in the picture below is super-frozen (bigeye) tuna and the right is "kampachi (belly loin). The instructions on how to thaw the tuna were slightly different from the ones listed on their website and on the label (temperature and duration of initial treatment). I followed the one on the package. The kampachi loin did not come with any specific instructions. So, I just thawed it quickly in the package soaked in running cold water. I wrapped both the tuna and kampachi in paper towels and placed on a plate in the refrigerator.


The kampachi thawed rather quickly but the tuna took more than 5 hours, probably better to leave it 12 hours (overnight). After it was thoroughly thawed, I wrapped in parchment paper and placed it in a Ziploc bag. It keeps up to 3 days after thawing in the meat case of the refrigerator.

In terms of taste, as far as "akami" or red meat of tuna goes, this was rather good but nothing beats "toro" and "chutoro" we can get from Catalina. It is far superior to "yellowfin frozen tuna" treated with CO. The kampachi was good but you may have to clean it up by removing some small bones and the remnants of skin. We still prefer tuna from Catalina but this is a good second source for sashimi fish.