Tuesday, September 9, 2014

Shio-koji marinated pork loin and chicken tenderloins 塩麹漬け豚ヒレと鶏笹身の唐揚げ

I posted dishes using shio-koji 塩麹 more than several times. I thought that, in general, the virtue of shio-koji was a bit over hyped.  Since the shio-koji I made from dried shio-koji was getting old (although it still looked and smelled OK), I decided to replace it with some store-bought prepared shio-koji in a small plastic pouch (see picture on the left). It appears that the rice kernels in this one are much softer than the ones from dry shio-koji. I had an extra tail potion of pork tenderloin and two chicken tenderloins which I removed when I was preparing chicken breast from bone-in split chicken breast, I decided to make a small appetizer "kara-age"  with these using shio-koji.

Because of the sugar/starch in the shi-koji, the cooked meat came out rather dark. I served it with shredded cabbage, deep fried shishi-tou シシトウ and wedges of lemon. I also served tonkatsu sauce トンカツソース and Japanese hot mustard 和芥子 on the side.


On the left are two pieces of chicken tenderloin and on the right are pieces of pork tenderloin.


Probably I overcooked a bit but still tasted ok.


I prepared both tenderloins a few days ago, I cut both into bite sized pieces, placed both in small Ziploc bags, added a small amount of shio-koji, massaged it and removed as much air as possible and sealed. I let it marinade for two days in the meat drawer in the refrigerator (a few hours to over night may have been adequate, but I did not get to it until today). In the picture below the upper one is chicken and the lower one is pork.


I blotted the surface of the meat with a paper towel and dredged with potato starch or "katakuriko" 片栗粉. I heated peanut oil to 350F and deep fried it for 5 minutes or so, turning several times during cooking. Shio-koji marination added a subtle sweet and salty flavor but I am not sure about the tenderizing effect of shio-koji, which everybody is raving about. It is variation from my usual "tatsuta-age" 竜田揚げ or "kara-age" 唐揚げ (marinade is soy sauce, mirin and grated ginger) but we sort of like the latter.

Saturday, September 6, 2014

Perilla gyouza 青じそ餃子

I have not made gyouza 餃子 for some time. Since the perilla in our herb garden is plentiful and will be soon go to flower and seed, I decided to use some for this gyouza after seeing the post at "No Recipe". Although the stuffing can be anything you like, I made a rather traditional ground pork/cabbage stuffing.


Since each stuffing is wrapped in perilla leaves the green leaves are visible through the gyouza skin.


I served 5 each as an appetizer with a mixture of rice vinegar and soy sauce (1:1) as a dipping sauce and Japanese hot mustard. The pork stuffing recipe is the same as before but I did not have garlic chives and used chopped cabbage boiled for 5 minutes with the moisture squeezed out. Since I generally don’t follow actual recipes but eye-ball quantities, please referred to a more precise recipe here.

I did not have "gyouza skins" so I used egg roll skins cut into 4 small squares. I placed one perilla leave on the skin and then the pork stuffing and formed a gyouza by wetting the edges, folding in half and then pinching the edges (again please see animated image here).

perilla gyouza

I like the entire gyouza to have a crispy skin.  I deviated from the regular way of cooking gyouza and fried both surfaces using a mixture of light olive oil and dark sesame oil until both sides were brown and crispy. I added a small amount of water and put on the lid to let the gyouza steam for 1-2 minutes. I removed the lid when the water all evaporated and further crisped up the skin.

I thought the perilla flavor would be much stronger but it was actually pretty mild. It was still a good gyouza. The egg roll skin I buy in our regular grocery store is thinner than wonton skin and we like a thinner and crispier skin.

Wednesday, September 3, 2014

Home made fresh cheese curd、improved version 自家製チーズカード

In the past, my wife made cottage cheese and cheese curd (which went into an Indian spinach curry, saag paneer) which we posted before. This is an improved version of the cheese curd. The improved version was excellent and better than the previous version so I decided to post it again.  I served the cheese with my mildly spicy marinara sauce which I had made for pizza the previous weekend. I also added some good fruity olive oil, smoked sea salt and garnished with fresh basil.


Here is another version with the marinara sauce, olive oil, and oil-cured black olive a few days later.


This improvement was a continuing work in progress with several stumbles along the way. Suffice it to say that success depended on the combination of the right ingredients and the proper tools. The improvement my wife made to the ingredients was the use of high-octane (4% instead of 1%) whole milk as well as high-octane buttermilk  (Harrisburg Dairies whole buttermilk from Whole foods). The buttermilk was almost as thick as yogurt.  The proper tools consisted of improved cheese cloth and a heavy duty stock pot to boil the milk without scorching. She got the new cheese cloth (from the New England Cheesemaking Supply Company). This cloth is called butter muslin and is used for draining curds for soft cheese. This cloth is much sturdier than the cheesecloth sold in grocery stores. It has a very fine mesh which captures all the curds instead of letting half of them do down the drain (which is exactly what happened on one of our first attempts). But, by far the most expensive investment, was the purchase of a new stainless steel stock pot (All-clad) for boiling the milk. In one of her attempts to make cheese, my wife used a porcelain-lined metal stock pot which I had used to cook wort for making beer many years ago. Although she stirred continuously, when the milk came to a boil, the bottom had heavily and totally scorched. The resulting curd tasted burnt. It was terrible. We had to discard it.  It also took considerable scrubbing to save the old stock pot. I had wanted to get a new stock pot for some time so I thought this was a good excuse to make the investment. I do have to say that to date this is the most expensive cheese curd EVER.

Ingredients:
Whole milk (4%) 1 gallon
Buttermilk 4 cups,
4 tsp. salt

My wife brought 1 gallon of whole milk to a boil in her shiny new stock pot (no scorching this time). She then added the buttermilk, stirred  and let it sit for a few minutes. Then, she poured the milk through the new cheesecloth over the colander. After 5 minutes or so, most of the water (whey) drained away and the cheese curd remained (see below). With this new cheesecloth, no curd was sacrificed to the sink god!


She wrapped the curd in the cheesecloth. Since we do not have a cheese press (yet), we used a Japanese pickles pot (this one is square with a spring loaded pressure board which can be further lowered by turning). She placed the wrapped curd into this contraption and pressed it by turning the knob.  She kept it in the refrigerator for several hours. More whey came out. She discarded this and pressed it again. The next day, the cheese curd was soft but hard enough to be cut into appropriate sized pieces.

The texture was very creamy and the taste was slightly sweet. It had the  texture of good cream cheese and a taste reminiscent of Mozzarella cheese. Besides enjoying the cheese curd itself as a drinking snack such as the ones shown above we used this in an Indian-style spinach curry which was also very good. Since the stockpot investment, my wife will have to make quite few batches of cheese (and possibly expand her repertoire) to reduce unit costs. (Meanwhile, I hope to enjoy the stockpot for my cooking projects “free of cost”).

Sunday, August 31, 2014

“Raw” scattered sushi 生ちらし

I am not going to go into an anthropological discussion of Sushi 寿司 or 鮨. It has many different forms but the one common ingredient is "vinegared" rice or "su-meshi" 酢飯 or "sushi-meshi" 寿司飯.  An old form of sushi was salted fish and rice fermented for preservation without refrigeration. Lactic fermentation adds "acid" to the food, among other things, including an awful smell. A good example is "Funazushi" フナ寿司. We tasted this in the past but only as a very tamed version in a small quantity. The most common and popular form of sushi involves pieces of fresh raw or cooked fish without fermentation on a small ball of vinegared rice. This style originated in the Edo era (16-19 century) and was called  "Edo-mae-zushi" 江戸前寿司 or "Nigiri-zushi" 握り寿司.  Another popular style is rolled sushi or maki-zushi 巻き寿司 including hand-roll or "Temaki-zushi" 手巻き寿司. By far the most home-cook friendly type of sushi, however, is scattered sushi or "Chirashi-zuahi"  ちらし寿司. I have previously posted variations of chirashi-zushi. Here I made "nama-chirashi" 生ちらし(meaning "raw" scattered sushi) or "Kaisen-chirashi" 海鮮ちらし( meaning fresh seafood scattered sushi) for lunch one day. It consists of pieces of sashimi 刺身 topping a layer of venegared rice.


The slices of cucumber are genuine Japanese cucumber (not American mini-cucumber) and tasted better. I served this with miso soup (tofu, nameko mushroom).


Sushi rice: This was made from imported Koshihikari コシヒカリrice from Niigata, Japan (subject for another post). I seasoned it with sushi vinegar from the bottle.

Topping: All the pieces came from a toro block I purchased from Catalina. This toro block did not have any chiai 血合い. #1(in the picture below) is the pure fat just underneath the skin. This time I left a layer a few millimeters thick on the skin and then removed it as a single layer. I cut it into rectangles. #2 is the more traditional fatty portion or Ootro. I salted it and then torched it with my handy kitchen flame-thrower (no kitchen should be without it) to make "aburi" 炙り. #3 is medium fatty tuna or Chu-toro 中トロ. #4 is wild caught hamachi which was fairly lean rather than oily. #5 is uni and the slices of cucumber are Japanese cucumber I got from our Japanese grocery store.

I made a rather thin layer of sushi rice, covered it with thin strips of dried nori and put the sashimi and cucumber on top.  I happened to have Sashimi-jouyu* 刺身醤油 I made several days ago and painted it on each piece of sashimi with a brush. I served wasabi and additional sashimi-jouyu on the side.

* Sashimi-jouyu: You can buy this special type of soy sauce in a bottle or make it yourself. There are many variations. The most famous is "Tosa-jouyu" 土佐醤油. I used soy sauce, mirin, and sake (2:1:1) ratio and added about equal amounts of broth made from shaved dried bonito flakes or katsuo-dashi カツオ出し. I then simmered the mixture for 10-15 minutes until the amount reduced to 2/3. I placed this in a sealable jar in the refrigerator. The amount of each ingredient can be adjusted to your liking. Instead of bonito broth, you could use water (to make it "pure" soy sauce flavor). You could also use much less mirin and sake or even add sugar.


The pure fat layer was particularly good. Usually, this layer is very firm. I cut it into small cubes and dressed it in " sumiso" sauce but this time the layer was not too firm and melted in your mouth. This was a rather decadent lunch and we even had a bit of cold sake.

Thursday, August 28, 2014

PA Dutch-style chicken and dumpling stewペンシルバニアダッチ風鶏肉とすいとんシチュー

Although my wife is not Pennsylvania Dutch, she grew up in a PA Dutch area in rural Pennsylvania. According to her, even in her grade school, the cooks were PA Dutch and, as a result, many of her childhood food memories are PA Dutch dishes and we posted quite few of these.

Recently, one of our friends asked if my wife could make a PA Dutch dish called chicken and dumplings and post it. My wife never mentioned this dish to me before and when I asked her about it her response was luke-warn at best. She knew about the dish but her childhood recollection was that is was BORING.  It appears that this was not one of her favorites. But recognizing taste can change over time with things cherished in childhood being less appreciated in adulthood and vice versa, she consulted her cookbooks and came up with this dish. Turns out that it is surprisingly flavorful and not bad especially for a dish involving "dumplings*".


I was amazed how much the dumpling swelled up.


All the final vegetables were freshly added after the broth was made from simmering the aromatic vegetables and chicken together.

* Dumpling, "Suiton" or すいとん (水団): Almost all cultures have some kind of dumpling which is essentially made from starch (flour or root tuber, potato starch and water to make a dough. The dough is formed into small balls or noodle-like strips then cooked in a soup or stew. Leavening agents, eggs, fat, herbs and other seasoning could be also added but the basic form was cheap and filling food meant to fill the stomach. In Japan, my parents' generation after World-war II, wheat flour ration (US army surplus) was often made into Japanese-style dumpling cooked in water/broth, which tended to bring up "bad" memories of the post war period for my parents' generation. The Japanese name "Suiton" literally means "water  dumpling". As compared with "noodles" made of flour, this type of dumpling is easier and quicker to make especially when you are hungry. Post-war Japanese generations which include myself may never have eaten this type of  "dumpling".

Here is my wife's version of PA Dutch chicken and dumpling stew. Originally a stringy old chicken would have been used. Or, as some recipes suggested, the carcass of the chicken served for Sunday dinner (chicken and dumplings was definitely a Monday i.e.not company, dinner). My wife chose chicken thighs because they do well when stewed. Also in an attempt to avoid the “boring” indictment she used chicken broth instead of just water called for in the original recipes.

Ingredients: (for 4-6 servings)
For Chicken and broth:
Chicken thigh: 4, skin on and bone in.
Chicken broth (or water about 2 quarts) to cover vegetables and chicken pieces.
Onion: 2 medium, coarsely diced
Celery: 4 stalk, coarsely chopped
Carrots: 4 large, skinned and coarsely chopped
Bay leaves: 2
Black pepper and salt to taste
Olive oil for browning chicken

For dumpling: (this makes lots of dumplings, you may want to adjust the amount proportionally)
Flour All purpose, 2 cups, sifted,
Salt 1/2 tsp
Baking powder 4 tsp
Parsley: fresh Italian parsley, finely chopped, 2 tbs or dried (2 tsp)
Black pepper to taste
Butter 3 tbs.
Egg, one large beaten
Milk 1/2 up to 2/3 cup, added in increments

Vegetables for the final stew:
Onion, 2 medium, medium dice, sautéed in oil.
Potato, 3 medium, skinned and cut into large cubes
Carrots, 4 medium, skinned and cut into bite size coins
Celery, 4 stalks, veins removed and sliced in 1/4 in

In a large sauté pan, add olive oil and brown the chicken. Deglaze the pan to get out all the fond. Sauté the onion until lightly golden.  Put all the vegetables, bay leaves, chicken into the pot. Pour chicken broth to cover (we used low sodium no fat Swanson chicken broth) and simmer for one hour with the lid on, removing the scum that may form on the surface several times.(#1) Let the chicken cool to room temperature. Remove the chicken from the bone. Discard the skin and set the meat aside. Strain the broth to remove all solids and set aside. Add the broth back into the pan (you could skim the fat).  Add the fresh vegetables for the final stew listed above (sautéing the onions until slightly caramelized). simmer until the vegetables are cooked (20 minutes or so) (#2).

For the dumplings sift the flour, add the baking powder, salt, parsley and pepper.  Cut in the butter using a pastry cutter (#3). Add the egg. Add enough milk until the dough is formed (as little kneading or mixing as possible) (#4). Using a small ice cream scoop (or two spoons), Drop a portion of dumpling dough into the gently simmering broth (#5). Put on the lid and let it simmer for 10-15 minutes. Do not remove the lid during this time. The dumplings swell up to fill the pot (#6).

PA dumpling composit

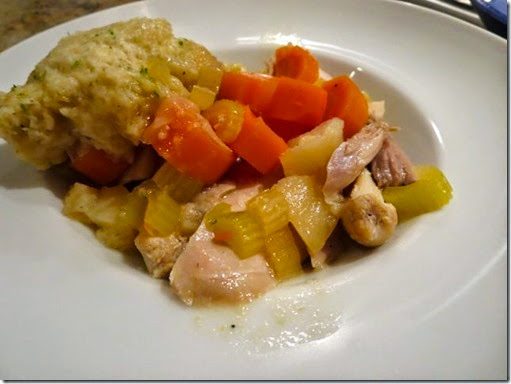
To serve, Place the cooked chicken meat in a bowl and add broth, vegetables and one dumpling per serving.

This was much better than I expected—not the least bit boring. The broth was rich and very flavorful. All the onions and carrots added complexity and a slight sweetness. The chicken meat was also pleasantly flavored from the time spent with the veggies in the broth. Even the dumplings were good. They were light and fluffy on top and moist with the flavor of the broth on the bottom. They also served to thicken the broth. It was a complete and very satisfying meal. I am surprised to say that we will probably add this to our list of “regular” dishes.

Monday, August 25, 2014

Indian-style chicken curry with onsen egg and homemade naan 温泉卵いりインド風カレーと自家製ナーン

This dish was made from left over Indian-style chicken curry with tomato and cream that my wife made several days ago. The curry was mostly sauce with only a small amount of chicken left so I decided to supplement the protein with slices of barbecued pork and onsen eggs 温泉卵. I also served Japanese-style sweet pickles I made.


I should have garnished with something green before taking the picture. As you can see, the egg white is not completely congealed in the onsen egg but the yolk was cooked with nice creamy texture.


We pondered how best to warm up the home-made naan. We tried three different ways; in a toaster oven, in a cast iron skillet (with additional melted butter applied), and in the microwave. It turned out that the microwave (in a silicon microwave container, covered) is most convenient with a good result.

This somewhat eclectic supper was pretty good. Having home-made and frozen naan in the freezer is very convenient and went well with this Indian-style curry.

Friday, August 22, 2014

Pork belly and cabbage stir fry 三昧肉とキャベツの味噌炒め

When we got pork belly (again!) and made simmered "Kakuni" pork 豚の角煮, I took some of the raw meat and thinly sliced it to make this dish (about 1/2 lb, I think). This is called three-layer pork or "sanmai-niku" 三枚肉, which is a fairly common cut in Japan and many dishes are made using this cut.  Since I also had left over cabbage (1/2 of the inner portion after taking most of the outer leaves for coleslaw) and a bag of leftover watercress (which  would not last too long), I came up with this dish. I was hoping the pork belly would come out more crispy. My wife suggested that if it was crispiness I wanted I should try using bacon next time. I served this with sweet vinegar pickles of cucumber and quail eggs.


This was not bad at all but if you are eating this much pork fat, however, Kakuni is still the best way to enjoy this deadly delight.


Ingredients for two servings as a drinking snack:

Pork belly, thinly sliced about 1/2 lb
Miso  about 2 tsp
Garlic a small clove, crushed (or from a tube)
Cabbage 1/2 small inner portion, core removed and cut into 1/2 inch squares
Watercress two handfuls
Sake 2 tbs
Oyster sauce to taste

I first put the miso and garlic in a Ziploc bag and kneaded it to mix. I then put in the sliced pork belly and massaged to have the miso mixture coat the surface of each of the meat slices. I let it marinate several hours in the refrigerator.

I removed the slices from the bag and lined them up on the plate flat. I remove any large globs of miso if present. I cooked the meat on low heat in a non-stick frying pan with a mixture of olive oil and sesame oil turning once until the edges became crisp and the meat was cooked through (a few minutes on each side). I removed the meat and set it aside. Brown bits (mostly miso) were on the bottom of the pan. I added the cabbage to the same pan. After a few minutes of stirring, I deglazed the miso fond with sake releasing as much as possible from the bottom of the pan. I let this miso-sake combination cook until it became thick and coated the cabbage. I added the watercress and for good measure a small amount of oyster sauce (may not need it, optional) and stirred until the watercress wilted (30 seconds). I put the meat back in  the  pan, mixed and turned off the heat.

I thought about adding some sweetness (I was thinking of mirin) but, at the end, I did not. The miso and garlic flavor without sweetness made this dish perfect for drinking sake. We still prefer Kakuni pork belly but this is a good dish. The Japanese style sweet pickles really went well with this dish.