Monday, November 24, 2014

Kinpira lotus root レンコンのキンピラ

One evening, I opened a package of cleaned and boiled lotus root or renkon レンコン.  I used a portion of the package for another dish but I had some left over. I decided to make kinpira of lotus root. レンコンの金平.  Although I have posted lotus root kinpira before, this one is cut differently and cooked for a much shorter time which gave it a different texture from the other one I posted. I also have posted many variations of kinpira with burdock root or gobo 牛蒡 as the most popular. "Kinpira" is a Japanese style of braising. First the food is sautéed in vegetable oil with dark sesame oil added, then seasoned with mirin and soy sauce.


To retain a nice crunchy texture, I cut the lotus root (2/3 package) in half length wise first and then sliced rather thinly in half moon shapes. Since this packaged lotus root has already been cleaned and boiled, I did not have to do any other preparation such as soaking in water with vinegar. I removed the excess moisture from the slices by spreading them on a sheet of paper towel and blotting them dry. I put vegetable oil (1 tbs) and dark sesame oil and red pepper flakes (amount arbitrary) in a wok and then added the sliced lotus root and sautéed for a few minutes until the oil coated the surface (see below).


I then add mirin (1 tbs) and soy sauce (1 tbs) and braised it until liquid was almost all evaporated.

This is quite different from burdock root or daikon kinpira especially in texture. The lotus root had a nice crunchy texture. This was a good small dish to have it with sake. If I seasoned it more strongly, this would go well with white rice as well.

Friday, November 21, 2014

Chinese-style marinated Lotus root and Nagaimo 長芋と蓮根の中華風マリネ

I had a portion of nagaimo in the refrigerator. I had to make something out of it before it went bad. I found this recipe on line and it looked interesting. It is nagaimo and lotus root first deep dried and then soaked in a Chinese style marinade.


I followed the recipe fairly closely.

Ingredients:
Nagaimo: I had a nagaimo about 3 inches long. I removed the skin and cut it into 1/4 inch think half moon shaped slices. I immediately soaked the slices in cold water with rice vinegar added (just a splash).

Lotus root: I used a segment about 3 inches long of packaged, prepared lotus root.  I sliced it into half moon shapes about the same thickness as the nagaimo.

Vegetable oil for deep frying.

For marinade: water (100cc), honey (1 tbs) and soy sauce (1 tbs), salt a small pinch, and star anis (one).

I removed the excess moisture from both the nagaimo and lotus root slices using a paper towel and deep fried it as is for 3-4 minutes at 320 F.

Meanwhile I heated up the marinade until all the ingredients amalgamated.  I drained the oil from the deep fried lotus root and nagaimo and placed them in the hot marinade. I let it cool to room temperature and placed it in a sealable container and refrigerated it overnight.

I served the dish cold. The marinade is rather strongly flavored of star anise and a bit sweet to my taste ( I used buckwheat honey which may have a much stronger flavor than regular honey). I may reduce the honey and increase the soy sauce next time. The texture of the nagaimo was nice and soft with no characteristic sliminess. The lotus root was still firm and crunchy. A good small dish with sake. I think, though, I may like this dish with Japanese flavorings (soy sauce, mirin, rice vinegar) better.

Tuesday, November 18, 2014

French Omelet with sous vide pasteurized eggs 自家製滅菌卵のフレンチオムレツ

I was experimenting with sous vide pasteurized shell eggs after an anonymous reader led me to another article which suggested using slightly higher temperature for a shorter duration of time. Using these pasteurized eggs, I made this French omelet based on a recipe that appeared in the Washington Post food section. Instead of wrapping the stuffing with omelet, the egg and filling are rolled together into a cylinder. I served this with my potato salad.


The below is the cut surface.


I made a 2 egg omelet and shared it with my wife.

Ingredients:
Eggs, 2 large (I used home pasteurized eggs, 57C for 75 minutes).
Light cream, 2 tbs (The original recipe calls for whole milk).
Fresh herbs (the recipe called for fresh chives and basil which I did not have so I used chopped scallion including the green part).
Salt and white pepper
Gruyere cheese

The home pasteurized eggs had slightly opaque egg whites and took a bit longer to beat completely. In a non-stick frying pan, I melted butter on medium flame and poured in the egg mixture. Placing the spatula in the center, I shook the pan quickly so that small curds formed. After vigorous shaking and mixing, I let it cook undisturbed until the bottom was firmly set but the top was still loose. I then placed chopped (or grated) Gruyere cheese on the top. I put the pan under the broiler (see below) until the cheese started melting. Using a spatula, I rolled the omelet in the frying pan.


I like this recipe. It is much easier to form an omelet. Since I used pasteurized eggs, I left some uncooked egg in the center  which mixed with melted cheese. If I had fresh herbs, this could have been better. Perfect breakfast or midnight snack.

Saturday, November 15, 2014

Sous vide pasteurized eggs Part 2 自家製滅菌卵パート2

After I posted sous vide home pasteurized shell eggs, an anonymous reader let me know of the existence of an article by Dr. Schuman (see below, reference #1) which more clearly indicated the safe parameters for shell egg pasteurization with bacterial culture results. That is at 57C (134.6F) for 75 minutes (please see the chart below).

I used 54.5C (130F) for 2 hours in my previous post. I meant to try this new parameter for pasteurizing shell eggs for some time but finally got around to it. As I expected, at 57C,  the egg white became slightly denatured and opaque. The consistency was slightly firmer than the previous method (see below).

57C(134.6F) for 75 minutes
Although the background (container) is different, you can see that the egg white is clearer using the 130F for 2 hours method (below).

54.5C (130F) for 120 minutes
Using the two eggs pasteurized at 57C for 75 minutes, I made a French omelet. Although it took a bit more effort to beat the eggs, these pasteurized eggs can be used like any other shell egg. Sunny-side up fried eggs, poached and soft boiled eggs should not have any problem, although I have not tried it.

My conclusion: At 57C for 75 minutes, pasteurization of shell eggs by immersion in heated water, is totally safe from salmonella.  Although the consistency and appearance of the egg white is altered. Making egg dishes using these eggs should be the same as if raw eggs were used. The only area about which I am not sure and will need to try is making whipped egg white from pasteurized egg whites (which would be especially useful for dishes such as French sorbet since cooking egg white would not be possible).

I also believe that pasteurization at 56C for 2 hours or longer will produce "reasonably" safe pasteurized eggs but this conclusion appears to lack rigorous bacterial culture results. The egg whites look and behave more like raw egg white.

***************************************************************************
*Just in case you are interested. These charts are from the reference #1. This is based on sensitive culture study until no salmonella was detectable. Dr. Schuman (reference #1) only tested 57C and 58C. So, we do not know at 55C, how long it will take before salmonella is not detectable.
pasteurized eggs charts in JPEG

  1. Schuman JD, Sheldon BW, Vandepopuliere JM, and Ball HR Jr. Immersion heat treatments for inactivation of Salmonella enteritidis with intact eggs J Appl Microbiol. 1997 Oct;83(4):438-44.
  2.  USDA Document "Pasteurization of Liquid Egg Products and Shell Eggs"

Thursday, November 6, 2014

Tako Grill タコグリル

I am running out of new dishes to post. One weekend, I made "Ganmodoki" がんもどき thinking that although I had made it before I did not post it. When my wife saw what I was making she said she was experiencing “deja vu all over again” and suggested that I had already posted it. I checked my blog and, in 2012, I posted this dish.  I have been making dishes which go well with sake, but none of them are particularly post worthy or new. Meanwhile we have been visiting Tako grill, our “Izakaya” substitute regularly. While their dishes are always good, like any sushi bar, the range and variety are dependent on what fish are available. Recently we had several visits in a row where we hit the jackpot and enjoyed some great sashimi. Sushi Chef Jose Calderon did justice to the selection by preparing some spectacular sashimi presentations.

The picture below shows one such arrangement. The toro is arranged into the shape of a large rose flower, on the left hiding under the scallion and myoga 茗荷 are fresh sanma or Pacific saury. In the back, "Aoyagi" clam あおやぎ is arranged. In the boat made of cucumber is "sumiso" 酢味噌 dressing. He also added "hagikami" ginger はじかみ生姜 or young pickled ginger.

IMG_0378

Everything was great but when they have it "aoyagi" clalm is a "must-have".

This picture shows how toro is frequently presented. It is “melt-in-your mouth” good.

IMG_0210

Mr. Segawa, has been making  “Izakaya” dishes for some time. I think we tried all of them at least once. Please note the menu continues on the back side.

IMG_0209

The dish below was one from the Izakaya menu. I do not remember what fish this was but it was dredged in potato flour and then served with a sweet and sour-type sauce. This could not possibly be bad.

IMG_0211

Back in “the day” (when I was in Japan), sanma was almost never served as sashimi or sushi (because it was considered a cheap fish and was mostly grilled) but improvements in transportation and refrigeration as well as upgrading the status of sanma made it possible to have very fresh sanma, and therefore, sashimi when it is in season even in the United States. This had a lovely oiliness, firm texture and just the right amount of seasoning.

IMG_0213

This time, Jose put together toro, wonderful uni (from California), Kanpachi カンパチ and aoyagi clam. When uni is good, nothing compares.

IMG_0409 2

We are so lucky to be able to indulge in these delicacies.

Thursday, October 30, 2014

Potato croquette with Sous vide chicken breast コロッケとスーヴィー鳥の胸肉のネギソース

Potato croquette in Japan also known as "Poteto Korokke" ポテトコロッケ was apparently modeled after a French dish "croquette" but it is one of the most popular Japanese-style Western dishes or "Yoshoku" 洋食 . It was invented probably shortly after Japan opened to Western cultures towards the end of the 19 century.  Instead of the béchamel sauce used in the original French version, the Japanese version uses mashed potato. (The béchamel sauce version is called "cream korokke" クリームコロッケ in Japan and usually contains crab meat and may be called "Kani korokke" かにコロッケ).  As a "seasoning", minced and sautéed onion and ground meat are usually added but only in small amounts. Potato korokke has been a symbol of a cheap side dish* which can be bought at a "Souzai-ya" 惣菜屋  or "side-dish store"(Any dish other than rice is regarded as a side dish; rice being the main show). More recently, traditional Souzai-ya have mostly disappeared and been replaced by the basement floor of department stores or "Depachika デパチカ.


*Digression alert: "Song of Korokke" コロッケの歌 was reportedly popular in the Taishou era 大正時代 (1912-1926). The first verse goes like this;

"I was so happy I got married 
But my wife serves me
Korokke today, Korokke tomorrow, and Korokke everyday all year long
this was not what I expected (after getting married)...".

Thus, this song fixed the status of potato korokke as a cheap side dish heavily relied upon by neophyte/incompetent (culinary skill wise) housewives as a quick fix supper.

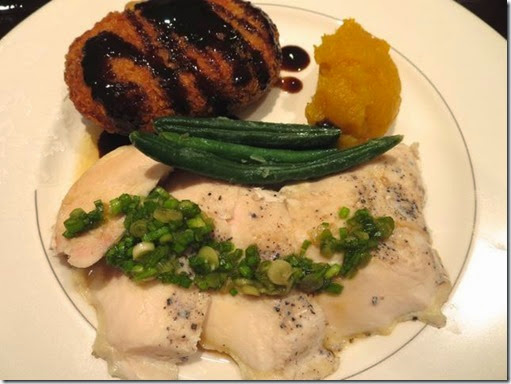
One weekend evening, I made potato korokke served with tonkatsu sauce とんかつソース and Japanese hot mustard (picture above).


Potato korokke:
Mashed potato*: white potato (4, medium), cooked and mashed, seasoned with butter and salt and cooled.

*Any kind of mashed potato will do but I like to leave some small chunks of potato for texture. This time, instead of making the mashed potato from scratch, I made this from the leftover mashed potatoes my wife made the day before when we barbecued a pork loin in our Weber grill. She microwaved the potato (4 medium) for 7-8 minutes or until cooked and mashed it mixing in a package of cream cheese spread (this one was "garden vegetables" flavor) and seasoned with salt and pepper. The addition of cream cheese spread is my wife’s new idea which she developed while we were on vacation. Cream cheese spread with "chives and onion" is probably better for this.

Onion: one large, finely minced, sautéed in butter and seasoned with salt and pepper.
Meat*: Any ground meat will do. This is seasoning but not the main ingredient so the amount is arbitrary but not too much. The ground meat is cooked with the onion. Let it cool down.

*Again, I deviated and used several slices of the barbecued pork loin finely diced since this was available.

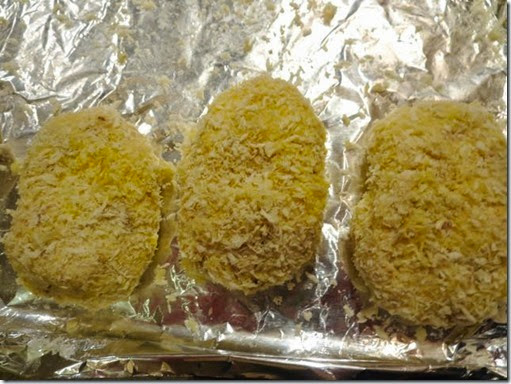
I mixed the mashed potato, onion, and pork. You could further season the mixture if you like.  "Curry" flavor (by adding any of your favorite curry powder) is very popular, at least, when I lived in Japan. I used an ice cream scoop to portion it out on an aluminum foil-lined cookie sheet. I moistened my hands and formed the potato mixture into flat oval shapes (I made a total of 9 good sized ones).  The temperature greatly affects the consistency of the mixture. Initially, the mixture was very stiff but by the time I formed the patties, it had become rather soft. I placed the cookie sheet into the refrigerator uncovered until I was ready to cook (for several hours) to firm up the patties before breading.

I dredged with flour, dipped in egg water and coated with "Panko" bread crumbs (see below).


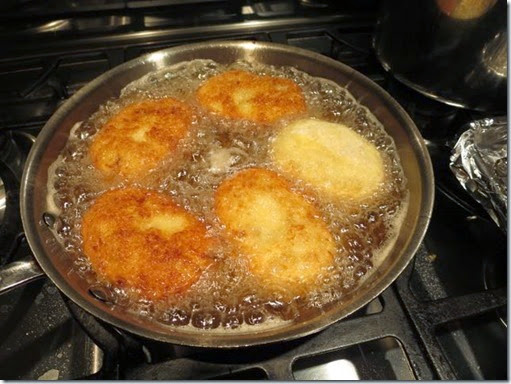
I deep fried the patties in peanut oil at 350F for 5 minutes on each side turning once.


In this case, Korokke was the main dish and, on the side, I also served sous vide chicken breast. I prepared (seasoned with salt and pepper and vacuum packed) this chicken breast sometime ago and froze it. One of my previous tries at sous vide cooking salmon that was still frozen did not yield a good result and I decided to thaw the chicken before sous vide cooking it. As before I cooked at 140F for 2 hours, which is enough to make the chicken safe to consume. This time I also made "Negi so-su" ネギソース or scallion sauce and put it over the chicken. My wife made a baked acorn squash seasoned with salt, honey and butter. I also added steamed and butter sautéed green beans.

Scallion sauce: I am sure there are many recipes for this but I took shortcuts. I thinly sliced scallions including the green parts (more the better). I added small amount of grated ginger and garlic (both from the tubes), and ponzu-soy sauce (from the bottle). I tasted it and added mirin for sweetness.

Acorn squash: I halved an acorn squash with a heavy chef's knife. My wife took over and cleaned the "guts”-seeds and membrane, placed it cut side down on an aluminum foil lined cookie sheet and baked it for 45 minutes at 350 degree. When done, she scooped out the meat using a spoon, seasoned with butter, honey, and salt.

This was quite good. The chicken meat was very moist and the rather assertive negi sauce went well. Of course, the main item, "potato korokke" had a nice crunchy crust with a flavorful soft center and was great. We do not mind having this today, tomorrow and everyday!

Monday, October 27, 2014

Grilled cheese sandwich with mushroom グリルチーズサンドウィチ

This is yet another version of breakfast that we came up with while we were on vacation. I was contemplating what to make when my wife mentioned she was in the mood for something ooey-gooey and cheesy…but we were eating too many eggs. Using what we had left over and with my wife's suggestion, I made this grilled cheese open face sandwich.

IMG_2537 (2)

We had onion, leftover portions of royal trumpet mushroom, branched broccoli (which I made few days ago as a side for a dinner). So these were the items I used for this open-face sandwich.

I first sautéed the onion in butter and then the mushroom seasoned with salt and pepper. I lightly toasted the sliced "artisan Italian bread" and placed these vegetables on top (see below).

IMG_2529 (2)

I placed several slices of aged cheddar cheese.

IMG_2531 (2)

Placed under the broiler fro few minutes or until the cheese melted.

IMG_2535 (2)

Before serving, I garnished it with grated parmesan cheese.

This was a good breakfast sandwich. Now only a few vacation days left, so we have to use up whatever is left in the refrigerator.