Wednesday, October 15, 2014

Grilled Capelin with eggs 樺太シシャモ焼

Shisamo” シシャモ is rather specific to Hokkaido but the vast majority of fish label “shishamo” is actually capelin or Karafto shishamo 樺太シシャモ.  The lovely autumn day we had our impromptu grilled marinated squid, I also grilled shishamo or capelin.

The shishamo which we can get at the Japanese grocery store is usually slightly dried and frozen. Although I could have cooked them in a frying pan or toaster oven, charcoal grilling adds an additional flavor dimension to the fish and is one of favorites.

This is the first time I noticed that the package was honestly labeled as Canadian Caperin with roe or “komochi karafto shishamo” 子持ちからふとししゃも  (see below). There must be a new regulation and enforcement to label the  origin of the food items.

In any case, this capelin with its roe was very good. We served this with a small mound of grated daikon or “daikon oroshi” 大根おろし with soy sauce. This was very good indeed.

Sunday, October 12, 2014

Grilled marinated squid 炙りイカ

I had a large frozen squid in my freezer and it had been living there for some time。My wife complained it was taking up too much space and it was time to evict it. I decided it wasn’t getting any better with age so I used it one weekend. This squid was identical to the one I used to make “squid rice”. I cleaned the innards and cartilage and removed the dark thin membrane of the skin. I removed the fin (“enpera” えんぺら), separated each tentacles, and cut the body into rings. When I prepared it, I thought I would make fried squid rings (breading with panko bread crumbs and deep fried) but the day turned out to be a nice sunny but cool fall day. We figured the cool weather would keep the mosquitoes relatively inactive. Conditions were perfect for cooking the squid on our small Japanese Yakitori grill. Because the squid was going to be grilled, I marinated it for several hours in an equal mixture of soy sauce and mirin and added grated ginger root.

The picture below shows the squid when it came off the grill. The legs were particularly good, not too chewy.and perfectly cooked.

This was also the first time, I used the Looftlighter to start the charcoals for the Yakitori grill (below). I just made a mound of charcoals in the middle and started the fire. Since I did not have to transfer the lit charcoal from the chimney starter, it was much less dangerous and much easier.

The below are marinated squid parts.

The squid cook rather quickly.

I turned them over after 1 minute or so and the squid rings firmed up and showing nice char marks. Another minute should be enough.

The squid was very good especially with cold sake.It was seasoned enough and not needing any sauce. Probably this was better than the fried squid rings I originally planned. With the help of the infrared heater, we stayed outside after the dark and enjoyed our grill (more items were grilled of course).

Thursday, October 9, 2014

Sous vide oil poached salmon 冷製スービイサーモン

I have been experimenting with sous vide salmon for a while including the temperature and length of cooking time. The last post of olive oil poached sous vide salmon, I used 135F for 30 minutes. Next time I tried,cooking frozen and vacuum packed salmon at 130F for 1 hour. The result of this attempt was not as good as the first attempt and came out rather dry. This time, using the same type of package for the salmon I defrosted it in the package under running water and stored it in the refrigerator for several hours.  Then I sous vide the thawed salmon for 30 minutes at 130F. This salmon was seasoned with pepper, salt and dried dill and vacuum packed in olive oil so the salmon was essentially oil poached.


This time, it came out very moist. Actually, when I tried to removed the salmon filets from the bag, they were so soft  they started to fall apart.. I briefly seared one side only (it was not possible to flip them over without having them completely disintegrate). We first ate it warm and it was very nice. I did not take any pictures.

The above picture is left over cold salmon served with other vegetables a few days later.  As a cold salmon, it was excellent. The vegetables are
1. Boiled (cold) green beans with sesame dressing.
2. Branched broccoli sautéed in olive oil and garlic dressed with grated Parmesan.
3. Taro Okamoto's cauliflower
4. Wedge of skinned tomato seasoned with smoked sea salt
5. Japanese-style sweet pickled cucumber.

We served salmon cold with a mixture of mayonnaise, Greek yogurt and Dijon mustard. This was rather healthy dish with lots of vegetables. Broccoli cooked with garlic and parmesan cheese went particularly well .

Monday, October 6, 2014

Ricotta Pudding リコタチーズのプデイング

Deserts are not a regular part of  a Japanese meal so I am not a dessert eater. Although I generally don’t eat dessert.  I found a Peanuts cartoon I saw many years ago particularly relevant. In this cartoon Snoopy is lying on his dog house musing “Dogs don’t eat desserts but we like to be asked”.  I concur; I don’t eat desert but I like to be asked. My wife, on the other hand is a dessert devotee. As far as she was concerned, it was a fundamental part of dinner when she was growing up. It was the prototypical parental bribe to get her to clean her plate as in “eat all you dinner or you won’t get desert”.  So even in adulthood, she relates to the expression “life is short eat desert first”.  She also knows that if she wants desert she has to make it herself…although I have been known, when enticed, to eat what she makes. So one evening, she whipped up this pudding. It is actually the filling for a sweet ricotta filled roll which you will see in another post. But it works well as a stand alone.


Ingredients:
1 cup ricotta cheese
1 egg yolk
1/8 cup sugar
1/4 tsp salt
1/4/tsp vanilla or almond extract
handful of raisins.

This is fairly easy to make. She mixed all the ingredients together (first picture below). She put them into individual ramekins (second and third picture) and then cooked in the toaster over at  350 degrees for 20-25 minutes (fourth picture).

ricotta pudding
This is a lovely light desert. It has a very pleasant texture, mild vanilla flavor and is not too sweet. Perfect for that person who likes to end a meal with a bit of sweet flavor.

Friday, October 3, 2014

Matsutake, chestnuts and tuna sashimi 秋の味覚とマグロの刺身

This time, all the goodies I ordered came at the same time which included matsutake 松茸, Northern American Chestnuts 北米産栗 and tuna 本マグロ, amaebi 甘エビ and uni うに. from Catalina.  I have posted matsutake and chestnut dishes many times before but we can only have these items once a year so I still take delight in their arrival. In addition, on the same day, we received sashimi items from Catalina (the sashimi was scheduled to arrive that day but it just so happened that the other items while not scheduled for delivery arrived the same day). This fortuitous coincidence called for an "akino mikaku" 秋の味覚 or tastes of autumn feast.

I used the fresh matustake from Oregon, by cooking them steamed with sake in a touban grill . We like this way of cooking matustake best (after trying many other dishes). The wafting smell of the matsutake when I remove the dome-shaped lid is the best and one of the pure enjoyments of the experience. I simply served with kosher salt and a wedge of lemon.


I also served a small sashimi of amaebi and uni. The amaebi was very fresh and sweet  (some were still alive when they arrived). The uni was "premium uni" and, to be truthful, not that great. Since I had boiled chestnuts, I also served one.

We also had chestnut rice as shime dish with a miso soup with heads of anaebi.

Here are the matsutake from Oregon mushroom. As you can see they were quite dirty. This time many stalks were left with knife gashes indicating they were not carefully harvested.

Most of instructions for cleaning matsutake indicate that after shaving off the stem ends with embedded dirt as you would if sharpening a pencil, gently rub off the dirt using a wet dish towel. I didn’t  think this would work well. Nothing is worse than biting into sand and dirt when eating matsutake. So after cleaning as above, I use a sharp paring knife and cut off or scraped off the thin surface layers to make sure no sand or dirt remained (see below).

These are the “colossal” chestnuts we received.

I used the chestnuts to make chestnut rice. In previous years I used a mixture of “glutenous” “mochi gome” rice 餅米 and regular short grain rice, this year, I used all imported Koshihikari コシヒカリ rice from Niigata. I cooked it using “Kamadosan” earthenかまどさん pot rice cooker (see below).

For libation, we had junmaishu 純米酒 called “Kurosawa” くろさわ from Kurosawas shuzou 黒澤酒造 in Nagano 長野. This was made by an old process called “Kimoto” 生酛 in which naturally occurring lactic fermentation is used instead of inoculation with lactobacillus. Although, Ginjou and Daiginjou sake are elegant and clean and crisp, sometimes we like to taste a more down-to-earth sake flavor and “Junmai” class is the best bet for this. This one is not overly yeasty (which often happens in this class of sake) and had a slight sweet note with distinctive honey suckle after taste. We really liked it although a bit more acidity may have been better. In any case, sipping Kurosawa with all these autumn tastes, we feel we did justice to the celebration of the arrival of autumn.

Monday, September 29, 2014

Simmered Chestnuts and Chicken "Chikimarron" チキマロン鶏肉と栗の甘辛煮

I thought I had exhausted all my repertoire possible for dishes using chestnuts but then I encountered this recipe on line and decide to make it using what was left over after making "shibukawa-ni" 渋皮煮, "Chestnut croquettes" 栗のコロッケ and "Chestnut rice" 栗ご飯. This turned out to be a good dish and we had this as a sumptuous lunch over the weekend.


The name of the chicken chestnut dish I made is "Chiki-marron" チキマロン(Chiki-English for chicken and marron-French for chestnut). I used, cleaned chestnuts (both outer and inner skins removed as posted before). I started with whole/intact chestnuts (9 of them) but realized that unlike Japanese chestnuts they would not be intact after cooking because of the many deep crevasses characteristic of North American chestnuts.  I added additional 3 chestnuts that broke into several large chunks when I peeled them (#1).

I poured in 1 cup (about 200 ml) of "dashi" broth (I made it with kelp and bonito flakes), sugar (4 tbs), and sake (4 tbs). Once it came to the boil, I turned the flame down, skimmed off any scum from the surface and covered with a  "otoshi buta" 落とし蓋 . I simmered for 8 minutes (#2). I then added soy sauce (3 tbs) and simmered  for 10-15 minutes until the simmering liquid was reduced to less than half (#3). I added freshly deep fried chicken "kara-age" 鶏の唐揚げ (see below) and mixed and simmered for 1-2 minutes until the potato starch coating bloomed into gelatinous coating and absorbed the simmering liquid (#4).

chestnuts and chicken composit

For chicken Kara-age: I skinned and deboned chicken thighs and cut them into bites sized pieces. I made up all of them but used only two for this dish reserving the rest for future use. (Of course number of remaining pieces declined continuously because we started snacking on them as soon as I made them). My wife declare that I could stop right there the dish was great just as it was.

I made the Kara-age by using a small amount of soy sauce and grated ginger and massaged it. I then dredged in potato flour (katakuri-ko 片栗粉) and deep fried in 170F peanut oil for 5 minutes (or until the center of the meat is done and surface crispy) turning several times. I drained them on a rack for a few minutes then added kara-age chicken into the pot of chestnuts and sauce.  I cooked the mixture stirring constantly until the coating on the chicken absorbed the simmering liquid leaving the pieces with a glossy rich coating.

I had some frozen chestnut rice which I heated in the microwave. It revived very well and tasted almost like freshly made.


My wife likes to add a thin pat of sweet butter to her chestnut rice (which is not the traditional preparation but tastes good nonetheless). I also sprinkled on some  "Goma-shio" ごま塩 which is a mixture of black sesame and kosher salt (see below). This is a rather standard Japanese seasoning.


Although we love kara-age and we were a bit skeptical about this dish (put crispy chicken into liquid? Really?), this was quite good. The crispy coating transformed into an altogether different but very flavorful coating that went very well with the chestnuts. Most of the chestnuts crumbled a bit but were still very good. The combination of chestnut rice and this dish is also good and really enjoyed all the goodness of chestnuts.

Saturday, September 27, 2014

Sweet simmered chestnuts with inner skin 渋皮煮

Although the North American chestnut tree was decimated by the chestnut blight (fungal disease) by 1940, there are still pockets of mature North American chestnut trees remaining as I posted previously. As usual, I got North American chestnuts from Girolami farm. Since I posted all the dishes I could think of that used chestnuts, I decided to try “Shibukawa-ni” 渋皮煮 which was also a part of Sushitaro New year’s osechi box.

Chestnuts are packaged by nature in many layers that have to be removed to reveal the eatable part. These layers include the prickly outer hull called “Iga” イガ, the hard outer shell (called “onikawa” 鬼皮) and inner papery skin (called “shibukawa” 渋皮). This particular preparation, however, the inner skin or shibukawa does not have to be removed. I consulted a few on-line recipes and decided to follow this recipe (in Japanese with pictures).

To remove the outer skin: I used the same technique I usually use but with some modification.  I first soaked the chestnuts in cold water for several hours and then brought the water with the chestnuts in it to a boil. As soon as It started boiling, I turned off the flame and let the chestnuts soak until they were cool enough to handle (a few hours).

I removed the hard outer shell using a paring knife which was not too difficult. I did have to be careful not to knick the inner skin (if the inner skin is damaged, the chestnuts will crumble during cooking) .

I then placed the chestnuts with the inner skin intact in a pot with water just covering the chestnuts (see below) and added baking soda (about 1 and half tsp into 400ml water)

As you can see below the water gets totally dark brown with scum appearing on the surface of the water (see below)

I skimmed the scum and after 15 minutes of simmering, removed the chestnuts with a slotted spoon and placed them in cold water. I rubbed the surface of the chestnuts and tried to removed any coarse strands on the surface while being careful not to damage the inner skin.  I repeated this process two more times for a total of 3 times.

The fourth time I repeated the process I turned the flame to simmer after it started to boil and added sugar in two increments (about 400grams but the amount is totally up to you. Making it very sweet, is appropriate if the chestnuts are going to be used as a dessert. Making the chestnuts less sweet, is appropriate if the chestnuts are going to be used as an appetizer). After 15 minutes, I turned off the flame and added brandy (about 20-30 ml but this is optional). I let it cool down.

We were somewhat disappointed with the end result after all this work. Compared to Japanese chestnuts, the inner skin of American chestnuts is much thicker and goes deeply into the crevasses. Although this method makes it possible to eat the skin, it is still very noticeable. It is not as soft as it would be using Japanese chestnuts. After all that work I forged ahead and ate the skin but my wife was much less invested in the process and ate only the nuts leaving the skin behind when she could. If we are going to make a similar dish again, we prefer “Kanro-ni” 甘露煮 much better.

Wednesday, September 24, 2014

Blue fin Tuna Block, sashimi, and sushi 本マグロの刺身と握り寿司

Nothing new here but we again got 1lb blue fin tuna block from Catalina. This block appears to have come from a larger fish than what we usually get. This time, I served sashimi from akami 赤身, toroトロ and karashi sumiso からし酢味噌 dressed “fat” and also as nigiri sushi 握り寿司.

I first removed the skin. Under the otoro portion, you can see the thin but white fat layer. This layer is usually very firm and I do not want to leave it on the otoro piece. I try to keep this fat layer on the skin when removing it and then go back to the skin and shave off the layer of fat. I divided the tuna immediately into blocks of “chiai”, akami,  and toro. I further divided the toro block into chutoto 中トロ and otoro 大トロ blocks. The portions I do not serve immediately, I wrap in kitchen parchment paper, place in a Ziploc bag and then put it in the meat drawer of the refrigerator. I usually marinade chiai and use it later for different dishes.
IMG_2322 with anotation
We also got spot prawn (ama-ebi 甘エビor more similar to botan ebi 牡丹エビ). Some were still alive (albeit barely)  when we received them. I quickly iced them down (picture below). These prawn are very perishable. The best I can do is to ice them down while preparing. I remove the head and trim the antennae and proboscis. I set the small heads aside for deep frying by putting them in a sealable container with ice cubes. I put them in the meat drawer of the refrigerator (The ice will not melt completely for a few days in the meat drawer). The larger heads (and other shells), I immediately put in a pot with water to cook into a broth for miso soup, For the body, I remove the shell and devein it. I do this for only for the amount I’m going to serve. I place the rest with shell still on in a sealable container with ice cubes.  With this treatment, these prawn will last for 2-3 days.

The picture below is actually the second evening serving after we received the fish. Instead of regular daikon garnish, I mixed daikon garnish with thinly sliced picked myouga 冥加 and dressed it in sweet vinegar. I seared the Otoro with a kitchen torch or “aburi” 炙り.  I cut the Amaebi in half lengthwise and then sliced it obliquely (this was a rather large prawn).

I cut the pure fat layer of the tuna into small cubes and dressed with karashi sumiso and finely chopped scallion.

For a change, I attempted to make nigiri sushi as an ending dish. For sushi rice, I used koshihikaru コシヒカリ imported from Niigata prefecture. I used smaller prawns for sushi. Others are akami and chutoro. Wasabi was just thawed “real” wasabi.

For my rare attempts at making nigiri, it was OK.

The sashimi was excellent. We really enjoyed this sushi and sashimi dinner.

Sunday, September 21, 2014

Looftlighter and barbecued chicken ルーフトライターとバーベキューチキン

As I posted previously, we regularly barbecue whole chickens in our Weber grill. During the year, I made some improvements in how I cook the chickens which may warrant a new post. The picture shows a barbecued chicken hot smoked on the Weber grill. It has a nice mahogany colored crispy skin (The picture shows a missing patch of skin on the bird. This is because my wife attacked taking a piece of the crispy skin before I could snap the pic. I assure you the bird was perfection when it came off the grill). As usual, the cavity was seasoned with salt and pepper, lemon juice and stuffed with aromatic vegetables (onion, celery, garlic and sprigs of fresh rosemary). Olive oil was rubbed on the skin surface and seasoned with salt and pepper as well. The smoke came from hickory chips.


Here is my process of cooking whole chickens in Weber Kettle.

Fire: We use hardwood lump charcoal instead of briquettes because the lump charcoal is made of just wood and does not contain any other additives. It also burns much hotter than the briquettes. We used to start the charcoal with a chimney and paper which works fine but the smoke is rather pungent until the paper fully ignites the charcoals. Also the fire sometimes goes out before igniting the charcoals. In the past we have tried a variety of electric starters but none of them worked well enough for us to switch, that is until now. After reading the review and seeing the video demonstration, we bought a Looftliter (invented by Mr. Looft). It looks like an oversized hair curler or drier.


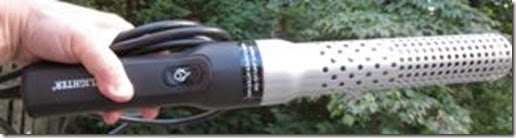
It starts a charcoal fire quickly but I often use indirect heat. If I started the fire using a large mound of charcoals, I would then have to divide the hot coals into the two indirect heat baskets which is not only hard to do but dangerous. I also tried putting charcoal in both baskets and starting the fire using the  Looftlighter. This sort of works but with this method the fire starts from the top of the charcoals in a basket (it takes a long time for the fire to spread downward). Also starting the fire in two baskets means they may not be ready at the same time. So, for me, preparing charcoals in a chimney starter remained the best bet. For the looflighter to work, I had to find a way to start the fire from the bottom of the chimney.

#1:  I made some modifications to my old charcoal starter chimney. I cut a 1x2 inch window just above the grids separating the charcoal and bottom space for paper (The steel is rather thick, I used a Dremel with a metal cutting disk blade). I fill the chimney with lump charcoal making sure some of the charcoal is easily accessible through the opening I made.

#2: I touch the tip of the looftlighter to the charcoal and press the switch. After 20-30 seconds, sparks start flying out rather spectacularly.

#3: I then pull the looftlighter back a little aiming at the cutout (hot air supplying oxygen works miracles). You can see the glowing charcoal in the picture. After 30 seconds to 1 minute you can see the neighboring charcoals are also ignited.

#4: I turn off the looftlighter and let the fire spread.

#5: After10-15 minutes, the charcoal in the chimney is fully ignited and ready to use. During the process, the amount of smoke is much less than using paper.

#6: I pour the ignited charcoals into the two indirect heat baskets just as I would have if I had used paper to start the fire (using heat resistant gloves).  I then place the drip pan in the center between the baskets and place the grill over and I am ready to cook.

Looftlight composit

#7: I placed two trussed and prepared chickens in the center and mounds of presoaked hickory chips over the fire (or on the fire).

#8: Here is one more improvement I made. I am now using a Ivation wireless thermometer which monitors the temperature of the Weber grill as well as the food (Two probes; one in the cavity of the Weber and the other inserted in the thigh near the hip joint but not touching the bone).

#9: Compared to a Bluetooth/Smartphone combination, the range of Ivasion is much longer which make it much more useful and practical. The only weak point of this thermometer is the user interface (UI ) (it is a typical incomprehensible Chinese UI). As you can see In the remote unit, I can monitor the temperature of the Weber as well as the food. Although I am not doing low temp smoking, the reason to monitor the temperature of the Weber grill is to prevent the skin from breaking and shrinking thus exposing the breast meat to the initial very high temperature (over 450F) if the air vents are fully open. This is a problem peculiar to hardwood charcoals which burn much hotter than briquettes. I open the air vents on the Weber gill lid only half way so that the temperature stays below 400F for the first hour. I then open the air vents fully for the last 30 minutes.

#10: This makes skin of the chickens rather intact and crispy.

As I said before, this is by far the best way to cook whole chicken. Even the breast meat come out moist and (for me) the dark meat is the best with juice dripping out as you cut it. (Also please note the fully intact mahogany skin the chicken had when it came off the grill before my wife got to it. One should not leave a chicken like this unguarded even for a second to do such things as retrieve a camera because it may attract the attention of all kinds of predators.)

So in conclusion, my tips for the good barbecued chickens using my Weber grill are;
1. Use Hard wood lump charcoal.
2. Start the fire using a modified chimney and looftlighter.
3. Monitor both food and grill temperature and start with relatively low grill temperature (below 400F) then for  the last 30 minutes, open the air vents fully to make the grill hotter.
4. Hot smoke using pre-soaked aromatic wood chips (apple and hickory are our favorite).
5. Prepare chickens with aromatic vegetables and herbs (onion, celery, garlic, lemon, fresh rosemary or thyme) in the cavity. Generously season with salt and fresh cracked black pepper and properly truss.

Thursday, September 18, 2014

Sous vide wine poached chicken breast with caper sauce 鶏胸肉のワインスービィケイパーソース

This is continuation of sous vide cooking. I prepared chicken breasts over the weekend by deboning some bone in split breasts but it turned out I couldn’t cook them because we had other items to cook. I thought about microwaving them in sake for our sandwiches but, instead, placed them in a Ziploc bag after seasoning with salt and pepper. Since I had some French white wine already open, I poured that in the bag so that the chicken could marinate and last longer uncooked.

The next weekend came and the chicken was still in the bag marinating in the wine. I decided to save this chicken from its misery and decided to cook it sous vide. Since this was already in wine and in the Ziploc bag I used submerge-displace-the-air technique instead of vacuum packing.


Since I did not put much seasoning on the chicken and, the wine marinade was in the bag after sous vide cooking, I decided to make a sauce from wine, shallot, capers and butter. I served this with my potato salad and coleslaw.


Chicken: Two skin-on breasts which were removed form bone-in split breast. Seasoned with salt and pepper and then marinade in white wine.

Sous vide: The temperature and duration are always difficult to determine. The last time I did sous vide chicken breast, I used 140F for 1 hour. The meat was fine but I felt it could have been cooked at a bit lower temperature. So this time I choose 137F for 1 and half hours (which should be adequate for sterilizing the meat - at least 40minutes at 137F). I used submerge-displace-the-air technique . I lowered the Ziploc bag with chicken and the marinade into the 137F water with the seal still open so that the air could escape and secured it on the edge of the pot using a small binder's clip.

Sauce: I sautéed two small shallot cut in thin strips in butter, added the wine marinade and reduced it to 1/3 of the original volume. Added caper and pats of butter to finish. I squeezed lemon juice and tasted. It had enough salt and pepper and I did not add any.

This time I did not bother with crisping up the skin. I removed the skin and sliced the meat rather thinly. I poured the sauce over. Wine poaching and slightly lower cooking temperature made the chicken really moist and nice. Additional sauce also made this better.

Monday, September 15, 2014

Tofu pouch gyouza 焼き油揚げ餃子

I am always looking out for interesting drinking snack recipes. When I saw the gyoza in deep fried tofu pouch ( or "abura-age" 油揚げ), I had to try it. I served this with a garnish of chiffonade of perilla leaves and myouga 茗荷. As a side, I also served beer-picked daikon and carrot and  Japanese-style sweet vinegar cucumber pickles.


The below shows the gyoza stuffing better.


Gyoza stuffing: The recipe I saw used onion, garlic chive, and fermented squid and guts (or "Shiokara" 塩辛) but I stuck to my original gyouza stuffing of ground pork, finely chopped cabbage and scallion seasoned with salt pepper, soy sauce and sesame oil.

Tofu pouch: I used small rectangular tofu pouch called "sushi age" which is meant to be used to make "Inari sushi いなり寿司".  This is much smaller than regular abura-age. I used frozen ones I had in my freezer. I thawed it at the room temperature for 30 minutes and then poured hot water over them in a colander to completely thaw and remove excess oil ("abura nuki" 油抜き). I pressed them between the paper towels to remove any excess water. Using a rolling pin, I went back and forth over the tofu pouch which helped separate the two layers. I opened the abura-age from the shorter end and using my fingers separated the two layers to make a pouch.

Assembly: I put in the gyouza stuffing in the pouch and flattened it to make sure the stuffing is evenly distributed.

Cooking: I suppose I could have cooked these in a toaster oven but I cooked then on a dry non-stick frying pan. Turning several times on low flame, I cooked them until the surface was brown and the meat stuffing completely cooked.


I cut them diagonally and served it with chiffonade of perilla and myouga. I poured on a small amount of noodle dipping sauce (from a bottle).

We were not impressed with this dish. The tofu pouch was not crispy enough and we much prefer the regular gyouza skin. Maybe, cooking this in a toaster oven could have been better. At least, I got one post from this dish.

P.S. Few days later, we heated the leftover tofu pouch gyoza in the toaster oven. We placed them on a rack over a small cookie sheet and warmed them up in the 350F preheated oven for 5-6 minutes. Then, switched to the broil mode, turning once, until both sides browned(1 minute each, be careful of over broiling and causing them to smoke). The result was much better. The abura-age skin got very crispy. In addition, I made a dipping sauce (equal mixture of soy sauce and rice vinegar, Japanese red pepper powder, sesame oil, and finely chopped scallion). This rather assertive dipping sauce made this dish even better. So next time we make this, I will bake it rather than pan-fry.

Friday, September 12, 2014

Hot smoked leg of lamb on Weber grill 子羊の腿肉のバーベキュー

During summer, we try to barbecue on our Weber grill over the weekend whenever possible. Besides enjoying what ever we grill, we use any left over meat for sandwiches which we take to work for lunch during the following week. The only problem is that we have limited varieties of animal/fish which we can barbecue. This time we found a bone-in leg of lamb which is a bit unusual in our regular grocery store (they usually have boned and rolled leg of lamb or rack of lamb). We always feel uncomfortable about the possibility of undercooking rolled leg of lamb since the internal surface may have been exposed and contaminated before it was rolled. But since it is tucked into the roll the meat may not have gotten hot enough to kill any bacteria. As a result, we usually cook leg of lamb butterflied by unrolling the rolled leg of lamb.

Although I will be deboning this leg of lamb and we could roll it and barbecue to medium, we decided to debone and butterfly which would the cooking go faster and provide us with more seasoned and crispy surface.

This is my wife’s plate. She likes the crusty well-done pieces (front portion of the plate) and one medium (pink) piece with au jus. As a side, we served potato salad and sautéed green asparagus.


Since this was hot smoked, you could see pink smoke ring just beneath the surface (due to carbon monooxide attaching to myoglobin).

I forgot to take pictures of deboning, butter flying, and grilling on Weber.

Leg of lamb: This was a whole leg of lamb with bone (entire length of femur) in. I deboned it and removed some of excess fat and butterflied it by adding few slits to make the thickness of the meat relatively even.

Dry rub: I made it very simple. Kosher salt and black pepper with finely chopped fresh rosemary from our herb garden. I rubbed it throughout the surface of the meat.

Weber grill: As usual, I used lump hardwood charcoal in indirect heat (dividing lit charcoal in two baskets which go on the side with the dripping pan in center). For smoke, we used soaked hickory wood chips.

I inserted the temperature probe in the middle of the thickest portion of the lamb and cooked until it reached 135F.

We (especially my wife) loves lamb. Initially, lamb was not my favorite meat but even I have developed a taste for it. A good sturdy red wine goes well with this such as Ausie shiraz but we had 2012 Worthy from Napa which was also good.

Tuesday, September 9, 2014

Shio-koji marinated pork loin and chicken tenderloins 塩麹漬け豚ヒレと鶏笹身の唐揚げ

I posted dishes using shio-koji 塩麹 more than several times. I thought that, in general, the virtue of shio-koji was a bit over hyped.  Since the shio-koji I made from dried shio-koji was getting old (although it still looked and smelled OK), I decided to replace it with some store-bought prepared shio-koji in a small plastic pouch (see picture on the left). It appears that the rice kernels in this one are much softer than the ones from dry shio-koji. I had an extra tail potion of pork tenderloin and two chicken tenderloins which I removed when I was preparing chicken breast from bone-in split chicken breast, I decided to make a small appetizer "kara-age"  with these using shio-koji.

Because of the sugar/starch in the shi-koji, the cooked meat came out rather dark. I served it with shredded cabbage, deep fried shishi-tou シシトウ and wedges of lemon. I also served tonkatsu sauce トンカツソース and Japanese hot mustard 和芥子 on the side.


On the left are two pieces of chicken tenderloin and on the right are pieces of pork tenderloin.


Probably I overcooked a bit but still tasted ok.


I prepared both tenderloins a few days ago, I cut both into bite sized pieces, placed both in small Ziploc bags, added a small amount of shio-koji, massaged it and removed as much air as possible and sealed. I let it marinade for two days in the meat drawer in the refrigerator (a few hours to over night may have been adequate, but I did not get to it until today). In the picture below the upper one is chicken and the lower one is pork.


I blotted the surface of the meat with a paper towel and dredged with potato starch or "katakuriko" 片栗粉. I heated peanut oil to 350F and deep fried it for 5 minutes or so, turning several times during cooking. Shio-koji marination added a subtle sweet and salty flavor but I am not sure about the tenderizing effect of shio-koji, which everybody is raving about. It is variation from my usual "tatsuta-age" 竜田揚げ or "kara-age" 唐揚げ (marinade is soy sauce, mirin and grated ginger) but we sort of like the latter.

Saturday, September 6, 2014

Perilla gyouza 青じそ餃子

I have not made gyouza 餃子 for some time. Since the perilla in our herb garden is plentiful and will be soon go to flower and seed, I decided to use some for this gyouza after seeing the post at "No Recipe". Although the stuffing can be anything you like, I made a rather traditional ground pork/cabbage stuffing.


Since each stuffing is wrapped in perilla leaves the green leaves are visible through the gyouza skin.


I served 5 each as an appetizer with a mixture of rice vinegar and soy sauce (1:1) as a dipping sauce and Japanese hot mustard. The pork stuffing recipe is the same as before but I did not have garlic chives and used chopped cabbage boiled for 5 minutes with the moisture squeezed out. Since I generally don’t follow actual recipes but eye-ball quantities, please referred to a more precise recipe here.

I did not have "gyouza skins" so I used egg roll skins cut into 4 small squares. I placed one perilla leave on the skin and then the pork stuffing and formed a gyouza by wetting the edges, folding in half and then pinching the edges (again please see animated image here).

perilla gyouza

I like the entire gyouza to have a crispy skin.  I deviated from the regular way of cooking gyouza and fried both surfaces using a mixture of light olive oil and dark sesame oil until both sides were brown and crispy. I added a small amount of water and put on the lid to let the gyouza steam for 1-2 minutes. I removed the lid when the water all evaporated and further crisped up the skin.

I thought the perilla flavor would be much stronger but it was actually pretty mild. It was still a good gyouza. The egg roll skin I buy in our regular grocery store is thinner than wonton skin and we like a thinner and crispier skin.