Sunday, April 12, 2015

Bonito “Tataki” カツオのたたき

Our Izakaya substitute "Tako Grill" is in the process of moving to a new location. It will be reopening sometime in April, so we have to get our sushi and sashimi fixes somewhere else. One such source is "Kanpai Shushi" (Tako grill's sister take-out and catering sushi place). We have had a few take-outs as well as party sushi platters from there. Nonetheless we are anxiously awaiting the opening of the new Tako. Another source of sashimi is our local Japanese grocery store. One weekend we found frozen Katsuo tataki カツオのたたき at the Japanese grocery store and we had to try it.


Although this was frozen, it appears to have been seared using straw, which is very traditional, as some soot still clung to one side. I served it with finely chopped scallion including the green parts, thinly sliced garlic and grated ginger root, as you see above. For sauce, either soy sauce or ponzu sauce would be the standard but I made a hybrid sauce by mixing ponzu sauce (from a bottle) and soy sauce (about 1:1) which I served in a small glass on the slide.


This was more than enough fish for two as a staring dish. One thin slice of garlic on a slice of the bonito with the scallion and ginger dipped in the sauce really makes this so tasty. My wife was a bit skeptical about the raw garlic at the beginning (despite the fact she had eaten this many times before-although on those occasions the garlic is grated) but she had to agree with me that this was the best way to enjoy this.

katuso tataki

The above is how this bonito tataki came vacuum packed. I simply let it thaw in the refrigerator for several hours and sliced it into half inch thick pieces at a slightly slanted angle.

We had this dish outside on the patio  under the heater and an alpaca throw blanket. It was one of the, recently rare, relatively warm days--although it was a bit windy. After a relatively harsh cold winter we are finally seeing signs that spring is just around the corner. Our plum tree, which has been know to bloom in late January or February braving passing snowstorms has just now started blooming (the 1st week of April).


Cold sake went very well with the bonito tataki (and stayed perfectly chilled through out the evening just sitting on the table). We actually opened the American brewed  Yamada-nishiki Daiginjou "Shouchikubai" (this is new sake for this year).  It is indeed the real daiginjou made from California Yamada Nishiki brew in California which rivals any decent daigin from Japan.

We braved the descending cold and dark by also grilling Hamachi collar and other items over the hibachi grill. It was just so nice to spend the evening outside (We suspected that there were not many people in our neighborhood enjoying the evening and early taste of spring the way we were). Also the first Japanese hibachi grilling session of the season is always a “red-letter” celebration.

Thursday, April 9, 2015

Clear Soup with Cod and Tofu たらと豆腐のお吸い物

I usually do not buy white fish since it usually lacks flavors. I made an exception one day, when I saw a cod filet. I thought I could make "fish and chips". When I presented this idea to my wife, her response was considerably less than enthusiastic. So, I decided to make several small Japanese style dishes. The first one I came up with was this clear soup with cod and tofu.


This should be garnished with "Mitsuba*" ミツバ but I did not have any so I used young Italian parsley which looks like Mitsuba but the flavor is totally different. I also added frozen yuzu peel (which has a nice yuzu flavor and is much better than the dried variety).

*I tried to grow this in a pot from seeds last winter but it was not successful.


I first cut the cod filet into bite-size chunks and sprinkled on some sake and a small amount of ginger juice (from freshly grated ginger root) and let it sit for 10 minutes. I then dried the surface with paper towels and dredged with potato starch (left upper in the picture below). I had dashi broth simmering (right upper, this was made few days ago using a dashi pack). I seasoned it with salt, light colored soy sauce, mirin and sake.  I season it lightly to bring up the dashi flavor. I dusted off the excess starch and gently placed the pieces in the simmering broth (left lower). The starch made the broth thick and viscous. I let it cook gently for about 2 minutes and then added small blocks of silken tofu (from Japan which I bought at a Japanese grocery store) (right lower).

cod soup

Instead of "mitsuba", I just took two springs of Italian parsley we had growing in a pot. I held the leaves and cooked only the stems in the simmering broth for 20-30 seconds. I then tied the stems into a loose round knot.

I placed the cod and tofu in bowls and poured in the hot broth and garnished it with the Italian parsley and Yuzu peels (first two pictures).

I think this was a qualified success.  There several things I could have done better. I should have made a better broth from kelp and bonito flakes. Probably I should not have used potato starch. I sort of liked the thickened broth and slippery surface of the cod but this appears not to be something my wife appreciated. Although the cod has a nice texture not much of its own flavor and finally, nothing replaces the smell and flavor of "mitsuba".

Monday, April 6, 2015

Nagaimo pork roll 長芋の豚肉巻き

Vegetables wrapped in thin slices of meat either pork or beef are a common and favorite theme in Japanese cooking. The most popular version of this theme in the U.S. is probably “Negimaki” 葱巻き which is scallion wrapped in thin slices of beef and then braised in a sweet soy sauce-based sauce. Since I had leftover nagaimo 長芋 and perilla leaves 大葉, I made this dish. Although using thinly sliced pork belly or "sanmai-niku" 三枚肉 would have been the best, I used some pork loin which I happened to have, thinly sliced and then pounded very thin.


To make it more interesting I also added "bainuki 梅肉" sauce which is umeboshi 梅干し meat (sans stone), finely chopped and then made into a paste using a Japanese mortar or "suribachi" すり鉢 with a small amount of mirin.


I made 6 sticks of the meat covered nagaimo and served them as an appetizer for two as shown above. I did this by first cutting batons of nagaimo after peeling the skin (approximately half inch thick and 2 inches long) and soaked them in water with a splash of rice vinegar. Meanwhile I cut thin slices of pork loin and pounded them thin using a meat pounder. I then coated the pork with flour using a fine mesh strainer to distribute the flour in a thin coat over the surface of the pork. I then placed a leaf of perilla on the pork, and a baton of nagaimo (after patting it dry using a paper towel) on the perilla, followed by a small amount of the bainiku and then rolled them together (#1 below).

In a non-stick frying pan on medium flame, I added a small amount of vegetable oil and cooked the meat roll first with the seams down turning to brown all sides(#2). I deglazed the brown bits (fond) from the bottom of the pan with sake (1 tbs) and mirin (1 tbs). When browned bits were incorporated, I added soy sauce (about 1-2 tsp) (#3) and shook the pan to roll the meat rolls until the sauce thickened and coated the surface of the meat (#4).
pork roll composit

I cut each roll in half and served it with blanched edible chrysanthemum or "shungiku" 春菊 dressed with soy sauce, sugar and  Japanese hot mustard mixture and garnished with toasted walnut bits.

The nagainmo was almost raw and still a bit slimy but had a nice crunch. The sliminess did not brother my wife (a good sign). Since the pork was not pork belly, I thought it was a bit dry but it had a nice flavor from the sauce and browning. The perilla and bainiku sauce added to the flavors. So, this was a rather successful starter dish for sake.

Friday, April 3, 2015

Edible chrysanthemum roll 春菊ロールと煮浸し

The other day, I saw fresh edible chrysanthemum or "shungiku" 春菊 at the Japanese grocery store. Since this is my wife's favorite Japanese vegetable and only sporadically appears in the grocery store, I got it. Although the most classic way to enjoy shungiku is in sukiyaki すき焼き, we were not having sukiyaki this time. So, I made a small appetizer with shungiku and served it with a skewer of chicken tenderloin in yakitori style with pickled plum 梅肉 and perilla 大葉 as a starter one evening.


I decided to make it a bit interesting and made a roll wrapped with thin omelet and a nori sheet.


In addition, I made the thick stem part into "Oshitashi" おひたし or "Nibitashi" 煮浸し garnished with bonito flakes.


I should have taken the pictures while I was making the roll but I did not.

Preparation of shungiku:
I washed and removed any wilted leaves and cut off the very end of the stems. I removed the leaves with thin stalks and separated the thick stems.

Cooking:
In a large pot, I cooked the thick stems first in salted boiling water for several minutes until cooked but still crunchy in the center. I scooped them up with a large slotted spoon and let them cool on the plate until I could handle them. I cut them into 2 inch logs.

I cooked the remaining shungiku for less than 1 minute, drained, and let cool on a paper towel lined plate.

Seasoning:
Thick stems (3rd picture):
I immediately soaked them in warm seasoned broth (dashi broth, soy sauce and mirin). Once it came to room temperature, I placed it in the refrigerator. I served it garnished with dried bonito flakes.

Leaves (1st and 2nd pictures):
After I squeezed out the excess moisture, I dressed them in karashi shouyu からし醤油 (Japanese hot mustard, sugar and soy sauce). It could be served as is (after cut into a reasonable size) but I made a roll with thin omelet and then dried nori sheet using a bamboo mat. I let it sit wrapped in plastic wrap for few minutes or until the nori sheet adhered to itself. I cut it in 1 inch cylinders.

Shungiku has a very unique nice flavors. Using two different ways of preparing, both were quite good as small starter dish for sake.

Tuesday, March 31, 2015

American Mu Shu Pork アメリカ風ムシューポーク

When I was browsing through the printed version of “Cook's Illustrated”, I came across this Mu Shu Pork recipe. I was particularly intrigued to try making the thin Chinese pancake. Mu Shu pork must be one of the quintessential American Chinese dishes (like chop suey). I remember I made this dish once many years ago when we lived in California for our American friends (I used wood ear black fungus and dried day lily buds which appear to be more authentic and I served it in  a Chinese pancake, probably store-bought). I asked our Chinese friend and confirmed that the authentic Mu Shu pork uses wood ear and lily buds but it is served on rice not a pan cake. (I suppose the Chinese pan cake is for Peking duck). In any case, the whole point of this exercise for me was to make a thin Chinese pancake, so I followed the American recipe in “Cook’s Illustrated”.

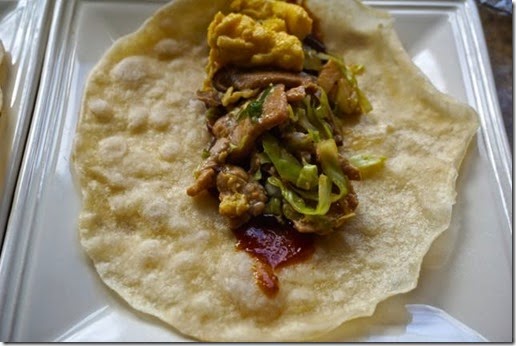
Here is the final product. Looking at it brings to mind an oriental burrito perfect for an American Chinese dish.


I am fairly proud, if I do say so myself, for successfully making this thin stretchy Chinese pancake. I smeared store-bought Hoisin sauce on the pancake and topped with the filling then wrapped it in a burrito-style.


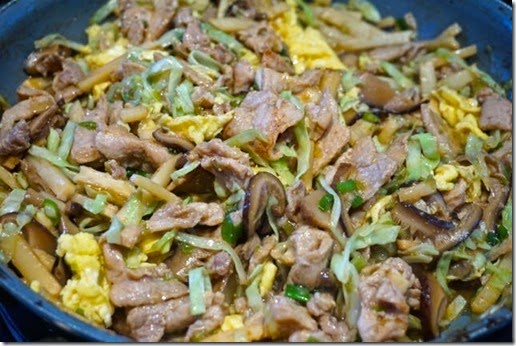
The filling looked like this. I deviated a bit but mostly followed the recipe (in the recipe below, many parts are directly quoted from the original recipe with my added modifications).


Ingredients for stuffing:
3 large dried shiitake mushrooms, rinsed
1/4 cup soy sauce
2 tablespoons mirin
1 teaspoon grated fresh ginger
1/4 teaspoon white pepper
1 (12-ounce) pork tenderloin, sliced thin against grain
2 teaspoons cornstarch
2 tablespoons plus 2 teaspoons  peanut oil)

2 eggs, beaten (I seasoned it with 2 tsp of sugar and a small pinch  of salt)
6 scallions, white and green parts separated and sliced thin on bias
1 (8-ounce) can bamboo shoots, rinsed and sliced into matchsticks (I used Japanese boiled bamboo shoot in a pouch)
3 cups thinly sliced green cabbage
1/4 cup hoisin sauce

  1. I soaked the dried mushrooms in cold filtered water, enough to cover, in a sealable container and left them in the refrigerator for 24 hours. I removed the stem, thinly sliced and place them in a small sauce pan with the soaking liquid and cooked for 30 minutes (I could have lightly seasoned  with soy sauce and mirin but I did not) on simmer and let it cool (right middle in the picture above). I strained and reserved 1/3 cup of the soaking liquid (for making the final seasoning liquid mix).
  2. I marinated the pork in 2 tablespoons soy sauce, 2 tablespoon mirin, ginger (right top).
  3. I mixed the reserved mushroom liquid, remaining 2 tablespoons soy sauce, and 1 tbs of mirin (left upper). I mixed the corn starch in a small amount of sake (or water) in a separate container for thickening the sauce (not shown).
  4. I heated 2 teaspoons of oil in a skillet over medium-high heat until shimmering. I added eggs and scrambled quickly until set but not dry, about 15 seconds. I transferred these to bowl and broke the scrambled eggs into 1/4- to 1/2-inch pieces with a fork.
  5. I returned the now-empty skillet to medium-high heat and heated 1 tablespoon of oil until shimmering. I added scallion (left bottom) whites and cooked, stirring frequently, until well browned, 1 to 1 1/2 minutes. Next came the pork mixture. Spread into an even layer and cooked without moving it until well browned on 1 side, 1 to 2 minutes. I stirred and continued to cooking, stirring frequently, until all the pork was opaque, 1 to 2 minutes longer. Then transferred it to the bowl with eggs.
  6. I returned the now-empty skillet to medium-high heat and heated the remaining 1 tablespoon oil until shimmering. I added the mushrooms and bamboo shoots to the skillet and cooked, stirring frequently, until heated through, about 1 minute. I added the cabbage, all but 2 tablespoons scallion greens, and mushroom liquid mixture and cooked, stirring constantly, until the liquid evaporated and the cabbage was wilted but retained some crunch, 2 to 3 minutes. Then I added  the pork and eggs and stirred to combine followed with the cornstarch slurry (enough to thicken the sauce). All this was transferred to a platter and topped with scallion greens.
  7. I spread about 1/2 teaspoon hoisin sauce in the center of each warm pancake then spooned on the stir-fry over the hoisin sauce and served.
Ingredients for pancake
1 1/2 cups (7 1/2 ounces) all-purpose flour
3/4 cup boiling water
1/2 teaspoons toasted sesame oil
2 teaspoon vegetable oil

chinese pancake composit
  1. These are the instructions: Using a wooden spoon,  mix the flour and boiling water in a bowl to form a rough dough. When cool, transfer dough to a lightly floured surface and knead until it forms a ball that is tacky but no longer sticky, about 4 minutes (dough will not be perfectly smooth). Cover loosely with plastic wrap and let rest for 30 minutes.
  2. Roll dough into a 12-inch-long log on a lightly floured surface and cut into 12 equal pieces (I cut in half, then cut into 3 equal pieces, then cut in half to make 12 pieces, #1 above)). Turn each piece cut side up and pat into a rough 3-inch disk. Brush both sides of 6 disks with vegetable oil with a splash of sesame oil added (The original recipe calls for all sesame oil but sesame oil is too strong for us); top each disk with oiled sides facing each other,  press lightly to form 6 pairs (#2). Roll disks into 7-inch rounds, lightly flouring work surface as needed (#3).
  3. Heat vegetable oil in a 12-inch nonstick skillet over medium heat until shimmering. Using paper towels, carefully wipe out the oil. Place pancake in the skillet and cook without moving until air pockets begin to form between the layers and underside is dry, 40 to 60 seconds (#4). Flip pancake and cook until a few light brown spots appear on the second side, 40 to 60 seconds. Transfer to a plate and, when cool enough to handle, peel apart into 2 pancakes (#5). Stack pancakes moist side up  (#6) and cover loosely with plastic. Repeat with remaining pancakes. Cover pancakes tightly and keep warm.  (Pancakes can be wrapped tightly in plastic wrap, then aluminum foil, and refrigerated for up to 3 days or frozen for up to 2 months. Thaw wrapped pancakes at room temperature. Unwrap and place on plate. Invert second plate over pancakes and microwave until warm and soft, 60 to 90 seconds.)
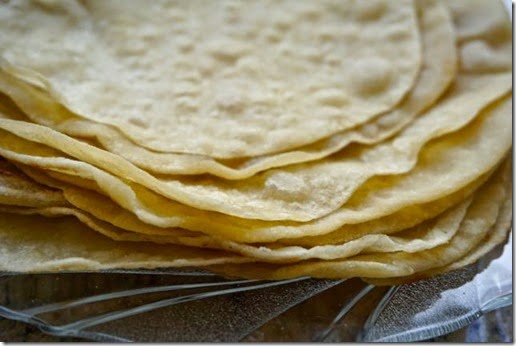
The below is the finished stack of the pancake. It is thin with a nice elastic texture. But, I had to confess that this is my second try. The first try did not work out. I did not make the size of the initial disks large enough and I oiled only one side (as instructed in the recipe) which made it very difficult to peel the two disk pair apart after cooking. Also the sesame oil flavor was too intense. So on the second try, I made sure I started out with 3 inch diameter disks (#1) and I brushed oil on both pancakes with vegetable oil plus a splash of sesame oil and made 6 pairs (#2).


We really liked this American Chinese Mu Shu Pork. Since I substituted mirin for dry sherry and omitted the sugar called for in the original recipe, by itself, the stuffing may have needed a bit more sweetness but once put together on the pancake, the hoisin sauce provided the sweetness which made the overall dish well balanced. I used freshly ground white pepper (instead of usual black pepper) which gave some heat. The use of good quality dried shiitake mushrooms is also important giving tons of "umami" flavor to the dish. In my opinion, the best way to hydrate dried mushrooms is to soak them in cold water in the refrigerator for 24 hours but not in the microwave oven as suggested in the original recipe. The pancakes are really good and this recipe works. At least for us, reducing the sesame oil flavor was an improvement. The pancake had a nice, unique stretchy consistency which cannot be substituted by using flour tortilla.

Since I made Chinese pancake successfully, maybe my next challenge will be making Peking duck but that will be difficult.

Saturday, March 28, 2015

“Cup” sake Funagichi Kikusui ふなぐち菊水生原酒


There is a class of sake called "Cup-sake" which comes in either a glass or aluminum "cup" (about 1 go size 一合 or 180-200ml) with a pull top. These are widely available in convenience stores and vending machines in Japan. This type of sake is usually not high quality but it is easy to get and you can consume it anytime anywhere which appeals to certain clientele. Ozeki 大関 sake brewery is credited for inventing this type of sake  (called "One cup Ozeki" ワンカップ大関) in 1964. More recently, better quality sake, even daiginjou 大吟醸 class is being sold in this format but when I lived in Japan, "cup sake" had some negative stigma attached to the extent that even in my youth I did not partake.

Interestingly, when we went to Sakamai 酒舞 in New York some years ago, one of the "genshu" 原酒 tasting included this "Funaguchi Kikusui" ふなぐち菊水生原酒. We did not think it was a particularly great sake but not bad either. We were a bit surprised that this came in an aluminum cup and was included in the "genshu" tasting at this “fancy” sake bar. Later, I learned that Kikusui sake brewery 菊水酒造 was in Niigata 新潟 and there were four different kinds of cup sake including "ginjo" class but this particular one is "hon jouzou" 本醸造 made of rice polished to 70%. "Nama genshu" 生原酒 implies non-pasteurized and non-diluted sake but I am not sure if it was pasteurized after placing it in the can.

In any case, when we had this at Yuzu restaurant the other evening.  Few days later, I happened to spot this sake-in-a-can at the Japanese grocery store.  I had to buy it to taste it. I served this cold.


It is always important to me that we taste sake with the appropriate food. I served daikon namasu 大根なます garnished with ikura いくら salmon roe, boiled octopus leg with karashi sumiso 芥子酢味噌and my pickled myouga 茗荷の酢漬.


The taste of the sake was totally different from what we had at Yuzu. It has some yeasty flavor of honjouzou but had a nice "umami" flavor and not extremely dry.  Although this is not one of our favorites, it is certainly a drinkable sake.

Wednesday, March 25, 2015

Cauliflower parsnip soup カリフラワーとパースニップスープ

I got the idea for this cauliflower soup/potage from one of the episodes of “Worst cooks in America”. (I hasten to add this was one of the recipes used in the final contest after the worst cooks were no longer the worst). I had a head of cauliflower and a bag of parsnips in the refrigerator and decided to make this dish (I just winged it without a specific recipe). To echo what is in the potage, I added baked cauliflower florets and parsnip medallions and garnished with chopped chives. I served this several times and in one rendition my wife added some of her cheese curd which was also good.
I served this just an small starter dish as you can see below.

Ingredients:
Cauliflower, one head, leaves and thick stem removed and coarsely copped preserving 1/5 separated into small florets for garnish.
Onion, three medium, finely chopped
Parsnips, 3, peeled and coarsely copped, reserving one cut into small medallions.
Olive oil, 2-3 tbs
Chicken broth, about 3 cups or just cover all the vegetables.
I sweated the onion in the olive oil in a soup pot until soft and cooked (4-5 minutes), I added the cauliflower and parsnips and covered it with chicken broth and let it simmer for 30 minutes until the vegetables were soft. Using an emersion blender, I pureed the mixture until smooth.
Meanwhile, I coated the cauliflower florets and parsnips with olive oil, seasoned with salt and baked in the convection toaster oven for 30 minutes at 350F (below) and set aside.

To assemble the final serving, I put the serving portion of the potage in a small sauce pan and heated it up. I then added light cream (to your liking) and seasoned it with salt and freshly ground white pepper. I placed the baked cauliflower and parsnip in the middle of the small bowl and ladled in the potage then garnished it with chopped chives.

This is a very straightforward potage with nice sweetness from parsnips and creamy texture. Still slightly crunchy baked vegetable echoed what was in the potage. When my wife added the cheese curd it contributed a different smooth texture that was very pleasing. This is quite a nice potage/soup, albeit all  white.