Sunday, October 25, 2015

Japanese pumpkin potage with chestnut 栗入りカボチャのポタージュ

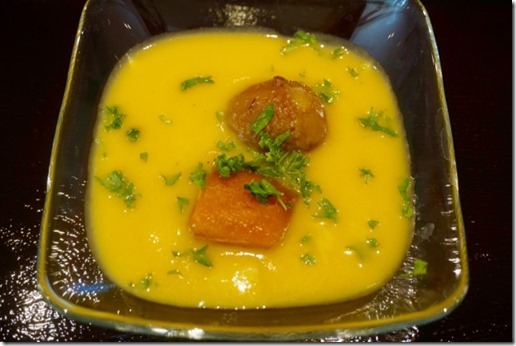
This is nothing really new. The other day, I got a Japanese pumpkin or kabocha カボチャ at the Japanese grocery store. As usual, I made simmered pumpkin or カボチャの煮物 (second picture below).  I also made chestnuts simmered in syrup 栗の甘露煮.  So, I just combined all three into one dish.


I prepared the kabocha as usual. I removed the skin and rounded off the sharp edges of each piece to prevent the edges from crumbling during the cooking process (called "nikuzure 煮崩れ). So, I used these scraps and the portion of kabocha which was too thin to be made into individual pieces to make the potage. I made the simmered pumpkin  exactly the same was as before seasoned with sugar, mirin, and soy sauce.


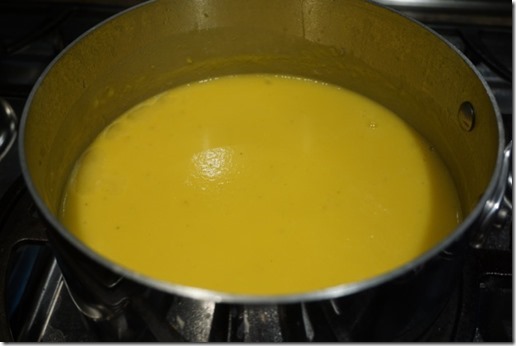
For the potage, I added finely diced onion sautéed in butter, small cubes of potato simmered in chicken broth (my usual Swanson no fat low sodium) with a few bay leaves for 20 minutes or until everything was cooked and soft. After removing the bay leaves, I pureed the pumpkin mixture using an immersion blender until all the solids were gone. (picture below).


I added cream, mixed, seasoned with salt and white pepper and warmed up before serving. Since I  made chestnuts simmered in syrup, I placed the simmered pumpkin and chestnut in the bowl and poured the potage and garnished with finely chopped parsley.


The potage was sweet and velvety. With the addition of the simmered pumpkin and chestnut, this is really the taste of autumn.

Thursday, October 22, 2015

Jalapeno Cheddar roll ハロペニョチェダーロール

When I saw this recipe, I thought ‘This is something my wife would be delighted to make’. Not that she is into Jalapeno pepper or anything hot but the idea of rolling bread dough with cheese and pepper inside would appeal to her. The original recipe calls for pickled Jalapeno peppers but we used fresh ones after deveining and deseeding (i.e. not hot at all).


Even as the bread was baking the kitchen was filled with the wonderful smell of cheddar and Jalapeno. The cheddar cheese all melted and made a nice brown crust on the top  and bottom.


The below is our variation of the original recipe ).
Ingredients:
1/2 cup milk
2 tablespoons sugar,
 2 teaspoons dry yeast, 285 grams bread flour divided into two parts; 95 grams for the yeast sponge and 190 grams for the bread. As is usually the case with bread dough additional flour in reserve in case the dough was too wet.
4 tablespoons butter
1/2 teaspoon salt
2 large eggs
240 grams Cheddar cheese shredded (about 2 cups) (We used smoked Cheddar)
2 fresh jalapeno peppers, deseeded and deveined and finely chopped
Instructions:
1. Stir the sugar and salt into the milk and scald the milk stirring to dissolve the sugar and salt. Cool to about 105 degrees F (40 C), add the yeast to the mixture to proof it. Once the yeast becomes bubbly add the 95 grams flour. Cover and let this mixture rest in a warm place until it's doubled in size. This forms the sponge.
2) Add the remaining 190 grams of flour to the bowl of an electric mixer. Add the sponge and start mixing at a low speed. Add the eggs, one at a time until fully incorporated. Add the butter in pieces until fully incorporated. Add additional flour as needed until the dough is soft but not sticky. Kneed the dough for 7 to 10 minutes. Turn the dough out onto a well floured surface, let it rest for 5 to 10 minutes then roll it out into an 18 x 18 inch square (45 cm x 45 cm).
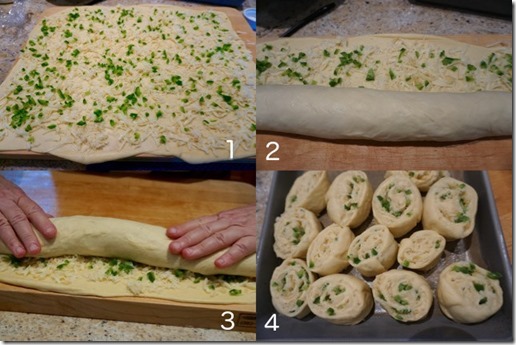
3) Sprinkle evenly with the cheese, putting a little extra cheese towards the edge closest to you and then scatter the jalapenos evenly over the top. (#1 in the picture below)
4) Roll the dough up and then slice the roll into thirds and then slice each third into 3 wheels. (#2 and 3 in the picture below. We sliced the pieces a bit thinner, after we divided the roll into thirds we sliced each third into 4 equal rolls).
5) We arranged  them in a 8" x 8" greased pan lined with parchment paper. We covered the pan with saran wrap and let it rise in a warm place (we had a bit irregular diameters, #4 in the picture below). We  preheated the oven to 350 degrees F.
6)When the dough had risen to fill the pan, we placed it in the preheated oven and baked until golden brown (25-30 minutes).

Jallopeno pepper role composit

Even though we deviated a bit from the original recipe we love this roll . The cheese we used gave it a very nice smoky cheddar flavor. The fresh jalapeno pepper taste was also very nice without heat. Interestingly the cheese melted into the bread adding moisture and out the top and bottom making a crunchy crust. This is a perfect roll for a snack.

Monday, October 19, 2015

Another otoshi threesome 又々お通し三種類

These are, again, an otoshi threesome I served one evening.


One of the times I made  cold simmered vegetables which we like to have on hand in the summer, I  included renkon  レンコン or lotus root and kon-nyaku コンニャク or devil's tongue. Both were too much to use in the vegetable dish so I made a small dish of kinpira of renkon and konnyaku.  The konnyaku was par boiled and I cut it into small long strips. The renkon was just sliced thinly. I put a small amount of vegetable oil with a splash of dark toasted sesame oil in a frying pan on medium heat and added flakes of dried red pepper. Then I added the renkon and konyaku and sautéed them until the oil coated the surface. I then braised by adding mirin and soy sauce. I braised it until only a small amount of liquid remained in the pan. I added white roasted sesame seeds and cut the fire. This is a variation of kinpira but the contrast of texture between renkon (firm and crunchy) and the konnyaku (soft but elastic) was perfect.


Since I had pork loin barbecued in my Weber grill (trussed, seasoned with salt, black pepper and finely chopped fresh rosemary and hot smoked/barbecued to the internal temperature of 145F) and also my potato salad, I made rolls. This combination cannot go wrong.


Since I prepared (boiled) harcoverts over the weekend, I just dressed it with sesame paste/mayo dressing (Mayonnaise, white sesame paste, and soy sauce) to complete my threesome.


These were good starters for the evening.

Friday, October 16, 2015

All Matsutake lunch 松茸尽くしの昼食

Since it was Matsutake 松茸 season, we ordered fresh matsutake from Oregon Mushroom as usual. They offer grade #1 and grade#2/#3 with grade#1 being the better matsutake with unopened caps. This year, they had some problem harvesting grade#1 matsutake and there was some delay before we received it. Around the same time, we received Northern American chestnuts from Gilolami farms. So, we have two major ingredients for our annual autumnal feast. I have posted all the chestnut and matsutake recipes I can think of previously.  In any case, on one weekend, we had this all matsutake lunch consisting of matsutake rice 松茸ご飯, chawanmushi 松茸茶碗蒸しand clear soup 松茸のお吸物.

I made the Matsutake rice the night before using the Kamado-san donabe rice cooker.


I heated the rice for lunch just microwaving it and topping it with thin slices of fresh matsutake. I garnished with green part of scallion. The fresh matsutake slices added a wonderful subtle aroma to this dish.


I also made matsutake chawanmushi and clear soup for this lunch. For both, I used a filet of sole which was first salted and sprinkled with sake, cut into bite sized pieces and gently poached (I turned off the heat after I added the sole) in dashi broth for few minutes (as usual, I made it with a dashi pack containing dried bonito flakes and kelp).

In the chawanmush, I only included thinly sliced matsutake and small pieces of poached dover sole filet. I garnished with snow peas (added to the chawanmush at the last 5 minutes of steaming) and garnished with yuzu skin (from frozen packed) and scallion.


I made clear soup from the same prepared broth seasoned with light colored soys sauce or usukuchi shouyu 薄口醤油, a splash of mirin and salt. I added silken tofu from Japan, matsutake slices. I also added yuzu skin and snow pea.


This was a rather luxurious lunch. The sole filet was very mild in flavor and had a melt-in-your-mouth consistency which was very nice.  The chawamushi was lava hot initially but the silky consistency and subtle matsutake aroma were sublime. We succumbed to having our house sake daiginjou "MU" 大吟醸 無--but just one glass.

Tuesday, October 13, 2015

Pork belly crisp 豚バラの唐揚げ

This is by far one of the most deadly dishes I’ve ever made. After using thinly sliced pork belly for grilled pork belly wrapped fig and asparagus, I made a quick stir-fried dish with pork belly, cabbage, zucchini slices  (I did not take any pictures). From the  remaining pork belly, I made this dish which is essentially pork belly kara-age 豚バラの唐揚げ.


Since the thinly sliced pork belly was not as thin as it would be in Japan as "bara-niku" バラ肉 , I first further thinned the meat using a meat pounder. I cut the pieces into 2-3 inch strips and marinated them in mirin, sake and soy sauce mixture (1:1:2 ratio) for at least several hours (I marinated it overnight). After removing the excess marinade by blotting with paper towel,  I dredged them in potato starch or "katakuriko" 片栗粉 (see below).


Since they are very thin pieces of meat, they fry up quickly. I deep fried them turning once in 350F vegetable oil for 1 minute on each side.


I drained the excess oil on a cooling rack.


I tasted a small piece to make sure it was done properly and it was. Very crispy. I served this on the bed of water cress (I removed all thick stems from the cress) and a wedge of lemon.


It is like crispy bacon but it is probably a bit deadlier and has a nice lightness despite high fat content. Excellent starter snack for red wine.

Saturday, October 10, 2015

Pork belly wrapped fig and asparagus イチジクとアスパラのバラ肉巻き

It was another rather nice day in Washington DC and we decided to grill outside. I was sent by-she-who-must-be-obeyed to the near-by Whole food market to get fresh whole fish. I got fish (trout, nothing else looked great). While there I could not resist buying sliced pork belly or "Bara-niku" バラ肉 which is a very common cut in Japan but we can get it only at this store around here. It is essentially "raw" (as in not smoked or cured) bacon meat. Since we were grilling our trout on a charcoal fire, I decided to make skewers using the pork belly. I was not thinking of any specific recipe but, since I also got mission figs at the same store, I decided to wrap the figs with pork belly. I first cut the figs into quarters and then wrapped them and skewered them for grilling.


I also had pencil asparagus already blanched and ready to go, I wrapped them in pork belly as well (below picture). I seasoned it salt and pepper before grilling.


I am sure this is not good for you but grilled pork belly with crispy edges and sweet figs inside (grilling enhanced the sweetness of the fig) cannot go wrong. My wife asked me to grill the pieces more after fig/pork belly was removed from the skewers to make all the surfaces crispy even the ones between the pieces on the skewer.


The asparagus joined in later.


We enjoyed this delectable pork belly as a starter with a red wine.  We then started on our trout. This time, I simply salted them (after scaling).


We really enjoyed the simply prepared trout. We did not need any thing else with the fish. Salt and charcoal fire really make the fish taste good.

As an ending dish, I made our usual grilled rice balls but this time, I made sweet miso sauce (miso, sugar, mirin) and brushed it on towards the end of the cooking (below).


I happened to make beer pickles the prior weekend and served it (daikon, carrot, and cucumber) on the side.


The daikon was the same extremely "hot" one we tasted as grated daikon and was very spicy even as pickles. I sort of liked it but my wife thought her stomach could not take it.

Wednesday, October 7, 2015

Grilled corn and black bean salad 焼きとうもろこしとブラックビーンのサラダ

This is a variation on a previously (5 years ago) posted recipe corn and black bean salad. After tasting grilled corn in a salad my wife got from the grocery store recently, she was inspired to try grilling rather and the usual microwaving of the corn for this salad. The added grilled flavor made this salad much better.


Since we could not grill the corns outside (mosquitos!), we decided to roast the fresh corn on a cast iron griddle (see below).


We brushed a small amount of olive oil on the corn and grilled it until surface got brown (see below) turning frequently. It smoked a bit although our exhaust fan handled it well. Next time, we may grill it without the oil.


Using a chefs knife and standing up the cob on it's stem, I cut off the corn kernels.

Ingredients:
Grilled fresh corn: 6 ears, kernels removed.
Black beans: 16 oz can, drained.
Jalapeno pepper: 1 veined and seeds removed, finely chopped.
Fresh cilantro: Leaves finely chopped, 1/4 cup
Lemon juice freshly squeezed: 1 -2 lemon(s) or 3 tbs
Olive oil 3 tbs
Ground (roasted) cumin
Salt and ground black pepper

I mixed everything in a bowl and let it stand for several hours in the refrigerator.

The grilling process added a nice grilled flavor. This is a very refreshing summer salad.