Monday, May 9, 2016

Bread, Olive oil and Wine パン、オリーブオイル、ワイン

BYOB (Bring Your Own Booze, Beer, Bottle) is a concept foreign to most Japanese. For that matter, I encountered a BYOB restaurant for the first time when I attended a professional meeting in Pittsburgh many years ago. I went to the restaurant which was in walking distance of my hotel. The weather was lovely and I was delighted to see diners enjoying wine and food al fresco. I got an outside table, sat down, and asked for a glass of wine. That is when I was informed that this was a BYOB restaurant. Being unfamiliar with the term they had to explain that they did not sell any alcohol. If I wanted some wine I had to "bring my own bottle" (BYOB).  The customers I saw enjoying wine had brought it with them. Somewhat at a loss as to what to do the waiter was kind enough to explain that there was a state run liquor store just 4 blocks away from the restaurant (how convenient). I walked there (quickly), got a bottle of decent red and came back to the restaurant to my table which they had kindly held for me. That was my introduction to a dining style rather common in Pennsylvania. 

Pennsylvania is not alone in this custom. BYOB is reportedly permitted in 27 states and prohibited in 13 states in US. In the DC area, some restaurants may allow BYBO with conditions (only wines that are not on their wine list can be brought in, there is a limit of only 2 bottles per party or table, and a $25-50 corkage fee applies, etc). We learned that, in Pennsylvania, however, BYOB is very common and less stringent. Since we stayed in rural/suburban PA recently, we made a point of taking our own bottles of wine to the BYOB restaurants (and if truth be told, our own wine glasses too. Let's face it clearly wine tastes better drunk out of crystal than thick glass). 

One evening, we went to a BYOB Italian restaurant. The owner was very gracious. The food was excellent. When we commented on the good quality of the bread and the very green fruity olive oil served on the table, the owner having taken note of the crystal wine glasses apparently suspected he had some "foodies" on his hands so he brought out his special and very best olive oil which was from Spain (to our surprise, not from Italy).

We tasted the olive oil. It had a nice fruity, grassy taste with peppery spicy finish which lingered in your mouth for some time. We raved about how great it was with the bread and the wine. We never tasted anything like it before. He offered to sell us a bottle, and we snapped it up immediately. 

The olive oil is called "Family Reserve - Escribano Estate" with crush date of October 2014.

Quoting from importer's website;
"This year’s Family Reserve is made from Picual olives at our owners private family mill in Andalusia, Spain. Soraya Aguilar’s family mill produces early crush, super premium quality Picual for our stores every October."

"The green fruit, estate grown Picual olives are crushed very early, with an extremely low 8% yield (oil/olive) and milled at 17 degrees celsius."

"This year’s oil has a bright, sweet and fruity nose with sweet green fruit and clean feel in the mouth. Upon tasting, you will find notes of green almond, artichoke and grassy aromas finished by a clean, robust peppery finish. High polyphenol counts (more than 400) make this oil one of our most healthy."

After we got home I decided to bake my baguette to try this olive oil. I have not baked my baguette for some time. I got up early on Sunday to bake it. I served thin slices, with this olive oil with sprinkles of Kosher salt in the evening with a red wine.


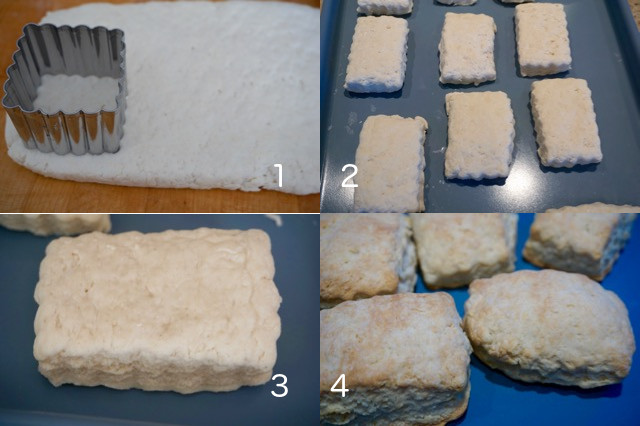
I ended up baking two batches of bread using two different yeasts, which happened by accident not by design. The first thing I did was to proof the yeast. Since I have not baked for some time (my wife has been doing most of the baking). I grabbed a package of yeast and started proofing by mixing the yeast and a pinch of sugar in 1/4 cup of lukewarm water. After 5 minutes, it did not bubble up as I expected. My wife came downstairs at this point and asked me which yeast I used. I fished out the yeast package from the trash bin. This was Hodgson mill active dry yeast. This one is dubbed as "for all flours especially whole grain" which my wife uses for whole grain breads. She suggested to use Fleischmann's Yeast instead. I proofed that yeast and it bubble up within 5 minutes. I used this Fleischmann's for the first batch which are the two on the left (picture below). By the time I finished kneading the first batch, I realized Hodgson mill yeast was also vigorously bubbling up; it just took more time than the other yeast. So, instead of wasting the yeast, I made a second batch (the two loaves on the right). They came out quite different in appearance; the only difference was the kind of yeast I used.


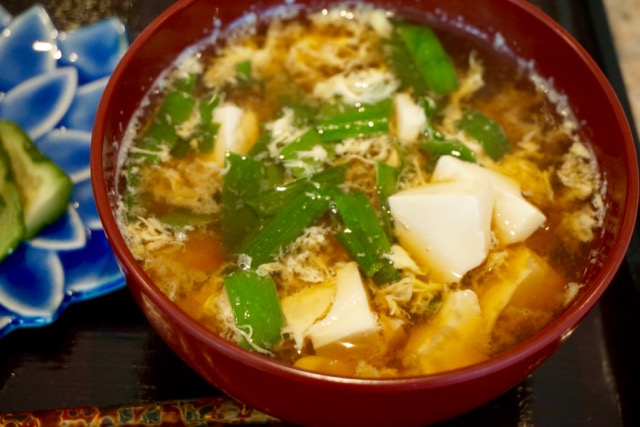
Although they look different in shape both had a nice crust and the center had many irregular holes with good texture and tasted about the same. In addition to the baguette and olive oil, we also had thinly sliced Manchego and applewood smoked American cheddar cheeses. This called for a good wine and I decided to open 2005 Shafer One point five. When I opened the bottle, the cork almost disintegrated which was not a good sign. But upon tasting, the wine was just fine. From our memory of tasting, when it was released, it had all characteristics of highly extracted California wine with fruit forward with vanilla and chocolate. After 10 years, it had aged gracefully. There were brown hues at the edge indicating some age/oxidation. The fruits were more muted but added dark molasses/ dark chocolate flavors and smooth tannin. Tasting my baguette with this spicy and fruity Spanish olive oil alternating with Manchego and Cheddar, sipping good wine I thought  'if you have good olive oil, good bread, good cheese and good wine what else do you need'?  I also realized that, aside from the olive oil, all these food items are "fermented" or formed using the help of micro-organisms.  The Japanese equivalent of basic food items like these would be sake, rice and miso.


Friday, May 6, 2016

Braised chicken liver with garlic chive 鶏レバーとニラの炒め物

Weather in the DC area has been heavenly the past week and, for the first time this year, we had Yakitori 焼き鳥 outside. We did our usual chicken wings, pork with onion, and chicken livers. We also grilled fingerling potatoes and yaki onigiri 焼おにぎり (grilled rice balls). Since our usual grocery store did not have any fresh chicken livers, I went to another gourmet grocery store and got a container of frozen chicken livers. The livers were whole and less damaged or fragmented than the ones from our regular grocery store. In any case, we did not grill all the chicken livers for yakitori so I made this dish since we also had spring garlic chives in our herb garden.


Despite the very generous amount of fresh garlic chive I used, the garlic chive flavor was not as strong as I would have thought it should be.


I did not use any particular recipe, just "winged" it.

Ingredients:
Chicken liver, frozen thawed, washed and soaked in water, cut into bite sized pieces (1 container - about 1 lb minus the two skewers of liver I used for Yakitori).
Garlic, 3 small cloves, finely chopped 
Garlic chive, cut into 1 inch lengths (Picture below)
Sake
Mirin
Soy sauce
Black pepper, freshly ground


Directions:
The chicken livers were a bit bloody after thawing but all the livers were intact and in much better shape than the usual chicken livers we get. I cut the livers into bite sized pieces and soaked them in cold filtered water changing the water several times. I blotted off the moisture with sheets of paper towel and seasoned the livers with salt and black pepper. In a frying on medium flame, I put in vegetable oil. Once the oil heated, I placed the liver in the pan and turned it several times until all the sides changed color. Then I added the garlic. After several minutes of stirring, I added sake (1 tbs) and put on the lid to steam (below). After a minutes or so, I removed the lid and turned up the flame and let the liquid evaporate.  


I added the garlic chive and stirred for few minutes.


I added mirin and soy sauce and further reduced the liquid while shaking the pan.


Once the liquid reduced just coating the liver, I cut the heat and seasoned further with freshly ground black pepper. I tasted it and decided I did not need to adjust the seasoning.

For the libation, we chose Joseph Phelps Pino Noir,  Freestone Vineyard, 2013. Since we are a member of the wine club, we just received this Pinot from them. I thought this could go well with this dish. This pinot predominantly tasted of red fruits (cherry, raspberry and also a hint of strawberry) upfront and showed an almost effervescent acidity with some spice elements. This went well with slightly "iron-ny" liver with sweet /salty and peppery savory seasoning.

The only disappointment I had with this dish was that the garlic chive flavor did not come through much at all. Maybe, I have to add more garlic chive just before cutting the flame. For that matter, I did not taste garlic that much either. We thought this frozen liver was quite good and even better than the "fresh" liver we get from our regular grocery store which appears to be roughly handled resulting in many fragmented pieces. This dish is similar to one I posted before with onion and garlic. We like both.

Tuesday, May 3, 2016

Garlic chive-Gyouza ニラ餃子

Since new shoots of garlic chives are coming out in our herb garden, we have to enjoy them while they are still succulent and tender. Later in summer, they will get really tough so this is the best time to enjoy them. One evening I made garlic chive Gyoza and served it as a small drinking snack.


The meat can be chicken or pork but I used pork.

Ingredients (makes about 12 dumplings):
Ground pork, about 220 grams (8oz) (I used hand chopped pork loin).
Cabbage, 3 leaves, boiled, hard vein removed, and chopped finely, and moisture squeezed out
Garlic chives, finely chopped, as much as you like.
Salt, pepper, sesame oil
Wanton skin, I used square store-bought skins but I cut them into rounds using a round biscuit cutter just for aesthetic reasons.

Directions:
1. Mixed well in a bowl, seasoned with salt and pepper and a small amount of dark roasted sesame oil.


Place a small mound of filling in the center of the wanton skins.


Wet the periphery of the wanton skin fold and crimp the edge.


Using a non-stick frying pan with a small amount of vegetable oil (splash of sesame oil, optional), cook until skin is crispy and brown. We like crispy skin so I turned them over and browned the other side but this is optional (usually only one side gets browned).


I added about 4 tbs of hot water and immediately put a tight lid on the pan. When the steam stopped escaping, I removed the lid and let the moisture completely evaporate and let the bottom get crispy again.


I served these with an equal mixture of rice vinegar and soy sauce as a dipping sauce. I was a bit disappointed since the garlic chive flavor was not as strong as I expected. In the next batch, I may add more fresh garlic chives.


Saturday, April 30, 2016

Lobster bisque as amuse bouche ロブスタービスク

As usual, after another recent "splurge" dinner of lobster I made lobster bisque the next day. I decided to serve the lobster bisque garnished with left over claw meat as an amuse-bouche. Since the bisque was so rich I wanted to serve a small amount so I used some tall narrow containers we got sometime ago in San Francisco (I am not sure they were originally intended to be used for because they are an odd size and shape. They are too large and tall to be used for sake cups, too narrow for a tea cup and too small for a tumbler). Nonetheless we liked the color and bought them but never really found a use for them.


The piece of claw meat was a good size but mostly sank into the bisque.


Since this version of lobster bisque was very rich (I used good amount of butter and cream). This was the perfect amount for us as a starter. We finally found a practical use for these otherwise lovely dishes. 

Wednesday, April 27, 2016

Biscuit ビスケット

The word "Biscuit" is used differently in North America and the British commonwealth. In England, biscuit is either sweet or savory "cookie" or "cracker" and in North America, it is soft quick bread (made with leavening agents such as baking powder or soda or both).   In Japan, biscuit  ビスケット usually means a type of cookie like in England. When I was growing up "biscuit" meant  a round sweet cookie which was locally produced and called "saka-biscuit" 坂ビスケット. It was wrapped in a paper cylinder (such as the one in the picture to the left). This company is still making "biscuits" but they are not wrapped in a paper cylinder like the old days.

More recently, probably because of its popularity KFC in Japan has made, North American style "biscuits" (with some Japanese modifications) became popular.

When I first came and live in the US, I was quite impressed with an instant biscuit that comes in a cardboard cylinder from Pillsbury. (see first picture).  With a sharp whack, the cylinder pops open (something my wife liked to do when she was a kid). You get "freshly" baked biscuits simply by putting the dough from the cylinder on a cookie sheet and baking.

Digression alert: My wife told me that when she was little girl her mother sent her to the local corner grocery store to get somethings for dinner, one of which was a package of Pillsbury biscuits. She was holding a roll of the biscuits in her hand while waiting in line to check out. The line was fairly long and it was taking some time.  When she got to the cashier she accidentally dropped the cylinder onto the floor. To every one's surprise there was a loud POP and the end of the tube flew off. The biscuits shot out of the tube like from a canon. Apparently the heat from her little hand activated the leavening agent and the whack when it hit the floor broke the seal causing the dough, which was by then under considerable pressure, to shoot out like little doughy canon balls.)

I haven't had these biscuits for quite some time but when I was using them I thought they were quite good particularly just out of the oven. But once they got cold they became hard as a rock.

My wife used to make authentic North American biscuits from the scratch all the time but she has not made any for quite some time. So, when she saw this interesting recipe in the Washington Post, she had to try it.  We enjoyed them with scrambled eggs for breakfast.


The original recipe was "double ginger" flavor but she did not add any ginger.
Ingredients

For the biscuits (the recipe yielded a dozen rectangular biscuits):
- 2 cups all-purpose flour, plus more for rolling
- 1 cup cake flour
- 1 tablespoon plus 3/4 teaspoon baking powder
- 1 1/2 tablespoons sugar
- 1 teaspoon salt
- 6 tablespoons (3/4 stick) chilled unsalted butter
- 3/4 cup cold regular or low-fat buttermilk, or more as needed

(The original recipe provided weights for the ingredients and generally when given a choice for baking, my wife thinks using weights is more accurate. But she discovered that the weights provided were nowhere close to the weight of the ingredient if measured by the cup then weighed on the scale. I could hear her muttering, "Don't they ever proof read their recipes or better yet try them out first?") 

Directions

Whisk together the all-purpose and cake flours, baking powder, sugar, ground ginger, if using, and salt in a large bowl.

Use the widest opening on a box grater to grate the butter into the flour mixture, adding it a bit at a time and gently mixing it into the flour so it doesn’t clump up. Use your hands to make sure the butter is fully incorporated into the flour. Add the buttermilk; use a flexible spatula to mix until the dough holds together. If the mixture's still too crumbly, add up to 2 more tablespoons of buttermilk.

Lightly flour a rolling pin and a clean work surface. Transfer the dough there; use a light touch to shape it into a rectangle, then pull the far end of the rectangle up toward you and fold the dough over in half. Press down on the dough and repeat this step 6 more times.

Roll out the folded dough to a 1-inch thickness. Use the biscuit cutter to form a total of 10 to 12 biscuits; you can re-roll the dough once, but you might notice less height on those re-rolled biscuits after baking. For this reason my wife made the biscuits into a rectangular instead of the traditional round shape. This is because, as suggested by the recipe above, the round shape results in dough between the circles being left over. In order to use up all the dough these leftover pieces have to be re-rolled and re-cut. The extra working of the dough causes the biscuits to be less tender and flaky. The rectangular shape results in using all the dough with only one cutting (pictures shown below). Place the biscuits on a baking sheet.

Cover the biscuits with plastic wrap; freeze for 1 hour or up to overnight.

When ready to bake, preheat the oven to 425 degrees. Line a baking sheet with parchment paper or a silicone liner.

Bake the biscuits (straight from the freezer, unwrapped; middle rack) for 12 minutes, then reduce the oven temperature to 375 degrees and bake for 8 minutes or until the tops are golden brown.


There were two reasons my wife wanted to try the recipe. First the idea of using a grater to flake the butter sounded like a good technique. Secondly, freezing the dough idea was new to us and we were interested in  how this came out. The biscuits were not as flaky or as fluffy as my wife's usual buttermilk biscuits. They were good in there own right but nothing special. They did go well  with the scrambled eggs (I made mine into a small sandwich). Hopefully, my wife will make her original buttermilk biscuits again, soon.

Sunday, April 24, 2016

Ricotta filled Danish/rolls リコタチーズ入りデーニッシュ

This is my wife's Ricotta filled Danish which she made some time ago in quantity. We froze them and we enjoyed them for breakfast. They warm up very well in the microwave.


Unfortunately, we ate them all before we had a chance to write about them in the blog.  Recently, my wife made another batch with some alterations to correct some problems she had with the first batch. The picture below shows the second version of her ricotta filled rolls.


The filling stayed inside the roll this time  as shown below.


The major problem my wife had with the first batch of ricotta buns was that even though she followed the recipe the filling was too watery and it was almost impossible to fill the roll. The filling ran out and once it got on the edge of the dough, the bun could not be sealed. In desperation she resorted to using a small bowl (shown at the edge of picture #2). She put the dough into the bowl to form a cup #3. Then she sealed the top like she would a small pie #4. The end result is shown in #5 and #6. this was a somewhat unsatisfactory solution to say the least.

riccotta filled Denish composit

The below is her second attempt. She read a recipe on the internet for a "light and fluffy" cheese cake which used ricotta cheese that had been drained in a colander over night. She thought 'ah ha. Maybe this could work for my ricotta buns.' So she tried it again. 

Ingredients:
Filling: 4 cups ricotta drained overnight
             2 egg yolks
             1/2 cup sugar
             1 tsp salt
             1 tsp almond extract
             1 tsp vanilla

Bread:
          2 packages yeast
          1/2 cup warm water
          1/2 cup scalded milk
          1/2 cup sugar
          1/2 cup butter
          4 eggs
          1 tsp salt
          4 cups of flour (with more to make the dough the right consistency)

Dirctions for filling: This time she drained the ricotta by putting two layers of cheese cloth in a colander. She added a package worth of ricotta cheese, wrapped it in the cheese cloth, put a small plate on top and weighted it down with several heavy cans. She put a large plate on the bottom to collect the liquid that came out then put it in the refrigerator overnight. The next morning there was about 1/2 cup of liquid that came out of the cheese. This time it was much thicker and easier to work with (#1). She added the eggs yolks, sugar, flavorings and salt and stirred until the mixture was smooth. 

Bread: She mixed the milk, sugar, salt and butter and heated it to scald the milk and melt the butter sugar and salt. While it was cooling she proofed the yeast. She added the milk mixture and yeast mixture to the flour and incorporated it. Then she added the eggs one at a time. She added additional flour 1/2 cup at a time until she obtained a soft but workable consistency (#2). She let it rise once then punched it down and assembled the rolls.

Assembly: She made rounds of dough weighing 2 oz each (#3). This time she could could just scoop the filling onto the center of the dough rounds  (#4) and pinch up the edges to seal (#5). The end result was a nice little bun (#6). She put them in a buttered pan and let them rise again (#7). She put them in a 400 degree oven for about 18 minutes. The final product is shown in #8. 


There is still a room for improvement in this recipe. Probably one more egg yolk is needed in the filling so that it will congeal better while baked. Because of the sugar in the dough, it tended to brown very quickly. It might be better to start with a 400 degree oven for maybe 5 minutes then lower the baking temperature  to 350F and cook a bit longer than 18 minutes? 

Both versions tasted very good. The sweet vanilla/almond flavor of  the ricotta filling was very nice. The bread was very soft and not too sweet. The ricotta filling made it pleasantly moist. 

additional notes: My wife made these buns again. This time instead of putting them together in a pan so that they would rise into each other she put them individually on a greased cookie sheet. This is because in the previous batch the buns were slightly soggy where they touched each other. Placed individually on a cookie sheet each bun received heat all around the the result was much better. In addition, she cooked them at 400 degrees for 5 minutes then lowered the temperature to 350 degrees and cooked them for an additional 15 minutes. The end result was very good. They were cooked perfectly.


Thursday, April 21, 2016

Seasoned rice and sake lees marinated cucumber 炊き込みご飯,胡瓜の粕漬け

One evening, I made a short Japanese course dinner for a visiting friend. Among the dishes we served, I made a type of seasoned rice which I served with grilled salmon. I posted a similar dish previously (scattered sushi cooked in Donabe). In this version, the ingredients that went into the rice was not pre-cooked. The next day, we had the rice that was left over from the dinner for lunch. I served it with my sake lees cured cucumber and garlic chives, tofu and egg clear soup.


For this seasoned rice or "Takikomi gohan" 炊き込みご飯, I used burdock root ごぼう, carrot 人参,  shiitake mushroom 椎茸and hijiki seaweed ひじき. I could have added more items such as abura-age 油揚げ and proteins such as chicken but I restrained myself.


When I made sake lees marinade, I mostly marinated fish but I also tried cucumber called cucumber kasu-zuke 胡瓜の粕漬け . This is my truncated version.


Since we have new tender garlic chives coming up in our herb garden, I made this classic clear soup with garlic chives, silken tofu and egg.


1. Seasoned rice (Takikomi-gohan) 4-6 servings:

Ingredients:
Rice, 2 cups (by the small 180ml cup came with the rice cooker), washed, and drained.
Shiitake mushroom, dry, 4, hydrated by soaking in warm water for 2-3 hours,  moisture squeezed out and sliced into small strips. I reserved the soaking liquid.
Burdock root, 1/3, skin scraped off with the back of the knife, thinly sliced on the bias, cut into fine strips, immediately soaked in acidulated water (I used a splash of rice vinegar) for 10-15 minutes, washed and drained.
Carrot: 1 medium, peeled, sliced on the bias and then cut into thin strips.
Hijiki: I soaked dry hijiki in plenty of water. Washed them and changed the water a few time until they were hydrated (20-30 minutes). I drained and washed and set aside.

I placed washed and drained rice in the rice cooker and added the shiitake soaking liquid (through a fine meshed strainer). I added mirin (1tbs), sake (1tbs) and light colored soy sauce (1 tbs). I could have added salt but I did not since I could always add more salt after it was cooked. I added water to make the specified amount required (in this case, the water level mark "2"). I then added the vegetables into the rice. I turned on the rice cooker.

After the rice was cooked, I let it steep for 10-15 minutes. Using a rice paddle, I mixed the cooked rice and served. 

2. Cucumber kasu-zuke:

The formal way of making this dish, requires making salted cucumber or "shiozuke". I took a short cut. I coated the surface of the cucumber with Kosher salt and placed them in a Ziploc bag and let it sit in the refrigerator for several days.

Ingredients:
Cucumbers, I used American mini-cucumber but Japanese cucumber would be the best, washed, I used the short cut method described above and let it stand in the refrigerator for several days.  The cucumbers look shriveled and the bag had a quite a good amount of exuded water. 
Kasu-doko,   This is the same one I used when I made "cod kasuzuke". I just placed the salted cucumbers into the kazu-doko. I dug it out after 3 weeks (below).


I removed the sake lees and washed.


The rice was quite good but my wife added a pat of butter. She thought the butter made it it much better. The cucumber was not like real kasuzuke but it had rather strong sake lees flavor and was qualified success.