Monday, July 12, 2021

Strawberry panna cotta いちごパナコタ

 My wife is into making panna cotta in some small jar we cam across recently. The amount is perfect for us as dessert. This time she made strawberry panna cotta. When we get fresh strawberry, I usually wash the strawberries, hull, cut into small pieces (small one quartered and large ones quartered and then halved). I place the strawberries in a sealable container, add some sugar (depending  on how sweet the strawberries are) and and triple sec  to taste. Then marinate them for a while in the refrigerator. This makes even not-so-good strawberries palatable and we eat as is or add it to the yogurt.  She used these marinated strawberries for panna cotta.


Ingredients:
1 tsp gelatin
1 1/2 Tbs. water
1/2 cup 4 % milk
1/4 cup sugar
1/2 cup strawberry puree (marinated strawberries as described above pureed)
1/2 tsp. vanilla
1 cup buttermilk

Sauce;
Strawberry puree to top off the jars

Directions:
Bloom the gelatin in the water. Warm the milk and sugar in a saucepan until the sugar is dissolved. Use the hot milk mixture to temper the bloomed gelatin until it is completely dissolved then add it back into the warm milk mixing to thoroughly combine. Add the strawberry puree and vanilla to the buttermilk and stir completely. When the milk sugar mixture has cooled to room temperature add the buttermilk mixture. Distribute to the serving jars (or containers). (Fills about 6 of the small jars). Put in the refridgerator until it becomes firm. When it is firm top with the rest of the strawberry puree.

This is a lovely refreshing dessert. The texture is very creamy. The bright slightly sweet strawberry flavor completely infuses the milk mixture and is very nice with the slight tang of the buttermilk. A perfect way to end a meal.

Friday, July 9, 2021

The 4th of July Pacific saury barbecue さんまの塩焼き、焼きおにぎり

 This year, instead of celebrating the 4th of July (Independence day) by firing up the Weber grill, we decided to fire up our ”Hibachi*" or "charcoal konro" 炭火コンロ. And, instead of grilling chicken, we decided to grill some pacific sauries or "sanma" さんま which had been hanging out in the freezer for some time. (My wife refers to these as "torpedo fish"). In the past, “sanma” which is a very bony fish was not considered “prime” eating and was very cheap. But in recent years, they are getting scarce and much more expensive.  According to the label on the package this group of three came from "Taiwan". Traditionally, fresh sanma is cooked with the innards intact but I cleaned these fish after thawing. I had posted and pontificated about sanma previously.  I salted them before grilling and served them with grated Daikon 大根おろし. We even found an appropriate long oval dish serving dish which appropriately accommodated this long heads-on fish as shown in the next picture.

*Digression alert: A Japanese style small charcoal-fired grill is called "hibachi" in the U.S. (or may be elsewhere also). But in Japan "hibachi" 火鉢 is not used for cooking but as a source of heat used in winter for warmth in traditional Japanese rooms. (Not in Hokkaido because it is too cold and an hibachi is not an adequate source of heat). The grills used for cooking are traditionally called "shichirin" 七輪. The modern name would be "charcoal or sumibi-konro".  In the old days, if grilling fish at home,  you would do this outside using a "shichirin" and charcoal fire. More recently, however, most of Japanese cook tops have a built-in fish grill which prevents smoking while grilling fish making "shichirin" obsolete. But, in my opinion, charcoal grilled fish is still the best!


Since the fish is oily, it makes a quite a good amount of smoke but cooks rather quickly.


Whenever we fire up the Japanese charcoal grill, my wife asks me to make grilled rice balls. I usually make a simple rice ball without any filling but this time she specifically asked for stuffing- mayo and mustard dressed salmon. So, I obliged. Since grilled rice ball takes much longer to cook than the fish, I started grilling the rice balls first while we enjoyed several small appetizers and cold sake. I posted how to make perfect grilled rice balls before. As far as we are concerned the best way to cook a rice ball is over a charcoal fire. Such perfection is displayed in the next picture. The high heat sears the outer layer into a toasty brown crust enhanced by the taste of the soy sauce mixture brushed on while it is cooking. The inside is soft and moist. The addition of the salmon stuffing further infuses a mayo/mustard/salmon/salty flavor. 


Once the rice balls were finished, I set them on edge over a cooler part of the grill to keep them warm while I grilled the fish. Our holiday meal is shown in all its splendor in the next picture.


Sanma are extremely boney fish and my wife is not as good at spitting out fish bones as I am. (This was demonstrated early in our marriage when I had to remove a fish bone from the back of my wife’s throat using a long nose plier.) But she is much better at deboning a fish with a knife than I am. So although “bone-out” is not quite the traditional way of serving "sanma", in the interest of safety, that is how we served it.  Seeing the pile of lovely fish meat next to the pile of recently removed bones somehow reminded me of the "Meguro-no sanma" story 目黒のサンマ which, again, I pontificated on before. In any case, this was very enjoyable holiday celebration; grilled sanma with grated daikon and soy sauce followed by grilled stuffed rice balls (we each finished one. My wife thinks the remaining rice balls will nicely heat up in our toaster oven. We will see).

Tuesday, July 6, 2021

Boursin cheese muffin ボーシンチーズマフィン

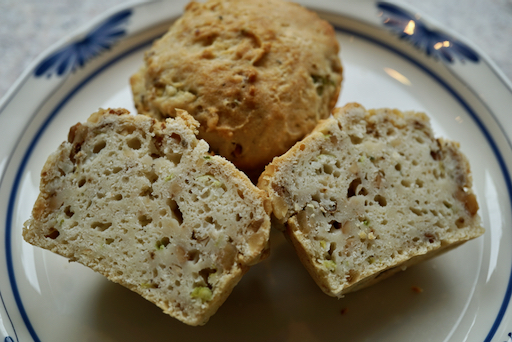
This is my wife's muffin project. This is rather unique. The muffin has Boursin cheese, scallion and garlic. Despite scallion and garlic, it is not too strong and has a nice moist cheesy texture. 


Ingredients: The original recipe did not fill a standard 12 muffin pan so I am showing the ingredients increased to 1 1/2 and and 2 times the original amount. The first increase would at least fill the pan. The second would make a full pan of generous muffins.

1 1/2 times increase
3 cups AP four
3 tsp baking powder
1/4 tsp salt
Black pepper
1 1/2 packages (8.5 oz.) boursin cheese
3 tbs butter
1 1/2 cup milk
2 eggs
3/4 cup walnuts
4 1/2 tbs. finely chopped scallions
1 1/2 cloves garlic

2 times the original recipe
4 cups AP four
4 tsp baking powder
1/4 tsp salt
Black pepper
2 packages boursin cheese
4 tbs butter
2 cups milk
2 eggs
1 cup walnuts
6 tbs. finely chopped scallions
2 cloves garlic

Directions:
Mix the dry ingredients, flour through pepper in a bowl. Set aside. Cream the cheese and butter together. Beat in the milk and eggs. Add the cheese mixture to the dry ingredients. Stir in the walnuts, scallions and garlic. Scoop the batter into the heavily greased muffin tins. Cook at 400 degrees for 18 to 25 minutes or until a cake tester inserted into one of the middle muffins comes out clean. Let cool for 5 minutes before attempting to remove from the pan.
These are hearty savory muffins. They have a dense almost cheese like consistency. The scallion flavor predominates but is not overwhelming. These are great muffins to have with a soup or stew for lunch or dinner. 

Saturday, July 3, 2021

Warm tofu with mushroom sauce 豆腐のキノコあんかけ

This was a dish I made sometime ago but somehow I did not post it. I made this dish one day to use up ingredients which need to be used quickly. I had portions of silken tofu which I kept in a sealable plastic container with water in the fridge, shimeji mushroom and fresh but pre-sliced shiitake mushroom (We specified whole fresh shiitake but we got a package of presliced shiitake mushrooms through the Instacart.) So, I came up with this dish which is a rather standard Japanese dish but I did not follow any recipe.


The sauce is thickened with potato starch slurry.  Dishes made with this kind of sauce are often called “an-kake” 餡掛け. This is a warm and soothing dish. It is basically vegetarian except for bonito in the dashi broth.


Ingredients (2 servings):
Half silken tofu divided into two portions
1 cup Japanese dashi broth (I made this from kelp and bonito flakes).
1/4 cup (or to taste) concentrated Japanese noodle sauce (from bottle)
1/2 scallion finely sliced
1 tsp potato starch or “Katakuri-ko” 片栗粉 make into “slurry” by adding 1 tbs water or sake.

Directions:
Heat the tofu in the simmering broth until warm (5-6 minutes).
Place the warmed tofu in bowels
Add the mushrooms to the broth and cook for 3-4 minutes
Add the noodle sauce and the starch slurries and thicken the sauce.
Add the scallion.
Pour the “ankake”sauce over the tofu and serve.


This is best served in cold weather but this is a very gentle smoothing dish with soft tofu and gentle taste of broth and mushrooms.

Wednesday, June 30, 2021

Hot and sour pork インドスタイルのホットサワー豚肉カレー

This is continuation of what to do with the  bone-in pork roast we have been getting. The roast is rather large and is either shoulder or thigh. After removing the bone(s), I make one large roast for cooking in the Weber grill and a smaller roast for Ni-buta 煮豚. The remaining odds and ends, I cut into small chunks for other recipes, mostly stewed dishes. We found out that once we cook the meat in chicken broth the meat tends to be much more tender and it is much easier to convert into other stewed dishes without long cooking. So, I cooked the pork in chicken broth and kept it in the refrigerator. The meat exuded collagen and the liquid congealed which is also used in the subsequent dish adding good mouth feel and flavors. In addition, if we do not have a chance to make the meat into another dish, we can reheat the meat in the broth. So this pork was 2 weeks old and re-heated once. I asked my wife to make this curry dish. She made it once before based on a recipe from her favorite Indian cookbook. We liked it but somehow we never blogged it.

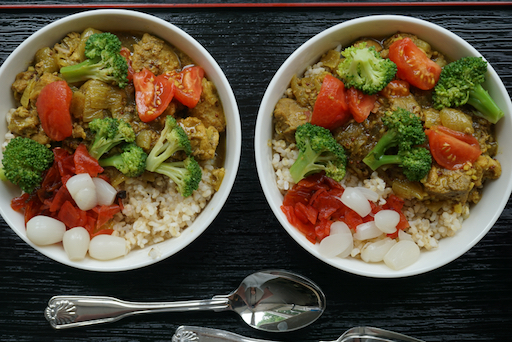
We served the curry for lunch one weekend as shown in the first picture. We served it on previously made brown rice and added skinned Campari tomatoes, cooked broccoli and Japanese pickles; rakyo ラッキョウ, fukusinzuke 福神漬け.


Ingredients:
1 tsp ground cumen
1/8 tsp cayenne
1 tsp. gound cardamon
1 tsp. cinnamon
1 1/2 tsp. black mustard seed
1 tsp. Ground fenugeek seed
1 tsp. salt
1 Tbs. brown sugar
1/3 cup sushi vinegar (recipe calls for white wine vinegar)
2 onions peeled and roughly minced
1 inch cube ginger (finely chopped)
2 cloves garlic (finely chopped)
1 Tbs. ground coriander
1/2 tsp ground tumeric
1 lb. previously simmered pork butt/shoulder trimmings

The second picture shows all the spices lined up. My wife does this to keep track of what spices she has mis en place and as you can see there are quite a few. 


Directions:
Pour the spices from cumin through brown sugar into the vinegar and stir to make a slurry then set aside. Saute the onions in a sauce pan until slightly carmelized. Add the garlic and ginger and cook until fragrant. Add the spice slurry to the onions and stir until the spices bloom (smell fragrant). Then add the coriander and turmeric stirring until they bloom too. Then add the precooked pork and mix to cover with the sauce. If there is not enough liquid add water or chicken broth. Cover and simmer for 20 minutes. The third picture shows the curry simmering in the pan. 


I think of this as not-quite a curry. It is spicy in terms of the layers of flavor of the many spice used but not particularly hot (depending on the amount of cayenne pepper). It does have a sweet/ sour undertone from the combination of the sautéed onions and vinegar which adds a brightness to the overall flavor. This is a good dish with rice or even bread.

Sunday, June 27, 2021

Panna cotta from homemade buttermilk 自家製バターミルクでパナコッタ

After my wife made buttermilk using the culture from "The culture for health" we were quite impressed with the quality of the buttermilk. My wife decide to make something using the buttermilk. Since we had some leftover blueberries she decided to use the newly made buttermilk to make panna cotta with blueberry sauce as shown in the first picture.


Ingredients
1 tsp. gelatin
1 1/2 Tbs. water
1 cup 4% milk
1/4 cup sugar
1/2 tsp. vanilla
1 cup buttermilk

For the blueberry sauce:
1 cup of blueberries
1 tsp. Of sugar

Directions:
For blueberry sauce:
Put the blueberries and sugar in a small ceramic dish and cook them at 350 degrees for 30 minutes in the toaster oven until they form a thick type of blueberry jam.

For panna cotta:
Bloom the gelatin in the 1 1/2 Tbs. of water. Put the milk and sugar in a sauce pan and heat until the sugar is melted. Remove from the heat and use several tablespoons of the warm mixture to “temper” the gelatin until it is completely dissolved. Add the tempered gelatin into the rest of the milk mixture and stir completely. Let cool to room temperature. Add the buttermilk and vanilla. Pour the mixture into the containers. Tip the containers using a muffin tin to support them in order to get the beveled appearance. Cool in the refridgerator until the mixture becomes firm. Just before serving spoon in the blueberry mixture on top of the buttermilk mixture to bring the contents of the container even with the top.


This panne cotta turned out well. It was very creamy, slightly tangy and sweet with a vanilla flavor. The blueberries added a nice fresh blueberry flavor that went very well with the vanilla.

Thursday, June 24, 2021

Homemade buttermilk 自家製バターミルク

 For the last couple of weeks we have not been able to get buttermilk particularly the brand my wife likes best. As was the case when we could not get plain yogurt at the start of the pandemic and my wife started making it, she decided to start making buttermilk too. So she ordered buttermilk starter from "Cultures for Health" (the same place she got the starter for yogurt). Unlike yogurt, however, there is little information on the internet on how to make buttermilk. Most of the entries are about what to substitute in recipes for buttermilk if you don’t have it. 

Digression alert: Buttermilk is one item that is very difficult to find or not at all in Japan even recently. When I was growing up in Japan, I never heard of it. Even in the U.S., not many people will drink buttermilk but almost exclusively use it in cooking, especially baking. It has its own unique tangy flavor which will add to the flavors of baked goods and its acidity will activate baking soda. My wife is one of the rare people I know, who enjoys drinking buttermilk. (She says, 'What's not to like? If you like sharp cheese why not buttermilk?') Originally buttermilk was the residue liquid after butter was churned. It was fermented to make buttermilk but modern buttermilk was made by inoculating and fermenting whole milk as my wife did (see below).


The resulting buttermilk (shown in the first picture) was quite thick and almost the consistency of runny yogurt but it has a very different taste... tasted like...buttermilk…actually pretty good buttermilk!


To make buttermilk

To “wake up” the culture when you first get it. 
Pour 1 quart of pasteurized milk into a glass container. 
Add 1 packet of starter culture and mix well. 
Cover the container and put in a warm spot (we use the proofing box) at 70 -77 degrees. 
Check after 24 hours to see if the buttermilk has set. If it has not leave it up to 48 hours checking every so often. 
Once it has set refrigerate at least 6 hours. (We put the container in the proofing box at 9:00 am on Friday and took it out at 8:00 PM on Saturday.) 

For subsequent batches add 1/4 cup of the previous batch to 1 quart of milk and repeat the procedure of putting it in a 70-77 degree proofing box until set. It should set in less time than the first batch, about 12-18 hours. While doing subsequent batches I realized the milk was very cold just coming out of the refridgerator and it took some time until it even reached room temperature in the proofing box. So I gently heated the milk to about 90 degrees in a pan on the stove. When it was about room temperature i.e. just warm to the touch,  I added the starter. This really accelerated the process. If the milk was started at 7:00 AM it was ready by 7:00 PM. The instructions suggest making a new batch every 7 days to keep the culture strong. It also suggests that it may take several batches for the flavor and texture to even out. 

The resulting buttermilk from our first batch, was very thick and creamy. It had a very mild flavor and even I was able to drink a little of it.