Wednesday, December 8, 2021

Cabbage curry salad (or rescued caramelized cabbage) カレー味のキャベツのサラダ

Making good on her threat to rescue the somewhat less than successful “skillet caramelized cabbage” my wife transformed it into curry flavored cabbage. Getting a cue from coleslaw, she added carrots and raisins. Then she further transformed it by turning it into a salad using mayo and strained (Greek) yogurt as a dressing. I think this dish may have been inspired by a recipe in her favorite Indian cookbook by Madhur Jaffrey’s called “Quick and Easy Indian Cooking”. Even so, I am certain, the recipe would not have called for the use of failed skillet caramelized cabbage. Nonetheless this was much better than the original.


Ingredients:
1/2 head of cabbage (about 1 1/2 lbs.) (I used the previously made caramelized cabbage)
3/4 tsp. Cumin seeds
1/2 tsp. Fennel seeds
1 tsp. Sesame seeds
1 cup raisins.
1 medium or large onion diced
2 to 3 carrots julienne
1 tsp. Salt
1/8 to 1/4 tsp. cayenne pepper
1 tbs. Lemon juice (I used sushi vinegar)
1/2 tsp. Garam masala

Directions.
Put some oil in a frying pan on medium high heat. When the oil gets hot add the cumin, fennel and sesame seeds to bloom the spices. When the sesame seeds begin to pop quickly add the raisins. They will essentially fry puffing up and turning light brown. Then add the onions and sauté until they have browned a bit. Add the carrots and cook until they soften somewhat. Add the cabbage. Stir and cook until blended and the cabbage has become soft. Add the salt and cayenne. Then at the very end add the lemon juice (or sushi vinegar) and the garam masala.


This was a major improvement over the sorry caramelized cabbage dish. The spices had depth of flavor and some zing but were not too hot. The raisins gave it sweetness that contrasted well with the tangy note added by the vinegar. The garam masala gave it a bright spark at the end of the bite. I would almost go so far as to call it a coleslaw curry. It tasted great both hot or cold. Although this can be eaten hot or cold, we further morphed it to salad.

I served this dish with sweet potato croquet, French fries made from sweet potato. I think this was a small dish that went with a drink in the evening.


This was a lunch over the weekend. I served the cabbage curry dressed with the mayo greek yogurt combo. The plate included a curry flavored chicken salad, cantelope and grapes (chicken was leftover breast meat from the whole chicken we cooked on the Weber grill) and Angel biscuit.  Both salads were curry flavored but tasted quite different.


I think my wife was indeed successful rescuing the cabbage from the original dish. 

Sunday, December 5, 2021

Hiyaoroshi #2 and Uni tasting 冷やおろし#2、海水うに

This is a continuation of our exploration of the “Hiyaoroshi” sake ひやおろし we recently acquired (with a complementary uni tasting on the side.) As I mentioned before, this sake is seasonal; only available in autumn and until recently, the only way to enjoy this seasonal sake was to visit Japan in autumn. This fall, however, thanks to Tippsy sake, we could enjoy hiyaoroshi here in U.S. So far, we’ve tried 5 different hiyaoroshi sakes. All of them were “Junmai” class but the aging process really “kicked them up a notch” making them taste superior to regular Junmai sake. All the hiyaoroshi we tasted had rich savory and complex flavors with some fruity floral characteristics. We tasted (from left to right) three sakes; “Ooyama”, “Gokyo” and “Kisoji”.


1. Ooyama 大山 (meaning “big mountain”) is from Yamagata prefecture 山形県 (which is famous for many excellent and “cult” sakes including “Juyondai”  十四代). The brewery is “Katou Kahashirou” 加藤嘉八郎酒造. This sake is called “Tokubetsu junnmai” 特別純米. “Tokubetsu" means “special”. My understanding is that this designation does not have an official definition, but usually the rice is polished to 60%. This is the same level of polishing as “Ginjou” 吟醸酒. So, by definition, this type of “Tokubetsu junmai” could also be sold as “Ginjo”. It is up to the brewer to decide what to call it. Junmai is usually characterized by robust and rich flavors while ginjo is characterized by more elegant crisp fruity flavors. So, depending on the aim of the particular sake, the brewer could call it either way. We really like this sake. Quite rich and dry with some acidity.

2. Gokyo 五橋 (meaning “five bridges”  indicating a famous 5 arched bridge called “Kintai kyo” 錦帯橋 spanning Nishiki-river 錦川 in the city of Iwakuni 岩国 (where the brewery “Sakai shuzou”  酒井酒造 is located).  This is labeled as “Junmai”  but again RPR (rice polishing ratio) is reportedly 60%. The flavor profile is very similar to the previous sake; again rich, savory with hint of fruit.

3. Kisoji 木曽路 (meaning “Kiso route ” which is the mountainous route connecting Tokyo or “Edo” to Kyoto in Kiso now a part of Nagano prefecture 長野県.) (Digression alert: We have visited Kiso. It is famous for “Hinoki” trees and deep forested mountains. We brought some Hinoki products from Kiso back with us from our trip and we are still using them after all these years.) The brewery is called “Yukawa brewery” 湯川酒造. It is again “Junmai” class with RPR of 70%. However, it is made using an ancient labor intensive techniqu called “Yamahai” 山廃. This sake is probably our favorite among the five hiyaoroshi we tried.  In addition to a rich savory taste it has some fruitiness with nice crisp acidity (maybe due to the “Yamahai” process).

We are happy with any one of the hiyaoroshi sakes we tried. We hope Tippsy sake continues bring hiyaoroshi next fall. 


Of course, with such libation we needed a good food to accompany it. We got some fresh uni from maruhide 丸秀, prepared two ways. One was uni preserved in salt water or “Kaisui uni” 海水うに (on the left). The other was regular uni preserved with  potassium alum, (in the center). I thought the regular uni had a better texture but my wife tasted a hint of the alum. Of course, the salt water uni was presented as nature intended. I also served “ikura” salmon roe which was marinated in concentrated Japanese noodle sauce or “mentsuyu” 麺つゆ in a cucumber cup.


The sake and these uni (plus the ikura) were made for each other. They went so well together. What a treat!

Thursday, December 2, 2021

Sir-fried "kinpira" Astuage tofu 厚揚げのきんぴら

Atsuage or Nama-age 厚揚げ、生揚げ is a type of deep fried tofu which has only the surface fried; the center remains as basically uncooked tofu. I have posted a few dishes using Atsuage. If the quality is good, just grilling it making the surface crunchy and inside soft and hot with soy sauce and chopped scallion is the simplest and best way to cook it. This time, the atsuage I got from the Japanese grocery store was a U.S. made brand I had not used before and not being sure of its quality I came up with this quick stir-fry dish. Since I did not have the appropriate greens such as asparagus or snow peas, I used the sugar snaps I prepared.


Ingredients:
1/2 atsuage, cut into thin slices and cut in half length-wise making thin strips.
1 tsp vegetable oil
2 tsp concentrated noodle sauce or 1 tsp each of mirin and soy sauce
10 blanched sugar snaps or snow peas.

Directions:
Heat the oil on a medium flame in a frying pan. When the oil is hot, add the atsuage and stir several minutes until the surface gets crisp and the interior raw tofu parts browns slightly.
Add the seasoning, the sugar snaps and stir for an additional minute.
Garnish with chopped scallion and serve immediately.


For a quick impromptu dish, this was quite good. Since all the sides of the tofu strips are crispy and seasoned, this is better than just toasted with soy sauce.  

Sunday, November 28, 2021

Swedish cardamom buns カルダモンロール

This is one of my wife's baking projects. She saw this recipe in the "Milk Street” magazine. It is a sweet roll seasoned with ground cardamom. We were not sure whether we would like the cardamom flavor in a  sweet roll but my wife decided to try it. This was a great success. It is sweet and the sugar/cardamom mixture melted and made a nice crust especially on the bottom.


Ingredients:
For the dough:
390 grams (3 cups) AP flour
103 grams (3/4 cup) bread flour
80 grams (6 Tbs.) White sugar
1 Tbs. Yeast
1 tsp. Ground cardamom (more if you want stronger cardamom taste)
3/4 tsp. Salt
1 1/4 cup whole milk warmed to 100 degrees F.
113 grams (8 Tbs. Butter) melted and cooled
1 large egg separated (yolk for dough. White to brush on buns before baking)

For filling
170 grams (12 Tbs.) Salted butter at room temperature (maybe try less butter to keep it from running out and puddling during cooking.)
163 grams (3/4 cup) packed light brown sugar
2 tsp. Ground cardamom
27 grams (2 Tbs.) white sugar

Directions:
To make the dough: in a stand mixer with dough hook mix AP flour through salt to combine. Add together the wet ingredients (milk through egg yolk). Then with mixer running slowly add the wet mixture into the dry ingredients and mix until the ingredients form a sticky dough. Increase mixer’s speed and knead until the dough becomes smooth and elastic (about 10 minutes). Line a 9 X 13 baking dish with parchment paper (#1). Put in the dough and press it with your hand to flatten it into an even layer. Cover with plastic wrap and let rise until almost doubled in size (about 1 hour). Transfer to a refridgerator and chill for at least 2 hours or up to 24 hours. (I chilled the dough overnight.)

When ready to fill and shape the rolls first make the filling by mashing the butter through cardamom together to form a well combined paste. Set aside. Turn the chilled dough onto a large cutting board. Roll out into a 12 X 16 rectangle. Spread the filling in a even layer on the dough spreading out to edges (#2). Do a three envelope fold with the dough (fold bottom third to middle then top third over that fold (#3). 

Rotate the dough 180 degrees so the short side is facing you. Roll the dough out into a 12 X 16 rectangle and repeat the envelope fold.

To form buns: Rotate the rectangle so the long side is parallel with the counter’s edge. Cut the dough crosswise into 16 even strips (#4). Pick up one strip by the ends and gently stretch it to about 16 inches by gently bouncing it against the counter while very gently pulling on the ends. At the same time twist the ends of the strip in opposite directions while gently stretching to create a looose spiral about 16 inches long. While holding one end of the strip in place between your thumb on one side of the dough strip and index, middle and ring fingers on the other side of the strip wrap the strip around your 3 fingers (index, middle and ring) without untwisting the spiral. Then tuck the end under and up into the center while sliding the resulting turban shaped knot off your fingers (Rt. Side of #4). Using 2 cookie sheets lined with parchment paper put 8 of the buns on one sheet and 8 on the other sheet using the pattern shown in #5 below. (Using this pattern is helpful because the muffins expand and they can cook without touching.) Cover and let rise until doubled. When doubled in size add 1 Tbs of water to the egg white beat the mixture together and then brush on the buns. Top with 1/2 of the white sugar listed in the filling ingredients list. Bake each sheet one at a time in a 400 degree oven for 15 to 18 minutes until the buns are a deep brown (#6). (When the trays are cooked separately it allows the muffins to be exposed to equal heat all around and helps caramelize the sugar to make a crunchy candy like crust.) 


As shown below it is a good thing to cover the sheets with parchment paper because it is normal for some of the filling to seep out and caramelize on the baking sheet.


Once the overflow cooled it became a nice candy/caramel with crispy texture (as shown in the next picture). We enjoyed some of it as a snack.


This is a perfect roll for breakfast. It is best soon out of the oven because it is covered in a crispy light caramelized candy crust both top and bottom. While not too sweet, the crust provides a wonderful crunchy texture over the softly chewy bread inside. Although the bun tends to lose its crispy candy crust over time as it melts into the bread and  it is still extremely good. Although we were initially unsure of whether we would like the cardamon flavor, it was gentle and went extremely well with the buttery caramelized flavor coming from the sugar. This bun has everything going for it as a breakfast. 


P.S. As I was browsing a Japanese newspaper web site (Asahi Shinbun 朝日新聞), I came across a series of articles describing a number of amazing bakeries in Japan. One of the articles was about a family-run bakery in Urawa ward of Saitama city さいたま市浦和 called "Bake house Yellow knife".  Among the amazing breads they bake was Swedish cardamon rolls. It appears that this kind of artisanal bakery with dedicated bakers paying attention to every detail is becoming more common in Japan now-a-days.

Thursday, November 25, 2021

Pork with chickpeas and potato curry 豚肉、ジャガイモと雛豆のカレー

This curry is a variation of "Pork with chickpea curry". This time, in addition to the chickpeas, she added black beans (left over from making pumpkin and black bean quesadilla) and potato. We decided having potato in any curry is a nice addition reminiscent of any good Japanese-style curry.  We added skinned Campari tomato and blanched broccoli before reheating and serving the curry.


Ingredients
1 can black beans
1 can of chickpeas
3 small red potatoes peeled and cut into pennies
3 garlic cloves
1 1/2 inch cube of ginger sliced
3 Tbs. chicken stock
1/4 tsp. cardamom
4 bay leaves
1 inch cinnamon stick
3 medium onions peeled and coarsely chopped
1 Tbs. ground cumin
1 Tbs. ground coriander
1 Tsp. ground turmeric
3 medium tomatoes peeled
1 Tbs. salt
1/2 tsp. cayenne pepper or to taste

Directions:
Put the ginger, garlic, and chicken stock in a food processor with a blade. Pulse until it forms a paste.
Put several Tbs. oil in a frying pan. Add the cardamom, bay leaves and cinnamon. Heat until the spices bloom and become fragrant. Add the onions and stir until they are partially caramelized. Add the ginger garlic paste and stir until the garlic smells fragrant and the mixture has been incorporated with the onions. add the cumin, coriander, and turmeric stirring until they become fragrant. Add the potato and tomato. Mash the tomato. Cook gently until the potatoes become soft. Add the chickpeas, beans and the stewed pork with the liquid in which the pork was cooked. Cook for 20 minutes until all the flavors meld. If the curry looks too soupy reduce it on low heat until the desired consistency is reached.


Although this a variation of a previous curry recipe the slight variations makes it different somehow. The chickpeas add a slightly firm texture while the black beans add a creaminess. The potatoes absorb the curry flavor and add yet another texture. This makes a very satisfying dinner or even lunch.

Monday, November 22, 2021

Buttermilk biscuit バーターミルクビスケット

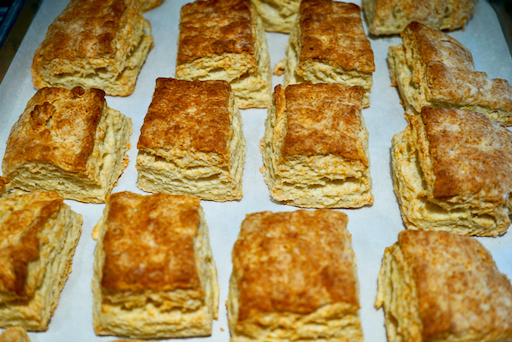
This is another one of my wife's baking projects. She used to make these biscuits (and tarts) often but she has not made them for quite some time. Since she started making buttermilk using the heirloom starter from "Culture for health", she has to make it regularly to keep the culture healthy and productive. So she has to make the next batch before the current batch gets too old. With this constant stream of buttermilk, she also has to find ways to use it. She remembered our old favorite; buttermilk biscuits. Then we realized she used to make them BB (before Blog). So that synched it. It was a “two-fer”; a way to use the buttermilk and a new blog entry. This was the perfect one to make. Back in the day she used  to  make them with "crisco" but she stopped using hydrogenated fat and now uses real butter instead. In any case, these biscuits came out really nice and flakey.


Ingredients:
2 1/2 cups AP flour
1 cup plus 2 Tbs. Cake flour
1 tsp salt
4 tsp baking powder
3 tsp sugar (or more for sweeter biscuit)
1 tsp baking soda
10 tbs. Butter
1 1/2 cups buttermilk 

Directions:
Sift together the dry ingredients (flour through baking soda). Cut in the butter. Add the buttermilk and lightly mix. Turn out onto a cutting board. (The dough will look dry and like it won’t possibly come together but don’t panic keep gently kneading it and it will). Roll out into a square about 1/2 inch thick. Make an envelop fold (bottom third over middle third and top third over both). Turn 180 degrees roll out to 1/2 inch thick again and do another envelop fold.. After rolling it out again, cut into squares of desired size (first picture below). (I cut the dough into squares instead of rounds because it requires less working of the dough. With a round you have to roll out the dough that remained after cutting out the circle. The less the dough is worked the flakier it will be). Put on a baking sheet covered with parchment paper. Cook in a 450 degree oven for 10 to 12 minutes or until golden brown (second picture).


Oh what an old classic friend these biscuits are. They are multilayered flakey. The crust has a satisfying crunch and the interior is soft and buttery. The buttermilk gives it a slight tang.  Can’t be beat for breakfast or any other meal. 

Friday, November 19, 2021

Skillet caramelized cabbage スキレットカラメライズドキャベツ

My wife and I are always looking for new and interesting recipes. One day, we simultaneously and independently both came up with the same cabbage recipe that appeared in the Washington Post. The article touted how glorious this cabbage dish was. Although, in general, we are not fans of cooked cabbage, we thought this might be an exciting new preparation which would significantly change our opinion much like blackened  Brussels sprouts revolutionized our appreciation of that vegetable. The picture below shows the dish just as it came out of the oven after one hour of baking.


We served a portion as recommended in the article with a dollop of Greek (strained) yogurt and dill (we did not have fresh dill so we used dry dill).  To our disappointment after all was said and done this dish was just "cooked cabbage" with a slight caraway flavor.  If you are a fan of cooked cabbage this is the dish for you. We, on the other hand, were much less than impressed. My wife said she will attempt to transform this it to something better (subject of future post).


Ingredients
1 medium head green cabbage (about 2 1/2 pounds)
4 tablespoons olive oil, divided
1 medium yellow onion (about 8 ounces), halved and sliced
2 cloves garlic, minced or finely grated
1 teaspoon caraway seeds
1/2 teaspoon fine sea or table salt, plus more to taste
1/4 teaspoon freshly ground black pepper
1 1/2 cups low-sodium chicken or vegetable broth
1 tablespoon apple cider vinegar
1/4 cup fresh dill fronds
3/4 cup plain Greek yogurt (nonfat, low-fat or whole)

Directions:
1. Position a rack in the middle of the oven and preheat to 350 degrees.
2. Cut the cabbage in half through the core, then cut each half into four wedges, making sure that each wedge retains some core to hold it together, so that you have 8 wedges.
3. In a large, ovenproof, high-sided skillet over medium-high heat, heat 1 tablespoon plus 1 1/2 teaspoons of the oil until shimmering. Add four wedges of cabbage to the skillet and sear until the cabbage is well browned and slightly softened, 3 to 4 minutes per side. Transfer the cabbage to a plate, and then repeat with another 1 tablespoon plus 1 1/2 teaspoons of the oil and the remaining cabbage, transferring the cabbage to the plate once browned.
4. Add the remaining 1 tablespoon of the oil to the same skillet. Add the onion and cook, stirring, until softened, about 3 minutes, then stir in the garlic and caraway and cook, stirring, until aromatic, 30 seconds more. Return the cabbage to the skillet, overlapping the wedges as needed. Season with the salt and pepper, then add the broth and vinegar and bring to a simmer.
5. Transfer the skillet to the oven and bake, uncovered, for 60 to 75 minutes, or until the cabbage is very tender and the liquid has reduced to about half.
6. Serve garnished with dill fronds and dollops of yogurt, and seasoned with additional salt, if desired.

We were a bit underwhelmed since our expectations were high. It was another cooked cabbage. As I mentioned, my wife is going to "make it better". She is threatening to make "cabbage curry". We will have to see.