Wednesday, December 30, 2015

Tako Grill assorted sashimi plates タコグリルの刺身の盛り合わせ

Our Izakaya substitute Tako Grill moved to its new location some time ago. The new restaurant is somewhat smaller, without sake bar, than the old one but it is a nice brand-new space nicely decorated. The new location has its own parking lot. While parking is a bit more expensive, even after validation from Tako Grill, than parking on the street at the old place, it is so convenient. It is worth it not to have to jump up in the middle of the meal to go feed the 1 hour street parking meter so as not to get a ticket. 

Mr. Segawa 瀬川さん has now started serving authentic yakitori 焼き鳥 cooked on a real charcoal grill (I keep forgetting to take pictures). Among the yakitori items, chicken liver or "reba" レバ and chicken meat ball or tsukune つくね are two standouts. We always have a great meal at Tako grill but the sashimi dishes we have had recently have been particularly outstanding. They have included a good variety of impeccably fresh fish prepared to highlight their best qualities. Here are some pictures of the assorted sashimi plates Chef Jose Calderon prepared for us.


Beside the usual toro トロ and ma-saba 真鯖 or chub mackerel, this evening geoduck or mirugaiミルガイ, sea urchin うに and octopus タコ (which was prepared at the restaurant) were excellent. The geoduck had a crisp crunch and fresh ocean taste; one of the best we've eaten.


This was another occasion featuring a similar line up in a different arrangement.


This evening, the scallops ホタテ were wonderful as well as the octopus and pacific saury さんま. And don't ignore the uni.


This was what we had on our most recent evening. The sumi-ika スミイカ or cuttle fish was by far the standout.  As an example of how the fish is prepared to accent its best characteristics Chef Jose, did a slight shimofuri* 霜降りtreatment for the squid. As a result the squid had a nice firm texture but was not chewy and had a pleasant sweet flavor. The Japanese halfbeak or sayori サヨリ was also excellent. On the several occasions, we have had sayori fish at Tako, it has always been good. We particularly like the way they take the head and skeleton, which was used as decoration, and then deep fry it. With this preparation, we could eat everything including the head; it was like a crunchy potato chip with great flavor. After moving to the new location, the chance of getting a variety of excellent sashimi has improved and the restaurant is always seems to be crowded while we are there. We even witnessed a line forming at the entrance one evening.

*Shimofuri: Means "frosted" since the surface turns white and opaque like frost. This is done by dunking raw fish or meat into boiling water very briefly and then immediately cooling it down by soaking in ice water. This slightly cooks the surface the fish.

Disclaimer: The above sashimi assortments are not on the menu. It is a sort of "omakase" sashimi assortment and may not be always available.

Information:
Tako Grill
4915 Hampden Ln, Bethesda, MD 20824
301-652-7030

Sunday, December 27, 2015

Stollen bread クリスマスストールンブレッド

I am not sure when my wife started making stollen bread for Christmas. Initially, she bought it at the grocery store and then she began to bake it at home. While this one includes a lot of butter, it doesn't taste as greasy as some of the commercial ones we have tried.  It also has a very nice subtle flavor of lemon, almond and is not too sweet.


Instead of candied fruits, she only added raisins.


Ingredients:
5 cups AP flour
4 tsp baking powder
1 1/2 cup granulated sugar
1 tsp salt
1 tsp nutmeg
1/2 tsp cardamon
2 cups blanched almonds toasted and pulverized
1 cup butter (2 sticks)
2 cups ricotta cheese
2 eggs
1 tsp vanilla
1/2 tsp almond extract
4 tbs dark rum
1 cup raisins
the zest of 2 lemons

Directions:
In a large bowl combine the flour, baking powder, granulated sugar, salt, nutmeg, cardamom, and pulverized almonds. Slice the butter into the mixture until it resembles coarse crumbs. Set aside.
In another bowel mix the ricotta, egg, vanilla, almond extract, rum, currants, raisins, and lemon zest. Stir the wet mixture into the flour mixture until ingredients are combined.

Turn dough out onto a floured board and knead a few times to bring the dough together into a smooth ball. Divide the dough into two portion. Roll a portion out into an oval. Use the rolling pin to crease the dough just off center. Brush with melted butter. Fold smaller half over larger half.  Repeat with other portion. (Instead of rolling into an oval which is the classic shape I make mine into squares. This makes it easier to slice into even pieces to heat in the microwave or toaster oven. I also sometimes make individual sized loaves to give as gifts.) Place on baking sheet and bake in 350 degree oven for about 45 minutes or until golden brown and tests for done.

This bread is very good and festive. It has a lovely almond flavor and is nicely moist. It really adds to the holiday festivities.

Thursday, December 24, 2015

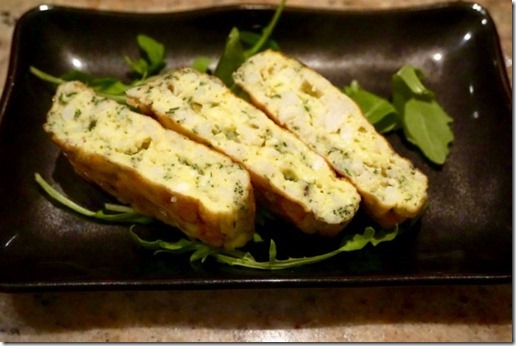
Crab “Kanitama” Omelet 洋風かに玉

When we had crab meat stuffed baked lobsters recently, we had excess crab meat and I decided to make a quick crab omelet or "kanitama" かに玉. Kanitama is usually made in a round disk-shape and served with a Chinese-style sweet and sour thick sauce or "ankake" 餡かけ.  I decided to make it in a rectangular shape like "Dashimaki" Japanese omelet and did not make any sauce but I did put some soy sauce on top.


I seasoned the omelet with fresh dill, salt and pepper.


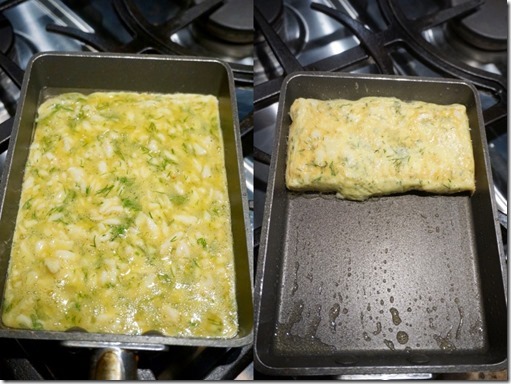
I mixed two eggs with finely copped fresh dill, crab meat and seasoned it with salt and pepper. Using my rectangular omelet pan on medium-low flame and a small mount of olive oil added, I poured in the entire egg mixture at once (left below) and started stirring so that it cooked quickly making small curds. While there was still enough uncooked egg mixture to make the folds stick together, I quickly folded the large square into a smaller square (mostly using flicking wrist motion) (right below).

Kanitama composit

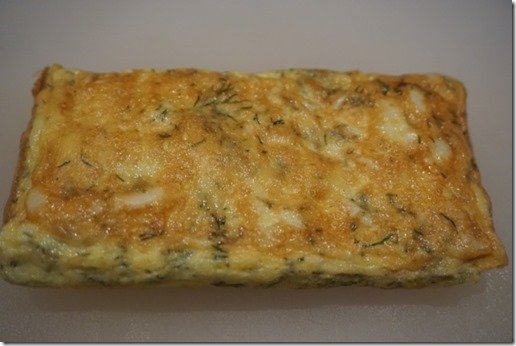
Since I was not using pasteurized eggs, I tried to make sure it was cooked through, but I may have over done it (below).


In any case, the amount of leftover crab meat was quite generous and this Japanese-Western hybrid omelet was luxurious and good.

Monday, December 21, 2015

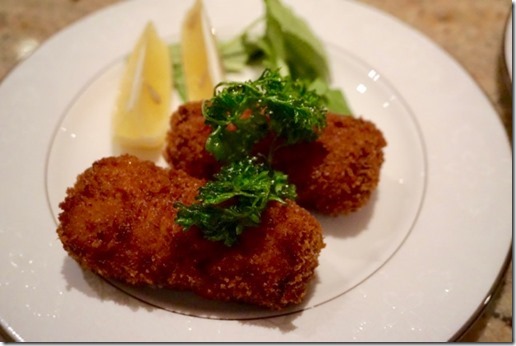
Creamy Crab Croquettes カニクリームコロッケ

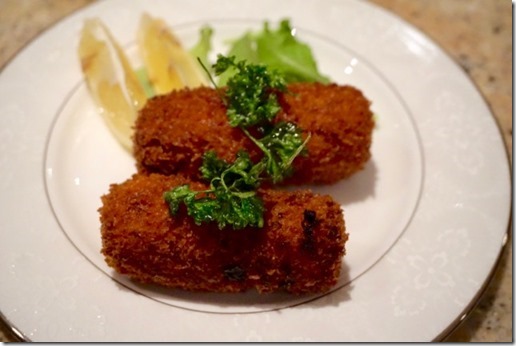
I have meant to make and post this dish for some time and I'm finally doing it. These crab cream croquettes are fairly common in Japan and can be bought pre-made and frozen, just deep fry to finish at home. A similar dish is presented in the Mark Robison's Izakaya cook book (p57).  I made this as I remembered it and did not follow any particular recipe. I asked my wife if I should serve it with a sauce (Tartar sauce would be the standard but it may be served with tonkatsu or chu-no sauce とんかつソース、中濃ソース), she said just wedges of lemon to preserve the delicate flavor of the crab, which was fine with me. I also garnished it with fried crisped-up parsley.


I served 2 per person as an appetizer with baby arugula.


As you can see below the nice crunchy crust, conceals the hot creamy center stuffed with a plenty of crab meat.


One reason I was a bit hesitant to make this dish is that it takes some preparation and it can "explode" during the frying process which is sort of a disaster to say the least. Besides Mark Robison's Izakaya cookbook,  variations of this recipe in English is available elsewhere.

Ingredients (makes 8 small croquettes seen above):
Crab meat: I used fresh lump crab meat which was leftover from making monk fish medallions with lobster/crab sauce. The amount is arbitrary, the more crab meat the better. I was told that a traditional Japanese dish, uses "canned" crab but I used fresh crab meat which was fine or even better.
Onion: One medium, finely chopped.
Butter: Unsalted, about 1 oz (30g) or a bit less (see direction below).
Flour: All purpose, about 1 oz (30g)
Milk: One and 1/3 cups (or cream if you are so inclined)
Salt and white pepper, freshly ground
Lemon zest, micro grated (optional)
Panko bread crumbs, egg, flour for breading.
Peanut oil or vegetable oil for deep frying.

Directions:
First, I made a rather stiff Béchamel sauce. As usual, I did not measure things but the above are approximate amounts. To reduce the amount of butter, I melted the butter, sautéed the onion and then added the flour. Because the flour coated the each small piece of onion, I could reduce the amount of butter/oil to make my Béchamel. When all the dry flour was gone (several minutes, I made sure not to color the flour), I added the cold milk all at once. I whisked it to dissolve/disperse the flour and kept whisking until thickened. I switched to a silicon spatula and kept mixing until the mixture had the consistency of firm mustard but not quite as firm as polenta. I mixed in the crab meat and seasoned it with salt and white pepper. On the fly, I decided to add some micro-grated lemon zest but this is optional (other things can be added such as chopped boiled eggs or creamed corn etc). I then dumped the mixture onto an aluminum foil-lined, oiled (I used light olive oil) cookie sheet and spread it out to fill the cookie sheet. I covered it with another sheet of aluminum foil and refrigerated it for an hour or until the mixture became firm (#1 below). After, the mixture stiffened, I divided the mixture into 8 portions using a slicon spatula (#2). Since it was still a bit soft, I refrigerated it for several more hours.

crab cream croquetts composti

After coating my hands with olive oil,  I formed each portion into small cylinders (or "tawara" shape , #3). I could have made oval patties but this shape was what my mother used to make and I am  following her lead. I then breaded the cylinders as per usual with, flour, egg water and panko bread crumbs (#4). At this point I had the choice of deep frying it immediately or freezing it either a short period (for 30 minutes) or completely (freezing helps prevent the dreaded exploding croquette). Since I was running out of time and we had other items to eat that evening, I decided to freeze it,

The next evening, I removed the croquettes from the freezer and deep fried, without defrosting, for an evening appetizer (#5). I used a smaller sauce pan instead of my usual frying pan so that the depth of the oil was enough to submerge the croquettes (another  precaution to prevent an explosion). At 350F turning several times, I fried it for 5-7 minutes (#6).

To summarize: The steps I take to avoid a croquette explosion are: 1. make the Béchamel somewhat stiffer than usual,  2. refrigerate or, even better, freeze the croquettes before frying, 3. Fry the croquettes at a temperature of 350F or a bit higher and use enough oil so that a crust will immediately form all around.

This was a bit of work but, at the end, it was worth it. We wrapped up the remaining 4 frozen coquettes, I  first wrapped them in a plastic wrap, then aluminum foil and placed them in a Ziploc bag and placed back to the freezer for a future feast. This was definitely a very decadent and excellent dish to start the evening. The crunchy crust with the unctuous soft hot interior tasting of sweet crab is irresistible.

Friday, December 18, 2015

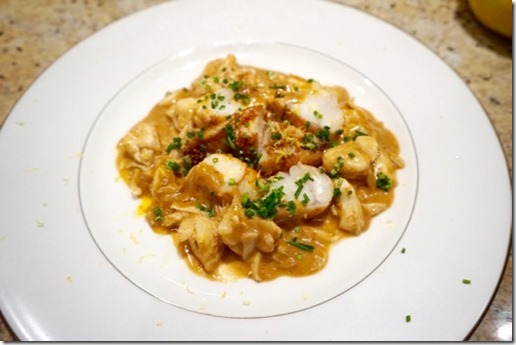
Monk fish medallions with lobster crab sauce アンコウのかにロブスターソース

I saw Monk fish fillets at our regular grocery store. It looked good and the price was very reasonable so I got two small filets for the evening. I could have made my usual baked monk fish filet but since we had lobster bisque (before adding cream to finish) from our previous lobster feast, I decided to make crab/lobster sauce with medallion of Monk fish.  So, I got a small container of lump crab meat as well. This dish was not based on any recipe and I just winged it but it turned out to be extremely good. Given the sweetness and lobster-like texture of the monk fish combined with the lobster flavor from the bisque it was not hard to imagine we were eating medallions of lobster tail rather than medallions of monk fish.


 I garnished with chopped chives and micro-grated zest of lemon.


Adding the sauce filled with lump crab meat and lobster flavored creamy sauce, it really taste like real lobster tails.

Ingredients (for two servings):
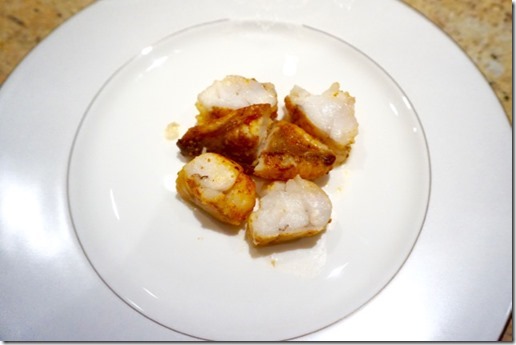
Monk fish: Two small filets, membrane removed, seasoned with salt and pepper. I sprinkled paprika to imitate the look of lobster tail more than for the flavor.
Lobster broth: This was a base for Lobster bisque. (Briefly reiterate; chopped onion, celery, sautéed in butter, add tomato paste, lobster shells, water and simmer for 1 hour. Remove the solids, reduce remaining liquid by half).
Cream, Butter

I first cooked the Monk fish, in a non-stick frying pan, I melted the butter and cooked the filets turning a few times and put them in a 350F oven for 4-5 minutes. I removed the filets to a plate, covered them with aluminum foil and let them rest for 5 minutes. Meanwhile I prepared the sauce. In the same pan, I added the lobster broth to deglaze, added cream and butter to emulsify to make it to a saucy consistency. I added the crab meat to warm up. I tasted it and it was salty enough. I added few grinds of white pepper.

I cut the monk fish fillets into about 1 inch thick medallions and placed in the middle of the plate (see below).


I  poured the sauce with crab meat around the monk fish medallions and garnished with chives and lemon zest (first two images).

This was a really good dish. We really enjoyed lobsters we had almost week ago again.


Tuesday, December 15, 2015

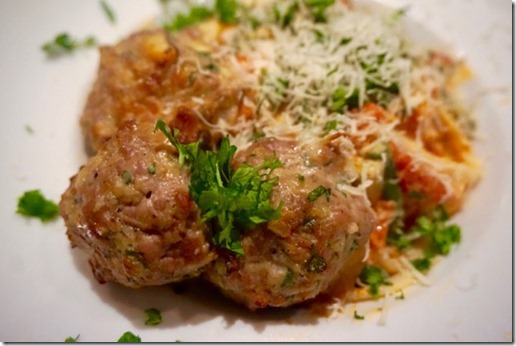
Meatball Udon Pasta ミートボール入りうどんパスタ

Although I make pork meat balls rather frequently, I realized I have not posted this. I did post a similar dish but these meat balls are baked not fried. I make this dish when I cook pork tenderloins. In order to make the tenderloins of equal size so they cook evenly, I trim off the ends. I use these ends to make the meat balls by hand chopping them into ground pork.  I generally get quite a good amount of trimmings from this process. I also use these trimmings for other dishes such as pork scaloppini but the trimming generally end up as ground pork. For this dish I used some pork meat balls I had made earlier and some udon noodles for a quick pasta and meat balls. (We use udon rather than spaghetti because my wife can't face spaghetti; something about those endless plates of overcooked spaghetti for school lunches as a kid)


I also quickly made the sauce from leftovers. I had some tomato sauce which I made a few days before for pizza. I just added cream to the sauce to change the flavor profile and consistency. The Japanese udon noodles were also cooked a few days ago.


I garnished it with chopped parsley and grated parmigiano-reggiano.


Meat balls: 
1 lb ground pork: I hand chopped the trimmings of two pork tenderloins.
1 large shallot finely chopped
3 medium fresh shiitake mushrooms, stem removed and chopped
1 tsp olive oil
1/2 cup or more panko bread crumbs
2-3 eggs, the amount of panko and eggs depending on the consistency of the mixture

I sautéed the shallot, shiitake mushrooms in a frying pan with olive oil for several minutes, seasoned with salt and pepper. After it cooled down to room temeprature,  I mixed it into the ground pork and added dried oregano, basil, salt, pepper, panko, and eggs and mixed well by hand. I like the mixture to be rather soft, I adjusted the amount of panko and eggs to get the right consistency.

Using a medium sized, ice cream scoop, I placed a scoop full of the mixture on an oiled baking sheet. I added a small amount of olive oil and shaped it into balls. I put them in a preheated 350F oven for 20-30 minutes. I like the meat balls that are rather eggy. When done, they are not perfectly shaped spheres; the bottoms are flat and the tops rounded but somewhat irregular.  Nonetheless I prefer this "artisanal" shape to dry dense perfectly shaped meat balls.

Tomato sauce:
2 large cloves of garlic, finely minced
1/2 medium onion, finely diced
3 tbs olive oil
2 14oz can of whole tomato, crushed by hand
dried oregano, basil, hot red pepper flakes, salt and black pepper to taste

I first sautéed the onion and garlic on low heat for a few minutes and added the tomato which was crushed by hand and excess liquid drained. When it started simmering, I added the seasoning and simmered for at least 30 minutes or longer depending on how much liquid I started with. When I have time, I add more liquid from the canned tomato and cook longer. If too acidic, I add a bit of sugar to the sauce.

Noodles: I just used dried "Sanuki" udon and cooked it boiling water for about 13 minutes as per package instruction.

In a frying pan on medium low flame, I added the tomato sauce and meat balls. When they were warmed up, I added cream and mixed. The amount of cream is to your liking. I then added the udon noodles until the sauce clung to the noodles and warmed up. I served the noodles with three meat balls per serving and topped it with a bit of fruity olive oil, parmigiano-reggiano, and chopped parsley. My wife sprinkled a bit more salt on hers. Since, everything was prepared ahead, putting together this dish was easy and quick. By adding cream, acidity of the tomato sauce was further reduced. It was very satisfying comfort meal.


Saturday, December 12, 2015

Pie rolls with cheddar cheese and fresh Jalapeno ミニパイロール

When my wife made Jalapeño cheddar roll, she thought of making a similar but smaller and easier appetizer rolls from store bought pie crust. The first one we forgot to take pictures and this is the second one she made.


This is small and flaky and perfect Hors d'oeuvre (this French word appears more appropriate than appetizers somehow).


She grated sharp cheddar cheese and smoked gouda. I deveined and chopped 4 fresh Jalapeño pepper (above).


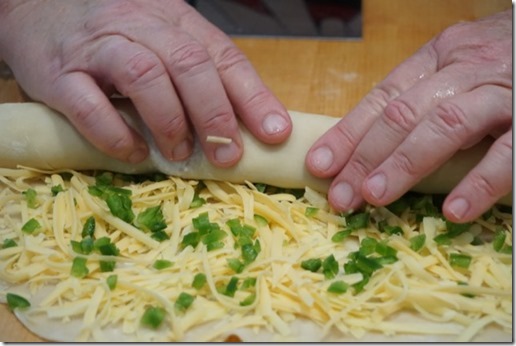
She rolled out pie crust in to 18 x 18 inch square and put cheeses and Jalapneo as see above.


She then roll this up to make a cylinder.


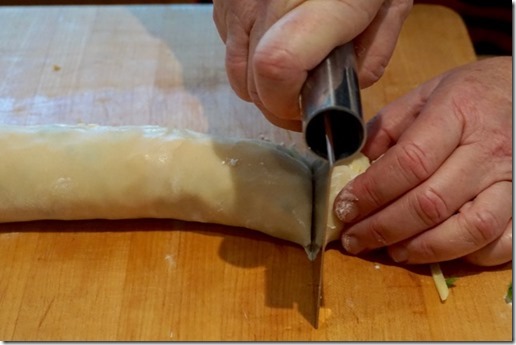
Cut the cylinder into 1 inch-thick disk.


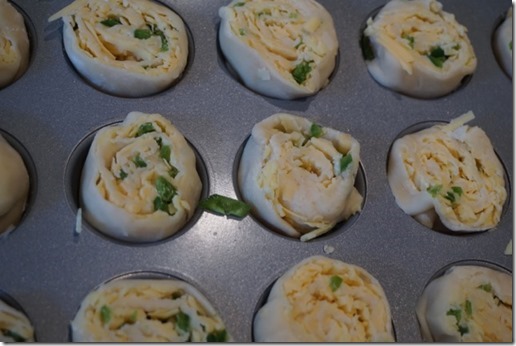
Place the disks into a non-stick mini-muffin pan (above) and baked it at 350F for 20 minutes.


The pie crust is Pillsbury which is found in a cold case at a grocery store. This can be frozen if you are not using it immediately.

The result was rather good. This is much flakier and a perfect Hors d'oeuvre.  we enjoyed it with a sip of wine. It freezes well too and can be easily heated up in a toaster oven.

Sunday, December 6, 2015

Indian-style Carrot salad インド風人参サラダ

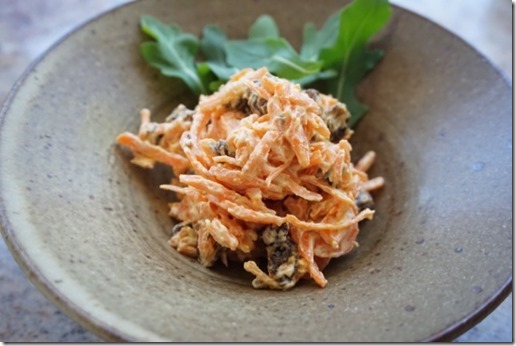
We try to make "sides" over the weekend so that we can take them to work as an accompaniment for the sandwiches we take for lunch. My wife wanted to make Indian-style carrot salad. This recipe is again based on Madhur Jaffrey’s “Quick and Easy Indian Cook Book” with liberal alterations.


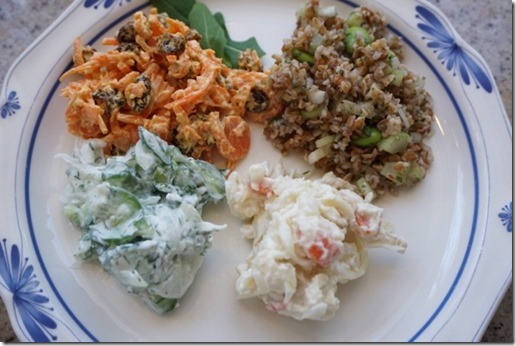
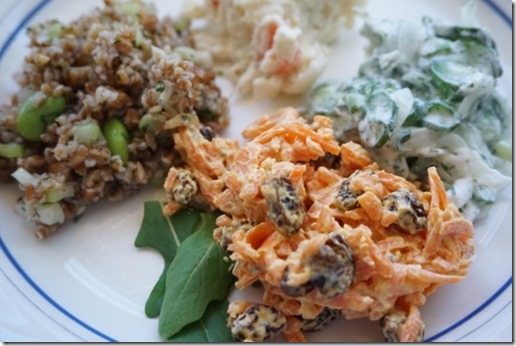
We also made some other salads. These salads are good as drinking snacks and we serve them on weekday evenings. The salads shown here are (clock wise): Indian-style carrot salad (upper left), Bulgur wheat salad, potato salad (with pickled myouga and rakkyo), cucumber onion salad with dill.


All four salads are unique with different tastes and textures. The carrot salad is the most spicy among them.


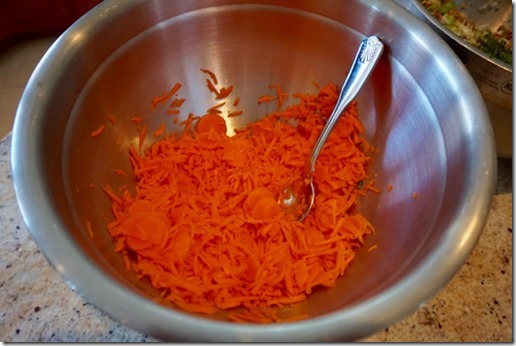
My wife was trying to get the right combination of crunchy/raw to slightly cooked texture for the carrots in this salad. She tried slicing the carrot in the food processor and decided the slices were too thick even using the thinnest blade. She tried grating the carrot in the food processor but the pieces were also a bit too big. I contributed to the project by slicing the carrot very thinly by hand as well as chopping the grated carrot into smaller pieces. She decided the grated carrot cut into smaller pieces were the best. Having made raw carrot salad before, she thought the mouth feel of totally raw grated carrot was unpleasant. So, she also lightly microwaved the grated carrot for 50 seconds to 1 minute or just until the edges were slightly softened but still crunchy. (In the picture below are mostly grated carrot briefly microwaved but also included my thinly sliced carrots which were also microwaved). This extra step really improves the texture. The carrot is still crunchy and the light cooking brings out its sweetness.


Spice mixture:
1/2 tsp salt
1/8-1/4 cayenne pepper
1/2 tsp cumin (Next time I may use less because it had a very strong cumin flavor)
1/2 tsp mustard seeds
raisins
Greek yogurt

I put some peanut oil in the frying pan and added the mustard seeds. When they began to pop I added the cumin, salt, and cayenne quickly followed by the raisins which plumped up nicely in the hot oil. Then, while still hot I added the entire mixture over the carrots and mixed well. (a word of caution: the mustard seeds start popping like Mexican Jumping Beans. Several jumped right out of the pan straight into my face. Luckily I was wearing glasses so they burned my cheek and missed my eye. Next time I may wear protective googles.)
This is the spice mixture which fried in peanut oil.


The spice mixture with hot oil was added and mixed in.


For dressing, the original recipe calls for plain yogurt but we used Greek (drained) yogurt my wife prepared.

This made a very nice salad. The spiciness was dampened and mellowed by the Greek yogurt but still had some kick and nice roasted cumin flavor. The gently cooked carrots had a very nice texture. Certainly this will join our favorite salad lineup.

Thursday, December 3, 2015

Ramen #4 Miso Ramen 味噌ラーメン

This is the fourth post for ramen ラーメン and the second after I said I would not post anymore ramen. But I saw this miso ramen 味噌ラーメン in the frozen case at our Japanese grocery store, and could not resist getting one. This is partly because I am originally from Sapporo 札幌 where miso ramen originated. Although "shio" and "shoyu" ramen are being served in any ramen place in Sapporo,  miso ramen appears to have become almost synonymous with "Sapporo ramen".  Miso ramen was reportedly invented at "Aji no Sanpei" 味の三平 in Sapporo. I remember going to this place when I was in high school. I do recall that there was a line but I did not think it was worth it (As I confessed before I was not a ramen aficionado). This is from the same company called Sun Noodle that made the "Shouyu" ramen I previously bought.  Before making this for lunch over the weekend, I thawed both the noodles and miso flavor packs for several hours prior to cooking as per the package instructions.


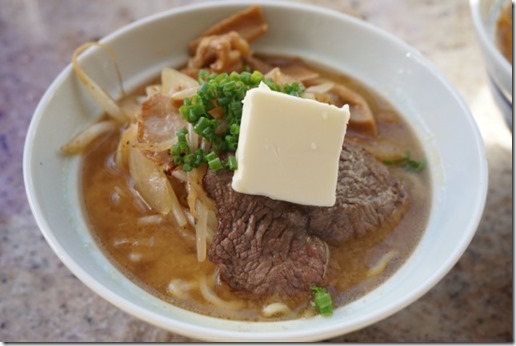
The toppings can be anything but I made something different. I even added a pat of butter which was not done when I lived in Sapporo but is now added with some corn mostly so tourists can have the  "Hokkaido" food experience. Again, I made half-ramen (one serving divided into two servings) or han-ramen 半ラーメン.


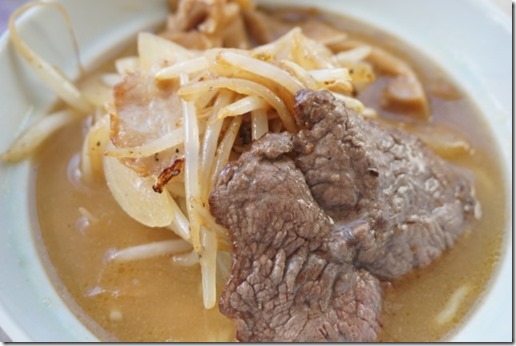
Since I had pork belly and also a small slice of filet mignon, I decided to use these as toppings as well.


On the left below is the sliced filet pounded until thin and pork belly thinly sliced.


Topping:
Onion: one medium onion cut in half and then sliced into thin strips.
Bean sprouts: One package of mung bean sprouts washed and drained.
Filet mignon: thinly sliced and then pounded thin. Seasoned with salt and pepper.
Broth: In a separate pan, I boiled water (about two cups) and dissolved one package of the miso flavoring that came in the package. I used more water than specified but it tasted salty enough.

I cut the pork belly in small bite sized pieces. I sautéed it in a frying pan with a small amount of peanut oil and a dash of roasted sesame oil. When the meat was cooked, I added onion and sautéed it until soft and edges were slightly brown. I then added the bean sprouts and kept sautéing for a few more minutes.  I seasoned with salt and pepper and a bit of miso flavoring from the packet.


I kept the miso flavored broth on simmer and boiled the noodles in a separate pot. After I tasted for doneness of the noodle, I drained and shook off the additional moisture using a strainer. I placed the noodles in two bowls, poured on the broth and topped with the onion-sprout mixture. I quickly cooked the steak in a separate frying pan with butter (30 seconds on each side).


I also added menma メンマ or seasoned bamboo shoots.


I garnished it with chopped chives and a thin pat of butter (second and third pictures above).

The noodles were different from the noodles in the shouyu ramen (which was Tokyo straight noodle). They were curly with a firm yet elastic texture (this must be the company’s version of the  "Sapporo noodle"). The soup was quite good with the taste of pork/chicken-based broth.The butter added a nice richness but being a traditionalist probably was not needed.