Showing posts with label Cheese. Show all posts

Monday, March 6, 2023

Surf-and-turf Valentine’s Day Dinner ロブスターとステーキ(サーフアンドターフ)

We rarely have a surf-and-turf dinner but since it was Valentine’s  day, we decided to have a steak and lobster dinner. The filet mignon came from Omaha steak and we got frozen lobster tail from Whole Food.  I cooked both in sous vide. I also made “Mac-and-cheese”. The temperatures I used in the past for lobster tail and steak were slightly different but this time I used 135F for both so that I could sous vide both in the same setting which worked.  The steaks were cooked for 4 hours and the lobster 45 minutes. I timed it so they both came out around 7pm.


I seasoned the lobster tails with salt and tarragon (I only had dried) and vacuum packed with several pats of cold butter. After it was cooked I removed the lobster from the vacuum pack, and drained the liquid inside and added a squeeze of lemon juice to make a lobster-butter dipping sauce. It was perfectly cooked.


I thawed the previously frozen steak and patted it dry. I then further dried it on sheets of paper towel, uncovered for a few hours in the refrigerator.  I seasoned it with salt and pepper before vacuum packing it for sous vide. After it was cooked I removed the steak from the vacuum bag, and quickly seared both sides in a frying pan with melted butter. I set the steak aside and added the juice accumulated in the vacuum bag to the pan and scraped off the brown bits left from searing the steak. I added 2-3 tbs of red wine and reduce the mixture in half. I finished the pan sauce with pats of butter and seasoned with salt and pepper. The steak was nice medium rare.


I have made and  posted several variations of “Mac and cheese”. This time I went with a classic with Béchamel sauce but I also added finely chopped fresh shiitake mushroom which added nice flavors. The cheeses I used as per my wife’s selection were fresh goat, sharp cheddar and smoke Gouda. The seasonings were salt and freshly grated black pepper and nutmeg. We really liked this version.


We had this with one of our favorites; Caymus Napa valley Cabernet  Sauvignon 2020. We really enjoyed this special dinner and wine.

Tuesday, February 7, 2023

Marinated Camembert Cheese カマンベールチーズのかえし漬け

I was browsing one of the Japanese food blogs I follow when my wife stopped me and asked what the picture on the screen was showing. It happened to be slices of Camembert cheese marinated in “Kaeshi” かえし*. Although the blog was about a “soba” Japanese noodle restaurant in Tuskiji 築地長生庵 their menu included a selection of sake and dishes that go with sake in addition to soba. (Judging from the blogs, it is a popular watering hole among sake drinkers).

*Kaeshi: Kaeshi is the concentrated soba noodle sauce made of soy sauce, mirin and sugar. It is transformed into soba noodle sauce by diluting the kaeshi with dashi broth. So since this was a soba noodle restaurant, good kaeshi must have been readily available.

Since we had just gotten a wheel of Camembert cheese and we also had a bottle of concentrated noodle sauce which is equivalent to Kaeshi, we decided to try to make the cheese dish shown in the blog. The original dish was topped with freshly grated horse radish. Although we had prepared horse radish in a jar, in general we find it too harsh in flavor. So my wife suggested the next best alternative; grated daikon. I thought that was a great idea since the spiciness of both daikon and horse radish comes from the same/similar chemical substance called “allyl isothiocyanate (AITC)”. Usually daikon is not as spicy as horse radish but sometimes grated daikon can be extremely hot (atomic) which we have experienced in the past.


Since Camembert cheese is fatty and does not easily absorb liquid marinade, we sliced the cheese and marinated it in x4 concentrated Japanese noodle sauce. We marinated it in the refrigerator for several hours. It came to be rather firm.

Fortunately, the grated daikon had a just right amount of spiciness and went very well with the marinated Camembert. This is an unusual West/East hybrid dish akin to miso-marinated cream cheese. We really like this. (And it does go very well with sake).

Saturday, February 4, 2023

New Fitz and Floyd Japanese Crane Plates 鶴と松模様のお皿

My wife has been getting decorative figurines and china from a Fitz and Floyd overstock website (I call it Frick and Frack) for some time. In addition, since both our china and flatware patterns have been discontinued, she discovered that she could fill in missing pieces from a place called “Replacments, Ltd”. She really hit the “jackpot” when she learned that old discontinued Fitz and Floyd pieces are also available at Replacements. The convergence of these two sites materialized in the form of the beautiful Japanese plates with a crane pattern which were originally produced by Fitz and Floyd, have since been discontinued but were available at Replacements (shown in the picture below.) Since we are particularly fond of the crane motif and have several plates with crane pattern, she got them. We got “bread and butter” size since we tend to use smaller plates more often. They are beautiful; with a crane and pine pattern (both of which are auspicious symbols in Japan).

Immediately after we received them we used them for a lunch (as shown in the picture below). We made Mozzarella cheese mochiマツレラチーズ餅 served on this plate with side of couscous salad クスクスサラダ and “hoshigaki” persimmon daikon namasu 干し柿入り大根なます.


This is close up of this plate. They are labeled “made in Japan” but the exact manufacturer was not specified. They are very well made and we are delighted with them.


My wife found out that Replacements. Ltd also had three larger salad plates available (quantities at Replacements tend to be limited) in the same crane pattern. She bought them out. They are heading our way.

Wednesday, February 1, 2023

Couscous Salad クスクスサラダ

We tend to forget what food items we have especially those that are frozen or “hidden” in the back of the pantry. My wife found several boxes of couscous the other day. All of them were a bit past their “best-used-by” date which was 2017 for one and 2019 for the other two. We just threw 2017 out but decided to try 2019. We gave them the “sniff-test” and they passed without any rancid oil smell detected. So my wife cooked them up. But when we tasted they were clearly well past edible; they were terrible. We had been planning to make some kind of coucous salad and I had already cut up some black and green olives for it. So the next grocery delivery, we ordered several boxes of couscous so that we could finish the couscous salad.  (Ironically the whole purpose of the exercise was to clear out excess pantry goods either by using them or throwing them out. Instead, with the couscous we ended up throwing everything in the pantry out and simply replacing them). For some reason, plain couscous was not available so the boxes we got had various flavors one of which happened to be couscous with roasted garlic and olive oil. That is the one we used to complete the salad. It was remarkably good. In order to prevent the earlier problem we had with the oil in the couscous going rancid, I opened the two remaining boxes of couscous, put the contents in a separate special vacuum bag, vacuum packed them and froze them. The idea was that this should extend the “best-by” date by a few years.


My wife cooked up the couscous and by itself  it tasted really good but the salad tasted even better.


Ingredients:
One box (5oz) Near East couscous with roasted garlic and olive oil (I am sure any other flavored couscous will do)
1 1/4 cup chicken broth
2 tbs butter
Black and green olives, sliced
2/3 block of Feta cheese, crumbled
2 stalks of celery, finely chopped
1/2 Vidalia (or other sweet) onion, finely chopped

For dressing:

1 tbs Dijon mustard
1 tbs honey
2 tbs rice vinegar
1/4 -1/3 cup extra-virgin olive oil
Salt and pepper to taste

Directions:
Cook the couscous according to the instructions on the package. In this case it was heat 1 1/4 cup water (we used chicken broth) to boiling add the butter and the contents of the included flavor package. Then stir in the couscous remove from the heat, cover and let it stand for 5 minutes. Fluff it up using a fork. Let it cool to room temperature.
Add the olives, onion, celery and feta cheese
Add the dressing and mix well
Taste and if needed add salt and pepper

This is a good salad. A bit filling but the combination of olives, feta cheese and slightly sweeet and tangy dressing really makes this dish.

Tuesday, November 29, 2022

Ikura and smoke salmon appetizer イクラと冷製スモークサーモン前菜

 We have been getting keta-slamon roe “Ikura” from Vital Choice. The available packages vary in size; sometimes only a tray of one kilograms is available and other time 6oz jars. In any case, we like keta-salmon roe the best among other trout and salmon roes. Our most common way to serve ikura is on blini with cream cheese and smoked salmon. This time, only small amount of ikura was left, so we made cream cheese wrapped with smoked salmon topped with ikura placed on a slice of cucumber.


This had most of the flavor and mouth feel of the blini. (Can’t beat the lovely salty burst of the salmon roe). But the cucumber was much less filling than one with blini.


Wednesday, November 23, 2022

Pumpkin tassie (mini-pie) パンプキンミニパイ

 This is another example of a small bite tassie (pie) my wife made. This time it was a type of pumpkin pie (in keeping with the Thanksgiving holiday season) and  more of a dessert than an appetizer. She served this two ways. One was topped with cream cheese and toasted (grilled) (left) and the other as is. The pumpkin filling has all the seasoning of pumpkin pie, so this tasted like one bite pumpkin pie. The cream cheese butter crust added a nice crunch. The browned cream cheese topping definitely made it better.


Ingredients: (makes 24)
For crust:
8 Tbs. Butter
80 g Cream cheese
140 g AP flour

For the filling:
2 large eggs
1 cup brown sugar
1 cup pumpkin puree
2 Tbs. Evaporated milk
1 tsp. Cinnamon
1 tsp. Ginger
1/2 tsp nutmeg
1/4 tsp salt
(2 tsp. Of pumpkin pie spice could also be used instead of the cinnamon, ginger and nutmeg)

For topping
Small slice of cream cheese

Directions:
In a stand mixer with a paddle beat the butter and cream cheese until smooth, about 2 minutes. Stop the mixer and add the flour. On low speed, mix until no streaks remain and the dough starts to come together, about 1 minute. Scrape any stray dough from the sides of the bowl, gather into a ball and flatten into a smooth rectangle or disc.

Cut the cold dough into 24 equal pieces, (I did this by dividing the total weight of the dough by 24 to get the gram weight of each piece. That way they would at least be somewhat equal). Using your fingers, evenly press each piece into the bottom and up the sides of the 24 mini muffin cups, making sure there are no holes. I found the best way to get the dough into the cups was to make a small ball out of the dough, put it in the cup then using my thumb push down on the center of the ball forcing a depression in the center and the displaced dough up the sides of the cup. Then using my thumb and fingers spread the dough evenly up the sides of the cup. (First picture below). There is enough butter in the dough that the cups don’t need to be greased or paper cups don’t have to be used. Refrigerate for at least 1 hour. (I refrigerated over night).


For the filling if using canned pumpkin cook it in a sauce pan for several minutes until it turns darker in color and pulls away from the sides. (This helps remove the canned taste, moisture and concentrates the flavor). Let the pumpkin cool than mix in all the remaining ingredients together. It will look like the picture below. Scoop the filling into the prepared crust cups. (I used the smallest ice cream scoop). Cook in a 350 degree oven for 15 to 20 minutes until the crusts are golden brown and the filling has set. 


These are wonderful mini pumpkin pies which bear all the flavor of the fall season. They are good just eaten plain or topped with a small piece of cream cheese. They are best when toaster-ovened until the cream cheese becomes soft and develops caramelized spots.


Sunday, November 20, 2022

Daikon and Cheese dressed in umeboshi 大根とチーズの梅肉和え

I saw this dish on one of the YouTube episodes by the first Iron chef Japanese Rokusabuto Michiba 道場六三郎. Although he is now 91 he has a YouTube channel. In that episode, he oversaw the production of ultimate sake and, while visiting the brewery, made two dishes that go well with sake. This one is very simple and I had all ingredients so I decided to make it. This is essentially cubes of daikon and cheese dressed in salted “Umeboshi” sauce. I served it with cold sake and it surprisingly went very well.  


Ingredients:
Daikon, peeled and cut into small (5mm) cubes, amount arbitrary
Cheese (I used smoked gouda) cut into small (5mm) cubes, amount arbitrary
Two umeboshi, fresh (“bainiku” 梅肉) and skin removed and cut into paste, add a small mount of sugar (I sometimes add mirin but Michiba-san suggested to add sugar.

Directions:
Simply dress the cubes of cheese and daikon.

I kept this in the fridge for a few hours. This was a very simple dish to make and as Michiba-san suggested it went well with cold sake.


Wednesday, November 16, 2022

Feta, spinach and pine nuts in phyllo dough フェタ、ほうれん草と松の実フィロ包

This is a small finger food based on a recipe from “Frog Commissary Cookbook“. It is phyllo-covered spinach, cheese and pine nuts filling. This is very good with crispy multiple layers of phyllo and cheesy savory center. As good as it is, this was a quite tedious work to make. Unfortunately, even for my wife who patiently makes various baked goods requiring tedious multiple steps, folding the phyllo dough was a bit too time consuming and tedious. I helped toward the end since she was getting very tired. When we finally got them in the oven we concluded that in the future it may be easier to buy this type of appetizer from a holiday season gourmet catalog rather than making it ourselves. 


Ingredients: (makes about 30)
Spinach-cheese filling
1/4 lb feta cheese
1/2 log (4oz) fresh goat cheese
2 bags of baby spinach, cooked covered over low flame without adding water, squeezed and finely chopped
1/4 cup dill (we used a bit more), finely chopped
1 medium onion, finely chopped
2-3 scallion finely chopped
1/2 cup pine nuts, dry roasted in a frying pan
Olive oil for sautéing

Directions:
Sauté the onion and garlic in olive oil for few minutes and let it cool in a bowl
Add the spinach and dill
Flake and mix the feta and goat cheese
Add the pine nuts
(we made this one day before and refrigerated)

Assembly:
One roll (15 sheets) frozen phyllo dough, thawed. Cut the 15 sheets in half making 30 half sheets.
Separate one of the 30 1/2 sheets of phyllo, paint with melted butter and fold it lengthwise in half (#1) and paint again with butter. Place one tsp of the filling (approximately shaped like an Isosceles Right Triangle i.e. a right-angle triangle with two equal sides) on the left corner of the beginning of the phyllo (#2) Fold like folding a flag until to the end (#3) and paint more butter.
Bake it in a 375F oven for 25 minutes (#4).


The folding process made multiple layers of phyllo dough which was very light and crispy in contrast to the cheesy savory filling. The combination of feta and goat cheese really worked. After enjoying these for several days as appetizer, we may have modified the opinion we expressed earlier and decided it was worth it to make them again ourselves rather than buying them from the holiday gourmet catalog. Next time we will divide up the folding. My wife will fold 15 of the 30 phyllo half sheets and I will fold the other 15. If we manage to do this simultaneously it should take only 1/2 the time. Wish us luck.

Monday, November 7, 2022

Pickled “Takuan” daikon and cream cheese 沢庵とクリームチーズ

 Among the Japanese pickles, “Takuan or Takuwan*” 沢庵 is common and traditionally made from “Daikon” 大根. My mother (and many other “mothers’) used to make it at home in the traditional way. First the daikon was hung to dry and then mixed with salt, rice bran and other ingredients in a wooden tub. Weights (often river rocks) were placed on a wooden lid which was slightly smaller than the opening.  It was then left to ferment for several months.  (In my mother’s case, it was left in the root cellar). In my childhood, it was a common fall scene to see daikon out hanging to dry often on the rack used to dry clothes. Nowadays, the vast majority of takuwan is produced commercially. The takuwan has a characteristic yellow color which traditionally came from a type of fruit called “Kuchinashi” クチナシ or “Gardenia” (this is just for color not for flavor) but commercial products may use other yellow food coloring.

*Growing up in Sapporo, Hokkaido, we always pronounced it “Takuwan” but elsewhere in Japan, it may be pronouced as “Takuan”.

In any case, when I was picking up our take-out order of sashimi and sushi at Tako Grill the other day, I saw a package of “Takuwan”. I have not had takuwan for many years but I am sure I was influenced by seeing a YouTube episode which featured a dish made of takuwan with cream cheese which the host clearly announced he did not like and thought it was very strange. I thought it was a very interesting combination and wanted to try it. After coming home, I tasted the takuwan and it was kind of salty and sweet at the same time and nicely crunchy. After a quick Internet consultation, I made two variations and served them with crackers.


The first one (shown on the left) is cream cheese flavored with miso mixed with juliennes of takuwan and carrot. The second shown on the right is made with cream cheese, soy sauce, and takuwan.

Ingredients and Directions (Miso flavored):
50gram cream cheese, softened at room temperature
1 tsp of miso (I used “awase miso” 合わせ味噌 or mixture of “red” and “white” miso)
Takuwan and Carrot , thin juliennes, arbitrary amount
Mix everything.


The second one is a soy sauce flavored cream cheese with small dice of takuwan and topped with freshly cracked black pepper.


Ingredients and Directions (soy sauce flavored):
50gram cream cheese, softened at room temheprature
small dices of takuwan, amount arbitrary
A mixture of soy sauce and wasabi to taste
Freshly cracked black pepper to taste
Mix everything.


Unlike the YouTube sequence which inspired me to try this dish, our assessment which differed from that of the host was that both were quite good and went well with the Cabernet we were having. The first one with miso has more complex flavors and lots of umami. The second one definitely needed the cracked pepper. Sweet and salty and peppery with some crunch from the takuwan went well.

Friday, November 4, 2022

Salmon-Spinach Tortas 鮭とほうれん草のケーキ

My wife is into making small appetizers. When she saw the recipe called “Tuna-Spinach tortas” at Washington Post on-line, it was a “must-do”. Although she liked the idea of a small tortas, canned tuna does not grace our pantry…ever.  (Instead, we keep frozen sashimi-grade tuna in the freezer). We also like salmon and almost every other week we get a half-salmon filet (A special available from the local grocery store only through home delivery). I scale it and using the main portion, make several fillet portions. I then separate the belly portion for an appetizer and use the resulting small irregular trimmings including the tail portion of the filet to make salmon cakes. After we cook the fillets (usually cooked in a frying pan to make crispy skin), I make salmon salad from the leftover portions.

This time my wife used the salmon salad I made from the left over salmon fillets instead of the canned tuna called for in the original recipe. The salmon salad was a bit different from what I usually make since we did not have enough cooked salmon fillets so I oil-poached the irregular bits of fresh salmon to make about 5oz of salmon. The oil poached salmon was much softer and more moist than our usual cooked salmon.  In addition, we did not have home-made Greek yogurt. So I used all mayo instead of mixture of mayo and Greek yogurt.

The tortas came out very nice and the salmon filling was moist but made a nice crispy shell. Although we cannot tell how the original canned tuna version would have been, this is pretty good.


As you can see in the picture below, the top portion is mixture of spinach, tomato and egg. The bottom is mixture of cheese and the salmon salad.


Ingredients: (12 cupcake sized servings)
2 bags of baby spinach cooked and drained
5 oz. Cooked salmon made into salmon salad (end amount about double the amount of salmon)
1/4 cup Parmigiana-Reggiano cheese grated
1/4 cup smoked gouda grated
3/4 cup plain panko (bread crumbs)
4 large eggs
4 Campari tomatoes
1 teaspoon kosher or sea salt
1/8 to 1/4 cayenne pepper

Directions:
Preheat the oven to 400 degrees. Grease the wells of the muffin pan with cooking oil spray. Combine the salmon salad, cheeses and panko in a mixing bowl. Divide it equally among the muffin pan wells, packing it in firmly. (I used second to largest ice cream scoop).

Lightly beat the eggs in a bowl. Coarsely chop the tomatoes (to taste), then add to the eggs, along with the salt and pepper. Add the spinach to the bowl. Stir until well incorporated, then spoon equal amounts of the mixture on top of each tuna portion in the individual muffin pan wells (#1). Bake for 15 to 20 minutes, until set and lightly browned (#2). Let cool for a few minutes before carefully inverting the tortas on individual plates. (#3 & #4)


This makes a great little dish that can be used as an appetizer or even part of a lunch. We were amazed at how it came out. Somehow the panko combined with the egg mixture makes a nice crisp crust on the bottom so the salmon salad seems like it is a pie filling. The salmon salad itself made a great filling. It was moist but held together. The flavors of the celery, onion and mayo used in the salad fused beautifully. The topping added a fresh note of tomato which went very well with the salmon filling. Overall this is an amazing little torta. 

Wednesday, October 26, 2022

Spinach cheese puffs ほうれん草チーズパフ

This is one of those small cheesy appetizers my wife likes to made. She saw this recipe on line and also realized that one of the boxes of frozen puff pastry was getting old. On the top of that, she cooked 2 packages of baby spinach and was looking for the best way to use them. So, all converged to result in this dish. I helped in preparation and clean-up. This is cheesy with a nice lemony flavor from the lemon zest. The puff pastry was still good and made a light crispy shell. This is a bit on the larger side and half  per person is just perfect size for us.

As usual, I ask my wife to take over.

Ingredients:
One sheet of puff pastry
2/3 cup onions finely diced
4 garlic cloves finely diced
8 oz. Cream cheese
2 eggs
2 packages of fresh spinach, cooked and drained
1 1/2 cup feta cheese finely crumbled
4 tbs. Dill
4 tsp. Lemon zest

Directions:
Cook the onion and garlic in a frying pan. Set aside to cool. Soften the cream cheese by lightly microwaving it under the defrost setting. Cream the softened cheese together with the eggs. Add the rest of the ingredients and stir until completely combined.

Cut the puff pastry into 9 squares. Roll out the squares so they are large enough the put in the greased cups of the muffin tin with the edges hanging over the sides (#1). (It was a bit tedious convincing the pastry to go into the cups. Also, the 9 filled cups would leave 3 unfilled in the 12 cup muffin tin. So I thawed some regular pie crust dough and used it for the remaining 3 cups.) (Digression: I made the remaining pie dough into impromptu cookies; roll out pastry, put butter and cinnamon sugar on half, fold the other half over, cook in toaster oven 400 degrees 15 minutes.)

Fill the pastry shells with the cheese mixture(#2) and fold the pastry hanging on the side over the cheese filling (#3). (Cover the cups with the pie dough with a round piece of dough like a pie topping.) Refrigerate 30 minutes. Bake in a 400 degree oven for about 20 to 25 minutes until the tops are golden brown (#4). Picture #5 shows the puff pastry puff while #6 shows the one made with pie dough.

Whether made with puff pastry or pie dough the result is highly acceptable. Lemon was the first taste to come through which melded into a savory onion, garlic cheese combo. Both pastries added a nice buttery crunch. Interestingly, the cream cheese mellowed out the feta very nicely. After biting into it you wouldn’t say “oh cream cheese and feta” instead you would say, “ a nice creamy savory cheese combination. What cheese would that be?”

Monday, September 26, 2022

Cheese bites, two kinds チーズバイツ、2種類

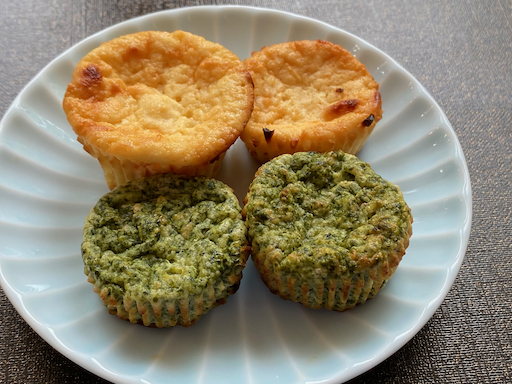
 My wife is into making small cheesy and eggy appetizers or bites. These are some she made recently. The green one is made with spinach and golden one is slightly sweet with honey. (My wife was not planning on making the golden one but the recipe for the spinach bites was short of filling the pan. She didn’t want to cook a pan that was not full so without a specific recipe to go by she came up with the golden bite.) Both are eggy and cheesy with different flavors and we like these small bites with a sip of  red wine.


Ingredients:
For spinach (green) cheese bites
One bag of fresh spinach cooked and drained
1/2 cup ricotta cheese
1/2 cup finely shredded Parmesan cheese
2 eggs beaten
1 garlic clove minced
1/4 tsp. salt
1/8 tsp. cayenne pepper


For spinach (green) cheese bites (X2)
Two bags of fresh spinach cooked and drained
1 cup ricotta cheese
1 cup finely shredded Parmesan cheese
4 eggs beaten
2 garlic clove minced
1/2 tsp. salt
1/8 tsp. cayenne pepper

For golden cheese bites
1/2 cup ricotta cheese
1 egg
1 Tbs. honey
1/8 tsp. cayenne pepper
1/8 tsp. salt
1/2 cup grated cheese (I used smoked gouda and Monterey Jack)

For golden cheese bites (X3)
1 1/2 cup ricotta cheese
3 egg
3 Tbs. honey
1/4 tsp. cayenne pepper
1 1/4 tsp. salt 
1 1/2 cup grated cheese (I used smoked gouda and Monterey Jack)

Directions:
For spinach bites: Pulse the spinach, garlic, salt, cayenne and eggs in a food processor until finely chopped and mixed. Add the spinach mixture to the combined ricotta and Parmesan cheese. Using the second smallest ice cream scoop put the mixture in mini cup cake tin lined with paper cups. As shown in the picture below I didn’t have enough spinach mixture to fill the tray so on-the-fly I came up with the golden mixture to fill the remaining cups. (As you can see the amount was perfect to complete the tray.)

For golden bites. Blend all the ingredients together and scoop into the paper lined cups.

Cook at 400 F for about 20 minutes until they are fairly firm when touched. Let rest for about 5 minutes and remove from the muffin tins.


These make very nice small bite appetizers. Both versions were very different but very flavorful and light in texture. The spinach bites were savory with a slight garlic cheesy flavor. The spinach flavor came through nicely. The yellow version was  sweeter (obviously due to the honey). The cayenne pepper in this version was much more pronounced than in the spinach version. It resulted in a sweet/hot/peppery combined taste that really made the bite. We also discovered they heat up very nicely in the toaster oven 

Tuesday, September 20, 2022

Philadelphia (Philly) rolls "Hosomaki" 細巻きフィラデルフィアロール

Although I have posted  Philadelphia rolls (or Philly rolls) 6 years ago, it was a medium sized (chumaki 中巻) and the nori outside (omotemaki 表巻き). I also said in that post that this could be a thin roll with the rice outside (Hosomaki 細巻き and Uramaki 裏巻き) like California rolls. So this is exactly that version. The reason I made Philly rolls is that the type of smoked salmon we got from Vital Choice which was called "wild salmon lox" was sliced a bit too thick and did not have much of a smoked flavor so it didn’t work well with our usual smoked salmon dishes such as blini, smoked salmon and ikura dish. I made sandwiches using this lox with avocado and cucumber on croissants smeared with cream cheese one side and mayo on the other which was quite good. A few days later I made these Philly rolls for an ending "shime" 〆 dish in the evening. 


I made two rolls. The first one (upper row) came out better. For this, we made fresh rice and made the sushi rice using a Japanese cedar "hinoki" 檜 vessel  called "Hangiri" 飯切りor sushi-oke 寿司桶. We brought this so many years ago when we visited Kiso 木曽 but amazingly it still smells of Hinoki wood. In any case, this Philly roll was made exactly like California rolls but instead of crab meat and avocado, I used lox, cream cheese and cucumber. I also sprinkled the outside layer with white sesame as in California rolls. In this preparation, the lox from Vital Choice tasted great.


As a small side dish I served simmered tender octopus leg 蛸の軟らか煮 (shown below).


I also served cucumber asazuke 胡瓜の浅漬け with salt broth soaked sugar snap スナップ豌豆の塩びたし.


This was a rather large shime dish for us but it was very good and both of us managed to finish it. (Such a hardship…not!)

Saturday, September 17, 2022

Jalapeño cheese curd ハラペニョペッパー自家製チーズ

We had some excess 1% milk which was approaching it’s “best-by” due date so my wife used it to make a cheese (curd). This time she tried something different for the flavoring and asked me to prepare finely chopped Jalapeño pepper. The picture below shows fresh cheese curd infused with jalapeño flavor but essentially no heat (spiciness). We like it very much. The fresh pepper taste is great. She served it slightly warmed in the toaster oven which is better that cold from the refrigerator.


She made cheese curd in usual way with heated milk and sushi vinegar. The main innovation was the use of 1% instead of 4% milk, plus the addition of the jalapeño mixed right into the cheese instead of part of an oil based marinade.


Ingredients:
1/2 gallon of 1% milk (could be basically milk of any fat content)
1/3 cup vinegar (she used sushi vinegar)
(The recipe also suggests the juice from one or two lemons, or 1/2 tsp citric acid)
1 tsp salt (or more to taste)

Directions:
Slowly heat the milk to 200 degrees F stirring constantly. After it reaches temperature remove from the heat pour in the vinegar and stir gently to combine. Leave the pot undisturbed for 10-15 minutes. It should be separated into clumps of milky white curds and watery yellow colored whey. If there is still a lot of unseparated milk add another tablespoon of the vinegar. Line a strainer with cheese cloth and set it over a bowl. Using a large spoon transfer the curds to the strainer. Let the curds drain depending on how dry you would like the ricotta to be. (If it is too dry add some of the whey reserved in the draining bowl). Gather the edges of the cheese cloth and gently squeeze the curd to further drain the whey. Then using string tie the top edges together and hang the bag from the faucet to further drain. After the most of the liquid whey has been drained off put the curd in a bowl, add the jalapeño and 1 tsp. kosher salt. Stir until everything is incorporated. Put clean cheese cloth in the cheese press. Add the curd and clamp on the lid. After one day of pressing in the refrigerator, the cheese becomes rather solid (below). 


For serving, she cuts the curd into small cubes as seen in the first picture. This cheese is a little more moist than the cheese made with 4% milk. (Wether this is due to the lower fat content of the milk or the way it was drained is subject to question). The Jalapeño adds a nice fresh green pepper taste that permeates the cheese. It is not spicy but it is very refreshing. We also like the curd slightly warmed in the toaster oven. This version of cheese curd is a nice contrast to the one with yogurt curry flavor marinade which is fried. We really like both and they go really well as an appetizer with a glass of red wine. 


Thursday, September 8, 2022

Tomato ribbon salad version 2 トマトリボンサラダ V2

This is another variation of my wife’s famous ribbon salad. The red layers are tomato juice based aspic but  the cream cheese-based white layers are a bit more complex than the previous version. I helped by chopping up and slicing the ingredients. Initially, my wife was dissapointed since she expected the white layer to be more flavorful. But a few days later when we had this again, the ingredients had melded together and we could taste much more flavor.


Ingredients for Tomato aspic:
3 cups tomato juice (we used V-8)
1 tsp. salt
1 tsp. sugar
2 tsp. Sushi vinegar
1 Tbs. Worcestershire sauce
Onion juice to taste (About 3 Tbs.
2 envelopes gelatin

Ingredients for white section
1 envelope of gelatin
1/4 cup cream
1 tub (8 oz.) or 1 block (8 oz.) Philadelphia cream cheese
1/4 cup sour cream
3 tbsp. mayonnaise
2-3 ribs celery, minced
1 med. green pepper, (jalapeño) finely chopped
2 med. onion, finely chopped
1/4-1/2 cup pimento stuffed olives, sliced
1/4-1/2 cup ripe (black) olives, sliced (we didn’t use because we didn’t have) 
(Optional) 1 ripe avocado, peeled & sliced (we did not use) 

Directions:
Soften gelatin in 1/2 cup of the tomato juice. Add mixture to the top of a double boiler. Heat until the gelatin melts. Put the rest of the tomato juice in a pan. Heat until all ingredients dissolved. Add the gelatin that has been melted in the double boiler. Chill 1/2 of the tomato aspic until set, in a 9 x 13 inch pyrex dish (below).


Soften the gelatin in the cream. Add mixture to the top of a double boiler. Heat until the gelatin melts. Mix cream cheese, sour cream and mayonnaise until smooth. Add the melted gelatin then the chopped celery, jalapeño, and onion. Spread cheese mixture over the congealed aspic. Add the olives on top of the cheese mixture. (Next time it would be better that the olives are finely diced.  Cut like this they made it hard to slice the ribbon salad into servings). (If using avocado lay the slices on top of the cheese mixture.) Refrigerate until firm (below).


Pour the second half of the tomato aspic gently over the avocado slices, to cover all. Cover with saran wrap and refrigerate until set.


Although this is a variation on the previous tomato ribbon salad, it is clearly in the same tradition. The red layer is much the same. The white layer is much softer. The olives are a great addition. They add a burst of saltiness. The flavors get much more pronounced after a day or two when the ingredients have had a chance to meld together. In general, this salad and its precursor are a light cool refreshing addition to a meal on a hot summer day.

Saturday, August 27, 2022

Instant Pot Egg Bites version 2 インスタントポットエッグバイツ

This is the second version of Instant Pot Egg Bites. The last one which was supposedly a recreation of  Starbucks’ egg bites was good but tasted a bit too cheesy rather than eggy when it got cold. So this time we changed the ratio of egg and cheeses so that it would taste more eggy. This is based on a recipe but, as usual, we winged it a bit. We added finely chopped prosciutto, shallot, and jalapeño pepper. This turned out to be quite good. It was smooth with distinct shallot and jalapeño flavors. The prosciutto added slight saltiness which also worked well. While both versions were very good. We probably liked this version better than the first version.


Ingredients (Recipe x1, 7 egg bites)
3 large eggs
1/4 cup cottage cheese
1/4 cup soft cheese, like cream cheese, Brie, Boursin, or Laughing Cow (we used cream cheese)
1/2 cup chopped mix-ins, like cooked meats and/or raw or cooked vegetables (we used jalapeños, shallots and prosciutto)
1/2 cup shredded cheese, such as cheddar, Monterey jack, or mozzarella (We used cheddar and Monterey Jack)

Ingredients (recipe x2, 14 egg bites)
6 large eggs
1/2 cup cottage cheese
1/2 cup soft cheese, like cream cheese, Brie, Boursin, or Laughing Cow (we used cream cheese)
1 cup chopped mix-ins, like cooked meats and/or raw or cooked vegetables (we used jalapeños, shallots and prosciutto)
1 cup shredded cheese, such as cheddar, Monterey jack, or mozzarella (We used cheddar and Monterey Jack)

Directions:
Combine the eggs, cottage cheese, soft cheese and other cheeses in a blender. Blend at medium speed for about 30 seconds, until smooth. Pour into molds 3/4 full. Evenly distribute the chopped veggies into the molds. Stir to further incorporate.

Pour 1 cup of water into the Instant Pot or electric pressure cooker. Cover the egg molds and put into the wire steam rack. Grasping the handles of the steam rack, lower the egg molds into the pot.

Cook the eggs on “steam”: Secure the lid on the pressure cooker. Make sure that the pressure regulator is set to the “Sealing” position. Select “steam” then adjust the time to 8 minutes (for single batch and if making a double batch, increase the cooking time to 10 minutes.)

The pressure cooker will take about 10 minutes to come up to full pressure. Cook time begins once it has reached full pressure.

When the timer goes off, let the pressure release naturally for 10 minutes, then perform a quick pressure release by moving the pressure release knob from “Sealing” to “Venting.” It will take a minute or two for the pressure to release completely. Remove the egg bites from the pressure cooker.

These were very good egg bites. They tasted more eggy than cheesy but the cheese flavor came through nicely enough. The shallots and jalapeño gave a nice spiciness while the prosciutto added some saltiness. The texture was very smooth almost like a very firm custard. These would be lovely as an egg substitute for breakfast or brunch as well as an appetizer with a glass of wine.

Thursday, August 18, 2022

Bacon cheese egg bites ベーコン、チーズ エッグバイツ

 We like small bite-size items, either savory or sweet. We are not sure how we came to order these silicon moulds for the Instant Pot. Maybe we got an email ad or my wife read the recipe somewhere. We ordered the silicon moulds from Amazon and we made these small bacon cheese egg bites. When we tasted them just coming out of the mould, it was like egg custard but after it cooled down a more cheesy flavor came through. Overall it is very good but slightly too salty for us.


Later we learned this is a variation of Starbucks’ Bacon & gruyere egg bites. We have never had this at Starbuck. Since we did not have gruyere cheese, we substituted Monterey Jack and Irish cheddar cheese. We used the recipe that came with the moulds. My wife made the batter and poured it into the moulds and I cooked them in the Instant Pot.

Ingredients (make 14 bites using the silicon moulds):
3 large eggs
4 bacon strips
1/2 cup shredded Monterey Jack cheese
1/2 cup shredded Gruyere cheese (we substituted Irish Cheddar).
1 cup cream cheese or cottage cheese (we used cottage cheese)
3 tbs cream
1 tsp unsalted butter, melted
1/4 tsp Kosher salt
1/2 tsp rice starch (flour)*

*we think the use of rice flour (starch) is to claim this is gluten free.

Directions:
Cook the bacon and break into smaller pieces. Place the bacon pieces in the bottom of each mould (#1)
Add the remaining ingredients to a blender and blend for 20 seconds
Fill the silicon mould to 75% full (#2)
Attached the lids to the silicon moulds.
Place 1 cup of water to the Instant Pot and lower the two silicon moulds with trivet
Place the lid on the Instant Pot with the pressure knob to seal. Using “Steam” function, set time to 7 minutes.
Let it depressurize (7-10 minutes) and open (#3).
Loosen the egg bites using small spatula and invert onto the plate to unmold (#4).


As I mentioned, when we tasted these while still warm, it tasted eggy/custardy but once it cooled it tasted more cheesy. The texture was smooth and velvety like a rich thick custard. It was a little bit too salty for us. (The cheese and bacon are very salty so probably we can omit the additional 1/4 tsp salt). I can see why these are popular. It is hard to eat just one. 

Sunday, July 10, 2022

Cheesy Lebanon Bologna bites チーズとレバノンボロニャ ミニマッフィン(バイツ)

 Some time ago, my wife made some small muffin/bites with cheese and Lebanon Bologna which is the perfect small appetizer with wine. We kept them frozen and she served the last two. She wanted to make some more and we naturally assumed we could find the recipe in our blog but after some searching, we could not find it. So, we concluded we must not have posted it. We looked for the original recipe and had difficult time but finally my wife found the print-out of the recipe. The original recipe came from King Arthur Flour web site and called “Cheesy Pepperoni bites”. The original recipe calls for “Pizza flavor seasoning ” to make it taste like pepperoni pizza, I suppose. As usual she took the recipe as “advisory” and made some changes mostly based on what ingredients we had available. So she used Lebanon Bologna (she keeps some on hand frozen) instead of pepperoni, added chopped fresh chives and omitted the pizza seasoning (since we didn’t have it).

I ask my wife to take over.

Ingredients
1 1/2 cups (180g) AP flour
1/4 cup (28g) Cheddar Cheese Powder
1 1/2 teaspoons baking powder
1/2 teaspoon salt
4 tablespoons (57g) butter, cut in pats
1/2 cup (50g) Lebanon Bologna (or pepperoni, diced) (#1)
1 cup (113g) sharp cheddar cheese, shredded
1/4 cup (14g) sliced chives (or scallions) (#1)
3/4 cup (170g) milk


Directions:
Preheat the oven to 425°F. Lightly grease a bite-sized tart pan; a mini muffin pan, or a baking sheet. If using the pop-up tart pan, have an ungreased baking sheet available to use as a base.
In a medium-sized mixing bowl, combine the flour, cheese powder, baking powder, salt.
Add the butter, working it in until the mixture is crumbly.
Add the Lebanon bologna, shredded cheese, and scallions, mixing to distribute (#2 above).
Add the milk, mixing just until everything is evenly moistened.
Scoop the dough by the level tablespoonful (second smallest ice cream scoop we have)  into the mini-muffin pan. 
Place the mini muffin pan onto a baking sheet to catch any drips.
Bake the biscuits till they're a medium to deep golden brown, 10 to 14 minutes.
Remove the biscuits from the oven, and cool briefly on a rack. Use a table knife to pop the bottom of the pan off the biscuits

I am sure pepperoni works well in this but Lebanon Bologna’s smoky and sweet flavors also work well. It is very cheesy with cheddar flavor which may be due to the addition of  “Better cheddar cheese powder” from King Athur. 

Friday, July 1, 2022

Cheese curd with Indian spices and yogurt

 This is from my wife’s new Indian cookbook called “Thali” by Maunika Gowardhan. Since my wife made cheese curd (paneer) to use up milk approaching its expiration date, she decide to try this recipe. It is called “Achari Paneer Tikka” but as usual, some of the ingredients were not available such as nigella seeds and particularly “gravy and oil” from “store-bought Indian green chili pickles”. We couldn’t even imagine how this should taste so we improvised using the pickling liquid from a jar of capers. We have no idea how this may have changed the end product but it clearly didn’t “hurt” it. Also we pan fried the paneer rather than grilling it. It came out rather nicely (below) with a brown crust.


Ingredients: (#1 below)
Paneer cut into inch size pieces (#2) below
2 garlic cloves roughly chopped
1 inch ginger root  roughly chopped
1 Tbs. coriander seeds
5 Tbs. greek yogurt
1 tsp. ground turmeric
1/2 tsp. garam masala
2 tsp. of pickling liquid from a jar of capers
salt to taste

Directions:
Blend the garlic and ginger in a small blender to make a smooth paste. (We used garlic and ginger paste from a tube.) Mix the garlic ginger and other spices into the greek yogurt (#3). Add the paneer cubes and coat them in the marinade (#4). Let them marinate for a least an hour. 

To cook: put a little oil in a frying pan. Add the paneer and marinade. Cook the pieces, turning them occasionally until the pieces get browned on the surface. 


This was a good variation on just plain paneer. The pieces had a nice crunchy, spicy crust and were soft inside. The flavor got even better over time with the pieces stored in the refridgerator. They toasted up well in the toaster oven and the crust got crispy again. 

Monday, June 13, 2022

Puff pastry cheese swirls

My wife decided she had to use up some old frozen puff pastry which passed “best-by date” by a year. She found a recipe for broccoli based cheese swirls on the back of the puff pastry box and decided to make them. In addition, she found some pesto we had made and frozen sometime ago and decided to use the pesto to make a pesto based cheese swirl. Sort of killing two birds with one stone approach. 

As usual, I ask my wife to provide how-to.

Ingredients:
two sheets of frozen puff pastry

For the Broccoli based cheese swirl
The amounts of all the ingredients are arbitrary and are generally enough to cover the sheets.
Cooked broccoli finely chopped (spinach could also be used)
Scallion finely chopped
Various cheeses grated your choice (I used smoked gouda, mozzarella, and Parmesan.)

For the pesto based cheese swirl
Pesto to cover the sheet of puff pastry
Various cheeses grated. (I used Monterey Jack, Cheddar and Parmesan

Directions:
Thaw the sheets of puff pastry. Spread the ingredients to cover the sheets (#1 & 2 for the pesto) and (#3 for the broccoli) based. Roll up the sheets and slice into 1 inch thick pieces. Cook in a 400 F degree oven for 15 to 20 minutes until the swirls are golden brown.


These make a wonderful alternative to the traditional cheese tray. The pastry was light and crunchy. The cheese was nicely melted and toasted. The scallion flavor came through and really made the broccoli based rounds. While both cheese swirls were very good, in a contest of pesto versus broccoli I am completely biased in favor of pesto. (Actually it may not even be a contest).