Showing posts sorted by relevance for query milk bread. Sort by date Show all posts

Thursday, September 6, 2018

Sally Lunn bread サリーラン ブレッド

This is again my wife's baking. This is a very usual and good bread called "Sally Lunn" bread. The original "Sally Lunn bun" was reportedly served in the spa town of "Bath" in England in the 18th century. In the U.S., the same name appears to be attached to breads that are dissimilar from the ones served originally in Bath. This recipe came from "Beard on Bread" and probably represents the latter category.  While the leavening agent is yeast it is a batter bread. This means that the texture of the dough is very unusual and not like regular yeast dough. It is wet, sticky and has to be "poured". My wife never made a bread like this before and wasn't quite sure how to handle it but in the end everything worked out just fine.  Lightly toasted and buttered, this is wonderful.


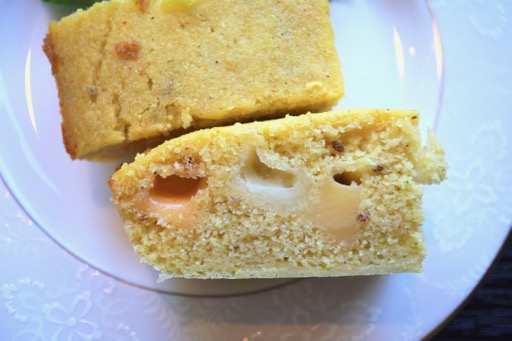
As you can see lots of holes which make this bread so light.


This is how it looks before toasting. Since it was baked in a tube pan, you have to cut it into wedges which is a bit awkward.


Ingredients:

1 package active yeast
1/4 tsp. sugar (to bloom the yeast)
1/2 cup warm water
1/2 cup lukewarm milk
1 stick butter melted in the milk
1 tsp salt
1/3 cup sugar
3 eggs
3 1/2 to 4 cups all purpose flour

Directions:

Bloom the yeast. Melt the butter in a sauce pan add the milk, sugar and salt. Stir until the sugar and salt melts. Let cool to lukewarm. Add the eggs and stir to combine. Add 3 cups of  flour to the bowl of a stand mixer with a paddle. Add the liquid ingredients to the dry ingredients and mix to incorporate. Slowly add more flour in small amounts at a time to make a "stiff but workable batter" (whatever that meant). (I ended up using a total of 3 1/2 cups flour until I declared the batter "workable".  It was very thick, wet, stretchy and somewhat stringy). According to the recipe: Pour it into a bowel. (Pouring was a bit of a euphemism. It was more like battling it into the bowl against its will.) Let rise until doubled.  Then, again according to directions, beat it down with a wooden spoon for about 1 minute. (Beating it down was the appropriate term here). Scrape it into a heavily buttered tube pan. (This took some doing, particularly to get it evenly distributed around the tube.) Cover and let rise until it reaches the top of the pan. (Initially I did not think that would be possible given the volume shown in the picture below, but to my surprise it not only reached the top but was trying to bust out of the cover by the time I captured it from going over the edge.)


Bake in a 375 degree oven for 45 to 50 minutes or until the bread is dark, golden on top and sounds hollow when rapped. (I thought this may have been a bit too high done next time I may try a shorter time). Turn out onto a rack to cool. (I was amazed at the final result shown below and even more amazed when we cut it into wedges and tasted it...what a beaut!)


Slice into wedges as shown below.


This was a remarkable bread making experience. This bread is very light and airy as you can see in the picture. I has a nice mild slightly sweet flavor. The crust is nice and crunchy especially when toasted. Who would have thought yeast bread could be made like this?

Saturday, February 6, 2021

"Kuri-mu pan" Cream custard buns クリームパン

 While I was growing up in Japan, sweet breads called "Kashi-pan" 菓子パン were very popular among kids. They came in many forms such as Melon-pan メロンパン  bread covered with a thin layer or sweet crunchy cookie, or bread filled with  cream custard (cream pan クリームパン), chocolate  (choko-pan チョコパン) or sweet bean paste (an-pan アンパン). The word “pan” is derived from the French word for bread “le pain” pronounced (le pan). Although these breads were very popular with kids either my parents' policy (most likely) or my own choice (I doubt it), I rarely enjoyed "kashi-pan" while growing up. When my wife and I visited Japan, my wife found "Kashi-pan" and, like the kid she is at heart, she really liked it. When we got home she even made "melon pan". My wife in general is very fond of filled buns. She somehow found this recipe for "Asian cream custard buns". She made two versions shown below. For the buns on the left, she fully encased the filling in dough. This is the more traditional way of making them. On the right, she filled a depression made on the top of the bun with the cream custard. This is the method she used for ricotta cheese buns


She said she did this to avoid having a bun with the steam created gap on the top as as shown in the picture below. This occurs because of the steam produced by the filling during baking. The one with custard filled in the surface depression does not have this problem. Since both are basically the same bun just prepared slightly differently I think both are equally good.


The picture below shows the glazed buns with cream totally encased in dough just out of the oven.


And these are the ones with the surface depression filled with custard.


Ingredients:
for the custard:
2 large eggs + 1 egg yolk
70 g sugar (1/3 cup)
15 g corns starch (2 Tbs.)
20 g cake flour (2 Tbs.)
300 g milk (1 1/4 cup)
1 tsp. vanilla
1 Tbs. butter

for the dough
250 g bread flour (2 cups)
50 g cake flour (1/3 cup)
30 g sugar (2 Tbs.)
20 g sweetened condensed milk (1 Tbs +1 tsp)
80 g cream (1/3 cup)
80 g milk (1/3 cup)
1 egg (25 g for the dough, the rest for the glaze)
1 tsp. yeast
1/2 tsp. salt
30 g cold butter cut into small cubes (2 Tbs.)

Directions:
For the custard
In a bowl, mix eggs, sugar, corn starch and cake flour until well combined. Heat milk in a sauce pan until steaming. Temper the egg mixture with the hot milk by adding several ladles full slowly and stirring to combine. After the egg mixture is tempered add it to the milk still in the sauce pan. Cook on medium low heat until it starts to thicken, stirring constantly. This could take some time so be patient. When it achieves a fairly firm consistency (i.e. won't run off if placed on a flat piece of dough). Take it off the heat. Add the butter until melted and then stir in the vanilla. Continue whisking so it doesn't form a skin as it cools. After it cools slightly cover with plastic wrap touching the top of the custard, again so it doesn't form a skin as it cools. Set aside or put into the refrigerator to use later.

For the dough
Add everything from the bread flour to the yeast into a stand mixer. Mix until dough forms. Let it rest for 30 minutes. Add the salt and knead for 1 minute. Add the butter a piece at a time kneading the dough until smooth. Knead 7 to 10 minutes. Form into a ball in a greased bowl. Turn the ball until it is covered with grease. Put into proofing box set at 81 degrees. Let it rise until doubled in size.

To assemble:
Punch down dough. Weigh the dough and calculate how many 50 g buns the dough will make. Then weigh the custard and see how much each scoop of filling must weigh to equally fill the 50 g buns calculated. I completely encased the filling for 8 buns in dough and put them on a parchment lined cookie sheet. I formed the remaining buns into balls and put them on the cookie sheet. The cookie sheets went back into the proofing box until the buns had about doubled in size. I took the buns made into balls but not filled with custard and using the base of a small cup dipped in flour pressed down on the center of the ball until the cup stopped moving. I then filled the depression with the remaining calculated portions of custard. I took the remaining egg and glazed the fully encased muffins completely and the depression filled buns just on the bread portion. I cooked them in a 375 degree oven for 12 to 18 minutes or until golden brown. I removed them from the oven and cooled on a rack.

These buns were everything you would expect in a kashi pan. The dough was tender and slightly sweet. The custard was luscious, not too sweet and vanilla flavored. What a breakfast treat!

Thursday, August 7, 2014

Naan ナーン

Although we almost never go to Indian restaurants on our own, my wife has been fascinated with the medley of spices and herbs in Indian cooking and we are making many different Indian-style curries which we have posted from time to time. I am a beneficiary of this and these curries are very convenient to have for weekday suppers (No more Japanese curry). We usually serve these curries with rice (often previously frozen rice). My wife occasionally wanted to have naan bread with the curry and bought packaged naan from the grocery store but it was terrible. So (inevitably) she asked if we could make it at home. I said "of course" and for the first time, we made our own naan.


We looked in my wife's Indian cookbooks and searched for naan  recipes on the web. The common ingredients in different recipes appear to be flour, yogurt, and three leavening agents (yeast, baking soda and baking powder). Next is to determine how the naan is best baked since we don’t have a Tandoori oven (yet?). After some exploration, we decided to use a hot cast iron skillet. We based our naan on the recipe we found on the web with some modification.

Ingredients:
(Dry)
All purpose flour 4 cups
Baking powder 1 and 1/2 tsp
Baking soda 1tsp
(Wet)
Milk 3/4 cup (we scaled*)
Greek yogurt 1 cup
(For proofing yeast**)
Warm (105F) water  1/4 cup
Sugar 1/2 tsp
Dry yeast  one package or 3/4 tsp
(During Baking)
Melted butter (Half stick)
Kosher salt

Based on the original recipe, we were not sure how much kneading was needed. We decided to knead it like any other bread until the surface was smooth and developed an elastic dough ball.

*Scalding milk may not be needed and was not in the original recipe Although "scalded milk" is often called for in bread recipes, in modern era of Pasteurized milk, only possible benefits may be denaturing/inactivating some proteins/enzymes in the milk which may interfere with yeast fermentation and gluten development.

**For proofing yeast, the original recipe calls for 1/4 warm water and 1tbs of sugar but the amount of sugar, to us, is way too much for proofing yeast. I mixed in the dry yeast and let it stand for 5-10 minutes until it bubbled up. This time, beside sugar in the yeast proofing, my wife also added 1 tbs of sugar into the dry ingredients, which probably did not affect the final results in any way.

I mixed the wet into dry ingredients and mixed with a wooden spatula and then hand kneaded, adding additional 1/4 cup of water since it was too dry until dough formed and the surface smooth but a bit sticky. (For about 5 minutes. I did not knead to the extent of making other bread.) I covered the bowl with plastic wrap and then with dish towels and let it raise for 1 hour.

I floured the kneading board, and deflated the dough and cut into 8 equal portions. I made a ball by stretching the surface and pinching the cut surface of the dough. I let them rest for 10 minutes and hand stretched the eight pieces into a triangular shape (see upper-left picture below). I somehow thought this was the traditional form but taking my wife's suggestion, I will make rounds next time since they would fit into the cast iron pan better).The initial ones were rather thick since the gluten was not relaxed enough but, towards the end, I could stretch it rather thin. When we tasted it, however, we decided the thicker ones with a more bready central portion are better. So, the thickness of the dough should be about 1/4 inch but no less (as was suggested in the original recipe).

I brushed one surface with melted butter and sprinkled Kosher salt (upper right). I placed the dough, the buttered side down, onto the preheated (for 10 minutes to the point where it started smoking) cast iron skillet placed on medium flame (lower left). I put on the lid and let it bake 1-2 minutes until the surface started developing bubbles. I brushed on melted butter and sprinkled Kosher salt and flipped it over using a spatula (lower right). I cooked it with the lid on for another minute or two.

Naan composit

The amount of the ingredients above made eight naan. The result: Just wonderful! The butter flavor permeated the bread with a nice crispy surface and soft center. The yogurt definitely added to the flavor and texture. As we tasted, we learned that the dough should not be too thin (like pizza). A certain thickness (1/4 inch) creates the perfect combination of crispy crusts and soft center. For the first attempt, this was a resounding success. As soon as the first naan came out, we finished it quickly between the two of us while we were cooking the remaining bread. This time, we did not eat our naan with curry but as a bread for any dish this is wonderful.

Only further modification we may make is to add salt (maybe 1 tsp) to the dry ingredients. We did not know how much melted butter was needed and melted 1 stick this time but 1/2 stick would be enough.

Monday, April 30, 2018

Cornmeal bread コーンミールブレッド

This is another baking project by my wife. This recipe is from the "Beard on bread" cookbook. "Beard on bread" sounds funny. I imagined a beard growing from the surface of the bread but of course "Beard" is the name of the late, famous "cook, cookbook author and TV personality" James Beard. The annual  James Beard Foundation Award is considered the "Oscar" of the culinary world. In any case, my wife looked through the book and decided to make this bread.


Ingredients:
1/2 cup cornmeal
1 cup boiling water
1 Tsp salt
2 packages of active dry yeast
1/2 cup warm water (100 to 115 degrees)
1 Tbs. granulated sugar
1 cup warm milk
1-2 Tsp salt
1/4 cup dark brown sugar
4 to 4 1/2 All purpose flour


Directions:
Pour the cornmeal and salt into the boiling water. Stir vigorously until it cooks and becomes thick. (You are basically making polenta). Before the cornmeal completely cools and solidifies, add the cooked cornmeal, warmed milk, salt and brown sugar to a stand mixer with a dough hook. Stir to make a creamy mixture with no lumps. Let cool until slightly warm. Bloom the yeast in the 1/2 cup warm water and 1 tbs. granulated sugar. Add to the milk mixture. Add the flour one cup at a time. Stir until the dough is smooth and elastic. (Add more flour if necessary). Knead in the mixer for 7-10 minutes.

Put the dough in a bowl with a small amount of vegetable oil. Coat the dough in the oil. Cover and let rise until doubled in a warm place. When doubled punch the dough down and make two loaves. Put in a well greased loaf pan (the more butter used to grease the crunchier the crust because the dough is basically frying). Let rise again until almost doubled. Bake in a 425 degree oven for 10 minutes then lower the temperature to 350 and continue baking another 20 to 25 minutes or until the loaves are nicely browned and sound hollow when tapped. The original recipe said to take the loaves out of the pan and put on the rack of the oven for a few minutes to crisp the crust. We didn't do that.


This bread reminds of us of English muffin bread my wife makes. Both have a nice crunchy texture. This one has a pleasant faint corn flavor, of course, from the cornmeal. This bread can be used in any dishes where English muffin bread is called for and also good every day bread.

Thursday, November 5, 2020

Cream cheese and chive with white bread muffin

This is one of my wife's baking projects. She likes cream cheese with onions and chives. It come in a small plastic tub. She usually uses it for mashed potatoes. She noticed that there were several containers in the fridge that were not getting any younger. She also like muffins stuffed with a “surprise” such as sweet potato or flavored ricotta cheese. So she decided to use the cream cheese in muffins. She used her favorite white bread recipe (which surprisingly we have not blogged before) and filled it with cream cheese as shown below.


I will turn the next part over to her

Ingredients
1/2 cup milk
3 Tbs. sugar
2 tsp. salt
3 Tbs. butter
2 packages yeast
1 1/2 cup warm water
4 -6 cups bread flour

for the filling:
1 tub of Philadelphia cream cheese with chive

Directions:
Combine the milk, sugar, salt and butter in a sauce pan and heat up until the milk is scalded and the other ingredients have melted or dissolved. Add the water and let the mixture cool. Add 4 cups of bread flour and yeast to a stand mixer. When the milk mixture has cooled add it to the flour while stirring on speed 2 with the bread hook. Add more flour as needed to make a smooth workable dough. Put dough in a bowl and coat the surface with vegetable oil to keep it from drying out. Let rise until doubled.

Form the muffins by punching down the dough. I weighed the dough and decided to make muffins weighing 2 1/4 or 63.78 grams. With this dough I got 20 muffins. I then used a small ice cream scoop for the cream cheese and made 20 balls weighing about 11 grams. I folded the dough over the individual cheese balls and placed the muffins in a heavily greased pyrex baking dish. I baked them at 400 degrees for 18- 20 minutes or until they sounded hollow when tapped.

These muffins were pretty good. As usual an air space developed above the cheese. I fully expected the cheese would melt into the bread but was surprised to find it sitting there about the same consistency as when I put it in the dough. (Made me wonder what the cream cheese was actually made of). The bread was good as always and the cream cheese flavor was very pronounced. But I have to say in all honesty the easiest thing to do in the future if we want this flavor combination is just to make the muffins and smear the cheese on with a butter knife.

Thursday, May 18, 2017

Cinnamon bread シナモンパン

This is another one of my wife's baking. She is always on the look out for interesting bread recipes. Finally she found a block of time to make this one weekend. This is an interesting bread. It is a cross between a quick bread and a yeast bread containing both yeast and baking powder as leavening agents. The original recipe came from King Arthur flour web site.


I forgot to take a picture of the loaf when it came out of the oven.


Ingredients: (My wife doubled the recipe and left out suggested cinnamon chips and cinnamon sugar topping.)
6 cups All-purpose flour
1 cup sugar
4 Tsp yeast
2 Tsp. cinnamon, ground
2 Tsp. salt
2 Tsp. baking powder
2 cups warm milk
1/2 cup melted butter
2 large eggs

Instructions:
In a large bowl, mix together the flour, sugar, yeast, cinnamon, salt, and baking powder.
In a separate bowl, whisk together the milk, butter, and egg. Combine the wet and dry ingredients, beating until smooth. Let the batter rest at room temperature for 1 hour, covered. Towards the end of the resting period, preheat the oven to 350°F. Spoon the batter into 2 greased 8 1/2" x 4 1/2" loaf pans.
Bake the bread for 35 to 40 minutes, until it tests done; a cake tester inserted into the center will come out clean.
Remove the bread from the oven, let it rest in the pan for 5 minutes, then transfer it from the pan to a rack to cool completely. Note: Don't slice the bread while it's hot! It'll slice much better when it's completely cool.

(Yield: 2 loaves)

I am not sure about the rationale for using yeast and baking powder but the dough was very soft and sticky and no kneading was required. It had the consistency of quick bread. It was let to rise for an hour (below).


Then, it was punched down and scooped  into the loaf pans like quick bread.


The resulting bread had an interestingly pleasant tender texture. It was similar to quick bread but was firmer with larger holes which I assume was due to the yeast. With this process not much gluten was developed. This bread was flavored with cinnamon and is a perfect breakfast bread. Toasting made it a bit on the dry side and microwaving worked better.

Sunday, February 11, 2024

Sweet Onion Bread Pudding 玉ねぎのブレッドプディング

I do not know how my wife decided to make this dish. She apparently saw this recipe on line and decided to make it.  The recipe calls for cubes of bread. She did not feel like using our home-baked milkbread or other breads we baked. So we ended up getting a loaf of whole wheat bread from Whole Foods. Although the original recipe was called “soufflé”, this is not a souffle. My wife decide to call it “bread pudding”. In any case, this is a good side dish. For the first time we tasted it, onion flavor was sort of strong (even though we used sweet onion and sautéed for a long time). But it calmed down and eventually tasted just right. It heats up  nicely by briefly microwaving. As shown in the picture we served this as a snack with Greek rice stuffed grape leaves (dolma or dolmadakia, store bought)


The recipe came from “Southern living”.

Ingredients: Recipe X 1/2
1 tablespoon butter
2 cups chopped Vidalia onions
1 cups fresh bread cubes (crusts removed) 
6 oz. evaporated milk
2 large eggs, lightly beaten
3/4 cups shredded Parmesan cheese (or combination of other cheeses)
1/2 teaspoon salt

Ingredients (Original recipe)
2 tablespoons butter
4 cups chopped Vidalia onions
2 cups fresh bread cubes (crusts removed)
1 (12-oz.) can evaporated milk
3 large eggs, lightly beaten
1 1/4 cups shredded Parmesan cheese (or combination of other cheeses)
1 teaspoon salt

Directions
Melt butter in a large skillet over medium heat; add chopped onion, and sauté 10 to 15 minutes or until tender.
Place onion and bread cubes in a large bowl. Stir in milk, eggs, 1 cup cheese, and salt. Pour into a lightly greased soufflé or baking dish. (For 1/2 recipe I used the smallest pyrex baking dish). Sprinkle with remaining 1/4 cup cheese.
Bake at 350 ̊ for 25 minutes or until set.


This is basically an onion flavored bread pudding. It is very flavorful (and very rich). Initially the onion was quite strong. It got better with time as the onion flavor blended into the cheese and bread. The 1/2 recipe was perfect for us.

Friday, February 12, 2021

Perfectly pillowy cinnamon rolls 完璧に柔らかなシナモンロール

This recipe  is from King-Arthur flour. The recipe was on a card that was enclosed with the collapsible bread proofing box we recently bought from them. This recipe piqued my wife's interest because it is made with "tangzhong" 湯種 and, of course, because it is a "sweet" bread. So she made this one day. She also added raisins but omitted the icing called for in the original recipe.


Some of the raisons on the surface got a bit dried up and hard but otherwise these were wonderful cinnamon raisin rolls. When they came out of the oven they were really soft but after a few days in the refrigerator, they did get a bit chewy but were still flavorful. My wife slightly reduced the sugar in the filling so they were pleasantly sweet but not too sweet, perfect for breakfast.


Ingredients:
for the Tangzhong
1/2 cup (113 g ) whole milk
3 Tbs. (23 g) bread flour

for the dough:
2/3 cup (151 g) cold whole milk
2 1/2 cups (300 g) bread flour
1 tsp. salt
2 Tbs. (25 g) sugar
2 tsp. yeast
4 Tbs. (57 g) butter softened
1 cup raisins or nuts (optional)

for the filling
1 Tbs. (14 g) butter, melted
1/2 cup (107 g) light brown sugar, packed (amount reduced slightly or increased to taste)
2 Tbs. (15 g) bread flour
4 tsp. (10 g) cinnamon
pinch of salt

For the icing (optional) I did not use it.
3 Tbs. (42 g) butter melted, divided
1/2 tsp. vanilla
pinch salt
1 1/2 cup (170 g) confectioners sugar, sifted
1 to 2 Tbs. (14 g to 28 g) milk

Directions:
For the tangxhong: in a small saucepan, whisk together the milk and flour and cook over medium heat until thickened. Transfer to a large bowl.

For the dough: Immediately add the dough ingredients to the bowl with the tangzhong in the order listed. (The order is important because the cold milk cools the tangzhong to the right temperature for the yeast). Mix and knead to make a smooth, elastic, somewhat tacky dough. Knead for 7 - 10 minutes. Put in a bowl and move to the proofing box set to 81 degrees until the dough rises and is puffy.

To assemble: Transfer the dough to a lightly greased work surface and pat into a 10 X 12 inch rectangle. Stir together the filling ingredients and sprinkle over the dough, leaving a 1/2 inch strip uncovered on one of the long sides. Distribute the raisins or nuts over the filling. Starting with the filling covered long side, roll the dough into a log. Slice into 12 slices. Put the pieces on a parchment lined baking sheet spaced about 2 inches apart. Tuck the tails underneath each roll to keep them from unravelling as they rise. Back into the warmer until they about double.

Bake on a rack in the upper third of a preheated 375 degree oven for 14 to 18 minutes until light golden brown. Remove from the oven and brush with 1 1/2 Tbs. of melted butter.

For the Icing (optional): Mix the remaining 1 1/2 Tbs. (21 g) melted butter with the remaining icing ingredients. Ice the rolls while they are just lukewarm.

These rolls have just the right amount of sweetness and the butter cinnamon mixture is very nice. While they were baking and when they were lightly microwaved before serving the yeasty cinnamon aroma was one of the pleasures of these rolls.

Monday, May 21, 2018

Pistachio nut bread ピスタチオナッツ入りパン

My wife has been making different kinds of  breads from a bread cook book entitled "Beard on Bread". This bread is a very interesting bread with pistachio nuts. It is a kind of a sweet bread but not too sweet and perfect for breakfast. You can see pistachio nuts on the cut surface.


One morning, we had a combination of the blueberry bread my wife made (it was frozen) and the pistachio nut bread. They went very well with a cup of cappuccino.


Ingredients
for bread 
1 Package active dry yeast
1/4 cup warm water
1 Tbs. sugar (to bloom the yeast)
1/2 cup granulated sugar
1 cup warm milk
1/4 cup butter softened
2 tsp. salt
3 to 4 cups all purpose flour

For filling 
1/4 cup melted butter
1/3 cup (additional) sugar
1 cup shelled salted pistachio nuts roughly chopped

1 egg lightly beaten for egg wash

Directions
Bloom the yeast. In the bowl of a stand mixer with a mixing paddle add the milk, softened butter, salt and 1/2 cup sugar, yeast mixture and stir. Change to a dough hook. Add the flour one cup at a time until dough forms around the hook. Form into a ball and put into a bowl with a small amount of vegetable oil. Coat the surface of the dough with the oil (so it doesn't dry out) cover with plastic wrap and let rise until doubled.

Punch dough down. On the floured board covered with parchment paper roll it into an 18 X 12 inch rectangle. (Since the dough is very tender, to make the transfer to the cookie sheet easier,  I measured a piece of parchment paper the same size as the sheet I was going to use to cook the bread. I rolled out the rectangle and formed the loaf on the parchment paper. Then I dragged the parchment paper over onto the cookie sheet. I did not remove the paper, I cooked the loaf on it. ) Brush the surface of the rectangle with the 1/4 cup melted butter. Sprinkle on the 1/3 cup sugar and the pistachio nuts. Beginning with the long edge roll the dough like a jelly roll pressing the seams and edges together. Form into a circle. At 3/4 inch intervals slice 2/3 of the way down into the ring (#1). Twist each slice to the right so the interior the slice is facing up (#2 & #3). Let the ring rise until doubled. Brush with egg wash. Bake in a 375 degree oven for 30 to 35 minutes until browned (#4).


I was not around when she started and I have no pictures of the rolled out dough, filling or rolling up process. In any case, this was rather elaborate and will have some impact if it was served whole and cut into individual servings. Of course, for us, my wife cut them into a manageable size, double wrapped in a plastic wrap and then aluminum foil and froze it. This bread has a fairly dense but still soft texture. It is slightly sweet. The saltiness from pistachio  appears to enhance the sweetness despite relatively small amount of sugar in it. This bread is extremely good and would be perfect for a holiday.

Saturday, July 14, 2018

Bolivian spicy cheese cornbread ボリビアのスパイシーなチーズコーンブレッド

It would appear that my wife is "binge baking"...something I fully endorse. This recipe comes from "Milk Street". She decided to make it because we had several ears of fresh corn left over after making corn souffle and she thought this would be an interesting way to use them. We've never seen a corn bread recipe that used raw fresh corn this way.


On the cut surface, you can see the melted cheeses. You can also see the hole that is left when the cheese melts into the bread. The original recipe calls for Monterrey Jack. Maybe we will use that next time.


Ingredients:
2 1/2 cups cornmeal
1/3 cup white sugar
1 Tbs. aniseed
2 1/2 Tsp kosher salt
2 Tsp. baking powder
1/4 tsp. cayenne pepper (or more if a hotter bread is preferred)
3 cups corn kernels
1 jalapeno pepper diced
1 1/2 cups whole milk
4 large eggs
1 1/2 sticks salted butter melted and slightly cooled
8 Oz. pepper jack cheese cut into 1/2 inch chunks (we used double Gloucester, smoked Gouda and Gruyere)

Directions:
Grease a 9 x 13 baking dish. (I greased the dish then added parchment paper cut to size and greased it as well. I have found this is a sure proof way to keep the bread from sticking.)

Put the cornmeal, sugar, aniseed, salt, baking powder, and cayenne pepper in a mixing bowl and stir to combine. Combine the corn, jalapeno and milk in a food processor. Process until very smooth. Add the eggs and butter and process until smooth again. Pour the corn mixture into the flour mixture and mix until smooth. Add half the batter into the prepared baking dish. Dot the surface with the cheese squares (#1) then cover them with the rest of the batter.


Cook in a 375 degree oven for 30 to 35 minutes until a toothpick inserted at the center of the bread comes out clean (#2). Let the bread rest for 20 minutes before serving.


This is  a pleasantly spicy bread with a rich moist texture. The cheese chunks add a nice burst of cheese flavor. (We suggest using cheeses that hold their form when heated like the smoked Gouda. We found the melting cheeses such as Gruyere melted into the bread leaving a small hole behind.)

Wednesday, May 31, 2023

Mango Chutney Almond Milk Rolls マンゴーチャツネとアーモンドミルクロール

This is another example of my wife’s major morphing of a recipe into her own version. She saw the sweet roll recipe in Washington Post which used almond milk, marmalade filling, orange juice and  orange zest for glaze. Since we did not have Almond milk we ended up making it, although in retrospect, we are not sure why the recipe even calls for Almond milk. We had marmalade but did not have orange zest or orange juice. So my wife used Major grey’s mango chutney instead of marmalade and omitted the orange juice. Since she had some sweetened condensed milk left over from making milk bread she decided to use that in the filling too. This is quite different from the original recipe but when substitution of ingredients is needed, my wife is very inventive. The mango chutney worked very well. In any case, this roll is very tender and slightly sweet and perfect for breakfast.


Ingredients:
For the dough
3 1/2 cups flour, plus more as needed for rolling the dough
1/4 cup granulated sugar
1 tsp. Salt
2 1/4 yeast
2 1/2 cups almond milk (not sure why almond milk is required next time I’ll just use regular milk)
4 Tbs. Salted butter
1 egg

For the filling:
30-50 grams sweetened condensed milk
30 grams butter softened
2 tsp sugar
3 Tbs. Major Grey’s mango chutney

Directions:
Add the dry ingredients; flour through yeast to the bowl of a stand mixer fitted with a dough hook. Add the wet ingredients; almond milk through egg. Mix until smooth dough forms. Knead for 10 minutes. Turn out onto floured surface and shape into a loaf. Put in a bowl, coat the surface with vegetable oil. Cover and put in the dough proofer at 78 degrees until doubled in size. Punch down the dough. Cover and let rest for 10 minutes.

Meanwhile make the filling by mixing together the ingredients for the filling. Roll out the dough into a large rectangle (#1). Cover the rectangle with the filling then roll it up as tightly as possible without squeezing out the filling (#2). Cut the roll into 14 to 16 equal slices. Put the slices cut edge down in a greased pyrex cooking dish. (Note: it is rather hard to cut the slices; they tend to squish. Out of frustration I just made the last part of the dough into a loaf and cooked it on a small cookie sheet. (I did not take a picture of this.) The loaf turned out just fine and could be cut into slices after it was baked. I might do this in the future instead of trying to make the rolls. ) Bake in a 375 degree oven for 20 to 25 minutes until golden brown (#3, #4).


These muffins were quite good. The dough had a crunchy crust but a soft interior. The filling formed a light custard like texture which was slightly sweet but with a lovely hint of spice from the chutney. Several large pieces of mango from the chutney provide a moist surprise burst of flavor. These were perfect flavorful pastries to have for breakfast with coffee.

Friday, August 14, 2015

PA Dutch Wet Bread stuffing

This is another one of my wife's PA dutch dishes triggered by our recent trip to rural Pennsylvania. It is essentially, a hybrid of mashed potato and bread stuffing but it tastes more like mashed potatoes than bread stuffing. When my wife was growing up, she used to eat something called wet bread stuffing served in the school cafeteria as a side dish for lunch. She remembers it as a loaf cut into slices and heated with a gelatinous texture.  Not one of her favorites as a child (it was that gelatinous texture) but as an adult she was curious to try it again. After some searching she found this recipe and though this may be it.


Ingredients (for 8 servings):
2 1⁄4 lbs potatoes, peeled and chopped
4 slices white bread, torn into pieces (My wife used Pepperidge Farm flavored bread stuffing about 2 cups). Several of the recipes go into great detail on how to handled the bread such as toasting it, frying it, and other methods to dry it out.
1⁄2 cup diced onion
1⁄2 cup diced celery
Salt and pepper

Directions:
  1. Saute the onions and celery until the onions are just translucent and soft
  2. Bring a large pot of salted water to a boil.
  3. Add potatoes and cook until tender but still firm, about 15 minutes.
  4. Drain, mash, salt and pepper to taste. Add enough milk and butter to give the mashed potatoes a very creamy texture. They should be a bit more liquid than usual for mashed potatoes because the dried bread soaks up the extra liquid. At this point just the potatoes themselves are good. 
  5. Preheat oven to 350 degrees.
  6. Lightly grease a 2 quart casserole dish.
  7. In a large bowl, mix together the potatoes, white bread (or flavored stuffing), onion, celery, salt and pepper. (First picture below)
  8. Pour into prepared casserole dish, dot with pads of butter (second picture below) and bake for 1 hour. (Final picture below).
(Mix the seasoned bread stuffing with the mashed potato).


(Fill casserole and dot the surface with butter).


(Bake for one hour at 350F).


This was not exactly the dish she remembered from her childhood. For one thing, there was no gelatinous texture and it was very good. The bread stuffing completely amalgamated with the potatoes. The flavored stuffing really made the dish savory. It was like mashed potatoes but different. It must have been a great way for PA Dutch cooks to use stale bread and leftover mashed potatoes. The first day, it didn't hold together and we spooned it onto the plate as shown in the picture above but a few days later it could be sliced. My wife is still curious about the concoction she ate as a kid but from her descriptions of it, I'm glad this was not it.

Tuesday, November 19, 2019

Japanese "Satsuma-imo" Sweet potato muffin version2

My wife likes to bake bread and she also likes Japanese "Satsuma-imo" 薩摩芋 sweet potato so she is always looking for ways to combine the two. She made "sweet potato" rolls using Japanese sweet potato roasted in the Weber grill and then mashed and seasoned with butter and soy sauce. She used the mashed Japanese sweet potato in the bread dough and also as a filling. In this variation she used the recipe for "refrigerator potato bread" but substituted mashed sweet potatoes for the white potato called for in the recipe. The result was this wonderful rolls/muffin. It has a very tender delicate texture and you can definitely taste the mild sweetness of the Japanese sweet potato. This muffin does not have a sweet potato filling because all mashed the sweet potato went into the dough.


Ingredients:
1 pkg. yeast
1/2 cup sugar (plus 1/2 tsp additional to proof the yeast)
1/2 cup warm water
1 cup warm milk
1 1/2 sticks ( 3/4 cup butter softened)
2 tsp. salt
2 eggs
1 cup mashed Japanese "Satsuma-imo" sweet potatoes (make link to my potato recipe) run through a food mill to eliminate any chunks that may remain after the potatoes have been mashed #1.
4 cups bread flour (with more as needed)

Directions:
Day1:
1. Proof the yeast in the warm water and 1/2 tsp. sugar.  Warm the milk with the butter in it. Dissolve the sugar in the milk mixture.
2. Using a mixing paddle on the stand mixer add the warm milk butter mixture, eggs and mashed potatoes blend thoroughly. Add the proofed yeast and salt. Mix completely.
3. Switch to a dough hook and add the flour one cup at a time until the dough clings to the hook and is smooth and springy to the touch. Knead on speed 2 for 7 to 10 minutes.
4. Form into a ball and put into a bowl with a small amount of vegetable oil turning the dough to cover with a coat of the oil. Cover tightly and place in the refrigerator overnight (or as the recipe says up to 16 to 18 hours).

Day2:
1. Next morning punch down the dough. (It will extremely cold and dense so "punch down" may not be the process that is actually possible. Just flatten the best you can) #2. Let rest for about 5 minutes (picture below) #3. Cut off pieces weighing 2 1/4 oz. #4. Form into rolls and place in a heavily greased baking dish several inches apart so they can rise #5. Cover and let rise until doubled. Cook in a 400 degree oven for 18 to 20 minutes until they sound hollow when tapped #6.


These muffins were amazing. The slow rise overnight in the refrigerator resulted in a very fine texture. The flavor was very delicate but clearly tasted of the sweetness of the sweet potato. The combination of the delicate texture and flavor almost felt like we were actually eating fluffy cooked sweet potato rather than bread. So the substitution of sweet potato for regular potato in this recipe worked very well and the end result was equally as good but distinctly different...well worth the variation.

Tuesday, January 29, 2019

Potato bread with caraway seeds ジャガイモ入りパン

I am stepping up to bake more than I used to; filling in the gaps left by my wife during recovery from her injury. This is one such baking projects. I did the "grunt" work under her supervision. Since we had leftover mashed potatoes from a barbecue (when we do a chicken or pork roast in our Weber grill, we often also roast potatoes) she wanted to use them to make this rustic bread (supposedly of Hungarian origin). This is also from the "Beard on Bread" cookbook. Since the original recipe asked for 8 cups of flour, we halved the recipe to make a smaller loaf as seen below. The recipe involves a starter (this starter only fermented for 30 minutes). It produced a very good rustic bread. Instead of just mashed potatoes, we used the mashed potatoes my wife makes with cream cheese (with onion and chive) which we had with the barbecued pork. We are not sure how much difference the cream cheese makes to the bread.


The black specks are caraway seeds. We are not sure if this is needed. The bread itself has nice flavors.


I slashed and sprayed with water to make "rustic" look and a good crust.


The "slashes" were supposedly to be "deep" so instead of a bread "lame", I used a kitchen knife which appeared not to cut as cleanly as it should have.


Ingredients
for starter:
1 package of dry yeast
1/2 cup of warm water with a pinch of sugar
3 tbs of flour

Additional 3/4 cup of warm water
1/2 cup  mashed potatoes (We used leftover mashed potatoes. My wife mixed in chive-and-onion cream cheese, 3/4 container for 2 large cooked russet potatoes).
3/4 tsp salt
1/4 tsp caraway seeds
2-3 cups of bread flour

Times 2 
for starter:
2 packages of dry yeast
1 cup of warm water with a pinch of sugar
6 tbs of flour

Additional 1 1/2 cup of warm water (or warm milk) 
1 cup  mashed potatoes (Or a mixture of mashed regular and sweet potatoes)
1 1/2 tsp salt
1/2 tsp caraway seeds
4  cups of bread flour

Directions
1. Dissolve the yeast in the warm water with the sugar and let it proof until bubbly.
2. In a bowl, mixed the the yeast mixture and flour. Cover with plastic wrap and then towels and let it stand for 30 minutes until the starter bubbles up (starter).
3. In a stand mixer, add the starter, water, mashed potatoes, salt and mix well using a paddle. Switch to the dough hook, add the flour one cup at a time at low speed until the dough forms and cleans the side of the bowl (in the end, we estimate we added about 2 and half cups of flour). Let the mixer knead the dough for 7 to 10 minutes.
4. Place the dough on the floured board and hand knead for a few minutes to make a tight ball.
5. In a large bowl, add a small amount of olive oil, place the dough, turn over to coat all sides and cover with a plastic wrap and then with towels and let it rise until the volume doubles (about 1 hour).
6. Punch it down and fold a few times to make a free formed round loaf.
7. Coat the wooden pizza paddle with corm meal and place the formed dough on it. Slide the dough back and forth to make sure the dough moves easily.
8. Cover the dough with a plastic wrap and then a towel and let it rise for 30-40 minutes.
9. Remove the towels and plastic wrap. Using a sharp knife, cut a deep cross on the surface of the dough.
10. Using a sprayer, spray water on the surface of the dough and slide it on the baking stone.
11. Bake at 400 F for 30-25 minutes (or until done depending on the size of the loaf).

This is a really good rustic bread. It has a nice firm consistency with crust and good flavor. We are not sure we really need Caraway seeds.


The bread is great toasted.We just ate as is with butter but this could make a good sandwich. It was a success with this modified recipe.

Monday, June 1, 2020

Garlic Mozzarella bread ニンニク、モッツァレラチーズパン

Somehow my wife found a YouTube video of this recipe and I follow the link to the recipe. The next day which happened to be Sunday, I made this bread. Although I followed the recipe and baked at 400F for 20 minutes, it was a bit over done (I used "intense heat" setting for the oven and the baking stone was in place. Next time I will bake this bread at 350F). The surface was nicely crunchy (essentially "fried" with butter).


The melted Mozzarella cheese made nice layers.


We started enjoying this bread as soon as it came out of the oven and it was still steaming. Since this was evening, we had it with a glass of Napa Cabernet. Within an hour the loaf had been reduced by 2/3's to the the size shown below. If you are wondering 'was the bread good' this should say it all.  This was sort of modified pizza or focaccia and yes, it was really good.


This recipe came from the blog "Baking and cooking with Ninik".


Ingredients:
Dough:
250g (2 cups) all-purpose flour/plain flour
5g (1-1/2 tsp) instant yeast
25g (2 tbsp) sugar
1/2 tsp salt
42g (3 tbsp) unsalted butter, melted
125ml (1/2 cup) warm milk
1 egg, whisked
Flour for kneading, if necessary

250g lactose-free fresh Mozzarella cheese (125g of each) (I just used cow milk fresh Mozzarella) .
Slice into small pieces.
Other cheese could be used if Mozzarella isn't available.

Garlic Scallion butter:
2 tbsp softened butter
1 tsp minced garlic
2 tbsp chopped scallions
1/2 tsp salt
Mix well

A sharp blade or regular knife.
Egg to brush the edge, if you are using.
Freshly cracked black pepper

Method for the dough:
In a mixing bowl, stir all the dough ingredients into a soggy dough.
Transfer to the counter, use flour if necessary to fold the dough with your fingers, fold, and press to guide the dough into a ball.
Put the dough ball on a baking tray (or we can use a round baking pan/pizza pan).
Cover until almost doubled (#1). After the dough expands, flatten with hand into a circle (#2).
Using a sharp blade, score the dough crisscross style (#3). Brush with egg at the edges if you like.
Spread garlic butter on the surface evenly (#4). Mark again the scored with a spoon for easier putting the cheese.
Insert pieces of Mozzarella cheese to fill the scored dough (#5). Add freshly cracked black pepper on top.
Bake at 200°C (400°F) preheated oven, top-bottom heat, for 20 - 25 minutes. An oven may vary.
During baking, you might find the butter leaking out to the baking tray (#4) (My oven appears to be hotter, I will bake it at 350F next time).
Best to eat warm to get the stretchy melting cheese. (Although, believe me, it is mighty-fine even when not piping hot.)


I think the scallion butter really made this bread special. The scallions became caramelized in the butter. The dough itself was very tender and almost slightly sweet. It made a nice contrast to the crunch of the crust and the toasted cheese. Wine and this bread, what else do you need? I will try it again for sure.

Version #2: The first version of this bread did not last long so fairly soon I made a second version with some various tweaks to hopefully improve an already pretty good final product. I decided to include my notes as an addendum to this blog. One of the changes I made was to score (cut) the loaf after I spread on the garlic onion butter as seen below (instead of before as suggested by the original recipe). This way, the cuts stayed open and it was easier to stuff them with the cheese.


Cheese stuffing is still a bit tedious but easier than with the previous version.


Another change was that I lowered the temperature to 350F. The original recipe did say the temperature may vary based on the oven. The oven I use is a convection oven and may run a bit hot. As shown below the loaf came out much better.


As before we had this with a glass of red wine. As before the bread was great and the changes I made were an improvement. The cheese was better distributed and cooking at the lower temperature resulted in a better texture to the bread. It was much more tender with an almost cake like crumb that was very pleasing.  As before the scallions caramelized beautifully and permeated the flavor throughout. As before, the only problem with this bread is that it pulls a pretty quick disappearing act. It's hard to resist going back for just one more piece--just another little one.