Showing posts sorted by relevance for query milk bread. Sort by date Show all posts

Wednesday, February 3, 2021

Sweet condensed milk bread

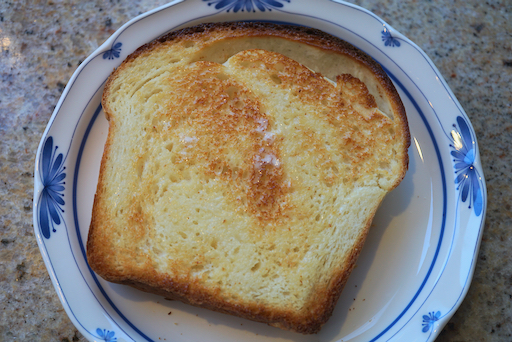
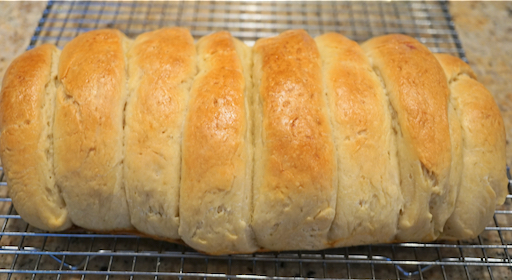
I made a Japanese-style super-soft milk bread recently. It was made with"Yu-dane" 湯種 or "Tangzong". I am not sure how my wife came across this recipe but this was also dubbed as "Japanese-style milk bread." It does not use Tangzong but uses sweetened condensed milk instead. My wife really wanted to try this recipe. We usually do not have any kind of condensed milk on hand so we ordered some when we had groceries delivered. As shown in the picture a space formed near the top surface. Maybe the secondary and last rising was a bit too much.  Otherwise this was a fine looking loaf of bread. It is not as soft as the previous milk bread but much softer than the regular white bread loaf we make. It has slight sweetness and the texture was great. Toasted and buttered this is great loaf.


My wife also used an egg for the glaze.


The grain of the cut surface shows slightly larger holes than the previous milk bread. This may be due to slight over raising after making the loaf.


One of the reasons this dough rose more vigorously may be this new contraption we got recently. This is called "Brod & Taylor Collapsible electric bread proofer". You just set the temperature which is said to be calibrated to the content temperature rather than the ambient temperature in the box. We interpret this to mean that when set at 81 degrees it is indicating that the bread being proofed is 81 degrees not the overall air in the box. The instructions say it was calibrated at the factory whether its for bread dough, yogurt or slow cooking).


This is collapsible so when it was not in use it flattens for easy stroage. The top has a clear window so that you can check on the progress of the bread dough rise.


Another good thing about this contraption is that it includes a shallow tray which can be half filled with water and provides moisture inside the box. We did not cover the dough but the surface did not dry out or make a crust. My wife is looking forward to using the box to make yogurt.


Ingredients
1 tsp sugar
1 cup milk
2 1/4 yeast (just a note: this is the amount of yeast usually used to make 2 loaves. This may have been another reason the bread rose so much so quickly.)
1 1/2 tsp. salt
1 Tbs. butter
3 1/4 cups bread flour
2/3 cup sweetened condensed milk
1 egg lightly beaten

Directions
Proof the yeast in the slightly warmed milk with the sugar dissolved. Add the yeast mixture and every thing except the egg to the bowel of a stand mixer. Mix until a dough forms. Knead for 7 to 10 minutes then turn out onto a lightly floured board and form into a ball. Place dough in a greased bowel turning to grease all over. Place in the proofing box set for 81 degree temperature until double in size. Punch down and form a loaf and put into a greased loaf pan. Put into the proofing box again until the loaf doubles in size. Brush the surface with the egg and bake in a 350 degree oven for 30 to 35 minutes until golden brown and sounds hollow when tapped. Turn out onto a wire rack to cool.

This is a very lovely bread. Nice soft texture and a complex flavor just slightly sweet. The flavor was even better the next day. The texture was a bit denser and moist compared to the previous Japanese milk bread we made. Nonetheless it is a wonderful toasted/buttered breakfast bread.

Tuesday, September 1, 2020

Super-soft Milk Bread 日本風食パン

Many years ago, when we visited Tokyo 東京, we stayed at hotels in the Asakusa area 浅草. (More recently, we've been staying at hotels in the Ginza/Tokyo station area). One of the fond memories we have of our stay at the Asakusa hotels was going to a coffee house or "Kissa-ten" 喫茶店 for breakfast and coffee. At that time, they usually offered, at a very reasonable price, choices of "morning sets" モーニングセットdesignated as  "A", "B" or "C". They consisted of some kind of egg (hard boiled or egg salad) and slightly different sides such as a mini green salad or cucumber. The foundation of the meal, and, as far as we are concerned, the best part, was a very thick slice of soft bread lightly toasted and served with butter or sometimes jam or jelly. The second cup of coffee was usually available at a steep discount which was another reason we liked breakfast at the Kissa-ten. Recently my wife came across a recipe for "Super-soft Milk Bread". In addition to being reminiscent of our favorite Kissa-ten bread, the accompanying write-up referred to it as a variation of "Hokkaido milk bread". Since I am originally from Hokkaido 北海道, that "sealed the deal". I had to make this. This is a very different recipe from our usual white bread loaf. It came out super soft, light and fluffy. It really reminded us of "Kissa-ten" toast. I sliced a very thick piece (but not as thick as some we had at kissa-ten) toasted it and slathered on the butter. Voila!


Some Japanese recipes for this type of bread include "Yu-dane" 湯種 or "Yu-kone or Yu-gone" 湯捏ね in which  a portion of flour is mixed and kneaded with hot water. Instead, this recipe pre-cooked the flour and milk into a soft paste called "tangzhong" which is the Chinese pronunciation of "Yu-dane"  湯種.  I read that this was popularized by a Chinese cookbook author Yvonne Chen as "tangzhong" which is the term that commonly appears in English-written recipes for this type of bread. This recipe came from the King Arthur website.

Ingredients
Tangzhong
3 tablespoons (43g) water
3 tablespoons (43g) whole milk
2 tablespoons (14g) King Arthur Unbleached Bread Flour


Dough
2 1/2 cups (298g) King Arthur Unbleached Bread Flour
2 tablespoons (14g) Baker's Special Dry Milk or nonfat dry milk
1/4 cup (50g) sugar
1 teaspoon salt
1 tablespoon instant yeast (This looked like too much for one loaf of bread, next time I may reduced it in half)
1/2 cup (113g) whole milk
1 large egg
4 tablespoons (57g) unsalted butter, melted

I weighed all ingredients except for the yeast and egg.

Directions
To make the tangzhong: Combine all of the ingredients in a small saucepan, and whisk until no lumps remain.

Place the saucepan over low heat and cook the mixture, whisking constantly, until it becomes thick and the whisk leaves lines on the bottom of the pan, about 3 to 5 minutes (#1 below).

Transfer the tangzhong to a small mixing bowl or measuring cup and let it cool to lukewarm.
To make the dough
Combine the tangzhong with the remaining dough ingredients, then mix and knead — by mixer or bread machine — until a smooth, elastic dough forms; this could take almost 15 minutes in a stand mixer (I used a standing mixer with a dough hook and kneaded it for 7-10 minutes).

Shape the dough into a ball, and let it rest in a lightly greased bowl, covered, for 60 to 90 minutes, until puffy but not necessarily doubled in bulk.

Gently deflate the dough and divide it into four equal pieces; if you have a scale each piece will weigh between 170g and 175g (I divided the dough in half-- I should have weighed the halves; the loaf came out uneven).

Flatten each piece of dough into a 5" x 8" rectangle, then fold the short ends in towards one another like a letter. Flatten the folded pieces into rectangles again (this time about 3" x 6") and, starting with a short end, roll them each into a 4" log. (After flattening, folding, I rolled it into two logs).

Place the logs in a row of four (in my case, two) — seam side down and side by side — in a lightly greased 9" x 5" loaf pan.

Cover the loaf and allow it to rest/rise for 40 to 50 minutes, until puffy (#2 below).

Toward the end of the rising time, preheat the oven to 350°F.

To bake the bread: Brush the loaf with milk and bake it for 30 to 35 minutes, until it's golden brown on top and a digital thermometer inserted into the center reads at least 190°F (#3 below).
Remove the loaf from the oven and cool it in the pan until you can transfer it safely to a rack to cool completely (#4).


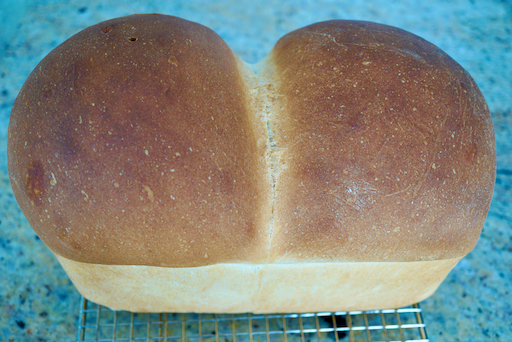
The dough rose rather quickly (this is the reason I think I will reduce the yeast next time). After the bread completely cooled, I sliced it (#4).We have been making white bread loafs for some time using an old recipe which came with our stand mixer. Our white bread loaf is good but this one is different and may be better. It is extremely light and very close to the Japanese loaf bread we had at the Kissa-ten. We were "transported" back to Tokyo with the first bite. It had a mildly sweet flavor and the crust was nice and crunchy. We will definitely make this again for sure.

Addendum:

I doubled the amount and made two loaves. I also, decreased the yeast by half (proportionally). I also weighed the 4 portions (2 for one loaf) and they came out in equal sizes (see pictures below). This is just a note to myself so that I do not have to calculate  the ingredients' weight again.

Ingredients:

Tangzhong
86 g water
86 g whole milk
28 g King Arthur Unbleached Bread Flour

Dough
596 g King Arthur Unbleached Bread Flour
28 g  nonfat dry milk 
100 g sugar
2 teaspoon salt
1 tablespoon instant yeast
226 g whole milk
2 large egg
114 g (one stick) unsalted butter, melted

Despite halving the yeast, the dough rose and the bread came out soft and fluffy. It may have taken a little bit more time to rise but the flavor of the bread, we thought, was better.

Saturday, April 10, 2021

Japanese milk bread with cream cheese クリームチーズで作った日本風ミルクパン

 This is an addition to the on-going saga of my wife making Japanese-style milk bread. As a gift, we received several large hard cover cookbooks; one was the “French Laundry Cookbook” and another was “Bouchon Bakery”. While browsing through the books my wife found a recipe called “Pain-au-Lait Pullman loaf”. Since she can read French fairly well, she immediately recognized this translated to “milk bread”. As she read the recipe, she found out it was indeed a Japanese style milk bread but they replaced the milk with cream cheese to make the crumb more moist. Although she thought she had already baked a full gambit of Japanese milk breads, she determined this was a variation she had not yet attempted and, besides, cream cheese is one of her favorite ingredients. So she went for it. The instructions were a bit unusual (read: incomprehensible. For example at one point it says, and this is a direct quote, “mix on low speed for 4 minutes. Continue to mix on low speed for 30 minutes” (huh??) Would that be 34 minutes of continuous mixing ?!!) So she consulted me and we decided to follow our CCK (Common Culinary Knowledge). In addition since we do not have “Pullman” bread pans, we made the bread using a regular loaf pan. It came out quite well as seen below. This is a close tie with the original milk bread I made. But a slightly different flavor due to the cream cheese. Lightly toasted with butter...perfect for breakfast with a cup of Cappuccino or Cafe latte.


Since we did not use a pullman baking pan, top are round instead of flat.


Ingredients:
547 g. AP flour
1 3/4 tsp yeast
32 g. sugar
11 g. salt
285 g. water
35 g. egg (probably one small egg)
25 g. butter (cut into cubes)
79 g. cream cheese (cut into cubes)


Recipe doubled:
1094 g. AP flour
3 1/2 tsp yeast
64 g. sugar
2 tsp. salt
570 g. water (or milk)
2 eggs
50 g. butter (cut into cubes)
158 g. cream cheese (cut into cubes)

Directions:
Put the dry ingredients in the bowl of a stand mixer with a dough hook. Mix the water and the eggs together. Slowly add the mixture to the dry ingredients until incorporated. Add the butter and cream cheese. Continue mixing until it is incorporated. Add additional flour as necessary to achieve a smooth dough. Continue kneading for 7 to 10 minutes. Put in a bowl. Coat with vegetable oil cover and put into a proofing box set at 81 degrees until doubled in size. Deflate the dough. Form into two balls and put touching together into a heavily greased loaf pan. Return to the proofing box and let rise until slightly higher than the rim of the loaf pan. Bake in a 375 degree oven for 25 to 30 minutes or until it sounds hollow when tapped. We also made this bread as a muffin (3 oz. in large pyrex). While the muffin is good we think it is better as a loaf of bread. 

This was one of the best milk breads my wife made. The texture was very soft but moist. It had a nice rich flavor and although I couldn’t taste it, my wife claimed she could taste a hint of the cream cheese which made it different from the previous variations she made. Toasted with butter...as I said perfect!

Friday, March 12, 2021

Condensed milk bread コンデンスミルクパン

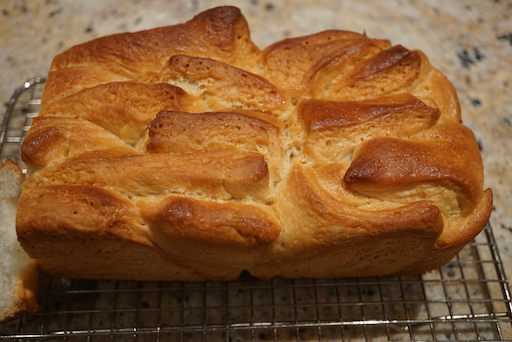
 My wife has been on a “roll” of making Japanese milk bread. She found many recipe variations on the internet and is trying a number of them. The picture below is one. The directions for making the bread that results in the irregular crust shown in the picture below seemed improbable.  But it worked. The crust has a nice crunch and the bread itself is slightly sweet.  An almost custard like filling forms in the grooves created by the irregular crust. 


Ingredients:
for the dough
200 g of bread flour
20 g of sugar
3 g salt
3 g active yeast
30 g sweetened condensed milk
130 g warm milk
20 g butter

for the condensed milk filling
20 g sweetened condensed milk
20 g butter

Ingredients ( X 2)
for the dough
400 g of bread flour
40 g of sugar
6 g salt
6 g active yeast
60 g sweetened condensed milk
260 g warm milk
40 g butter

for the condensed milk filling
40 g sweetened condensed milk
40 g butter


Ingredients X3
for the dough
600 g of bread flour
60 g of sugar
9 g salt
9 g active yeast
90 g sweetened condensed milk
390 g warm milk
60 g butter

for the condensed milk filling
60 g sweetened condensed milk
60 g butter


Directions
Add the ingredients to a stand mixer with a dough hook. Mix until a dough forms then continue kneading on low speed for 7 to 10 minutes. It is ok if some of the dough sticks to the bottom of the bowl as it is being kneaded. Turn dough out onto a board and do final hand kneading. Form into a ball. Coat with vegetable oil and put into a bowl. Cover and put into the proofing box until it doubles in size. While the dough is rising mix together the filling. by mixing the butter and condensed milk to form a smooth paste.

Once the dough is finished rising roll out into a rectangle. Evenly spread the filling over the dough (#1).
Cut the sheet into 4 even pieces (#2). Then, stack them on top of each other. Divide into 8 even pieces. Arrange each piece in a loaf pan (#3). Cover and put back into the proofing box until it doubles in size (#4). Bake in a 300 degree oven for about 35 minutes or until golden brown.


The part where the dough pieces are arranged in the loaf pan as shown in #3 is the part that seemed improbable. The pieces slipped around and barely filled the loaf pan. It seems impossible that this would result in a loaf...but it did! During the second rise the pieces melded together and when they cooked they formed a loaf with lovely crunchy irregular crust. The filling became custard like in the crevices formed by the crust. The flavor was slightly sweet and the interior texture was very soft. This was an amazing loaf.

Sunday, September 11, 2022

Marbled matcha milk bread 渦巻き抹茶食パン

 My wife saw this recipe on the King Arthur’s website and as part of her project to try every type of Japanese milk bread (shoku-pan 食パン) she could find (as witnessed in the number of milk bread recipes in this blog), she decided we had to make this. Who could pass up a Japanese milk bread with swirls of matcha green tea in it? The original recipe called for a single loaf made with three equal portions placed in the baking loaf pan. My wife decided to just make 2 separate loaves. Rolling the dough to make the different colored swirls was a bit tricky, and required some teamwork. But the end result, with nice concentric swirls (below), looked better than the pictures of the original 3 part loaf. Visually stunning, we can taste the green tea (quite a good amount of matcha 抹茶 green tea powder went in). 


As usual, I ask my wife to take over.

Ingredients
Tangzhong 湯種
1 cup (227g) milk, whole preferred
1/2 cup (60g) AP flour

Dough
1/2 cup (113g) milk, whole preferred; cold*
2 1/2 teaspoons instant yeast
2 tablespoons (25g) granulated sugar
1 large egg
3 1/2 cups (420g) AP Flour
2 teaspoons salt
4 tablespoons (57g) unsalted butter, softened, plus more for greasing pan
2 tablespoons (12g) matcha powder
1 tablespoon (14g) water

*Cold milk will help cool down the tangzhong and bring the dough to a slightly warm temperature.

Directions:
To make the tangzhong: In a small saucepan, whisk together the milk and flour. Cook the mixture over medium heat, whisking constantly, until a thick paste forms and the whisk leaves lines on the bottom of the pan, about 4 to 6 minutes. Transfer to the bowl of a stand mixer.

To make the dough: Using a whisk or the whisk attachment of the mixer, add the milk, yeast, sugar, and egg into the tangzhong and whisk until fully combined.

Add the flour and salt to the mixing bowl and use the dough hook attachment to knead on low speed until a shaggy, cohesive dough forms, about 1 minute.

With the mixer still on low speed, add the butter about one tablespoon at a time, waiting to add the next piece until the previous one is fully incorporated, about 3 to 4 minutes total. Increase the speed to medium-high and continue to mix until a smooth, elastic, and tacky (but not sticky) dough forms and pulls away from the sides of the bowl, 7 to 10 minutes.

On a lightly floured surface, divide the dough in half. Knead one half briefly, form into a tight ball, place in a greased bowl, and cover.

Transfer the remaining half of the dough back to the bowl of the stand mixer and add the matcha tea and enough water to get the tea incorporated into the dough. Knead, beginning on low speed and working up to medium, until fully incorporated, about 1 to 2 minutes. (Don’t worry about any remaining small clumps of matcha; they won’t appear in the finished loaf.) Transfer the matcha dough to the lightly floured work surface, knead briefly, round into a tight ball, place in greased bowl, and cover.

Let the dough rise at a warm room temperature until doubled in volume, about 45 minutes to 1 hour.

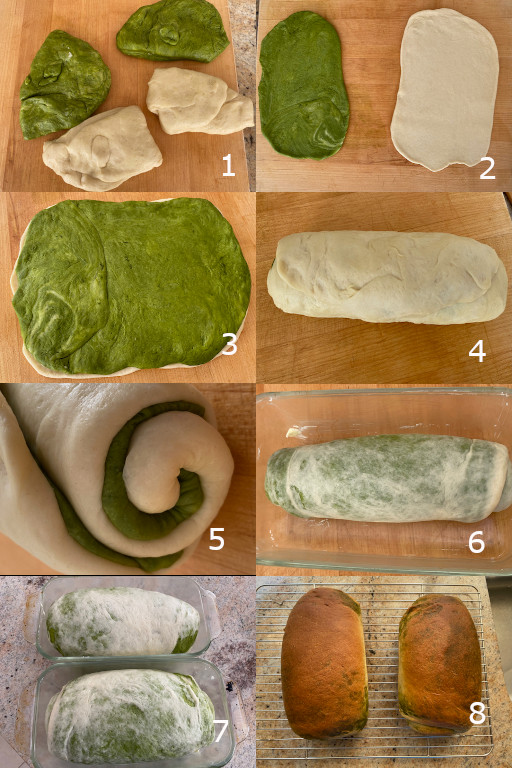
To shape the loaf: Turn the matcha dough onto a lightly floured work surface and divide it into 2 equal portions and set aside. Repeat with the plain dough (#1). Let the dough rounds rest, covered, for 15 minutes to make the dough more pliable and easier to work with.

Use a lightly floured rolling pin to roll out one portion of plain dough into an oval. Repeat with a portion of matcha dough (#2). Stack the matcha dough on top of the regular dough, then lightly press with the rolling pin to cohere. It should measure 11” X 8”. (#3). Starting on the short end, roll up the dough into a tight cylinder (#4). Cover and set aside while you repeat the process with the remaining portions of dough. You should end up with two cylinders, each made up of two kinds of dough.

Arrange one cylinder on your work surface so that the short end is facing you, then use a rolling pin to flatten it into a 12” x 8” rectangle. The plain dough will be covering the matcha dough entirely, but you will see a flattened green and white spiral at both ends (#5). Starting with the shorter end, roll up the dough into a tight log (#6). Place the log, seam side down, into a buttered 8 1/2” x 4 1/2" loaf pan. Repeat with the remaining dough and put it seam side down in the second loaf pan (#7).

Cover the pan and set it in a warm place. Let the dough rise until it looks puffy, springs back slowly when gently pressed; about 30 to 40 minutes. Towards the end of the rising time, preheat the oven to 350°F. Bake for 40 to 45 minutes, or until the crust is golden brown and the interior of the loaf registers at least 190°F when measured with a digital thermometer (#8).

Remove the loaf from the oven and turn onto a wire rack to cool for at least 30 minutes before slicing.


This is a visually beautiful and delicious tasting bread. The green tea flavor is very mild but does come through. The texture of the bread is very soft as is typical of milk bread. It is great lightly toasted and buttered for breakfast. 

Thursday, February 18, 2021

Milk bread with condensed milk and tangzong コンデンスミルクと湯種のパン

This is continuation on the theme of Japanese milk bread. My wife found this recipe somewhere on the Internet. This recipe uses condensed  milk and “tangzong” or “yu-dane” 湯種. The version I made used “tangzong” but no condensed milk. My wife’s previous version used condensed milk but no “tangzong”. This one uses both. So she was curious how this would turn out. Interestingly, it did not rise as much as the other iterations.


The cut surface also shows a bit larger holes compared to the previous milk breads we made. Nonetheless it is very soft and slightly sweet.


Ingredients:
for the tangzong
20 g (2 Tbs. + 1 tsp.) AP flour
75 g (1/3 cup milk) (the recipe called for water, I used milk)

for the dough
115 g (1/2 cup) whole milk
12 g (1 Tbs. sugar)
5 g (1 1/2 tsp yeast)
320 g (2 2/3 cups AP flour)
3 g (1 tsp. salt)
60 g (3 Tbs.) sweetened condensed milk (I have used up to 90g of condensed milk which worked just fine.)
1 large egg
55 g (4 Tbs. butter, melted)

egg wash (optional)
1 large egg
1 Tbs. whole milk

Directions:
for the Tangzhong: whisk the flour and milk together in a sauce pan. Heat until it thickens. Set aside and let cool.

for the dough: Warm the milk and add the sugar. Cool to 110 F and use it to bloom the yeast. In a stand mixer combine the flour and salt. Add the condensed milk, egg, melter butter, tangzhong and yeast mixture. Mix until a dough forms. Knead for 7 to 10 minutes. Shape to dough into a ball. Add to a bowl and coat with a thin coating of oil. Put bowl in a warm place (we used the proofing box) until doubled in size. Punch dough down. Shape into a loaf and put into a greased bread loaf pan. Back into the proofing box until doubled in size. If using the egg wash, mix the egg and the milk then brush over the loaf. Cook in a preheated 350 degree oven for 28 to 30 minutes until it is golden brown and sounds hollow when tapped. Let cool on a wire rack.

The main difference between this bread and previous versions was the texture. It was still very light but there appeared to be a lot more holes. It was still very soft and moist. It almost melted on the tongue. It also didn’t rise as much as the previous versions. It had a buttery slightly sweet flavor. This was still a wonderful bread lightly toasted and buttered.

Wednesday, August 13, 2014

Melon bread /Sunrise bread メロンパン/サンライズ

My childhood memories growing up in Sapporo include a type of sweet bun/bread called  "kashi pan" 菓子パンor cake or sweet bread. Being a kid, sweet anything was preferable, although I did not particularly care for very sweet bread especially with a sweet filling. One of these is "Melon pan*" メロンパン. Where I grew up, Melonpan was a round bun coated with crystalized sugar called "zarame" ザラメ 粗目 but no filling. Much later, I learned that there are quite a few regional variations to this bread. There is one variation called "Sun rise" サンライズ. What I had in Sapporo appears closer to "Sunrise" bread but it was called "Melonpan".  I read several extensive discussions on this subject in  the food anthropology column (in Japanese) I follow.

* "Pan"パン means bread in Japanese which apparently was introduced by Portuguese missionaries and the Japanese word "Pan" was said to have originated from the Portuguese word "pão".  The Spanish word for bread  is "Pan" and French is also close "Pain".

In any case, my wife developed a taste for melonpan on a recent visit to Japan. Melonpan is generally not available here so since she really liked it, my wife decided she would have to make it herself if she wanted to eat it.  I looked for recipes and the only ones I found were in Japanese. I selected one in Japanese and translated it for her. After some trial-and-error, she perfected her Melonpan recipe. Hers are not as sweet as I remembered and she does not use sugar icing. I found myself really liking her Melonpan. She tried making it several times--making ones with and without cream custard filling.  She found that covering the entire "bun" with cookie dough was rather difficult to do. Based on the "sunrise" bread she now only covers the top of the bun with cookie dough. This accomplishes the same effect but with much less effort. She also found that she has to use more flour than specified in the Japanese recipe. She surmised that the flour must be slightly different. She also found that the instructions for assembly in the Japanese recipe were almost impossible to do. So she developed a different method which is much easier and has more reliable results. 


She does not brother with scoring the cookie layer or garnishing with sugar. It naturally creates a "dry earth" pattern which looks good to us. Both types of buns, with and without custard filling are good but we like the ones with custard filling.


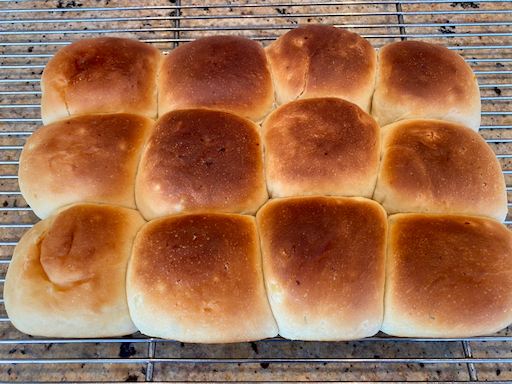
She makes 10 buns at a time and she freezes those we do not eat immediately. They warm up nicely in the microwave.

I asked my wife to fill in the rest.

These buns are a labor of love because they involve a lot of steps but for devotees of melonpan these are wonderful.

Ingredients (10 rolls):

Bread dough
Bread flour  344 g (or 2 and 1/4 cup)
Dry yeast 1 and 1/2 tsp
Butter 8g(or 1/2 tbs)
Salt 1 tsp
Milk 50CC
Warm Water 150CC

Combine the milk, sugar, butter and salt. Warm the mixture to scald the milk and dissolve the sugar and salt and to melt the butter. Remove from heat a let it cool to room temperature. Proof the yeast in the warm water. Put half the flour in a mixer with a dough hook. Add the liquids to the flour. Mix adding more flour in small amounts until the flour reaches a smooth consistency and forms a ball around the hook. (as with all bread the amount of flour is variable. You may need to add a bit more flour to reach the right consistency). Knead in the mixer for 7 to 10 minutes. The dough should be very soft but not very sticky. Take the dough ball and put it into a bowl with a small amount of vegetable oil in the bottom. Coat the ball with the oil then cover and place in a warm place until doubled in size.

Cookie Dough
Cake flour 148g (1 1/4 cups + 2 tbs)
Baking Powder  ½ tsp
Butter 60g(or 4 1/2 tbs)
Sugar 50g
Beaten egg 25g
Melon oil (or vanilla essence)  3/4 tsp or to taste

Add the baking powder to the cake flour and put aside. Cream the butter and sugar. After it becomes fluffy and light yellow add the egg and beat until fully incorporated and fluffy. Add the vanilla and incorporate. Add the flour to the butter/egg mixture and quickly stir until just incorporated. The mixture should be soft and slightly sticky but should be firm enough to hold its shape and work with. If it doesn’t have this consistency add a bit more flour. I flatten the cookie mixture into a square sheet and wrap in plastic wrap. I put it into the fridge to cool completely.

Custard Cream 
Egg yolk (medium)  x2 (set aside)
Milk 200ml
Sugar 35g
Cake flour 26 g (or 3 tbs.)
Vanilla 1 tsp

Mix the milk sugar and cake flour in the top of a double boiler. When the mixture starts to thicken use several tablespoons of it to “temper” the egg yolks then add the tempered egg yolks to the heated mixture. Add the vanilla. Stir constantly until the mixture becomes very thick. Immediately remove it from the heat a put into a bowl. Cover the surface with plastic wrap to prevent a skin from forming while it cools. Set aside until completely cooled.

The custard has to be thick enough to hold its form when cooled—about the consistency of soft butter (see picture 2 below).

Assembly:
After some trial and error and several disasters trying to follow the method in the Japanese recipe,  I came up with this method which seems to work best. After the dough has doubled, deflate it and divide into 10 equal pieces (I do this by weighing the entire ball then dividing it into 10 pieces of equal weight. (cover with plastic wrap to keep moist). I divide the custard into 10 equal weights the same way. (notice the cream has the consistency of soft butter.  If the cream is too soft or runny, as it was when I followed the Japanese recipe exactly, it will run off the bread and the edges can’t be sealed). I also divide the cookie dough into 10 equal weight pieces.

I divide the 10 equal weight balls of dough in half. I flatten them into rounds as shown in picture 1.  I place the pre-weighed cream on one of the rounds shown in picture 2. I take the second round and cover the cream. I crimp the edges to seal (picture 3). I then take the pre-weighed cookie dough put it between two pieces of plastic wrap and using a small rolling pin make a round large enough to cover the dough (picture 5). I put the assembled bun on a cookie sheet far enough away from any other bun so the sides don’t touch after they rise (picture 5). I let the 10 assembled buns rise until almost doubled.

  melon bread composit

I bake them in a 350 degree oven for 20 minutes until they are lightly golden brown. These buns are wonderful. They can also be made without the cream inside. The cookie on top really makes them. They are lightly sweet and the custard has a wonderful vanilla flavor. They are a bit of work to make but worth every mouthful.

Friday, May 29, 2020

Homemade yogurt 自家製ヨーグルト

We do not like low-fat or non-fat yogurt. We go for the full fat version. Our favorite is Seven Stars Farm Yogurt from Pennsylvania. The only place we can get this is at Whole Foods. Even before Covid-19, we had periods when even regular plain Dannon yogurt was not available at our grocery store. This occurred at the start of Covid-19. In the face of this shortage, my wife decided to start making her own yogurt again. This is something she did many years ago as a means of milk inventory control. She used a recipe given to her by a Palestinian friend whose family used it to make yogurt in the middle-east. Unlike other recipes which require pedantic small jars heated for a long time in a yogurt heating appliance, this recipe can make large quantities of yogurt overnight in "one sitting". This recipe uses commercial Dannon yogurt as the seed. We remembered it as a success but my wife has not made it for sometime. Nonetheless, she found the old recipe and made a batch.

According to this recipe you can use any quantity of milk with any fat content. If using low fat milk, however, add 1 1/2 cups nonfat dry milk (NFDM) for every 1/2 gallon of low fat milk. (This boosts the volume of milk solids in the milk making the resulting yogurt thicker). Bring the milk to a boil. Add the NFDM and allow the milk to cool in a bowl until it reaches 110 to 115 degrees at which point add 4 oz. of Dannon plain yogurt. (The same amount is used regardless of the quantity of milk). Wrap the seeded bowl of milk in several towels to keep it warm overnight. The next morning you have yogurt.

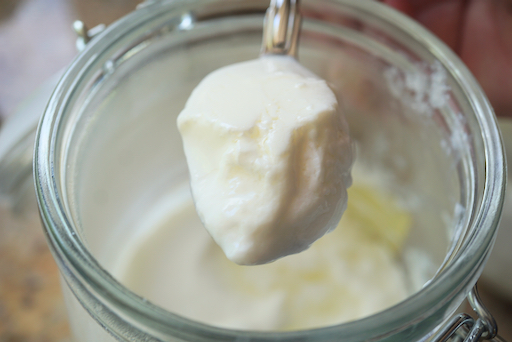
My wife used to heat up the milk in a dutch oven but this was the most tedious part of making yogurt since you have to continuously keep stirring it to keep it from boiling over and to prevent scorching on the bottom. She read somewhere that a slow cooker could be used to heat up the milk. So, we took our slow cooker, which we have not used for ages, out of storage. She heated the milk in the cooker set on low for three hours then turned it off. She took about a cup of the hot milk and using an immersion blender added the NFDM whipping it until all the NFDM dissolved. She then added the whipped portion to the rest of the milk and stirred it until everything was incorporated. (She did this because she found from experience sometimes the NFDM does not dissolve completely and forms an unpleasant layer in the yogurt on the bottom of the bowl). She let the milk cool for two hours until it was about 110 to 115 degrees before inoculating with the seed yogurt. She put the slow cooker bowl with the lid on into an ice chest to keep it warm overnight. The final product is shown below.


As you can see the consistency of this yogurt is quite different from the original Dannon. It is, nonetheless, quite firm and creamy. A major difference as shown by the yogurt dripping off the spoon is that it is very elastic. When the bowl is gently shaken it jiggles almost like jello. My wife made some Greek yogurt from this batch. The resulting Greek yogurt is very creamy and a dip we made using the Greek yogurt was much better than one with just strained Dannon. I also made some salmon salad and potato salad using this yogurt and it was much better and creamier than when I use the regular Greek yogurt.

My wife also learned that she was not alone in this yogurt making endeavor. While people were stuck at home during Covid-19, they were making yogurt in addition to baking bread. She read an article in the Washington Post about yogurt starters from "Culture for Health" and ordered some. The heirloom yogurt starter she got contained 4 different kinds. She used the "Viili" starter first which is described as "A Finnish yogurt variety, very mild and creamy, with a fairly thick consistency. It’s a versatile favorite that’s perfect on its own or in any yogurt recipe." According to the recipe, this starter does not require a heated environment. Following the instructions she used one cup of cold 4% milk and dissolved the starter in a glass jar, covered it with several layers of cheese cloth fastened by rubber band around the opening.

After 24 hours, it was still basically a glass of milk. The instructions said it could ferment for up to 48 hours. By then it had congealed a bit but was still basically a drink of milk rather than yogurt. She moved it to the refrigerator. The instructions recommended refrigerating it for at least 6 hours before tasting. The picture below shows the batch after a few days in the refrigerator. It firmed up a bit and had some curd. It also had a nice tangy/acidic yogurt flavor without any "off" taste. But it was way too runny.


Somewhat disappointed she fired off an e-mail to the company explaining the situation and asking for advice. They responded very quickly saying that the dried starter may take some time to fully "wake-up" to its full potential. As long as the first batch still smelled good they recommended starting a new batch using the ratio of one tbs from the 1st batch to 1 cup of cold milk. They recommended making 1 to 2 cups with that ratio (no more no less). Then they suggested she make successive batches with the most recent batch as starter until the desired consistency is attained. My wife used 2 cups of 4% milk with 2 tbs of the first batch for the second batch. After 48 hours it congealed significantly more than the 1st batch. The picture below is after 1 day in the refrigerator. It coagulated a bit more with a creamy consistency.


She then used 3 tbs from the second batch with 3 cups of milk for the 3rd batch. It was yet more solid (below picture). In addition it firmed up in 24 rather than 48 hours. We thought this consistency was not bad. She then used 4 tbs of batch 3 with 4 cups milk for batch 4. As shown below, after 24 hours this is just the right consistency and has developed a more pronounced tangy yogurt flavor. Success!


Well, now we have no shortage of yogurt. We have two options for making it and both are very good; one for low fat milk that results in yogurt that tastes like full fat and one for "high-octane" i.e. 4 % fat milk. It's a good thing we like yogurt and eat a lot of it. As long as milk is available we will no longer ever be without yogurt.

Thursday, February 7, 2019

Refrigerator Potato Bread/muffin 冷蔵庫ポテトパン/マフィン

This is the second potato bread we made. This time my wife did everything herself from the beginning to the end. So, her arm is definitely improving as well as she is determined to accomplish what she wants to do. This is called "refrigerator" bread since it rises over night in the refrigerator. The recipe also came from "Beard on Bread" cookbook. Again, it is a nice rustic bread with integrity and perfect for toasting with butter for breakfast.


Ingredients:
1 pkg. yeast
1/2 cup sugar (plus 1/2 tsp additional to proof the yeast)
1/2 cup warm water
1 cup warm milk
1 1/2 sticks ( 3/4 cup butter softened)
2 tsp. salt
2 eggs
1 cup mashed potatoes (make link to my potato recipe) run through a food mill to eliminate any        chunks that may remain after the potatoes have been mashed.
4 cups bread flour (with more as needed)

Directions:
Day1:
1. Proof the yeast in the warm water and 1/2 tsp. sugar.  Warm the milk with the butter in it. Dissolve the sugar in the milk mixture.
2. Using a mixing paddle on the stand mixer add the warm milk butter mixture, eggs and mashed potatoes blend thoroughly. Add the proofed yeast and salt. Mix completely.
3. Switch to a dough hook and add the flour one cup at a time until the dough clings to the hook and is smooth and springy to the touch. Knead on speed 2 for 7 to 10 minutes.
4. Form into a ball and put into a bowl with a small amount of vegetable oil turning the dough to cover with a coat of the oil. Cover tightly and place in the refrigerator overnight (or as the recipe says up to 16 to 18 hours).

Day2:
1. Next morning punch down the dough. (It will extremely cold and dense). Let rest for about 5 minutes (picture below).


2. Knead vigorously until it becomes soft and pliable (about 6 minutes).
3. Shape into 2 loaves of equal size and place into 2 heavily greased loaf pans. Cover and let rise until doubled in bulk  (the recipe says this could take up to 4 hours. This bread rose in 2 hours).  Make shallow slashes using a bread lame (see picture below).


4. Bake in a 375 degree oven for 40 to 45 minutes until browned and sounds hollow when tapped.
5. Remove from the pans immediately when they come out of the oven. (When I removed the loaves they seemed a bit soft on the underside so I put the loafs back in the oven outside the pans directly on the oven rack for about 5 minutes. This made the crust nice and crunchy).


This bread has a very pleasing dense but fine texture. It has a slightly sweet taste and the taste of the cream cheese and chives used in the mashed potatoes came through adding a pleasant dimension.


We are glad that my wife is up to baking again. I am certainly benefitting from having good breads to enjoy.

Addendum (1-22-22): This bread can also be made into muffins as shown in the next picture. These muffins were weighed at 76 grams and produced a total of 23 muffins. They were cooked in a 400 degree over for 20 to 25 minutes or until golden. When turned out of the pan the underside was very soft and white so I turned them upside down on a cookie sheet and cooked them for another 5 to ten minutes until they formed a light brown crust. 


Monday, March 15, 2021

Condensed milk bread V2 コンデンスミルクパン version2

 This is yet another version of my wife’s exploration of Japanese milk bread. This version is made with both condensed milk and cake flour so you would expect it to be very soft and fluffy...It wasn’t.


Ingredients:
3.5 cups cake flour
1 Tbs. instant yeast
1/2 tsp. salt
3/4 cup whole milk at room temperature
3/4 cup condensed milk
1 egg
2 oz. butter

Egg wash
1 medium egg
1 Tbs. whole milk

Condensed milk glaze (I didn’t use)
3 Tbs. condensed milk
1 Tbs. butter.

Directions
Place the ingredients in a stand mixer with a dough hook. Mix until dough forms. Knead for 7 to 10 minutes. Form a ball. Put in a bowl. Coat with oil. Cover and put into proofing box until it doubles in size.
Deflate the dough and form into a cylinder that will fit in the load pan. Use a sharp knife and cut the cylinder into pieces of equal thickness. Place the pieces seam side down in the lightly greased loaf pan (shown in the picture below).  Cover and let rise in the proofing box until double in size. Lightly brush the top of the loaf with the egg wash mixture. Cook in a 350 degree oven for 35 to 40 minutes until golden brown.


This bread came out hard and dry. The specified amount of cake flour did not result in a dough. The mixture was more like a batter. My wife had to add much more cake flour for it to take shape. We’re not sure what went wrong but this was a disappointment and will not be a regular on our baking schedule.

Monday, February 20, 2017

Three cheese Jalapeno cheddar roll ハロペニョとチェダーチーズロール

At the near-by Whole Food grocery store, Jalapeno cheddar rolls are only available on weekends when the local football team is playing. My wife really likes this cheese bread. The last time we happened to be in the the store, the bread was available. My wife went "wild" and bought four loaves thinking she would cache them in the freezer, so they would be available on non-game weekends. Unfortunately, unlike previous batches, the person who made this batch was extremely heavy handed with the jalapeno. The heat was so intense, it could have caused spontaneous combustion of the mouth. We couldn't eat it. With great regret my wife gave away the loaves to friends with asbestos tongues who thought the heat was wonderful.

My wife was very discouraged because she didn't think she could have faith that the bread she purchased would be an edible batch. I encouraged her to make Jalapeno cheese bread herself. I told her that I could remove all the veins and seeds from the Jalapeno before mincing so that we would have only fresh pepper flavors but no heat. I also pointed out that she could then have the cheddar rolls whenever she wanted them, not just on football weekends. (I didn't mention that I too secretly looked forward to the availability of homemade cheddar rolls). So, one weekend, she made her own version of  Japaleno Cheddar rolls or,  I should say,  Japapeno double cheddar, triple cheese rolls. They were double cheddar because the bread itself had cheddar cheese in it as well as the filling. Triple cheese because she used two different kinds of cheddar as well as a gouda. She decided to include cheese in the bread itself because she had noticed one of the reasons the Jalapeno rolls from Whole foods was so hot was because the bread itself had jalapeno in it. So she decided if the goal was cheesy flavor go all out and include cheese in the bread too.


My wife also added finely chopped and caramelized onion.


Ingredients:
(for bread dough)
4 cups of bread flour
1 3/4 cup milk, scalded
1/2 cup water
3 tablespoons butter, unsalted
2 tablespoons sugar
1 tbs salt
2 packages dry yeast
2 cups shredded Irish cheddar

(for stuffing)
4 fresh jalapeno pepper, seeded and deveined, finely chopped
1 onion, finely chopped and caramelized in olive oil
2 cup total, grated smoked gouda and double Gloucester cheese

Directions:
Put bread flour in mixing bowl. Combine the milk, butter, sugar, and salt in a sauce pan.
Scald milk and dissolve the butter, sugar, and salt. Let cool to about 110 degrees.
Meanwhile proof the yeast in the 1/2 cup water with a 1/2 tsp sugar added.
Turn on the mixer and add the liquid ingredients.
After they have been incorporated slowly added the grated cheese until it is incorporated. Add additional flour a little at time until a dough clings to hook and cleans the sides of the bowl.
Continue kneading on speed 2 for 7 to 10 minutes.
Place in greased bowl. Cover and let rise until doubled.
While dough is rising caramelize the onions, prepare the jalapeno and grate the cheeses.
Punch down dough and roll out into a rectangle about 1/4 inch thick.
Spread the onions, jalapeno and cheese evenly over it making sure to get to the edges (#1 and #2).
Roll the dough into a log (#3). Cut crosswise (#4). Put in a heavily greased pyrex pan. Let rolls rise until doubled in size (#5).
Bake in a 375 degree oven for 20 to 25 minutes (#6).


This was a resounding success and decadent beyond belief! While baking, we could smell cheddar and fresh jalapeno.  This was a very good roll. It had a soft texture with a nice cheesy cheddar-y bread and fresh jalapeno pepper taste but no significant heat (thanks to my careful removal of veins and seeds). You also can't go wrong adding the flavor of caramelized onions. Although we are not a football fans, this could have been a perfect snack for watching the Super bowl.

Friday, August 4, 2017

Savory Bread pudding 甘くないブッレドプディング

Bread pudding is a classic way to use up stale bread. Sweet bread pudding is most commonly served with caramel sauce as a dessert.  My wife saw a recipe for savory bread pudding in a Williams-Sonoma catalog. We like savory variations on usually sweet dishes. She made this with some significant modifications especially since we did not have any stale bread and none of our home made bread lasts long enough to become stale. My wife used Pepperidge farm bread stuffing leftover from last Xmas instead. We tasted it when it was baked but did not take a picture. So, a few days later, we pan fried the pudding and served it with skinned Campari tomato (seasoned with Kosher salt and spicy Spanish olive oil), fried eggs with runny yolk, cold cauliflower and broccoli. This was a lunch one weekend.


The pudding, eggs, and broccoli were heated up in the same frying pan. I first melted the butter on medium flame and started with the bread pudding (just to warm it up and give it a slight crust), when I turned it over, I added blanched broccoli and eggs. I put on the lid and cooked it for 30 seconds and let it stand for 1 minute with a lid on which made perfect fried eggs (of course, I used Pasteurized eggs).


We liked the bread pudding served this way better than immediately when it came out of the oven.

Ingredients:
1/4 bag of Pepperidge Farm herb stuffing
2 strips of bacon (#2)
2 small onions diced (#1)
olive oil, as needed
3 shitake mushrooms diced including stem (#1)
1/4 cup grated Parmesan cheese
1/3 cup (7 g) fresh flat-leaf parsley, chopped (#1)
1 tsp. fresh thyme leaves
1/4 tsp. Kosher salt
3 large eggs
1  cups (480 ml) whole milk
1/2 cup (240 ml) cream
1/4 cup (25 g) grated Gruyère cheese
Freshly ground pepper


Directions:
Preheat an oven to 350°F (180°C).
Butter a small baking dish (we used one that was 5 1/2 x 7 1/2 ).
Prepare the onions, mushrooms and parsley (#1).
In a fry pan over medium-high heat, cook the bacon until crisp (#2). Transfer to a large bowl. Add the onion to the pan and cook over medium-high heat, stirring often, until caramelized, 3 to 5 minutes. Transfer the onions to the bowl with the bacon.
Add the mushrooms to the pan and sauté. Transfer the mushrooms to the bowl and let cool. Add the Parmesan, parsley, thyme and salt to the cooked mushroom mixture and mix well.
In another bowl, whisk together the eggs, milk and cream until well blended. Pour over the mushroom mixture and stir to combine  (#3). Gently mix in the bread stuffing.
Carefully pour the bread mixture into the prepared baking dish.  (If you have extra, fill a buttered ramekin and make an additional tiny bread pudding.) Scatter the Gruyère evenly over the pudding and grind a light dusting of pepper on top.
Bake until the custard is no longer runny but still a bit wobbly in the center, 40 minutes to 1 hour (and about 25 minutes for a ramekin) (#4).
It will continue to cook as it sits before serving. Serve the bread pudding hot or at room temperature. Any leftovers can be stored, well wrapped, in the refrigerator for up to 3 days and reheated, covered with aluminum foil, in a 350°F (180°C) oven.

With all the cheese, bacon and cream this is a rather rich dish. We found only a small piece at a time was plenty. Nonetheless it is a nice dish. Cutting it into small slabs and frying it in melted butter made it more interesting by adding a slight crust. Next time, we may use "stale" bread instead of bread stuffing but probably not our home baked bread.

Tuesday, September 22, 2015

Pumpkin pancake パンプキンパンケーキ

Our favorite pancake is blueberry butter milk pancake. During blueberry season we make a batch of these pancakes almost every weekend and freeze the extras we make. They freeze very well. After making the “super secret” pumpkin bread we had canned pumpkin left over so, in keeping with the season, we decided to make pumpkin pancakes. I usually use 4 identical non-stick 8 inch frying pans to make a batch of pancakes. I could make the pancakes without oil or butter in the pan but my wife informed me that the oil is essential for the crispy "fried" edges she likes. My wife found this recipe on line.


Compared to our buttermilk pancakes, these really puffed up much higher. We enjoyed them with small amount of maple syrup and a side of espresso coffee.


The below is a direct quote from the original recipe (italicized) with our modification in parentheses.

Ingredients:
2 cups all-purpose flour
2 tablespoons packed brown sugar
1 tablespoon baking powder
1 1/4 teaspoons pumpkin pie spice
1 teaspoon salt
1 can (12 fl. oz.) Evaporated Milk (We made our own
1/2 cup Pumpkin puree
1/4 cup water
1 large egg
2 tablespoons vegetable oil
Chopped pecan (we first roasted and chopped) 
Instructions:
Toast about a cup of pecans, mix flour, brown sugar, baking powder, pumpkin pie spice and salt in large bowl. Combine evaporated milk, pumpkin, water (we actually just used regular milk), egg and 2 tablespoons oil in small bowl; mix well. Add to flour mixture. Stir just until moistened; batter may be lumpy. (Stir in chopped pecans.)

HEAT griddle or skillet over medium heat; brush lightly with oil. Pour 1/4 cup batter onto hot griddle; cook until bubbles begin to burst. Turn and continue cooking for 1 to 2 minutes. Repeat with remaining batter. Serve with  Pumpkin maple syrup (We just used straight maple syrup). 
This made a total of 10 pancakes. Here is the picture of the 8 remaining pancakes (we ate two). In addition to the pumpkin pie spice called for in this recipe, we did not have evaporated milk either. We have not used or bought evaporated milk for ages. So in addition to making our own pumpkin pie spice, we also made our own evaporated milk. I know what you are thinking; that we have entirely too much time on our hand to do something as silly as that but there were extenuating circumstances. First, we really wanted to make these pancakes, second we had some excess milk that we were wondering what to do with before it went bad. We consulted the internet and found it was fairly easy to make evaporated milk--just simmer a quart of milk until it is reduced by half. (While the process of actually making the evaporated milk was easy, cleaning the pan was not. Trust me, it is worth it to buy it in a can). It took half a day to make and the end product had chunks of "scum" or "membrane" (I assume from the milk protein). We strained the liquid and the end result was fairly thick, deep cream color and tasted pretty good. The funny thing is that this recipe calls for evaporated milk and then adds water. Why not just use regular milk? After all that work we were not about to add water so we used enough regular milk to make the batter of pouring consistency. We have a feeling that just adding milk or a mixture of milk and cream may do just as well as evaporated milk and water.

We really like this pancake. It has a nice pumpkin and pumpkin spice flavor and is nicely moist and fluffy. The canned pumpkin adds some mild sweetness. The toasted pecans added a nice crunch. These pancakes, like the blueberry pancakes also freeze very well. We took these to work for breakfast and they revived nicely in the microwave oven.

Thursday, September 6, 2018

Sally Lunn bread サリーラン ブレッド

This is again my wife's baking. This is a very usual and good bread called "Sally Lunn" bread. The original "Sally Lunn bun" was reportedly served in the spa town of "Bath" in England in the 18th century. In the U.S., the same name appears to be attached to breads that are dissimilar from the ones served originally in Bath. This recipe came from "Beard on Bread" and probably represents the latter category.  While the leavening agent is yeast it is a batter bread. This means that the texture of the dough is very unusual and not like regular yeast dough. It is wet, sticky and has to be "poured". My wife never made a bread like this before and wasn't quite sure how to handle it but in the end everything worked out just fine.  Lightly toasted and buttered, this is wonderful.


As you can see lots of holes which make this bread so light.


This is how it looks before toasting. Since it was baked in a tube pan, you have to cut it into wedges which is a bit awkward.


Ingredients:

1 package active yeast
1/4 tsp. sugar (to bloom the yeast)
1/2 cup warm water
1/2 cup lukewarm milk
1 stick butter melted in the milk
1 tsp salt
1/3 cup sugar
3 eggs
3 1/2 to 4 cups all purpose flour

Directions:

Bloom the yeast. Melt the butter in a sauce pan add the milk, sugar and salt. Stir until the sugar and salt melts. Let cool to lukewarm. Add the eggs and stir to combine. Add 3 cups of  flour to the bowl of a stand mixer with a paddle. Add the liquid ingredients to the dry ingredients and mix to incorporate. Slowly add more flour in small amounts at a time to make a "stiff but workable batter" (whatever that meant). (I ended up using a total of 3 1/2 cups flour until I declared the batter "workable".  It was very thick, wet, stretchy and somewhat stringy). According to the recipe: Pour it into a bowel. (Pouring was a bit of a euphemism. It was more like battling it into the bowl against its will.) Let rise until doubled.  Then, again according to directions, beat it down with a wooden spoon for about 1 minute. (Beating it down was the appropriate term here). Scrape it into a heavily buttered tube pan. (This took some doing, particularly to get it evenly distributed around the tube.) Cover and let rise until it reaches the top of the pan. (Initially I did not think that would be possible given the volume shown in the picture below, but to my surprise it not only reached the top but was trying to bust out of the cover by the time I captured it from going over the edge.)


Bake in a 375 degree oven for 45 to 50 minutes or until the bread is dark, golden on top and sounds hollow when rapped. (I thought this may have been a bit too high done next time I may try a shorter time). Turn out onto a rack to cool. (I was amazed at the final result shown below and even more amazed when we cut it into wedges and tasted it...what a beaut!)


Slice into wedges as shown below.


This was a remarkable bread making experience. This bread is very light and airy as you can see in the picture. I has a nice mild slightly sweet flavor. The crust is nice and crunchy especially when toasted. Who would have thought yeast bread could be made like this?