Thursday, February 25, 2010

Stewed pork belly 豚の角煮

This is one of the rather classic home cooked or Izakaya dish. Pork "kaku-ni" 角煮 has an origin in China and reportedly came into Japanese culinary vocabulary through Okinawa 沖縄 and Kyushu 九州. Although one may think that Japanese food is rather low-fat and healthy (which is mostly correct), Japanese also like totally unhealthy fatty items such as this dish. Cubes of Pork belly (portions used for salt pork and bacon) are cooked a long time in a soy sauce based broth producing a meltingly soft and sweet fatty morsel. This cut of pork is very common in Japan called "sanmai niku" 三枚肉 or "bara niku" バラ肉. The closest we can get in a regular grocery store in the U.S. is pork spare ribs. But unless you get pork spare ribs which include the front side, you do not get this cut of pork. The types of meat you get under "pork spare ribs" vary and, toward the back of the ribs, you get a cut similar to pork chops. Since salt pork is exactly a block of a pork belly (which is salt cured), I decided to experiment making this dish from salt pork.  There are many recipes including using a pressure cooker. The vast majority of the recipes suggest boiling the meat in a large amount of water first before cooking it in a seasoned broth. I figured that even though salt pork is salty, by boiling it in water or a seasoned broth with a lower salt content for a long time, the salt will eventually leach out from the salt pork. I looked through several recipes and decided on one which looked differet from the vast majority of the recipes and interesting by Atsushi Tsuchiya 土屋敦.


I first removed the rind (or skin) and cut a block of salt pork (about 500 grams) into 1 inch by 2 inch rectangles. Using a small dry frying pan, I browned all sides starting with the fatty side so that some fat will render out first (2-3 minutes on each side). In a small bowl, add 4 tbs of soy sauce (I used 1/3 low sodium soy sauce) and marinate the seared pork cubes for 10 minutes. I then put the pan on a low flame and cook for 5 minutes until soy sauce reduces a little and becomes slightly viscous. I add 200ml of sake and increased heat and cook 8-10 minutes and add 3 tbs of sugar.

Meanwhile I soak about 5-6 inch long dried kelp in water and let it rehydrate for 30 minutes or more. Add the water in which the kelp was soaking to the pan above so that the meat is covered. As it comes back to the boil, I skim off fat and scum which will appear on the surface. I placed the kelp to cover most of the meat as shown below and turn down the heat to simmer. I cook about 4 hours on simmer turning the meat over after about 2 hours, adding more water as needed.
I served this with a dab of Japanese mustard and sliced scallion. As an accompaniment, I made blanched baby Bok choy or チンゲンサイ青梗菜 dressed with a mustard soy sauce (Japanese mustard, sugar and soy sauce). This is a partial success. Although the meat is not too salty and fat is nicely rendered and soft, the meaty parts are a bit dry. I have to try this recipe with pork spare ribs.

P.S. We tasted this again after letting it sit in a refrigerator for 2 days (we forgot that we had this). I skimmed off any congealed pork fat and removed the kelp and warmed up the broth and pork. The pork was much better seasoned and not as dry, as compared to the last time we tasted this. The original recipe indeed recommended to keep it in a refrigerator overnight before serving and it is definitely worthwhile to do this extra step.

P.S. I posted two other attempt at making "Kakuni"; one with spare ribs and the other using genuine pork belly (to be posted).

Tuesday, February 23, 2010

Grilled chicken salad with white sesame dressing 鶏肉と椎茸の胡麻和え

This another example of making-a-dish-from-whatever-we-have. We had a left over grilled chicken thigh with salt. I decided to make a small Japanse-style salad with sesame dressing or "goma-ae" ごま和え. I often make similar dishes with some variations depending on what I have at a given moment.
Dressing: I first saute white sesame seeds (3 tsp) in a dry frying pan for a few minutes (although the sesame seeds are bought already roasted) this brings back the fresh toasted flavor. I tip the sesame seeds (reserving a few for a garnish) into a Japanese mortar or "Suribachi" すり鉢 and, with a pestle, grind the seeds until they are coarsely cracked and some oil comes out. You can smell the nice roasted sesame. Then, add 1 tsp of tahini or "shiro negi-goma" 白練りごま and 1/2 tsp of sugar, 2-3 tsp of soy sauce. I also add a very tiny amount (1/2 tsp) of rice vinegar but this is optional. The vinegar will add a subtle sourness as wel as lighten the color of the dressing.
Chicken: I just slice the one left over grilled chicken thigh with salt into small strips.
Scallion (1-2): I char the outer skin of a large scallion (white parts) over a direct gas flame for 2-3 minutes. Let it cool a little, remove the charred skin and cut into 1 inch long segments. I slice the remaining green parts into thin strips diagonally for a garnish. 
Cucumber (1 mini or 1/3 Japanese cucumber): I thinly slice one mini cucumber, salt and mix and let it stand for few minutes. I ring out the excess moisture and dress it with a small amount of sushi vinegar. 
Shiitake mushroom: I happened to have fresh shiitake mushrooms. I grilled 3 with the stem removed in a toaster oven for few minutes and cut into small strips and dressed it with a small amount of soy sauce while hot.

Mix all the above ingredients and dress with the sesame dressing. Garnish with thinly sliced scallion, Campari tomates, and sesame seeds. It is an extra step but dry roasting the sesame seeds makes a big difference.

Sunday, February 21, 2010

Plum wine 梅酒

I promised to post "Umeshu" 梅酒 previously. After all, I named my blog "on wine and food" so it is appropriate to talk about plum wines, although it is actually a fruit liquor and not really a wine. Many years ago (probably 25 years or so), while we were visiting Sapporo, we went to a get-together dinner at my late brother's in-laws' place. At the end of wonderful feast, they served us a plum wine which grandma mother-in-law had made many years ago. It was nicely aged and tasted like fine port or sherry--so good. There was no comparison to anything made commercially. Later, when we mentioned this to my mother, she immediately dove into the cabinet under the sink and produced an old bottle of umeshu that she had made and served it to us. Again, it was excellent. These episodes prompted us to make our own umeshu in the U.S. At that time, we were living in California and it was relatively easy to get green unripe Japanese plums or "Aoume" 青梅 at a Japanese market. We started making umeshu at home. The traditional recipe uses rock sugar and shouchu 焼酎 (usually 50 or 40 proof) or Japanese distilled potato liquor. After we moved to DC, it is still possible to get Japanse plums but it was hit or miss. Some years, we got some green plums from our Japanese grocery store. The owner was kind enough to set aside some for us whenever she got them but, some years, we did not get any plums. Thus, our quest to find a Japanese plum tree which will produce good fruit began.

Japanse plum 梅 or prunus mume is more closely related to apricot rather than plum or some cultivars are believed to be a hybrid such as cultivar "
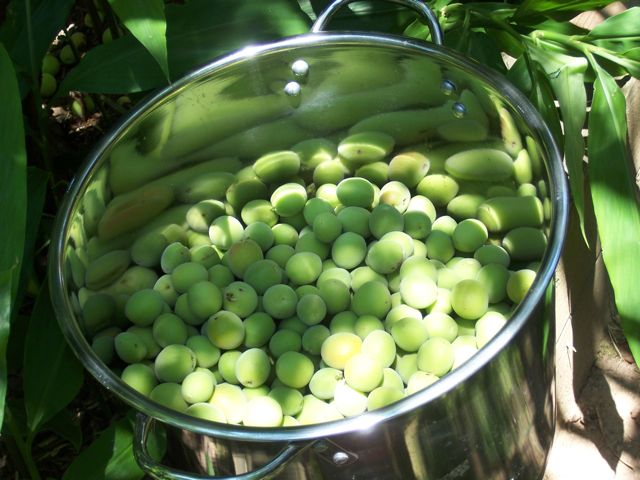
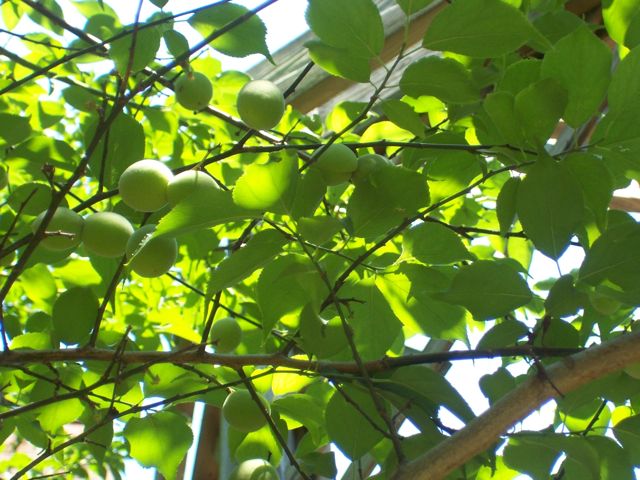
Bungo" 豊後梅. Their fruit reportedly is the best for umeshu and umeboshi 梅干し, a Japanese salted plum. We looked high and low but most of Japanese plum trees in the U.S. are stricktly ornamental and all of the tree catalogues we looked at only described how pretty the flower was but did not mention the fruit. After sending many emails to many tree nurseries, one from Washington state responded saying that this one (I do not remember exactly what was the name or cultivar) would produce decent fruit. So we ordered it. It came in the mail in a small brown envelope and the bare root tree was about 5 inches tall. It came in late summer so we put the small "twig" in a little pot on the deck. But winter was fast approaching and we wondered what to do with the little guy. It was not looking particularly happy and we did not think it would survive the winter sitting inside the house next to the window--for that matter we didn't think it would survive the winter no matter what we did. As a desperate measure, we plunked it down into the small raised vegetable patch we have in the backyard (we used to grow tomatoes until it got too shady for that). This was meant to be the plum tree I.C.U. and lo-and-behold, it revived itself and started growing. Now it is about 20 foot tall (see picture above) in the same vegitable patch since we lost a chance to transplant it elsewhere. It started producing fruit in the past 4-5 years. It was a first bumper crop in 2008. Vintage 2008 is our second vintage of umeshu made with estate (?) grown plums.

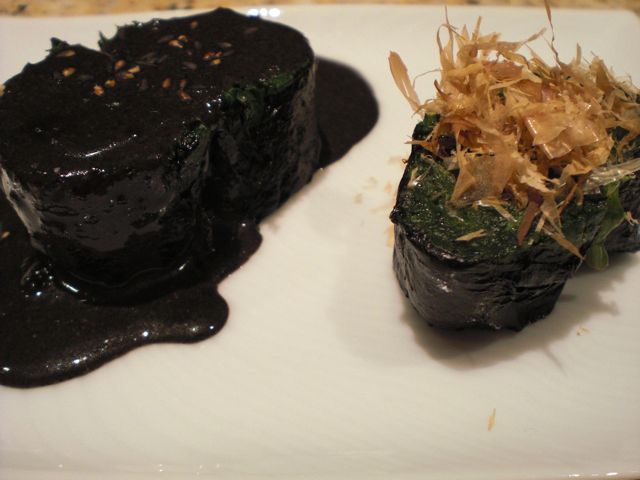
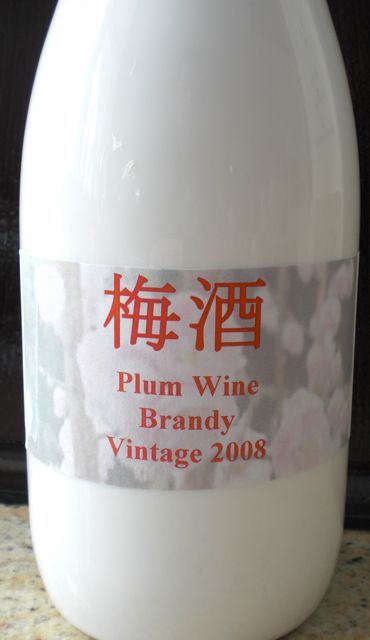
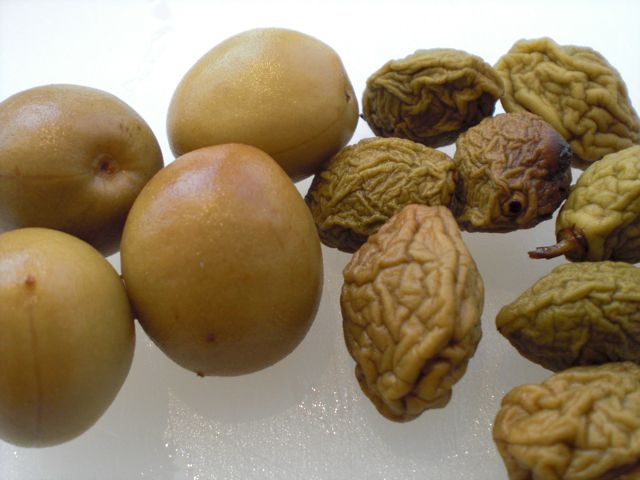
Recipe: Our recipes for umeshu have evolved a little but are based on the traditional Japanese recipes. We use regular sugar instead of rock sugar (since we did not see a big difference in quality of the resulting umeshu and it is rather difficult to get rock sugar) and use either 80 proof vodka and brandy (not VSOP or XO, just cheap Christian brothers). Our regular recipe uses 1lb of plums, 1/2 lb of sugar and 1.75 liters of brandy or vodka. We use to prick the fruit as suggested in a Japanse recipe (supposedly to encourage the flow of juices from the fruit) but this produces a murky wine with lots of precipitate. So, we do not prick the plums but, instead, coat the fruit with sugar and let it stand for one day in a jar so that the moisture is being extrated from the fruit before adding the alcohol. For Vintage 2008, I used 2 lbs of fruit since we had so much. The above picture was the Vodka version. Not intentionally but I left this batch with the fruit for one and half years (I usually bottle it after one year). The brandy version became darker and the fruit is all shriveled up (see picture below, right) as compared to the vodka version in which the fruit looks plump (picture below, left). I am not sure what made this difference. Since the sugar amount is the same, it must be something to do with the brandy (This difference was not apparent when I made brandy and vodka plum wines in previous years).

Tasting notes: The taste test was done while bottling. As a reference, we also tasted the old vintage brandy plum wine (I think it is 2000 or 1999 vintage but the label has fallen off). The picture below, from the left to right, are 1) Old vintage brandy plum wine, 2) 2008 Brandy plum wine and 3) 2008 Vodka plum wine. You can clearly see the diference in color. Nose is best in the old vintage with nice strong plum nose with a nutty sherry character. Palate is also the best in 1) with nice mellow plummy taste without any harsh edges despite a high alcohol content. 2) is not bad for young plum wine but 3) definitely has a raw, harsh edges.


We have accumulated quite a few bottles in the past 20 some years. One of these days, we may be able to do the vertical tasting but it is a bit like Scotch tasting, your have to be very careful, otherwise you will be totally soused after a few tasting.

P.S. Please see here for additional information on Umeshu.

Friday, February 19, 2010

Sliced duck breast and scallion with Ponzu sauce

Sliced duck breast with Ponzu sauce 鴨とネギのおろしポン酢 (Mark's book p145)

Japanese consider scallion or "negi" 葱 and duck or "kamo" 鴨 to be the ultimate culinary combination. The Japanese expression "Kamo ga negi o shotte kuru" 鴨が葱を背負ってくる or a short form, "Kamo-negi" 鴨葱 literally means "A duck flies in with bundles of scallion on its back", which describes the situation in which "A perfect victim falls into your hands willingly and carrying a present to boot". I had to make a small deviation from the original recipe since I did not have a "Tokyo" scallion or naga-negi 長ネギ (You could get one at a Japanese grocery store) and I did not want to use leeks as the substitute as suggested.
I cook the duck breast in my usual way. I clean the duck and score the skin in a cross hatch pattern (rather than simply piercing the skin as indicated in the recipe since this will allow more complete and easy rendering of the fat), salt and pepper, cook it in a dry frying pan, the skin side down, on a medium-low flame. I cook it for 6-7 minutes until the skin is brown and crispy. During the cooking, I remove excess fat using paper towels. I turn over the duck and place it in a preheated (400F) oven for 6 minutes. While it is hot, I marinade it in a Ponzu sauce (Mark's book p145 but I used a commercial one from the bottle) for several hours. Meanwhile I brown the white parts of scallion (as many as you need but I used 6) in a frying pan on a medium flame with a small amount of oil (5-6 minutes), cut them into pieces a few inches long. I thinly slice the green parts of the scallion on a bias as a garnish as seen above.

I remove the duck breast from the marinade and slice it rather thin and drape the slices over three segments of the scallion and top them with grated daikon, yuzu-kosho 柚子胡椒 (Mark's book p145 but I used a commercial one from the tube) and garnish with sliced scallion (green parts). We thought that yuzu-kosho was a bit too spicy to our taste but the combination of scallion and duck is great and the grated daikon was also nice cutting through the richness of the duck. We like this dish very much.

Thursday, February 18, 2010

Spinach with creamy black sesame sauce ほうれん草のごま和え

Spinach with creamy black sesame sauce ほうれん草のごま和え(Based on Mark's book p76)
Spinatch with mustard soy sauce ほうれん草の芥子醤油

In general, fruits and vegetables are much tastier and better in Japan with few exceptions. These exceptions include carrots and spinach. Carrots available in the U.S. are thinner, longer and much sweeter especially when eaten raw. Western varietals of spinach are tender and good for eating as a salad especially "baby" spinach.  Although Western varietals of carrot and spinach are now available in Japan, traditional Japanese spinach is rather tough and not suited to eating raw as salad and contain a high amount of oxalic acid. I still remember that my mother told me when I was a child that spinach had to be boiled in a large amount of water and then soaked in cold water to remove as much oxalic acid as possible. I am not sure common Western varietals have a significantly lower oxalic acid content, however. It is getting difficult to find bunches of fully grown spinach in our grocery stores. Instead, I often end up with pre-washed and packaged "baby" spinach. I think that, for traditional Japanese ways of preparing spinach like seen here, it  may be better with bunches of Japanese or Asian spinach since Western spinach does not have a same texture.

I prepared two rather common sauces to serve with spinach. One to the left is with black sesame sauce as described in Mark's book p76. One to the right is dressed with a mustard soy sauce or "karashi jouyu" 芥子醤油 and topped with dried bonito flakes. I cooked the whole bag of baby spinach (which yielded only two servings) in a small amount of water in a sauté pan with a tight-fitting lid for 2 minutes or until the spinach wilted. I drained and let it cool. I squeezed out any extra moisture and rolled it using a Nori sheet in a long cylindrical shape like making a roll sushi. I left it wrapped in plastic wrap until the Nori absorbed the moisture and adhered to the spinach (few minutes). I then cut the the roll into 1/2 inch pieces yielding 8 pieces.

1. For the black sesame sauce, I followed the recipe in Mark's book. I toasted 1 tbs of black sesame seeds in a dry frying pan and put them in "suribachi" すり鉢 and ground them until they became pasty. I added 1 tbs of "neri kuro-goma" 練り黒ごま (this can be bought at a Japanese grocery store) or black tahini. I deviated from the recipe and did not add any sugar but instead added mirin and soy sauce (2 tbs each). Since I did not have "dashi" broth handy to dilute the sauce to the desired consistency, I used mirin which added liquidity as well as sweetness without the dashi broth.

2. For the mustard soysauce, I put 1/2 tsp of a prepared Japanese mustard (sold in a tube, this is hot, not like Western mustards), 1/2 tsp of sugar and 3 tsp or more of soysauce in "suribachi" and mixed well.

Both are good, although we really liked the black sesame sauce. Toasting the sesame seeds really brings out the nice fresh fragrant flavor of sesame. Black sesame paste adds a nice nuttiness. I had to find "adult" (as opposed to "baby") spinach for this dish, though.

Tuesday, February 16, 2010

Tatsuta fried chicken 鶏の竜田揚げ (Mark's book p54)

This is one of "teiban" 定番 or regular dish in Izakaya. I used to make this dish often (when we were young and reckless) but I have not made it for some time. My wife used to call this dish "Japanese chicken McNugget" but it is much better than McNugget (actually, no comparison). Two teiban fried chicken dishes in Izakaya are "kara-age" 唐揚げ and this dish. For Kara-age, no prior marinading is used or it may be just garlic flavored. "Tatsuta-age" uses a soy sauce based marinade. In either dish, the chicken pieces are deep fried after being dredged in flour (wheat, potato and rice flours with many establishments using proprietary mixes to attain the ultimate crispy coating). The name "tatsuta" is said to come from "Tatsuta" river or "Tatsuta-gawa" 竜田川 where Japanese maples or "momiji" 紅葉 (actually, "momiji" literally means "red leaves") are famous because of their brilliant red color in autumn. It is said that the color of the marinated, deep fried chicken resembles the red maple leaves along the "Tatsuta" river (that is poetic but requires lots of imagination, I think).


The recipe in the Mark's book (p54) is interesting, since the chicken is first macerated in salt and sake and then dressed in soy sauce just before it was dredged in flour and deep fried. I will try that in the near future but, here, I used my more traditional recipe. I bone, clean and cut up chicken thigh into bite size pieces across the grain of the meat. I then marinate the chicken in a Ziploc bag containing sake, mirin, and soy sauce (1:1:2 ratio) and 1/2 tsp of grated ginger (optional) for at least 30 minutes to several hours or even overnight. (For shorter marinating time, increase soy sauce in the marinade.) I lift the chicken pieces from the marinade, pat dry with paper towels, dredge in potato flour or "katakuri-ko" 片栗粉 and deep fry. I actually use a "shallow" frying method as you see below. I use the amount of oil (peanut oil) to the depth of 1/2 inch so it comes to half the thickness of the chicken pieces. The oil temperature should be about 350F but I use the bamboo-chop-stick-dipped-in-oil method of judging the oil temperature. The shallow frying will all moisture to escape more easily from the chicken pieces (since half is exposed to air) and produce a crispier outer layer besides using less oil. (I learned this technique from a chicken "kara-age" recipe in a cook book by Kentaro Kobayashi, which lists many small dishes that go with drinks). I fry for 3-5 minutes and toward the end, crank up the heat a bit to make the surface crispy (cut to test for doneness). I drain the chicken of excess oil on a metal grate before serving. I serve this dish on a folded tempura "shikishi" paper 天ぷら敷き紙, but it is obviously not necessary if you do not have one.

 You only need lemon wedges, or not even that, since the chicken pieces are already seasoned. We try not to make and eat too much deep fried food but this one is really good especially since we have not had this for some times.

Last time we were in Kyoto, we had chicken Kara-age at "Tori-hachi" 鳥八 (A specialized chicken dish drinking place but not "yakitori"-ya) near Kyoto station. They have two large vats of oil on induction cookers with electronic thermal sensors to maintain the high and low temperatures and they use a double frying method to produce an excellent "kara-age". 

Sunday, February 14, 2010

Hanger steak ハンガーステーキ

We do not eat lots of beef. We eat more pork and chicken. When we eat beef, often, we will go for filet mignon. If we are going to have Fajitas, we go for a "skirt" steak. We often noticed when you go to other countries, cuts of the meat especially beef is quite different. Hanger steak is one of these cuts which have been more popular outside the U.S.. More recently, even here in the U.S., it is getting much more popular becase it is very tasty, although it is not one of the tender cuts of beef. The day, I got  a whole red snapper, I also saw hanger steaks in the butcher section of our gourmet grocery store and I could not resist getting one small steak. When we eat beef we do not eat that much. We often prepare it in a manner suitable for an Izakaya dish or as an accompaniment for a drink. I often serve beef sliced so that you can eat it with a pair of chopsticks. 

This is not a recipe per se. Often, I make a simple soy sauce brown butter sauce for steaks (I learned this sauce from a small but elegant Japanese course menu restaurant "Makoto"). Tonight, I cooked a hanger steak (seasoned with salt and pepper) in a frying pan, without finishing in an oven as I usually do for filet mignon, to cook it medium rare. I let it rest on a plate covered with aluminum foil. Since we had an already open bottle of left-over red dust Shiraz from Australia, I decided to make a red wine sauce with shallots.  While the meat was resting, I added 1 large shallot cut in thin rings and sauted using the remaining fat from cooking the steak for 3-4 minutes until it got soft and slightly brown and brown bits (fond) come off from the bottom of the pan. I deglazed the pan with 2-3 tsp of red wine vinegar and let it evaporate to almost dry. I then added 1/4 cup (or whatever was left in the bottle) of red wine and the meat juice accumulated in the plate on which the steak was resting. I reduced it to a small amont just enough to cover the bottom of the frying pan (5 or so more minutes on a high flame). I finished the sauce with 2-3 thin pats (1 tbs or less) of unsalted and cold butter, tasted and adjusted the seasoning with salt and pepper if needed (not needed here). I then sliced the hanger steak into thin strips across the grain of the steak. I topped the steak with the shallots and the wine sauce. This steak was so flavorful that you do not have to eat that much to enjoy the beef. We definitely needed to open a better wine. Crauford Maroon Vineyard Tattoo Cabernet Sauvignon 2005 went so well with this steak.