Tuesday, December 27, 2011

Omelet rice オムライス

One evening, this was what we had as a shime 〆 or ending dish. I thought about what we had in the fridge and suggested to my wife "chicken omelet rice" or "omuraisu" オムライス. Omuraisu, "omu" is short for "omelet" and "raisu" i.e. rice in Japanese. It is a quintessential Japanese style Western "Yoshoku" 洋食 dish and also one "kids" like. I am not sure about the history of omuraisu but the movie "Tampopo" たんぽぽ made a version of omuraisu famous. Please see this link for the details and the actual movie footage.

The basic omurice is fried rice flavored with ketchup and covered with an omelet. I do remember my mother making it for us when we were kids. She had a special rice mold just for omurice.
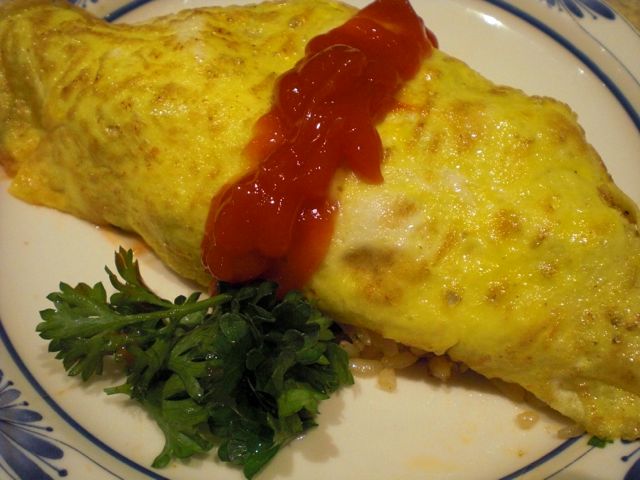
You cannot really appreciate the size of this omurice seen above but this is a miniature version and probably less than 1/3 of the usual size. As such it is a perfect shime or ending dish for us.

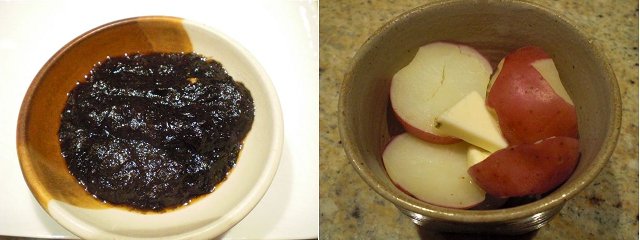
Rice: As ususal I used previously frozen rice (about 1/2 cup) which was briefly microwaved; not warm but the grains could be separated (in my case about 30-40 seconds).

I used finely chopped shallot (1 medium or onion), leftover barbecued chicken (meat from one leg, cut into small cubes), and parsley (several sprigs, finely chopped). The more authentic recipe calls for canned green peas for greenery.

I added light olive oil (1 tbs) to a non-stick frying pan on medium heat. I first sautéed the shallot for 1 minute or until it became semi transparent, I then added the chicken meat and the rice and fried them for 1-2 minutes. I seasoned it with salt and pepper. I then moved the rice mixture to one side making an empty area in the frying pan. I added about 2 tbs of ketchup and stirred using a silicon spatula without mixing it with the rice for 1 minutes until the color darkened (which makes the flavor of ketchup a bit more complex).  I then mixed the ketchup with the rice mixture and added the parsley. I tasted (adjust the seasonings if needed) but did not need more seasonings.

After I divided the fried rice into two portions, I cleaned the frying pan and added a pat of butter and one egg (beaten) to make a thin omelet. I devided the omelet in half and draped it over the mound of rice and adjusted the shape to make it presentable. I squirted the ketchup on the top and added parsely springs as a garnish. If you have, you could erect a small Japanese flag or any national flag of your choice on the omuraisu but that is for kids. I have no idea  why a flag is used to decorate a "lunch" for kids or "Okosama ranchi" お子様ランチ in which "omuraisu" is one of the most popular items.

My wife is not crazy about "ketchup" flavored rice but I think this is a perfectly fine dish for adults to end the evening as long as you do not erect a national flag on it.

Sunday, December 25, 2011

Edible chrysanthemum with black sesame sauce 春菊の黒ごま和え

Edible chrysanthemum or "shungiku" 春菊 is one of my wife's favorite Japanese vegetables. We even grew some from the seeds for few years.  The harvest, however was was quite meager and the plants frequently got leggy consisting mostly of stalks with few leaves so we stopped growing it. Only sporadically, do I see fresh shungiku at the Japanese grocery store. This green is usually used in "Sukiyaki". My wife, however, gets quite creative with it, claiming that "shungiku in not just for sukiyaki any more." She shocked several of my Japanese friends by using it as lettuce in a salad..."but it is never eaten this way in Japan", they exclaimed. My wife asked, "why not?"

I bought shungiku last weekend but did not have a chance to prepare it. Rather than let them go waste, I decided to make this simple dish.
Shungiku: This started out as a good sized bunch but once cooked, like spinach, it reduced tremendously. I first cut off the largest stalks on the bottom and blanched the bunch in salted boiling water for about 1 minute and immediately shocked it in ice water. Using paper towels, I wrapped the shungiku and squeezed out any excess moisture as much as I could. I then wrapped the shungiku in nori sheet to make a cylindar. I sliced the cylindar into 4 pieces (2 pieces per serving as you can see above).

Black sesame sauce: This is exactly as I posted before. I used black sesame paste from the pouch (2 tbs), sugar (1 tsp), soy sauce (1-2 tbs), if needed, sake or mirin to adjust the consistency.

The flavor of shungiku is very unique. It is not spinach and really taste like "chrysanthemum". This is rather healthy but quick good dish. Next time, when I get fresh shungiku, I have to make sukiyaki--unless my wife comes up with something else first.

Friday, December 23, 2011

Drunken tomatoes and its "marinade" Martini 酔っ払いトマトとマーティニ

This is certainly not post-worthy but I noted it anyway just in case I have a lean time for recipes (such as now). I have previously mentioned our favorite way of preserving and enjoying Campari or cherry tomatoes; we make them into a drunken tomato or Martini-on-a-stick.
I first blanch the tomatoes (Campari or cherry or even grape tomatoes), shock them in ice water to stop the cooking and then remove the skin. For marinade, I use either straight Vodka or more often,  Vodka or Gin Martini (I prefer Gin and used Tanqueray this time, the proportion of dry vermouth is up to your taste) and soak these skinned tomatoes. After overnight soaking in a refrigerator, they are ready to be enjoyed. The most proper way is to put tooth picks and serve several on a plate with a small mound of salt on the side and call it "Martini or Bloody Mary-on-the-stick". Another way is to use it as a garnish or as a salad. 

Soaking tomatoes in alcohol keep them fresh tasting for long time in the refrigerator but after one week, it is time to finish up. So I made a salad from the drunken tomatoes, leftover baked cauliflower, chick peas and olive and baby arugula.  For dressing, I simply splashed Champagne  vinegar, good fruity olive oil, a few grinds of black pepper, and sprinkling of salt.

And now, the piece de resistance is the marinade. It is essentially gin martini but has nice sweet tomato flavors and is much easier to drink than straight gin martini. It serves as a perfect aperitif, and with the salad, a promising start of the evening.

Wednesday, December 21, 2011

Chestnut croquettes 栗のコロッケ

This looks like "Menchi-katsu" メンチカツ but this is made completely with chestnuts, no meat or anything else is involved. After I got the second batch of North American chestnuts, I looked for chestnut recipes and found this chestnut croquettes recipe.
Here, are the cut surfaces. 
I only made three but to make three I needed 5 chestnuts for the batter (#1). I broke up boiled and cleaned chestnuts (5) and put them into a small bowl food processor. I added milk gradually white running the processor until a nice consistency of the batter was reached (#2). Actually, I overdid the milk so I added a small amount of potato starch to adjust the consistency. I then encased the three chestnuts with the batter (#3) and then rolled them in Japanese Panko crumbs (#4). I skipped the usual steps of dredging in flour and egg water steps since I did not feel they were needed. I let them sit for few minutes so that the panko adhered better to the nuts (#5) and deep dried them in 340F peanut oil on medium flame (#6) for several minutes.
This is really good. Chestnut encased in chestnut batter is a great combination. We really enjoyed the sweetness of chestnuts and the levels of texture ranging from the interior nut, through the batter surrounding it, topped with the crunch of the outer layer. I liked the chestnut tempura and this croquette equally well but my wife said she definitely like the croquette better. She said the croquette really had substance and could be served as the "meat" part of a meal. She also said she now realizes chestnuts are indeed "real" food you can enjoy.

Monday, December 19, 2011

Chestnut tempura 栗の天ぷら

We got North American chestnuts from Girolami farm this year and were very much impressed with how good they were and I ordered another 3 lbs. One of the difficulties in dealing with chestnuts especially the North American variety is removing the inner brown skin or "shibukawa" 渋皮. It appears that the shibukawa does not just cover the surface of the chestnuts but goes deep into the cleavage of the nuts making it extremely difficult to remove, and making the nuts taste bitter if it is not removed. I do not remember this characteristic in Japanese chestnuts. In any case, I solved this problem after few tries (see below).
After I found the way to remove the shibukawa fairly easily and completely, I saw the description of chestnut tempura. Although I have never had or made this, I decided to try it. The above is the result. It is excellent and the chestnut's sweetness and nice texture came through very well.
I also made shiitake mushroom tempura and served them with my usual green tea salt as seen above.
Now my method of removing the shibukawa inner skin: I first soaked the chestnuts in cold water for a few hours. I put the pot with chestnut in it on high flame until it started boiling, I turned it down to simmer. I cooked for 15-20 minutes and shut off the flame. I let it sit in the pot for 20 or so minutes. I scooped up several chestnuts at a time using a large slotted spoon and started removing the outer and inner skins. It was still rather hot but just cool enough that I could handle them. When I pulled on the shibukawa using a paring knife, to my surprise it came off very easily and with a little care, the shibukawa even came out from the cleavages as seen above. When the chestnuts got cold or dry and were too long out of the cooking water, it became more difficult to remove the shibukawa and the nuts tended to break when I tried. So, I worked 4-5 chestnuts at a time. In any case, I got really good at it and removed both outer and inner skins breaking only few chestnuts. I produced a good numbers of intact chestnuts with both skins completely removed this way.

The tempura batter is my usual; a mixture of potato starch and cake flour mixed with cold water. I  made a somehwat thick batter for this. I deep fried it in fresh peanut oil at 340F for 3-4 minutes.

This is surprisingly good.  The natural sweetness of chestnuts is really enhanced and nice combined with nice "hokuhoku*" ホクホク texture. 

*It is difficult to translate to English. This is to express the texture of starchy root vegetables such as boiled or grilled potato especially roasted sweet potato called "Ishi-yaki Imo".

Saturday, December 17, 2011

Potato with nori "Tsukudani" and butter  小芋のバターと海苔の佃煮添え

In Japan, raw nori 生海苔 can be had as a seasonal item (I think it is in winter and early spring). I only remember that we had this a few times--it is not a very common item even in Japan. One of the famous dishes made from raw nori is "Tsukuda-ni"  海苔の佃煮. I do remember one commercial product called "Edo-murasaki" 江戸むらさき which came in a glass jar. It is very salty and had an almost chemical taste to me and I did not like it then. It has been a very popular condiment (for breakfast) and goes well with a white rice.

When I made a nori wrapped cod roe omelet, I had excess nori sheets and made this instant "Nori Tsukudani". I read this recipe a long time ago in one of the drinking snack cook books and made it once or twice in the past but until now, I completely forgot about this dish.
Here is what it looks like (below left) and it is very simple to make. I just tore a dried nori sheet into small pieces (by hand) and place the pieces in a frying pan. I then added enough sake that the nori just absorbed the moisture and became "slushy". I kept stirring the mixture with a pair of cooking chop sticks on low heat (left image). When the nori became a loose paste, I added soy sauce in stages as I tasted to monitor the saltiness and kept cooking until a nice paste-like consistency was reached (image below left).
I first served this as an accompaniment for sake. You just lick a small amount of this stuff on the tips of chopsticks as you sip sake. My wife thought this was a bit too salty to eat alone and suggested I use it to top boiled potatoes. I thought this was a good idea. 

I quickly microwaved  small red potatoes and added pats of butter when it was hot. As the butter was melting (above right), I topped it with my instant nori tsukudani.

To eat the dish we smashed the potatoes and mixed in the nori. This was a very good comforting dish, although this was the first time I made this and tasted it.

Thursday, December 15, 2011

Squid, asparagus, and carrot flavored with tarragon and French vermouth いか、アスパラガス、人参のタラゴン、ベルモット風味

This not a photogenic dish. In our regular market, I found some decent looking squid and got a pound of it. Early in the day, I baked ciabatta bread. So, I decided to make a squid dish which would go well with this crusty bread.
There is no recipe or dish on which this is based. From a pound of squid, I made two relatively large (for us) servings.

Squid: The squid was already cleaned. I just washed it and cut the bodies into thin (1/2 inch) rings. I cut he legs in half and made sure no cartilage or "beaks" were left. I patted the pieces dry with paper towels.

Vegetables: I used carrot (one medium, peeled and thinly sliced on the diagonal), asparagus (4, bottoms cut thinly on the diagonal and the tips cut in half lengthwise), royal trumpet mushrooms (2 large, torn length wise), shallot (one small, thinly sliced), garlic (4 cloves thinly sliced).

I started cooking with the vegetables. I added olive oil (2-3 tbs) in a large frying pan on medium heat. I sautéed the shallot, carrot, sliced stems of asparagus first. After a few minutes, I added the tips of the asparagus, royal trumpet mushrooms, and garlic and cooked for 2-3 more minutes. I seasoned it with salt, pepper, thyme (dried, 1/8 tsp) and tarragon (dried 1/4 tsp). I then added white dry vermouth (3-4 tbs) and put on a tightly fitting lid. I steam/simmered it for 1 minute and removed the lid and upped the heat to reduce the juice by about half (2-3 more minutes). I removed  the vegetables and the juice onto a plate.

I wiped the frying pan clean and added olive oil (2 tbs) on medium high heat. When the oil was shimmering on the surface, I added the squid and very quickly sautéed, seasoning with salt pepper for less than 1 minute or until the squid was just cooked. I put back the vegetables back in the pan with the juices and combined with the squid then cut the flame.

I lifted the squid and vegetable from the pan and divided in two plates leaving the juice behind in the pan. I put back the pan and further reduced the liquid (squid imparted some more juice as well). I then added a few thin pats of butter to make an instant sauce. I did not have to adjust the seasoning of the sauce. I poured it over the dish.

My wife toasted and buttered the Ciabatta bread and placed it on the side.

I am not sure how this dish should be categorized. White (French) vermouth and tarragon flavors may be considered "French" in style. Since I did not over cook the squid, it was very tender. Despite the amount of garlic I put in, it was not too garlicy and the tarragon really made this dish.

We are having the last bottle of Hall Cab 2008 with this dish. Ciabatta bread was perfect to mop up the sauce.
P.S. I am sure you can find recipes for ciabatta bread elsewhere. Few points which are important include; a sponge (starter) which I started the day before I baked the bread. Since the dough is rather sticky, I formed the ciabatta (slippers) on a parchment paper (minimal handling and forming to preserve the bubbles) and let it rise on the paper. After the second rise, I lifted the dough by grabbing both edges of the paper and placed it, still on the paper, directily on a pizza stone (baking stone, preheated).