Tuesday, October 9, 2012

Shrimp cocktail in Hilton Head ヒルトンヘッドの茹で海老のオーロラソース

This is leftover peel and eat shrimp we made on the first evening at Hilton Head. I have posted “shrimp and grits” also made from the leftover shrimp and broth made from the discarded peels. I served this as an appetizer. Since I did not have my usual pantry, I made this sauce from whatever was available. Since we did not have appropriate vessels, I also made a cup from a half lemon.
CIMG5370
darioush The dipping sauce was made of mayonnaise (2tbs), ketchup (1 tbs), finely chopped sweet onion (2 tbs), finely chopped sweet pickles (1 tbs) and parsley (1 tbs), grated lemon zest (1/2 tsp) and lemon juice (1 tbs). The mixture of mayo and ketchup is popular in Japan and often referred as “aurora” sauce.

I shelled the boiled shrimp and served it with wedges of lemon and baby arugula. We had this with sparkling wine from California “Domaine Chandon” Reserve Brut. (We are partial to this winery since we had several memorable times at their restaurant). The shrimp was impeccably fresh, sweet, succulent and jumbo size—almost like small lobsters. They were shrimp at their finest something we have found to be consistent here.

The fabulous shrimp were followed by a main course of fillet mignon (which was a very good cut of beef from a local gourmet grocery store) with green asparagus and my wife’s smashed potatoes. We switched to “Darioush” 2009 Cab. This was a bit on the decadent side but we were on vacation. Sitting on the balcony in the candle light (we had a combination of LED candles and real candles. The LED candles were included because the wind from the ocean sometimes makes it impossible to keep the real candle lit), watching the moon rise over the ocean, listening to the surf and looking out at the bobbing lights of the shrimping boats as well as the lights from several large freighters on the horizon heading to Savannah, we could not have had a better dinner at any restaurant.

Saturday, October 6, 2012

Shrimp and Grits シュリンプ アンド グリッツ

As usual, we were in Hilton Head island in shrimping season. One of joys of being here is the view of the ocean from our balcony including shrimping boats that come very close to the shore and, as a result, enjoying peel and eat fresh local white shrimp. The first night, we boiled up a pound and a half of white shrimp. With a good crusty bread and wine, it was dinner. Using the leftover shrimp and a broth made from the water used to boil the shrimp with the peeled skins added, we made a classic southern dish “Shrimp and Grits”.This could be a breakfast dish or ending dish for a snack dinner with wine.
CIMG5434
We made this in a rather simple way. Some traditional recipes suggest making Tasso ham gravy and using chicken broth to make the grits. We made the grits using the shrimp broth, ham, onion and leftover boiled shrimp. For two servings like you see above we used;

Grits – 1/4 cup Quaker oats quick (5 minutes) grits. Real stone-ground hominy (alkali-treated corn) takes too long to cook and “instant” kind does not have the right consistency.
Shrimp broth – 1 and 1/4 cup. This was salted when we boiled shrimp. Just enough saltiness that you could drink it.
Onion 1/2 medium onion, finely chopped.
Ham – two slices of good packaged ham, cut into small bite sized pieces.

My wife first sautéed the onion in a small sauce pan with olive oil (1-2 tbs) until soft and slightly browned (about 5-7 minutes), added the ham and the shrimp broth. When the broth came to a boil, she added the grits, stirred and turned down the heat to simmer for five minutes with a lid on. Then she added a tablespoon of butter and several gratings of parmesan cheese.
We served this in  a small bowl with the boiled shrimp and chopped Italian parsley as a garnish.
DSC_0109
This dish was the essence of “shrimpiness”. The grits had a lovely light fresh shrimp taste and sweetness from the broth. The broth was what really made the dish. Although we did not make Tasso ham gravy, the onion and ham added a nice dimension. Something this good can only be made with the impeccably fresh shrimp available here. Especially with the view of ocean and shrimping  boats from our balcony, this was a perfect dish.

Wednesday, October 3, 2012

Shio-koji marinated Monk fish "mock" lobster 鮟鱇の塩麹焼き擬製ロブスター

Again, I spotted monk fish fillets in our grocery store. Since I am on a shio-koji 塩麴 kick, I thought this may be a good fish to try.

Monk fish: I bought two small monk fish fillets (combined, about 1 lb). I removed the slimy membrane as much as I could

Shio-koji marinade: I made some variation and added olive oil (2 tbs), mirin (2 tbs) to shio-koji (2 tbs). I placed two Monk fish fillets in a Ziploc bag, poured in the marinade, massage it a bit and removed as much air as I could and sealed. I let it marinade in the refrigerator overnight for 24 hours.

Since monk fish has the texture, but not the flavor, of lobster tail and is sometimes referred to as “poor man’s lobster), I decided to cook the Monk fish fillets as mock lobster tails. After the 24 hour marinade, I removed the fillets, blotted the excess moisture from the surface and sprinkled on smoked paprika (powder) (to simulate the color of cooked lobster) and then made shallow slit on top length wise—doesn’t it look like a lobster tail?. I placed them in a pre-heated 400F toaster oven for 10-15 minutes or until center of the thickest part was opaque (cut and peek).

I served this on a bed of couscous (from a box, this one was parmesan flavored). On the side, I served boiled sugar snap peas(seasoned with salt) and a tomato (skinned and shaped like a rose with salt and a dab of mayonnaise).

This was really good. The change in the texture of fish reminded me of “kasuzuke” 粕漬け or fish marinated in sake lee. The addition of mirin gave a bit more sweetness. Both of us really liked this preparation. Although Monkfish without marinating is very good, this one really made it better.

Sunday, September 30, 2012

Shio-koji marinated pork chops ポークチョップの塩麹焼き

Shio-koji 塩麹 got me going again. Given the previous success with chicken thighs and pork tenderloin skewers, the natural next choice was, of course, pork chops. In the U.S., pork chops are a very popular cut of pork but it is very difficult to cook them correctly especially on a barbecue grill—they often come out overcooked, tough, and dry. In Japan, SPF (Specific Pathogen-free) pork is popular and many restaurants may serve undercooked pork (center is still pink). But even SPF pork is not safe to eat raw or under cooked. Especially since some SPF pork was imported from other countries (especially South Asian countries). Even domestic (Japanese) SPF pork, requires a high level of faith in the level of inspection it has undergone. I personally have some doubt about how much regulation would be enforced. Although the risk of contracting something from eating undercooked pork in Japan maybe low, I just cannot trust blindly that pork labeled as "SPF pork" is safe undercooked. For that reason it probably a good thing that eating raw (sashimi) pork and beef liver was banned in Japan recently. Here is an interesting article about teneasis and cysticercosis in Japan. I have seen too many cases of cerebral cysticercosis in my line of work. I like my pork just perfectly cooked.

I marinated two pork chops in shio-koji (again 10% weight or just thinly coat the surface of the chops) and marinated it in the refrigerator overnight. As a control, I also cooked one chop seasoned with just salt and pepper. In the image below, two chops in the back, which were just turned over, are the shio-koji marinated, one in front which has not been turned over is the control chop. I browned both sides of the chops (#2). As before, the shio-koji marinated one browned more because of the sugar and starch in shio-koji. I then placed the frying pan into the pre-heated 350F oven for 10-15 minutes until a instant-read digital thermometer registered 145F inserted in the thickest portion of the chops. I covered the pan loosely with aluminum foil and let the chops rest for 10 minutes (#3 is shio-koji marinated and #4 is the salt and peppered one).

As far as pork chops go, this was not bad.I served this with a tomato rose, my wife's smashed potato, haricoverts (first steamed and sautéed in olive oil with garlic and seasoned with salt and pepper). I sliced the chops so that we could eat them with chopsticks.

As you can see in the first picture, it is perfectly cooked with the cut surface ever so faintly pink but uniformly so because of the resting process ensuring no undercooked center. It was tender and juicy (as pork chops go). We compared this with the salt and pepper seasoned control chop (#4 above) and there was a discernable difference but it was not great. Interestingly though, it was a different story with the leftovers. When I sliced into the shio-koji chop for sandwiches the next day, it was much more tender and juicier than the salt and pepper seasoned chop which was dryer and tougher. So this was a qualified success.

Thursday, September 27, 2012

Chestnuts simmered in syrup 栗の甘露煮

CIMG5359
We are into the chestnuts season once again. This year, I was Johnny-on-the-spot and pre-ordered them. I got North American Chestnuts from Girolami farm as before (#1 in the picture below). As I mentioned in last year’s post on chestnuts, it is wonderful to know some North American chestnuts trees survived the chestnut blight. American chestnuts, unlike Japanese chestnuts have a brown skin that goes deep into the nut. It is extremely bitter and unpleasant if left in the nut. But it is also very difficult to remove. Last year was a series of trial and error to come up with the best way to peel both the outer and inner skins (Onikawa 鬼皮and Shijukawa 渋皮, respectively. I finally found the secret. I peel the chestnut while it is still hot and the brown skin just lifts out. If you wait until it cools it is impossible to remove. This method, however, while successful, requires asbestos fingers.

This year I am providing some visual aids.The chestnuts came in a net bag (1 lb). I soaked them in water for several hours and then boiled them gently for 15-20 minutes (counting the time after the water came to the boil). I let it sit and cool down a bit--for 20-30 minutes. I scooped the chestnuts out of the water using a slotted spoon 3-4 at a time. While still very warm, I sliced off the flat bottom part using a sharp paring knife (#2). I kept peeling the outer skin by pulling it up from the initial cut (#3). Then, just tugging gently on the inner skin, it came off easily even from deep within the crevices (#4), Some chestnuts, however,had crevices made by the brown skin, so deep it almost divided the nut into two separate pieces. In that case, removing the inner skin breaks the whole chestnut apart. This year, my wife helped me removing the inner skin which sped up the process significantly.


Since I have already posted quite a few recipes using chestnut, I decided to make “Kuri-no-kanroni 栗の甘露煮. I usually buy this ready-made and sold in a jar. Most of the time, I use this in my “Chawan mushi” 茶碗蒸し.The commercial ones have both outer and inner skins cut away and the surface is smooth. The color is also bright yellow which make me think they use some kind of dye (natural dye or otherwise).
In my case, I used cooked and cleaned chestnuts like you see below (#1). For this amount of chestnuts, I prepared 200ml of water with 100grams of sugar dissolved poured over the chestnuts covering the chestnuts completely. I simmered gently for 20 minutes with the lid slightly askew (#2). I added a pinch of salt toward the end of cooking (to enhance the sweetness, although this may sound odd). I scooped up the chestnuts and placed then in a glass jar (#3). I reduced the remaining syrup for a few minutes and poured it over the chestnuts (#4).
.
My kanroni does not look as pretty as the commercial kind but it tasted very good and can be eaten as a snack/dessert or, as I mentioned, in chawanmushi.

Monday, September 24, 2012

Shio-koji pork skewers 塩麹豚肉の串焼き

With a success of shio-koji marinated chicken thighs, I made these "Yakitori"-style (or "Muroran" style) pork skewers. One is shio-koji marinated and the other, sweet miso marinated (the one more blackened is shio-koji marinated in the picture below).


Pork: These are the trimmings from two pork tenderloins. I cut them in bite size chunks.

Marinades: One is shio-koji and the other sweet miso (white miso 2 tbs, sugar 1 tsp and mirin 2 tbs). I put enough marinade to coat the meat in Ziploc bags, massaged it and removed as much air as possible and sealed (left in the picture below, the brown one is miso marinated and the white one shio-koji marinated). I let it marinade at room temperature for 30 minutes.

Skewers: I first soaked bamboo skewers in warm water while the meat was marinating. I alternated pieces of meat with sweet onion and made 4 skewers (left in the picture below)


Cooking: Since previously, I badly burned the chicken thighs, I decided to cook these skewers in the oven first. I preheated my toaster oven to 350F (in the convection mode) and baked the skewers for 15 minutes. Then, I switched to the hi-broil mode and moved up the grate so that the skewers were one inch below the broiling elements. After 2-3 minutes when the one side started charring, I turned them over and broiled for 2 minutes.

I served this over the bed of couscous. Again we were impressed with the tenderizing effect of shio-koji despite the rather brief marinating. The shio-koji version was tender, moist and succulent. The sweet miso version had a nice sweet nutty flavor but was considerably more chewy.

Friday, September 21, 2012

Salmon salad focaccia bread sandwich フォカッチャのサーモンサラダサンドイッチ

One weekend, we baked several breads. I have been lazy in terms of baking bread and my wife took over most of my baking chores. I decided to bake a simple focaccia bread to use it for sandwiches during the following week. I baked two 
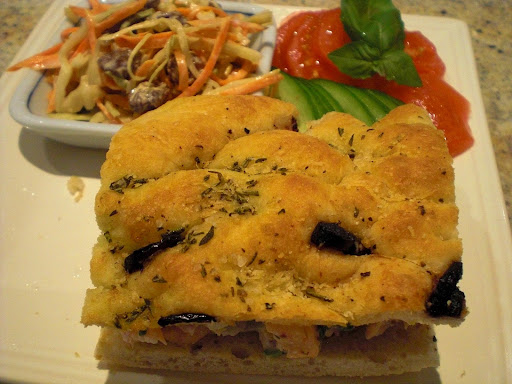
focaccia which were a bit over 11 x 13 inches. When the bread comes out of the oven, I usually cut off the four edges and eat these pieces like grissini dipped in salted olive oil while hot, which is very good. After the remaining bread cools down, I  cut the sheet of focaccia into eight uniform rectangular pieces for sandwiches. The picture below is half a sandwich.

For a lunch on Sunday, I made salmon salad from leftover salmon. The salmon was our regular menu. It was simply salted, peppered and cooked in a frying pan and finished in an oven. We usually leave half of the salmon (although we finish the crispy skin) and use it for something else later.


Salmon Salad: I just flaked the cooked leftover salmon (about 1/3 lb). I realized we were totally out of celery but if we had some, I would have used it finely chopped. Instead, I used cucumber (one American mini, cut in half lengthwise and then thinly sliced, salted and excess moisture squeezed out). I also added finely chopped parsley (few sprigs), finely diced Vidalia onion (small, half) and cornichon pickles (5-6 finely diced). For dressing, I mixed mayonnaise (2 tbs), Greek yogurt (2 tbs), Dijon mustard (1 tsp), and lemon juice (1 tsp), salt ad pepper.


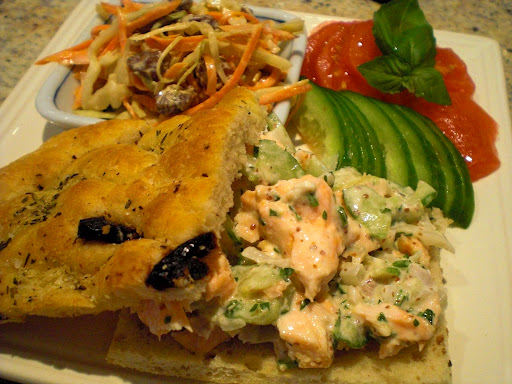
I sliced the focaccia bread into two layers and put the salmon salad on top (picture above). I served this with coleslaw and sliced cucumber, skinned and sliced Campari tomato.

Focaccia bread: I essentially used the same dough as for my pizza. I placed bread flour (3 and half cup), Kosher salt (1 tsp) and light olive oil (2 tbs) in a food processor with a dough blade installed. I mixed them by running it at low speed for 10 seconds. Meanwhile I proofed the yeast by adding a package of dry yeast into 1/4 cup of lukewarm water with a small pinch of sugar and mixed well. I let it stand until it started foaming. I added enough cold water to make it 1 cup and mixed it well.


While the food processor was on low speed, I streamed in the water yeast mixture. I usually add a few more Tbs. of water as I watch the dough form above the blade. I touch the dough to test its consistency. It should be slightly sticky and rather soft. If not you can add more water. I let it rest for 5 minutes so that the moisture distributes evenly. I then ran the food processor on low speed for 30 seconds. I dumped the dough out on the floured board and hand kneaded to finish until it was elastic and smooth (about 5 more minutes). I made a tight ball with the surface of the dough stretched and place it in a one-gallon Ziploc bag with the inside sprayed with PAM non-stick spray (or use olive oil). I removed as much air as possible, sealed, left it on the counter top loosely covered with towels and let it rise for 1-2 hours or until the volume doubled.

I deflated and folded the dough, divided it into two equal portions and formed them into rough rectangles. I covered them with a dish towel and let them rest for 10-15 minutes until the gluten relaxed. I then formed the dough into about 11x13 inch rectangles (If you like, you could make thicker and smaller rectangles, in that case I would use lower temp, 350F, and longer baking time, 30 minutes).

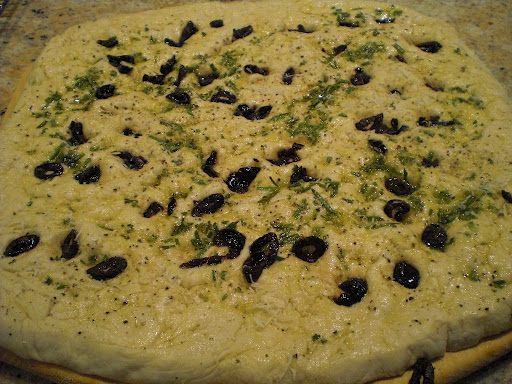
I put a thin layer of cornmeal on a wooden pizza peel and place the dough on top. I slid the dough back and force on the peel by jerking the peel to make sure the dough was not sticking at the bottom. I generously brushed the dough with olive oil/ fresh chopped rosemary mixture and garnish it with oil-cured black olives (pitted and chopped). Using my fingers, I made multiple indentations especially over the olives so that they don’t not come off easily. Finally I grated Reggiano parmigiano cheese on the top.

I slid the dough onto the baking stone in a 400F oven (preheated for at least 20 minutes after it reached 400F) and baked the dough for 20 minutes (below).
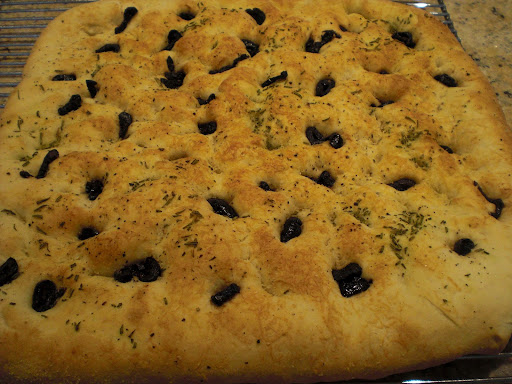

My foccacia was rather thin (but thick enough to cut into two layers for a sandwich) with crust but as I mentioned before, you could make it thicker and less crusty. Sometimes I make another variation in which I formed the dough exactly like pizza to make very thin pizza-like focaccia bread with olive oil and rosemary.