Wednesday, February 20, 2013

Marinated chiai nattou with egg yolk 卵黄入り血合い納豆

I made this dish from the two portions of chiai 血合い (one from the toro block and the other from top loin block) which was marinated over night. This dish may be rather challenging for most Westerners and even for some Japanese. Again,I have posted this before. You could add more soy sauce and put it over rice. We just had this as a drinking snack.

Once the chiai was prepared, the rest was rather easy. I used one small individual package of nattou 納豆 (frozen, made from organic soy beans from Hokkaido,-of course). After thawing the nattou, I mixed in fine chopped scallion, seasoning (tare) and the mustard that came with the nattou and mixed rather vigorously for a few minutes using my favorite nattou mixing contraption. I then separated one egg (As before I used a safe pasteurized egg for this). I added the cubes of marinated chiai and the egg yolk and mixed well. I just garnished it with the finely chopped green part of the scallion.

The gamey strong taste of chiai was a good match for nattou and the egg yolk binds all flavors. I admit this may be the acquired taste.

To clean the palate, I then served tuna sashimi as seen below. This time, I had very fatty tuna (ootro) from the previous night as well as medium fatty tuna (chutoro) and red meat (akami) from the top loin block I prepared this evening. As a garnish, especially since it is the year of the snake, I made snake belly cut mini cucumber or "jabara" 蛇腹 which was soaked in salted water and then seasoned with sushi vinegar (or I could used sweet vinegar). I served it with a tomato rose.

The quality of tuna was very good. Nothing really beats good blue fin tuna.

Sunday, February 17, 2013

Seared Ootoro fatty tuna 大トロの炙り

This is a continuation of the blue fin toro block we got from Catalina. After consuming the sashimi, I made the most fatty part of the tuna into "aburi" 炙り preparation. I have posted this before but, this time, I have more pictures and also made sumiso 酢味噌 sauce. The combination of "aburi" and "sumiso" further cut the fatty taste so that it was not too overwhelming.

In very proper sushi bars, you should use a charcoal fire to sear the tuna but, for convenience, I used the ubiquitous kitchen blow torch (no self respecting kitchen should be without such a flame-thrower). I first sliced the ootoro pieces and spread  them on a utility plate. Since I happened to have a collection of fancy salts, I sprinkled freshly ground Hawaiian sea salt (pink colored) and let it sit for a few minutes. I, then, hit them with my blow torch as you see below. I seared it until the surface changed color and developed a few dark spots. I did this on only one side.

The sumiso sauce should have been called more precisely "karashi sumiso" 芥子酢味噌 sauce. Again I have posted the recipe before. To briefly reiterate; I added white sweet miso or "saikyo miso" 西京味噌 (1 tbs) in a small Japanese mortar "suribachi" すり鉢, prepared Japanese hot mustard (to taste from tube), sugar (optional,1/2 tsp) and rice vinegar (1 –2 tsp). To adjust the consistency, you can add “dashi” broth or just water. At this point, we had eaten more than enough fatty tuna for one evening (there is such a thing as too much of a good thing).
Next day, I prepared the top loin of blue fin tuna. This is also a small I lb block as you see below. This block almost looks like the tail portion of the same fish from which my “toro” block came.

As you can see from the side view below, this top loin has slightly fatty meat on the bottom and chiai 血合い or dark red meat (left upper corner).

So this one was very similar to the toro block in terms of the configuration of the different kinds of meat but depending on the size of the fish, one pound block could be quite different.  I separated the slightly fatty red meat or “kotoro” 小トロ (left) with skin on, red meat or “akami” 赤身 in the center and “chiai” 血合い on the right.

I used to discard “chiai” but, more recently I make dishes from it which I posted before. I made the marinade ahead of time. This is rather simple marinade of sake, mirin, and soy sauce (2:2:3 ratio). I heat the mixture until gently boiling without a lid for a few minutes to meld the flavors and let the alcohol evaporate. I let this cool down to room temperature. I cut the chiai (I used combined portions from both the toro and akami blocks). I placed them in a sealable plastic container and let it marinade overnight in the refrigerator.
The rest is for the next post (I am stretching out the content).

Thursday, February 14, 2013

How to prepare small "Toro" block 鮪のトロのさばき方

I have mentioned that it is getting more and more difficult to get fresh blue fin tuna from Catalina Offshore Products because it is offered only infrequently. For that matter, our Tako Grill appears to be having difficulty getting toro as well. The other day, when I checked the Catalina site, both top loin and toro block were available and, without hesitation, I ordered both blocks (small blocks 1lb each).

Here is the first sashimi I prepared on the Friday evening the tuna arrived.


The Toro was just excellent. I served mostly toro and a small portion of chutoro 中トロ (or more like kotoro 小トロ). Since I had half a (leftover) ripe avocado, I also served slices of avocado in sashimi-style. For garnish, I made the usual daikon garnish mixed with mini-cucumber (skin portion only) and carrot. Instead of the usual raw preparation, I salted the vegetables and then squeezed out the excess moisture. I then dressed them with sushi vinegar. The wasabi was freshly thawed "real" wasabi. We have not tasted this kind of good quality toro, actually more like Ootoro 大トロ, for quite some time. This is melt-in-your mouth good. My wife ooed and aahhed appropriately.


I realized that, although I have posted sashimi from Catalina several times and how to prepare the large belly loin block, I did not illustrated how I prepared the small block of tuna belly into sashimi. Since I am running out of dishes I can post, I thought this would be a good punt.


Here is a small one pound block of toro. This is from a rather small tuna and it has the skin on. The left side is toward the belly .


The toro block usually has a very dark red portion called "chiai"  血合い and small top loin portion, in this case, "chutoro"  中トロ. I first removed the chiai part and then the triangular shaped "chutoro" block .


Now I have three portions; on the left toro with the skin still on, chiai in the middle, and chutoro on the right. Usually I discard "chiai" but this time I made a dish from it.


Using a thin sharp blade (since I do not own a traditional "yanagi" knife 柳刃, I used a salmon fillet knife from Global which works fine for me. I removed the skin, by placing the toro skin down on the cutting board then moving the blade horizontally between the skin and toro while pressing on the toro with my palm. I removed a thin layer of mostly fat that was attached to the skin (right above and below picture). I did not discard this almost pure fat.

The left on the picture above is the toro bock. I cleaned up the white membrane ("peritoneal" lining which lines the abdominal cavity of the fish) which is shown on the right edge of the toro block in the picture above. Sometimes bone may be present, so I carefully look for it and remove it. This is a rather small block but I cut it into two making two small rectangular blocks or "saku" from which I sliced the sashimi seen in the first picture.

The portions we did not eat immediately, I wrapped in parchment paper and placed it in a ziploc bag and stored them in the meat drawer of the refrigerator. It should last at least 2 more days.

Monday, February 11, 2013

Chinese flavored simmered Taro roots 中華風里芋の煮物

Just before the new year, I bought a small package of “satoimo” 里芋 or “taro” from our Japanese grocery store. Since we had New year’s dishes from Sushitaro which included simmered satoimo, I did not use it. My wife reminded me that it was still sitting in the refrigerator and that it might be getting moldy. I sprang into action. Instead of making it the usual Japanese way, I decided to make it in a more-or-less Chinese way primarily through altering the seasoning. This is loosely based on something I saw on line. I did not follow the recipe closely.

Ingredients (for two small servings):
  1. Taro root (satoimo) (six, both top and bottom cut off, peeled, halved, and soaked in water)
  2. Dark sesame oil (1 tsp)
  3. Chicken broth (about 1/2 cup, my usual Swanson no fat low sodium kind).
  4. Black-bean garlic sauce (1/2 tsp)*
  5. Chili garlic sauce (1/3 tsp)*
  6. Soy sauce 2 tsp, (I used light colored or “Usukuchi” 薄口醤油)
  7. Mirin (1 tbs)
  8. Sake (1 tbs)
  9. Black sesame seeds (for garnish, 1/2 tsp)
*I used these two Chinese/Asian seasonings since I happened to have them but you could use "Toban Djan" or chili bean sauce with chopped garlic.

I first put the dark sesame oil in a small sauce pan on medium flame. I added the black bean and chili garlic sauce and sautéed until fragrant for 1 minute and added the drained and pat-dried  satoimo. I tossed and sauteed so that the potato surface was coated with the oil and seasoning mixture. I then added chicken broth, soy sauce, mirin and sake. When it started to boil, I turned the flame down to simmer and placed my favorite silicon "otoshibuta" 落し蓋 on top of the taro then put on the regular lid slightly askew and simmered it for 15-20 minutes or until the satoimo was cooked.
Meanwhile, I dry roasted black sesame seeds in a dry frying pan for several minutes. Using a Japanese mortar and pestle (suribachi すり鉢), I coarsely ground it.
I put the taro in a bowl, spooned in some of the remaining simmering liquid and garnished with black sesame.

I did not make this too spicy. It was nice to try something different from my usual Japanese way of cooking satoimo. Satoimo has a nice texture and the seasoning definitely worked well. This could make a nice side dish or a drinking snack. In our case, it was the latter.

Friday, February 8, 2013

Homemade apple sauce and juice 自家製林檎ソースとジュース

This is another fresh juice to combat a less-than-optimal condition you may find yourself in the morning after indulging. (Although that is not necessarily the condition that prompted us to make this on this particular occasion).  Using the same juicer I described in the carrot juice blog, my wife made fresh apple juice (Fuji apples). The juice tasted divine but the process left behind a large amount of apple pulp  (By-the-way, the amount of juice shown in the picture is significantly less than what was actually produced…I drank some before I remembered to take the picture).

My wife couldn't bear to throw out the pulp residue so she decide to make it into apple sauce. She just transferred all the grated apple from the juicer to a pot. She put back some of the juice since it was a bit too dry and cooked it for 5-10 minutes. She added a small pinch of salt and a teaspoon of sugar to enhance the natural sweetness of the apple.
To me, apple sauce is not something I would usually eat since, in my mind, it definitely classifies as "baby" food. But this version of apple sauce was amazing.  It had the bright fresh intense taste of the Fuji apples which we never achieved with apple sauce made the usual way. While the consistence was smooth it was irregular which gave it an interesting texture. We had this for breakfast. In addition to tasting great, it allowed us to self-righteously feel were doing something healthy. Of course, if you have a baby, this would make a good food for them too.

Tuesday, February 5, 2013

Marinated dried "surume" squid スルメのしょうゆ漬け

Well, this is the last ditch effort to make dried "surume" squid palatable. I saw this recipe on line and decided it would be worth a try.

Marinade: Sake, water, mirin, soy sauce in equal amounts. (The original recipe called for sugar but I did not add any sugar). I put the mixture in a sauce pan and let it come to a boil and reduced the heat. I let it simmer for another 1 minute. When the marinade cooled down to room temperature, I added a 2x3 inch dried kelp. After the kelp rehydrated, I put the dried surum squid in a sealable container and put the kelp on the top of the squid. I marinated it for 3 days in the refrigerator (see the picture below).

Before I served it, I removed the excess moisture and grilled it in the toaster oven briefly.
I cut it into narrow strips and served it (the first picture). It was much softer for having been marinated, but it still had a rather strong fishy smell and taste. This was more edible than the original. My wife’s comment was, “the fishy shoe leather is softer than before.”  Even for me this is not something I would relish. A nice try but we will pass on "surume" next time.

Saturday, February 2, 2013

Carrot potage 人参のポタージュ

This was entirely made by my wife. After making fresh carrot juice from 8 medium sized carrots, she used the remaining pulp to make this potage. She added onion, potato and parsnip. This turned out to be quite a nice potage. I have to ask her to continue here.

I sautéed two diced onions in a soup pot, I then added 4 parsnips cut into coins and 6 baby potatoes cut into fourths and continued sautéing. Finally, I added the pulp left over from juicing the carrots as shown in the picture above.  I added enough chicken stock to cover the veggies put the lid on simmered until the parsnips and potatoes were cooked. I added no additional spices except some salt. When everything was cooked we puréed using a “motorboat” blender.
The potage turned out to be quite sweet. The sweetness came from the vegetables. The parsnip flavor seemed to predominate and it was very nice. This was a great use of the leftover carrot pulp. By not adding any additional spices the subtle flavors of the vegetables I used were able to shine through.

Wednesday, January 30, 2013

2012 NOWF cookbook 2012 NOWF クックブック

We received the hard cover copy of last year’s posts. My wife always likes to have a paper copy of our blog in her hands as something substantial and tangible to represent our interests in cooking (and eating). As usual, this one is from blog2print.
I posted a link in the NOWF Cookbooks tab for the PDF version if somebody is interested in browsing through the pages. As you notice, after several years of doing this post, I am running out of ideas and non-izakaya food is creeping in more often. This is something totally different from what I do for a living and gives me some diversion, so we will try to keep doing this as long as we can.

Sunday, January 27, 2013

Curry flavored carrot juice sauce with shrimp 海老のカーレ味人参ジュースのソース

This is another dish based on the theme that we “rediscovered” our juicer. After making fresh carrot juice, we remembered that I used to make shrimp in curry flavored reduced carrot juice. My wife thought she knew where the recipe came from but could not find it. Web search did not yield anything similar. So I decide to make this dish from my memory (or whatever was left of it).

Ingredients for two servings:
  1. Medium sized shrimp (12, I used frozen shell-on raw shrimp)
  2. Sake or white wine (1/4 cup)
  3. Carrot juice (24 oz, freshly made from 10 large carrots but store-bought carrot juice will also do)
  4. Ginger (finely minced, 1/2 tsp or more)
  5. Curry powder (1/2 tsp or more, I used Japanese S&B brand but any curry powder will do) 
  6. Olive oil (1 tbs) and butter (thin pats divided)
I first thawed the shrimp under running water. I salted the shrimp and let it rest for 10-15 minutes in a colander. I removed the shells (these were already deveined) and set the shrimp and shells aside.
I sautéed the ginger in olive oil with one thin pat of butter. I then added the curry powder and mixed until fragrant, I added the shrimp shells and sautéed until the color changed. I added sake and reduced it in half and removed the shrimp shells. I then added the carrot juice and simmered/reduced it by half stirring occasionally  (20 minutes or longer). When the juice attained a thick and saucy consistency, I added the shrimp and cooked for 20-30 seconds on each side turning once until the shrimp was cooked. I swirled in a few thin pats of butter to finish the sauce. (Taste and if need add more salt. I did not since the shrimp was well seasoned).

I served this with couscous and garnished it with chopped parsley. This is a very nice dish. The sweetness of the freshly made carrot juice and curry flavor went so well together. Although shrimp were frozen, the dish was not bad at all.

Thursday, January 24, 2013

Carrot juice 人参ジュース

This is certainly not a drinking snack but rather one for the day after to combat any ill effects of indulgence the night before. We got a juicer a long time ago. We used it for awhile but then lost interest in it for some reason (probably because it was so hard to clean the blade/filter) so it has been sitting around for a while. In any case, we “rediscovered it” (probably because we found a brush that is perfect for cleaning the blade/filter) and decided to make some "healthy" juices. The first one we made was carrot juice.

This is what the juicer looks like. Vegetables or fruit are fed through a slot at the top where they are ground up by a high speed spinning grater and then centrifugal force pushes the grinds up into a metal micro filter and the juice is extracted. The juice then comes out from the spout into a beaker below. The remaining pulp was further pushed up into a holding area (3rd pictures below).
We used 6 good sized carrots peeled which is the maximum about we can juice at one time.
Compared to store-bought carrot juice, it is nicely fresh tasting and very sweet. This is a perfect alternative to orange juice for the morning. I am planning to make some nice dishes using the juice. My wife, however, doesn’t want to waste all that pulp. She thinks we should be able to use the carrot grinds for something--so stay tuned.

Monday, January 21, 2013

"Weekday" cassoulet 簡単カスレ

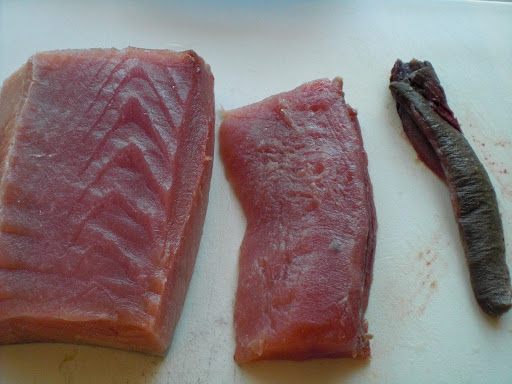
As usual, I had the raw trimmings from two pork tenderloins leftover after cooking the tenderloins. I thought I would make something which I have not tried before. The idea of making a bean and pork stew dish came to me, which is along the same line as the quick lamb stew dish I make from cooked  (leftover) lamb and kidney beans (I thought I posted this but apparently not).  My wife objected to a Boston-style baked bean-type dish pointing our that the pork usually used in that dish was salt port not pork trimmings. So, we decided to try making the leftover trimmings into “cassoulet”. Remembering how Anthony Boudain made this in one of his shows and consulting a few recipes on line, I came up with this quick and simplified (and less deadly) recipe. It is mostly based on “Weekday cassoulet” recipe from the food network web site. Although it is titled  “Weekday”, I made this on the weekend.

Although the traditional recipe used a wide variety of meats and copious amounts of bacon, I restrained myself and only used one strip of bacon, plus some chicken thighs I had in the fridge and the leftover pork trimmings.
I used:
  1. Pork tenderloin trimmings (about 1/2 pound, cut into small bite-size chunks)
  2. Chicken thighs, skin-on and bone-in (4, excess fat and skin trimmed)
  3. Bacon (1 strip). 
  4. Onion (1 medium, finely chopped)
  5. Celery (3 stalks, finely chopped)
  6. Garlic (4 cloves, finely minced)
  7. Carrot (1 medium, finely chopped)
  8. Bay leaves (3)
  9. Dried thyme (1/2 tsp)
  10. Dried French tarragon (1/2 tsp)
  11. White vermouth (or white wine) (1/2 cup)
  12. Chicken broth (1/2 cup, non-fat, low-salt Swanson)
  13. Great Northern beans* (2 cans, 16oz each, drained and rinsed)
  14. Stewed whole tomato (1 can, 16oz, drained and crushed by hand)
*Great Northern beans is a type of white beans (Navy beans) and similar to cannellini and grown predominantly in Minnesota.

For the bread crumb mixture which goes on the top (I don't think this is essential).  I used
  1. Japanese Panko (1 cup)
  2. Parsley (finely chopped, 2 tsp)
  3. Garlic (1 clove, finely chopped)
  4. Olive oil (1 tbs)
I mixed them up in a small bowl by rubbing them between the fingers and set them aside.

Of course, you can use different varieties of meat such as duck or duck confit, mutton, pork, goose and sausage. If you start with dried white beans and tough cuts of meat, you need a much longer time to cook.

I seasoned both the pork and chicken with salt and pepper (I got a fancy salt assortment this Christmas and used “smoked” sea salt. When ground, it gave off smoky aroma). I used a deep Pyrex baking dish/pot with a glass lid. On low flame, I cooked the bacon which was cut into 1/2 inch pieces and  cooked it until the fat rendered and it became crispy (for about 5-7 minutes). I removed the bacon and set it aside but left the bacon fat in the pot. I then browned the pork and chicken in small batches on medium flame which took a good 15-20 minutes.

I removed the pork and  chicken from the pot and set them aside. The chicken did render more fat but I judged the amount of the fat was just right and did not remove any fat from the pot. I then sautéed the onion, celery, carrot, and garlic for 3-4 minutes until soft, seasoned with salt and pepper. I then deglazed with white vermouth and reduce it for 5 minutes. I added the white beans, tomato, bay leaves, thyme, tarragon and and chicken broth. I then put back the pork, chicken, and bacon nestling the pieces into the beans and vegetables.

I baked it with a lid on in a preheated 350F oven for 50 minutes. While it was in the oven we grabbed the wine (see below) and the timer and retreated from the kitchen to imbibe the wine while watching a winter sunset (a great way to cook).

After 50 minutes, I removed the lid and spread the crumb mixture on the top and put it back into the oven on broil setting until the crumbs got nice and golden (picture below).
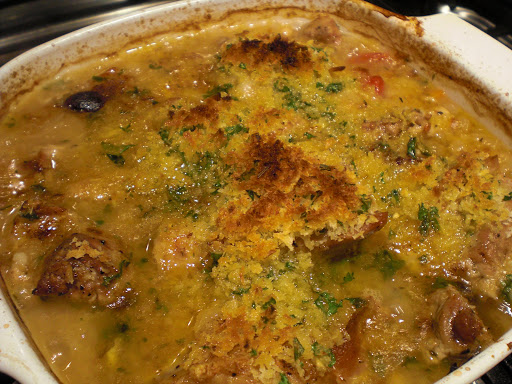
This dish is comforting beyond belief. The beans have a wonderful flavor and texture. The varieties of meat add a complexity and unctuous mouth feel. With the long cooking time the chicken fell off the bone and the pork was fork tender. It was absolutely perfect for a cold winter's night. This will definitely be a regular on our menu. Since it seems there is no end to the combination of meats you can use, the numerous variations of this dish will make it continuously interesting. This is also one of those dishes that is better the next day. It made a very good leftover of the leftovers.

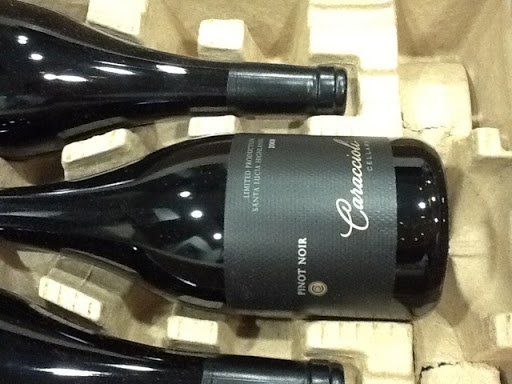
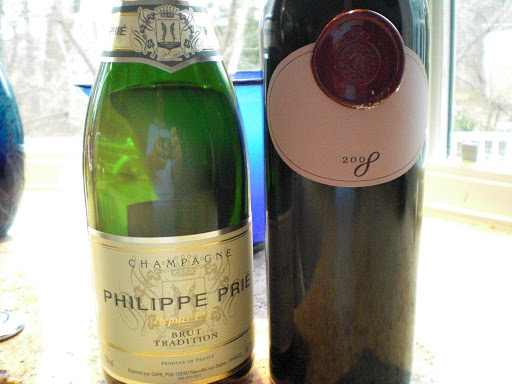
We had this with a bottle of Pinot Noir, which is very unusual for us since we usually do not particularly like Pinot. This one is from Santa Lucia highlands near Monterey, Caraccioli Pinot Noir 2008. As far as we can tell, this one got high marks (reportedly 93 by RP).  We bought half a case for Thanksgiving and Christmas. It went very well with the cassoulet but, still, we had to admit that we are not Pinot aficionados.

Friday, January 18, 2013

Dried "Surume" Squid 網焼するめ

When I posted "Saki-ika" tempura さきイカの天ぷら, I mentioned my childhood memory of whole dried squid called surume するめ. I said;
When I was growing up, "surume"  was a rather common snack, not necessarily just a drinking snack. This was a dried whole flattened squid. To eat, you have to first grill it lightly and then tear it along the grain into thin strips (it can easily be torn into strands by hand with an occasional application of teeth). It is very chewy like old leather and you have to work on it for a while in your mouth before it’s soft enough. As you chew, more flavors will come out. In fact a Japanese saying, "The more you chew, the more flavor you get" 噛めば噛むほど味が出る equates the effort you need to extract full flavor from dried squid to the effort you need to extract meaning and joy out of life; or subtle but real goodness can only be appreciated with substantial effort. But even in Japan, vigorous use of the masseter muscle is not an exercise people like to do.
The other day, when we were cruising the isles of our Japanese grocery store, I found a package of dried "surume" squid (Picture above).

Compared to what I was familiar with when I lived in Japan, this one is much smaller and apparently it has been "grilled" with a secret marinade. I was not sure if this is a modern “tamed” version or close to the original surume I remembered.
After I removed one from the package, I briefly warmed and softened it up over an open gas flame. The legs were folded under the body but after warming they could easily be unfolded.
I cut this into small strips and tried it. Surprisingly, this is very close to what I remembered as "surume". Very tough and you have to chew for some time before swallowing becomes a safe option. Also the taste is similar to what I remember. I gave one strip to my wife, she gummed at it for a while then spit it out. (Her comment: “Think fishy tasting shoe leather and you’re part way there). (I’m guessing she didn’t particularly like it.) I tried the legs as well. I suppose this is a drinking snack for the desperate. With one of these, you could spend hours chewing and drinking. I have to come up with some way to use up the remaining surume. (my wife suggested burying it).

Tuesday, January 15, 2013

Chicken thigh stir fry with shiokoji 鶏腿肉の塩麹炒め

This is a quick dish. I used shio-koji as a seasoning but you could just use salt. Shio-koji adds just a hint of sweetness and complexity but it is not essential for the dish.
CIMG5640
Chicken: For two small appetizer-size servings, I used one chicken thigh. I skinned and deboned and removed visible fat and butterflied the thickest portion to make the thickness even. I then cut into thin strips crosswise, added 1 tbs of shio-koji and mixed and let it sit for 5-10 minutes (right in the picture below)
Other items: I finely chopped garlic (one fat cove), ginger (1/2 tsp), scallion (3 stalks). I also added thinly sliced fresh shiitake mushrooms (3 large) and also sugar snaps (6).
shiokoji chicken
Cooking: I added peanut oil (1 tsp) with a dash of dark sesame oil in a non-stick frying pan on medium flame. When the oil was hot, I added the ginger and scallion, fried until fragrant (1-2 minutes). I turned down the heat to low and I then added shio-oji marinated chicken thigh and the chopped garlic and sautéed until the surface turned opaque. I then added the shiitake mushroom and the sugar snap and kept sautéing for 4-5 minutes or until the chicken was done. I adjusted the seasoning by adding a bit of salt and freshly cracked black pepper.

This is nothing special but it is a quick and nice drinking snack which goes well with any drink.

Saturday, January 12, 2013

Tempura smelts 生シシャモの天婦羅

I spotted fresh and cleaned smelt in our regular grocery store one day. Smelt is a small fish and, in Japan, a type of smelt is called "Karafuto shishamo" which is a common substitute for real "Shishamo" from Hokkaido. Capelin is also in the same family. The smelt spends most of its life in the sea but, like salmon, it swims up river to spawn.  The ones I got  were most likely fresh water smelt from the Great Lakes. In Japan, egg-bearing females are the most valued. None of the smelt in my “catch” appeared to have eggs. As usual, Japanese and English fish names are difficult to sort out.

The smelt I got were already cleaned (gutted and head off) but not dried like the ones in Japan. The most popular way to cook smelt here in the U.S. (if you are the type of person who would even consider eating smelt) is deep fried. Like shishamo, you can eat every thing including bones, tails and fins. I pondered how to cook them and decided to make a sort of tempura using a thin batter.
CIMG5649
Smelt: This is fresh smelt, head off and cleaned. I got 1 lb which is good for 4 generous appetizer size servings.

Tempura batter: I used cake flour (4-5 tbs) and cold seltzer water (add and mix until it forms a thin batter) with a pinch of salt mixed in.

I heated peanut oil in a frying pan (1 inch deep) to 350F (180C) on medium flame. I dipped the smelt in the batter and deep fried it for 3-4 minutes turning over once.
smelt composit
I served this with a wedge of lemon, deep fried parsley, and green tea salt. You could make this in kara-age 唐揚げ (coated with potato starch) or more Western style with seasoned flour or cornmeal and some kind of dipping sauce as well. This was a perfect drinking snack and also a good source of calcium. This goes well with any drink.

Wednesday, January 9, 2013

New Year's Eve 大晦日

Usually we get good sashimi items for Catalina offshore products for new year's eve. This year, they did not have any good tuna or sea urchin. We had to do without them on the new year's eve. Since I bought the half filet of salmon (over 4 lb), even after making salmon kelp rolls as well as "Russian" marinated salmon, we had a good amount of  salmon left including the skin. So no sashimi this time and    we had salmon and filet mignon.

When I made salmon kelp rolls, I needed to trim the salmon to make it even square  logs. Using these trimmings  I made salmon cakes. Since some of the pieces were still large chunks, I finely minced the half of the salmon trimmings finely (which binds the other ingredients) and the remaining cut into small cubes. Other ingredients are finely chopped onion and celery (sautéed in butter, seasoned with sat ad pepper and cooled), finely grated zest of lemon, finely chopped parsley,  Japanese Panko bread crumbs,   Dijon mustard, mayonnaise and seasoned with salt and pepper. I then made a small flat cakes and  fried them with a bit of olive oil.


Using the more intact portions of the salmon left, I made cubes of teriyaki style salmon with separately cook crispy salmon skin. I just seared all surfaces of the salmon cubes and then braised in a mixture of sake, mirin and soy sauce (1:1:2 ratio) until liquid evaporate and sauce became somewhat thick.

Finally, we had a filet mignon, stuffing (re-heated in small ramekin with scripy bacon), and apple-blackend Brussels sprouts salad. Baked (blacken) brussels sprouts were sliced, red seedless grapes halved, apple (we used Fuji), skinned and cubed dressed in honey mustard dressing garnished with toasted walnuts. I made a quick sauce by degrazing the pan with port wine, reduce it in half. I then added balsamic vinegar and reduce it a bit and finished with several pats of butter.

For libation, we had NV Philippe Prie Brut with cheeses and salmons (the picture taken morning after). For us, differences in the quality of champagnes are very subtle after a certain price point but this was a quite nice one. Then with steak, we switched to 2008 Buccella Merlot . This is a quite amazing red! We really enjoyed this with filet mignon.


We managed to stay up until mid-night to see the ball to drop in on TV.

Sunday, January 6, 2013

Japanese "Karasumi" Botargo 唐墨

As we explored the Sushi Taro osechi boxes, we noticed something new this year. To our delight we found something we really like; cured and dried mullet roe called "Karasumi" からすみ (in the circle below). We also discovered "komochi konbu" 子持ち昆布 (a piece of kelp coated with herring roe) tucked in a small bamboo container (shown on the left). It was dressed in spicy cod roe or "mentaiko" 明太子.

These items are indeed the “ultimate delicacy” or "chinmi" 珍味. I briefly grilled the karasumi over a direct gas flame for 10-15 seconds before serving. You can see in the picture that one of the edges is slightly blackened (right piece).

The texture and taste of karasumi is difficult to describe but, to me, the closest is a good quality "neri uni" 練り雲丹 or sea urchin salted and processed into paste. Karasumi, however, is much better. The combination of slightly sticky texture, oceanic taste and saltiness goes exquisitely with sake. It provides the ultimate enjoyment of "nibble-a-little-sip-a-little" which is the Japanese way sake is supposed to be enjoyed. A small nibble followed by a sip of sake brings out the perfection of the taste pairing. It can also lead to the consumption of a large amount of sake. As we amply demonstrated with just these two thin slices of " karasumi" and one very small block of "komichi konbu". This karasumi was home-made by Chef Katsuya Kitayama. We had this item sometime ago at a sushi "omakase" dinner at Sushitaro. I initially thought this was not something my wife would like but I was totally wrong. Her karasumi lasted longer than mine since she practiced the slow repetition of nibbles and sips more appropriately and more often than I did.

Digression alert:
"Karasuki" 唐墨 means "Chinese ink cake". I am not sure about the origin of the name but the shape of a whole cured and dried mullet egg sac was said to resemble an ink cake imported from China. I was surprise to learn that this item was originally imported from Europe through Nakasaki port (which was the only port open during Edo times). Botargo (or bottarga) is the European counterpart of karasumi, although I have not tasted it. Botargo is famous in Italy, especially Sardinia and Sicily, as well as other Mediterranean countries. (It was actually mentioned in Anthony Bourdain in his episode on Sardinia.) In Japan, the ones produced in Nagasaki 長崎 from mullet roe or "bora" ボラ are the most famous. Apparently similar preparations are made from other fish roe but, again, I have not seen or tasted them.

In terms of libations to go with these delicacies, I cannot think of anything better than sake either cold of warm. Sparkling wines such as Procecco may be the next best choice and, maybe, some crisp austere white wine but, for me I’m sticking close to a good sake with karasumi.

"Komochi konbu"  子持ち昆布 is another delicacy; a rectangular piece of kelp sandwiched between layers of herring roe. Originally this occurred naturally when wild herring laid their eggs on kelp. Now, however, it is almost never available in its natural form, so most on the market are produced in an aquaculture setting.  (I was told Canada is a major producer). I suspect many are "manufactured" by coating the kelp with processed herring roe although I could not confirm this as a fact.This is one of the New Year’s good luck foods since numerous golden colored roe symbolize prosperity (both financially and offspring-wise) and kelp "konbu or kobu" 昆布 is part of the phrase "yoro-kobu" 喜ぶ meaning to rejoice.  Katsuya 勝也 dressed this with spicy cod roe "Karashi mentaiko" 辛子明太子 (roe dressed with roe) which raised konochi-konbu to the next higher level.

"Karashi mentaiko辛子明太子 reportedly originated from Korea and appears popular in the south of Japan; in such cities as Fukuoka 福岡. Certainly it was not popular in Hokkaido when I lived there. It is a spicy red pepper marinated salted cod roe. I usually do not bother buying this but make it from regular cod roe mixed in hot sauce (Tabasco or Sriracha).

We enjoyed the Karasuki and komochi konbu immensely. These types of surprises make it so much fun to receive and explore the Sushi Taro osechi boxes. We will remember the joy just these two items brought us for the rest of the year. Thank you Sushi Taro.

Tuesday, January 1, 2013

Happy New Year 2013 明けましておめでとう

Happy New year 2013! Last year was not an easy year. The most vexing were "departures" in the family and among good friends. One of the bright spots was that we finally got back our house from construction and, for the first time in the past 3 years, we could sit in our "tea room" to have our new year's celebration and eat all those Japanese auspicious good luck foods. This year, like the last year, we got Sushi taro's osechi boxes.

This picture shows our small alcove (or "Tokonoma" 床の間) with kagami-mochi 鏡餅. Of course we bought a fake plastic one with packaged round mochi inside. Digression alert: When I was a child, kagami-mochi  or traditional real round "mirror" mochi rice cakes were not packaged or preserved. They were just mounds of pounded rice that remained on display until they were supposed to be eaten (usually January 11, called "kagami-biraki" 鏡開き). Usually, by that time, green mold developed beween the two layers of mochi rounds.  I vividly remember my mother scraping the mold off before she could serve them as "zenzai" 善哉, mochi in sweet red bean sauce (which I did not care for-so my mother need not have gone to all that effort to remove the mold). At least, with the packaged mochi, we do not have to contend with scraping off the mold. Oh the wonders of modern technology!


This picture shows new year's good luck food served on individual lacquered tables as well as the Osechi Box we got from Sushi Taro. I supplemented the Osechi box by preparing several of the items shown here.  From the upper left, daikon namasu 大根なます with boiled octopus and salmon roe, "Russian" marinated salmon, herring roe - this year, there was no terrorist package scare and my mothers "care package" arrived on time and included very nice large herring roe. Among the "kuchitori"  口取り appetizers, I made salmon and burdock kelp rolls 牛蒡と鮭の昆布巻き, date-maki roll 伊達巻 and chicken "matsugaze" cake 鶏肉の松風焼き. From the Sushi Taro's Osechi box, simmered black beans  黒豆, simmered roe bearing sweet fish 子持ち鮎の甘露煮, vinegar-dressed lotus root 花輪蓮根, kumquat simmered in syrup  金柑蜜煮, sake braised shrimp 海老酒煎. As you may notice, many items from the sumptuous Sushi taro osechi boxes have not been touched yet and remain for subsequent feasting.

My dikon namasu came out a bit on the sweet side this year. This may be due to the fact I was out of regular rice vinegar and had to use "sushi" vinegar which already contained sugar and salt (despite the fact that I reduced the seasoning especially the sugar).

The herring roe were very luxurious large ones from Hokkaido. I prepared them as per usual and they were excellent. The salmon on the right is my mother's recipe; "Russian" pickled salmon.

Finally we had a new years soup or "zouni"  雑煮. As usual, I added mochi 餅 or rice cake in a deep fried tofu pouch or "mochi kinchaku"  餅巾着. Instead of "yuzu", I also added a small wedge of lime. Since I forgot to get fresh chicken for the soup we used smoked barbecued chicken left over from Christmas. It added a nice smokey flavor dimension