Tuesday, July 30, 2013

Indian-style lamb stew インド風ラムシチュー

My wife really likes lamb and recently developed an interest in Indian-style cooking with lots of spices and flavors but not too much heat (spicy hot). This dish combines her favorites. This is, for sure, much more interesting than a regular "curry".

This recipe also came from "Easy and quick Indian cooking" but, as usual, my wife made some variations based on available ingredients. So it varies slightly from the original recipe. I was sous chef for this dish and did all the chopping and preparing.

The ingredients:
Lamb, I bought about 3 and 1/2 lb of lamb shoulder (bone in). After removing the bones and fat, the final amount was about 2 1/2 lb. I cut it into a large bite size (1-2 inches chunks).
2 onions chopped
2 tsp. ground ginger
1 tsp ground garlic
3 tsp water
1 1/2 tsp ground cardamon
2 bay leaves
1/4 tsp ground cloves
10 peppercorns
1 tsp cinnamon
1tsp coriander
2 tsp ground cumin
4 tsp smoked paprika
1/4 tsp cayenne
1 1/4 salt
1/4 tsp garam masala
7 tbs plain yogurt (thick greek style)
1 1/2 cup chicken broth
1/4 garam masala

The first step was to make a paste out of the ginger, garlic and water. We chose not to brown the meat (because it doesn’t seem to really make a difference that we can taste), so I made the sauce and then added the meat. The cardamon, bay leaves cloves, peppercorn and cinnamon went into the hot oil and cooked a few seconds until they were fragrant. Then I added the onion and cooked until it became medium brown. Next came the ginger/garlic paste which I cooked for a few seconds. Then the coriander, cumin, paprika, cayenne and salt. While on low heat I stirred in the yogurt one tbs at a time. When the sauce was all nicely blended I added the lamb cubes and water. I put on the lid and simmered for about a hour until the meat was tender. Before serving I was supposed to sprinkle on the garam masala (I forgot to do this.)


This dish was fun to make. I really enjoyed the smell as all the spices bloomed in the oil and gave off their fragrance. I had always thought the yogurt could not be used in cooking because it would “break” so it opens new vistas to be able to use it. (The secret seems to be to add it slowly over low heat). I really like the somewhat tart flavor it adds. For this recipe I might reduce the amount of chicken broth.

The meat really cooked down and the sauce was a bit watery. The flavor however was wonderful. Lots of flavor with only a hint of heat. (That is another thing I like about this cooking; I can control the amount of heat a keep it at a comfortable level). The meat was fork tender.

Saturday, July 27, 2013

Burdock root salad 牛蒡のサラダ

Whenever I buy “gobou”, two long roots are in one package and I need to make several dishes before I can finish it. I almost always make “kinpira”  きんぴらごぼう and make several other. Since my wife made “coleslaw” and there was leftover dressing, I made this gobou salad. It is similar to the previous post but I changed the way the gobou was cut and had the slight difference in the dressing.
I made a small serving with a half of a tomato, skinned and peeled (or blanched, shocked and the skin peeled) arranged in a rose-shape with some watercress.

This time, I only added carrots.

Gobou: After scraping off the skin under running water using the back of my knife. I shaved the gobou as though I was sharpening a pencil (I do not know how many younger people today actually sharpen pencils with a knife) in  small elongated pieces shaped like leaves of small bamboo or “sasa”. This way of cutting  is called “sasa-gaki” 笹掻き (here is the visual aid at You Tube) and most often used for gobou. After I cut the gobou in “sasagaki”, I soaked the pieces in water acidulated with rice vinegar for 10 minutes or so I then drained and washed them in running cold water. I cooked the pieces in boiling salted water for 20 minutes (I checked occasionally but this gobou was rather hard and required a long time to cook). I drained and soaked the pieces in cold water for 2-3 minutes and drained.

Carrot: I peeled and prepared the carrot in the same way as the gobou. I cooked the carrot  for 5 minutes and drained.

Dressing: This was leftover from making coleslaw. Essentially, it is half and half mixture of mayonnaise and plain yogurt (water drained or use Greek yogurt), seasoned with sushi vinegar, Worcestershire sauce, salt and pepper.

Even after 20 minutes of cooking, this gobou was a bit fibrous. The slightly bitter fresh taste of water cress was a nice contrast.

Wednesday, July 24, 2013

“Mughlai” Chicken 鶏肉のインド風クリームソース

This is the second Indian-inspired dish my wife made called “Mughlai” chicken. This is a very flavorful dish with lots of spices but not hot. Although it has good amount of cream, use of yogurt makes it less deadly while keeping the sauce very rich. I was sous chef and did the prepping of the chicken and chopping of vegetables. My wife follow the recipe from Madhur Jaffrey’s “Indian Cooking” cook book. The recipe is similar to one by  Nigela Lawson which  is available on-line.

Ingredients:
Chicken: Both recipes are a bit vague about what parts and kind of chicken. We used chicken thigh, skin off, bone out, and cut into two pieces. We used a total of 6 thighs (12 pieces, about 3 lb or 1 kg).
Ginger, I inch cube, peeled and coarsely chopped (we cheated and used ground ginger from a tube).
Garlic, The receipt calls for 8-9 cloves but we cut this down but again used ground garlic from a tube.
Almond, 6 tps, sliced. We used whole almond toasted and sliced.
Cardamom pods, 10, lightly bruised
Cinnamon stick, one
Bay leaves, two
Cloves, 5
Cumin, ground, 2 tsp
Cayenne pepper, 1/8 tsp
Plain yogurt, 7 tbs
Light cream, 10oz
Salt, 1 1/2 tsp
Raisin, 2 tbs (the original recipe called for golden raison but we used regular raison.)
Garam masala, 1/4 tsp
Onion, 2 medium, finely chopped
Vegetable oil, 7 tbs
1. Make a paste of almond (4 tbs), garlic, ginger, and water (starting from 4 tbs) in a small electric blender. We needed to add more water to make it a paste.
2. Brown the chicken:in oil in a large skillet in all sides in two batches. Set them aside.
3. In the same pot, add the cardamom pods, cinnamon stick and bay leaves in the same oil and fry until fragrant. The original recipe does not instruct to remove these items (only mentioned that they were not meant to be eaten). So as not to accidently crack a tooth however, we removed these including black seed spilling out from the  cardamom pods using a fine meshed square skimmer.
4. We added the onion and sautéed it for 3-4 minutes. We then added the almond paste, cayenne pepper and cumin and sautéed for few minutes.
5. We started adding the yogurt one tables spoon at a time until all were incorporated.
6.We added the cream, salt, and the chicken pieces including the liquid accumulated.
7. We simmered it for 20 minutes on low flame with a lid on. We turned over the chicken pieces and added the raisons (see below) and simmered for another 10 minutes.
8. We served this over rice with toasted and sliced almond as a garnish (The first picture).
This is a very nice dish. It has a very complex flavor. Since we did not put too much cayenne pepper, it is not too hot. The mixture of yogurt and cream made the sauce very rich (hopefully better than just cream). This dish reheated well in the microwave oven.

Sunday, July 21, 2013

Fish cake and green beans "Isobe" fry ちくわとインゲンの磯辺揚げ

I made this dish to try out the new plates we recently acquired in New York. This white square plate with rim is very versatile. My only complaint is that it does not seem to have been made to stack—when stacked on atop the other the top plates slide off making it difficult to store. I realized that I had defrosted "chikuwa" 竹輪 fish cake the previous day but did not use it. I decided to make tried-and true "Isobe" 磯辺 fry. I also made green beans in the same  fashion.


Chikuwa: I cut it in half crosswise and then cut the halves into 4 pieces lengthwise to make 8 small batons.

Green beans: I trimmed both ends and cut in half to make the length equal to the chikuwa pieces.

Tempura batter: Just a mixture of cake flour and cold Seltzer water plus dried "aonori" 青海苔 sea weed. I made this a thin, runny batter.

I deep fried in 170F oil until done (the chikuwa 1-2 minutes, the green beans 3 minutes).

These two items were quite good. The green beans got so "etherial" like the dried green beans. The chikuwa developed good slightly chewy texture. Both had nice crisp  light crust with "seashore" flavors from the "aonori". I served this with my usual green tea salt.

Thursday, July 18, 2013

Chickpeas cooked in tea 紅茶ひよこ豆

This is another one of my wife Indian-style cooking but we served this as a drinking snack and it worked very well. Of course, this can be a side dish (vegetarian) for dinner. Again this is from “Quick and Easy Indian cooking”.


Ingredients:
Chickpeas, canned x2, 19oz cans, drained
Vegetable oil, 1/4 cup
Cumin seeds, 1 tsp
Onion, x1 medium, finely chopped
Garlic, 2 cloves, finely chopped
Whole plum tomatoes, canned, x1 16oz, drained and coarsely chopped
2 Tsp grated ginger
1/14 cups prepared black tea (earl grey)
Jalapeno pepper, 2 medium size, seeded and de-veined, cut into thin slices
1tsp salt
2 tsp. ground cumin seeds
1 tsp garam marsala
4 tbs. cilantro chopped
1 tsp. fresh lemon juice


Following the instructions I drained and rinsed the chickpeas. I put oil in a frying pan and added the cumin seeds and let them bloom for a few seconds. Then I added the onion and cooked until the edges turned brown. I added the garlic and tomatoes and cooked until they became a bit carmelized. Next came the chickpeas and the remaining ingredients. I simmered for about 10 minutes.

I initially made this dish because I was curious about how the tea and chickpea combination would taste. As it turns out the tea is simply to color the chickpeas and didn’t seem to add any particular flavor. Since I removed the veins and seeds from the pepper, this was not too hot but if you like it hot, do not remove the veins and seeds. For us this has a nice slow heat which is perfect. 

This was a very good savory dish that just got better with time as all the flavors melded together. It almost had the feel of a comfort food. This will go with any drink.

Monday, July 15, 2013

Grilled squid with "Tsume" sauce イカのたれ焼き

Although this was not real “Tsume” sauce つめだれ, I had the sauce left when I cooked a whole Vermilion snapper which contained a lot of “umami” and protein from the fish. This was first used to make a simmered tofu or “Niyakko” 煮奴 by diluting with dashi broth. After this, I reduced it and adding more soy sauce and mirin and used it for yakitori. This sauce was finally used to make this grilled squid. This is very similar to other squid dish I posted but this time I grilled it using the toaster oven and the sauce was a bit better.

These are rather small squid. I made shallow crisscross cuts. I dried the surface with a paper towel and placed them in the broiler about one inch from the upper heating elements. After 6-7 minutes I turned them over and cooked the other side for another 5 minutes. When the squid was almost fully cooked, I brushed on the sauce and let it grill for 1 minute on both sides brushing the sauce on the other side as well.
This was remarkably tender squid and the sauce was pretty good. I served it with a wedge of lemon on a bed of water cress.

Friday, July 12, 2013

Yakitori; three kinds 焼き鳥3種類

On the weekend, I had a package of chicken thighs. I was afraid it would go bad soon. Although we could not grill outside because of the pesky mosquitoes, I decided to do "Yakitori" 焼き鳥 in the toaster oven. With some influences from eating Yakitori at Torishin 鳥心 in New York. I decided to make three different sauces/seasonings.

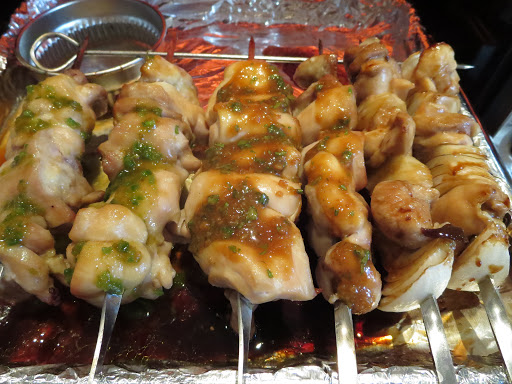
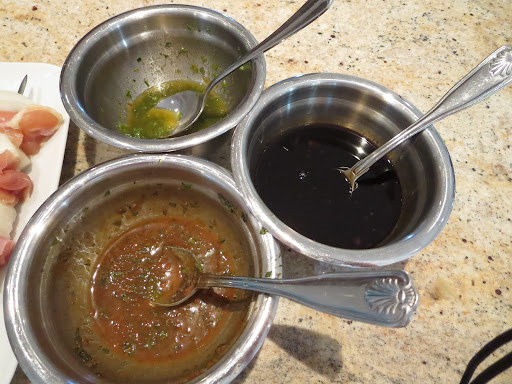
The picture below is what I cooked.  The closest skewer is Yuzu-koshou and Jalapeño pepper, the middle is sweet miso with "shiso" しそ perilla and the furthermost with onion is with a "tare" sauce.
  
I. "Tare" or "Tsume" sauce たれ or つめ (right in the picture below).
Many "Yakitori" places have their secret sauce which has been in use for many years.  The sauce is maintained by straining the old sauce, adding a new batch and cooking it again everyday.  Dipping grilled chicken into it everyday for many years, of course adds to the flavors. Home cooks could not possibly match this.
Another similar sauce is called  "Tsume" which is a short for “Tsume-dare” つめだれ. “Tsume” comes from the word  "nitsumeru" 煮詰める or to "reduce" by boiling. It is usually used to "paint" some sushi like "anago" 穴子. It is essentially a concentrated ”sweet and salty” or “ama-kara” 甘辛 sauce made from soy sauce (mirin, sake) and sugar with some savory elements (classically, for anago, I was told, grilled "anago" bones were used. Some recipes use pre-made “oyster sauce”).
Mine started out as the simmering liquid for "Vermillion snapper". After  the fish was cooked and removed,  the remaining and reduced seasoning liquid totally congealed in the refrigerator because of the protein components from the fish. I diluted this using “dashi broth” and made a simmered tofu or “Niyakko” 煮奴. After making this dish, what remained of the simmering liquid was kept in the refrigerator. This was the base of the sauce I used here. I tasted the sauce and added more soy sauce, mirin and reduced it to 1/3. It became slightly thick and tasted salty and sweet (not as sweet as some Yakitori “tare” sauce) with good savory “umami” flavors (right in the picture below). Of course, you can make this sauce simply by mixing soy sauce, mirin or sugar and thickening it with a potato starch slurry.
2. Sweet miso with perilla 大葉入り甘味噌 (left front in the picture above).
This is made with miso (2tbs), green perilla (2 large leaves finely chopped), and mirin (about 2 tbs or until the consistency of the miso reaches a saucy stage).  I thought of adding a bit of dark sesame oil but refrained.
3. Yuzu-koshou and Jalapeño pepper 柚子胡椒ハロペニョ (left back in the picture above).
I made the least amount since this was rather spicy. I finely chopped up half a Jalapeño pepper (1/2, seeded and deveined) and mixed with yuzu-koshou (1 tbs) and mixed in mirin (1 tbs). I was thinking of adding lemon zest (micrograted) but forgot to do it.
4. Chicken
I boned and skinned 6 thighs (3 were large but three were small). I cut them into a bite size chunks. I just made 4 skewers just from the chicken and two with sweet onion (left in the picture below).
Since I had to use more skewers than usual for cooking in the toaster oven, I also had to use a larger baking pan than usual but the skewers could not reach both rims of the pan. So I had to improvise. I added another metal skewer in the back so that the chicken skewers would not sit in the juice in the bottom of the baking tray. I used the broil function of my toaster oven which turns on the upper elements to highest power. I cooked the chicken without sauce (seasoned only with salt) turning once after 8 minutes until the chicken meat was almost completely cooked. I then smeared two skewers each with one of the three sauces. I then grilled each side for one to 2 more minutes being careful not burn it. (In the picture below, from the right, tare, miso and Yuzu-koshou).
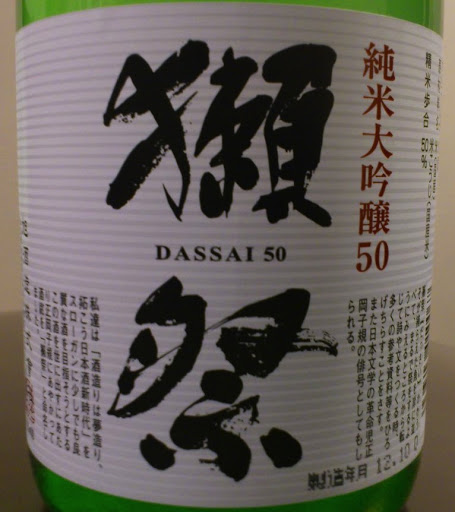
For oven grilled Yakitori, they were not bad at all. The yuzu-koshou ones were rather spicy but not too spicy (at least for me). My wife liked the miso flavor the best. Both agreed “tare” was rather mundane. We had this with Dassai 50 Daiginjou 獺祭50大吟醸. This sake may have been a bit to gentle and delicate for yakitori.
*Digression alert:
I was wondering about the name of this sake "Dassai" for some time. While I was drinking this sake, I read the label which explained the origin of this name. I supplemented this with some more Google search results. The first letter 獺 means "river otter" or "kawa-uso". The second letter 祭 means "festival". The combined word "Dassai" 獺祭 or "Otter festival" was based on the observation that after catching several fish, the otter will line them up on the river bank before eating them as though making an offering of the fish to it's ancestors. The word "Festival" obviously referred to a commemoration of ancestors such in the "obon" festival. The poet 李商隠 Li Shangyin in the late "Tang" 唐 dynasty called himself 獺祭魚 meaning "fish of the otter festival" equating himself to the fish caught by the otter as he sat among all the books and scrolls of his predecessors lined up around him to give inspiration for new poems. Later the Japanese poet 正岡子規 "Shiki Masaoka" took this name as well and called himself 獺祭書店主人 meaning "master of the otter festival book store". The sake brewery which makes "Dassai" is called "Asahi Sake brewer" 旭酒造 which is located in a small town called 獺越(おそごえ)"osogoe" in Yamaguchi prefecture 山口県. Taking one letter "otter" 獺 from the name of the place, they named their sake 獺祭 or "otter festival".