Sunday, September 13, 2020

Chawan-mushi with “ikura” salmon roe 冷製茶碗蒸しイクラのせ

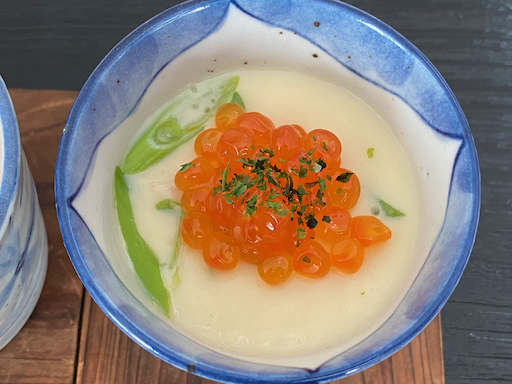
 This is not a new dish but it was the second appetizer for the evening when we had the tuna caprese as the first dish. This is a cold chawan-mushi which I made in the morning.  I topped it with “ikura” salmon roe and garnished with “ao-nori” 青海苔 a type of dried green seaweed called laver.


For this version of  chawan-mushi , I used shrimp, chicken and scallion since I did not have the other items I usually use.


Ingredients: (for 6 small cups such as the sized container shown above)
3 large eggs (150-170 ml)
Broth, three times volume of the eggs (450- 520ml). Any broth including chicken broth will do. I used a mixture of bonito and kelp broth from a dashi-pack and broth I made from shrimp shells. I seasoned the broth with mirin, light colored soy sauce and salt.

6 large frozen shrimp, shell on, thawed, salted, let it stand for 5-10 minutes, shelled and cut into bite sized pieces.
1 cooked chicken tenderloin, shredded.
1/2 scallion, sliced on bias.

Directions
In 6 small bowls, add the shrimp, chicken, and scallion. Mix the eggs and seasoned cold broth, pour the egg mixture through a fine sieve. Steam (I used an electric wok) on high stream for 10 minutes and then lowered the steam and keep steaming until the egg mixture was set (another 10-15 minutes or more).

Instead of eating this hot, I let it cool to room temperature and refrigerated it. I served it cold with Ikura and dried “ao-nori” on top.

Since I did not have other items such as shiitake mushrooms, I used whatever was available. This simpler approach worked very well for this cold chawan-mushi. The addition of the ikura salmon worked very well. It provided a nice texture with a delicate pop in the mouth followed by a  burst of fresh sea saltiness. After this we had another tuna dish.

Thursday, September 10, 2020

Tuna sashimi caprese with basil and perilla 漬けマグロのカプレーゼ

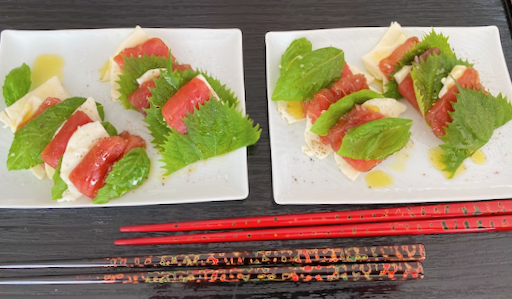
This was the first of three appetizers I made one evening using a saku block of yellowfin "ahi" tuna キハダマグロ we got from Great-Alaska seafood. I am always looking for different ways to serve yellowfin tuna sashimi. The recipe I saw at e-recipe was a usual caprese with the addition on tuna sashimi.  I altered the recipe by leaving out the tomato. In addition, I used basil for one batch and perilla for the other.


The one with basil is shown on the left in the picture below . The basil came from our window-sill garden. The one with perilla is shown on the right. The perilla is from our herb garden.


Ingredients: (for an appetizer for two)
1/3 tuna “saku” block, sliced into 6 slices (3 slices per serving)
6 slices of fresh mozzarella cheese
6 basil leaves
6 perilla leaves (if large cut into two)
Good olive oil (I used our favorite Spanish olive oil)
Salt and pepper

Marinade:
2 tbs soy sauce
1 small clove of garlic, crushed  using a garlic press (or grated from tube).
1/2 tsp. sugar

Directions
Add the marinade and the tuna into a Ziploc bag, remove the air, seal and marinate for 10-15 minutes. Blot out excess marinade (I decided to cut one slice into two so that I could make the basil and perilla versions). Layer the mozzarella cheese, tuna, and either basil or perilla. Sprinkle with the olive oil, salt, and freshly cracked black pepper.

This was a really good way to have tuna sashimi. The addition of garlic in the marinade made it really good. Both the basil and perilla versions while different were good. We thought both are good but the perilla ones had stronger and more distinct flavor.

Monday, September 7, 2020

Cabbage and perilla in brine キャベツの青じそ漬け

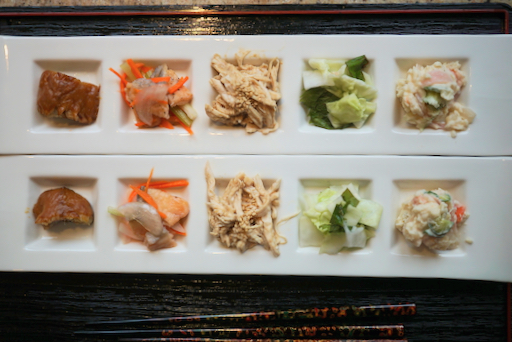
These were five small appetizers we had one evening. Among these five appetizers, one is new and another is sort of new (a variation).


From the left, three kinds of protein. In the picture below which is the close up of the individual dishes, the left is smoked mackerel with miso sauce (since it is difficult now to get fresh mackerel, we got a package of smoked mackerel). My wife suggested serving it with the miso sauce I use to simmer the fresh mackerel サバの燻製味噌ソース. Unfortunately, this batch of the smoked mackerel was a bit too salty and the addition of the miso sauce did not improved the situation by adding more saltiness. The center is vegetables and fried salmon in sweet vinegar 酒の南蛮漬け and the right is chicken dressed in sesame dressing 酒蒸し鶏胸肉の胡麻和え.


Below, from  left to right is the previously mentioned chicken with sesame dressing, the center is a new small dish which is cabbage and perilla in brine キャベツの青じそ漬け.  There are many variations on this theme but I used a recipe from the on-line version of the Japanese newspaper "Asahi shinbun" 朝日新聞. (The recipe follows below the picture). The right is my usual potato saladポテトサラダ. 


Ingredients for cabbage dish
150 grams cabbage, cut into 1 x 3-4 cm strips
4-5 Green perilla leaves, cut into 1cm square

For Brine (mix the below and let it cool to room temperature)
1/2 cup hot water
1 tsp salt
1/2 tsp sugar
1/2 tsp rice vinegar


Directions
In a Ziploc bag, add the cabbage and green perilla, pour in the brine, remove the air as much as you can and seal. Sandwich the bag between two plates and put the weight and let it stand for 30 minutes until more water comes out and the cabbage becomes soft. It will keep several days in the refrigerator.

The brine was rather gentle and the cabbage tasted fresh and had a nice crunch. eating it with the perilla pieces really made it. This is a nice refreshing dish.

Friday, September 4, 2020

Homemade Ricotta cheese 自家製リッコタチーズ

For a while during covid we were not able to get plain yogurt. In the past, my wife made yogurt using Dannon yogurt as the seed but when it was not available, she bought some heirloom yogurt starter from Cultures for Health. Recently she has been into making yogurt from the heirloom starter as well as the Dannon yogurt which is now available. The home-made yogurt from the heirloom starter lactobacillus is now in its 16th generation.  With some effort (heating and maintaining the temperature of the milk for a specific time before seeding), the consistency of the heirloom yogurt has greatly improved and it tastes much better than commercial yogurt. It is very creamy, sweet with a slight tang. Meanwhile, we noticed that the  Dannon based home-made yogurt has a slight viscous (slimy) consistency which is different from the original store-bought Dannon and is not entirely pleasant. (When my wife made yogurt many years ago using Dannon the resulting yogurt did not have this consistency). When it is made into Greek (strained) yogurt, however, it is much creamer and nicer than Greek yogurt made from store bought Dannon.  The dip made from Home-made Dannon derived Greek yogurt is really nice. When making Greek yogurt, however, it produces a large amount of whey. My wife always thought it was a bit of a waste to throw it away and wanted to find a way to use it. Finally she found a recipe for homemade ricotta using the whey from yogurt and decided to make a small experimental batch. We were a bit amazed at how good this homemade ricotta is.


Although we learned that authentic ricotta (re-cooked) is made using only whey, the ones commercially available in the U.S. apparently are mostly made from milk. The recipe my wife found uses a combination of whey and whole milk.

Ingriedients: This is the original recipe. The recipe my wife used for the small experimental batch follows.
2 gallons fresh whey (use within a few hours of straining)
1 gallon milk (optional)
1/2 cup distilled white vinegar
salt to taste

What my wife used for her small experimental amount
1 cup whey
1 cup milk (optional)
1/8 cup vinegar (she used rice vinegar)
salt to taste.

Directions
Mix the whey and milk and put in a slow cooker. Heat on low until the combination reaches 195 F. (About 2 to 3 hours). Remove from heat add vinegar and stir. The curd will form and float to the top. (When the milk reached 195 F and we took off the lid and it looked like this (picture below). Apparently, the curd had already started to form)


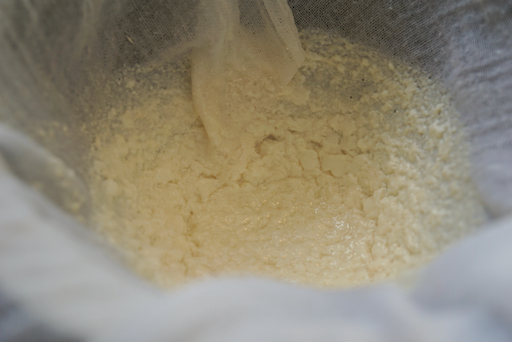
Drain the curd through a butter cheese cloth (picture below). One hour draining for soft ricotta. Six or more hours for firmer ricotta. Remove from the cloth, put it into a small bowl and salt to taste.


Although my wife made only a small amount, it was really good. It was creamy with a soft texture. The vinegar gave it a slight tang while it also maintained a slightly yogurt flavor and the salt really brought everything together. My wife is inspired...Watch out. 

Tuesday, September 1, 2020

Super-soft Milk Bread 日本風食パン

Many years ago, when we visited Tokyo 東京, we stayed at hotels in the Asakusa area 浅草. (More recently, we've been staying at hotels in the Ginza/Tokyo station area). One of the fond memories we have of our stay at the Asakusa hotels was going to a coffee house or "Kissa-ten" 喫茶店 for breakfast and coffee. At that time, they usually offered, at a very reasonable price, choices of "morning sets" モーニングセットdesignated as  "A", "B" or "C". They consisted of some kind of egg (hard boiled or egg salad) and slightly different sides such as a mini green salad or cucumber. The foundation of the meal, and, as far as we are concerned, the best part, was a very thick slice of soft bread lightly toasted and served with butter or sometimes jam or jelly. The second cup of coffee was usually available at a steep discount which was another reason we liked breakfast at the Kissa-ten. Recently my wife came across a recipe for "Super-soft Milk Bread". In addition to being reminiscent of our favorite Kissa-ten bread, the accompanying write-up referred to it as a variation of "Hokkaido milk bread". Since I am originally from Hokkaido 北海道, that "sealed the deal". I had to make this. This is a very different recipe from our usual white bread loaf. It came out super soft, light and fluffy. It really reminded us of "Kissa-ten" toast. I sliced a very thick piece (but not as thick as some we had at kissa-ten) toasted it and slathered on the butter. Voila!


Some Japanese recipes for this type of bread include "Yu-dane" 湯種 or "Yu-kone or Yu-gone" 湯捏ね in which  a portion of flour is mixed and kneaded with hot water. Instead, this recipe pre-cooked the flour and milk into a soft paste called "tangzhong" which is the Chinese pronunciation of "Yu-dane"  湯種.  I read that this was popularized by a Chinese cookbook author Yvonne Chen as "tangzhong" which is the term that commonly appears in English-written recipes for this type of bread. This recipe came from the King Arthur website.

Ingredients
Tangzhong
3 tablespoons (43g) water
3 tablespoons (43g) whole milk
2 tablespoons (14g) King Arthur Unbleached Bread Flour


Dough
2 1/2 cups (298g) King Arthur Unbleached Bread Flour
2 tablespoons (14g) Baker's Special Dry Milk or nonfat dry milk
1/4 cup (50g) sugar
1 teaspoon salt
1 tablespoon instant yeast (This looked like too much for one loaf of bread, next time I may reduced it in half)
1/2 cup (113g) whole milk
1 large egg
4 tablespoons (57g) unsalted butter, melted

I weighed all ingredients except for the yeast and egg.

Directions
To make the tangzhong: Combine all of the ingredients in a small saucepan, and whisk until no lumps remain.

Place the saucepan over low heat and cook the mixture, whisking constantly, until it becomes thick and the whisk leaves lines on the bottom of the pan, about 3 to 5 minutes (#1 below).

Transfer the tangzhong to a small mixing bowl or measuring cup and let it cool to lukewarm.
To make the dough
Combine the tangzhong with the remaining dough ingredients, then mix and knead — by mixer or bread machine — until a smooth, elastic dough forms; this could take almost 15 minutes in a stand mixer (I used a standing mixer with a dough hook and kneaded it for 7-10 minutes).

Shape the dough into a ball, and let it rest in a lightly greased bowl, covered, for 60 to 90 minutes, until puffy but not necessarily doubled in bulk.

Gently deflate the dough and divide it into four equal pieces; if you have a scale each piece will weigh between 170g and 175g (I divided the dough in half-- I should have weighed the halves; the loaf came out uneven).

Flatten each piece of dough into a 5" x 8" rectangle, then fold the short ends in towards one another like a letter. Flatten the folded pieces into rectangles again (this time about 3" x 6") and, starting with a short end, roll them each into a 4" log. (After flattening, folding, I rolled it into two logs).

Place the logs in a row of four (in my case, two) — seam side down and side by side — in a lightly greased 9" x 5" loaf pan.

Cover the loaf and allow it to rest/rise for 40 to 50 minutes, until puffy (#2 below).

Toward the end of the rising time, preheat the oven to 350°F.

To bake the bread: Brush the loaf with milk and bake it for 30 to 35 minutes, until it's golden brown on top and a digital thermometer inserted into the center reads at least 190°F (#3 below).
Remove the loaf from the oven and cool it in the pan until you can transfer it safely to a rack to cool completely (#4).


The dough rose rather quickly (this is the reason I think I will reduce the yeast next time). After the bread completely cooled, I sliced it (#4).We have been making white bread loafs for some time using an old recipe which came with our stand mixer. Our white bread loaf is good but this one is different and may be better. It is extremely light and very close to the Japanese loaf bread we had at the Kissa-ten. We were "transported" back to Tokyo with the first bite. It had a mildly sweet flavor and the crust was nice and crunchy. We will definitely make this again for sure.

Addendum:

I doubled the amount and made two loaves. I also, decreased the yeast by half (proportionally). I also weighed the 4 portions (2 for one loaf) and they came out in equal sizes (see pictures below). This is just a note to myself so that I do not have to calculate  the ingredients' weight again.

Ingredients:

Tangzhong
86 g water
86 g whole milk
28 g King Arthur Unbleached Bread Flour

Dough
596 g King Arthur Unbleached Bread Flour
28 g  nonfat dry milk 
100 g sugar
2 teaspoon salt
1 tablespoon instant yeast
226 g whole milk
2 large egg
114 g (one stick) unsalted butter, melted

Despite halving the yeast, the dough rose and the bread came out soft and fluffy. It may have taken a little bit more time to rise but the flavor of the bread, we thought, was better.

Thursday, August 27, 2020

Red wine miso sauce with tuna cutlet 赤ワイン味噌ソースとマグロカツ

I thawed a block "saku" of low-grade yellowfin tuna sashimi. As usual, I tried to make some variation dishes. First I made "zuke" marinated tuna cubes with avocado very similar to one I posted. The second dish was imitation "negitoro " ネギトロ. These two dishes are very good with cold house sake "Tengu-mai"  天狗舞大吟醸.  The third dish I made was tuna cutlet マグロカツ.  I gave a twist to this dish by making a red wine miso sauce and serving it with our relatively new house red wine DAOU Vineyards “Pessimist” Red Blend 2018. I saw the sauce recipe in a digital version of the Japanese newspaper “Asahi “ 朝日新聞. The recipe was written by a sommelier. It is a reduced red wine with miso and he claimed that, with this sauce, the food will go well with red wine. He also suggested fried food would be the best with this sauce. I served tuna cutlet with this sauce accompanied with cucumber and cabbage “asazuke” 浅漬け as well as the cauliflower I usually make and skinned Campari tomato.

The reason I made this sauce was because one of the bottles of red wine we opened recently had a bit  of a musty taste/oder and we decided not to drink it. It was not corked but somehow the handling was not right since other bottles of the same wine were ok. Also we have had this wine so many time in the past with no problems.  In any case, I used a portion of this wine to make a chicken liver dish, a stew of leftover barbecued chicken, and this red wine miso sauce to finish the bottle. Once cooked, the wine lost its mustiness.

Ingredients
Red wine 200 ml
Red miso 2 tbs (I did not have red miso 赤味噌 and used “awase” miso 合わせ味噌)
Mirin 2 tsp
Rice vinegar 2 tsp
light colored soy sauce 2 tsp
Honey 2 tsp or more to taste

Directions
Reduce the red wine in half, dissolve the miso and add other ingredients and adjust sweetness to your liking by adding more honey.

I added more honey than indicated. I had to strain the sauce since it developed some sediments (due to vinegar?). I served it on the fried tuna and the fried taste completely dominated. We actually couldn’t taste the sauce at all. My wife, who never skimps when it comes to the application of sauces actually took to soaking her pieces of tuna in the sauce and said she still couldn’t taste it. Finally, in desperation she slurped it with a spoon and conceded it tasted very nice. I would have expected to at least taste the miso flavor but it was completely muted. I am not sure this may have been because I did not use red miso. In any case, this sauce did not have much flavor but we enjoyed the tuna cutlets with red wine. Since more sauce is left, I may add more miso to see if that will improve the flavor.

Friday, August 21, 2020

No Knead rye bread with "Karikari"-salted plum カリカリ青梅入り捏ねないライ麦パン

 As I promised in the previous post on no-knead olive rye bread, I made no-knead rye bread with "karikari-koume" カリカリ小梅 or salted small green plums. Initially I thought this bread was a failure, primarily because after 18 hours of rising not all the flour was incorporated into the dough as it should have been. It did not rise much and even after baking it was still a fairly flat loaf. In addition, as I was getting ready to incorporate the green plums into the dough my wife came along and snarfed a plum to taste. (This was the first time she tried one). She made the face reserved for eating raw lemons and blurted, 'how can you ever eat these things?' For her, it was not only salty but also very sour. For me it was salty but not that sour.


Initially, I had prepared 200 grams of the salted plums to add to the dough. After her tasting, and at her suggestion, I reduced the amount to about 150 grams and chopped them into smaller pieces  It turned out this was the right thing to do.


On the cut surface the plums look like green olives.


Ingredients
300 grams bread flour
100 grams rye flour
2 grams instant yeast
150 grams Karikari-koume salted plum, stone removed and roughly chopped (It is easiest to crush the plum with the flat of the knife and then split the plum open to remove the stone. I chopped a bit more finely than for the olives)
300 grams cold water

Directions
Exactly same as the other no-knead breads. Mix everything, cover and let it rise for 12-18 hours. Form the ball on a well-floured board by pulling the edges to the center. Dust with more flour and cover with a floured dish towel (I also placed an inverted large bowl over it). Let it rise for 1-2 hours. Preheat the oven to 450F with cast iron Dutch oven inside for, at least, 30 minutes before baking. Place the dough in the hot cast iron dutch oven, put the lid on and bake for 30 minutes. Remove the lid and bake an additional 10-15 minutes. Take it out and let it completely cool on a cooling rack.

All I can say after this experience is that yeast bread is very "forgiving". Turned out this "failure" bread was not bad at all. The taste was unique and very interesting (in a good way). The addition of the plums was just fine. The bread toned down the sourness and they provided a nice burst of saltiness reminiscent of olives but with the distinctive plummy flavor so characteristic of Japanese dishes. This combination of rustic rye bread and salty plum is similar to a rice ball with "karikari koume". The texture was very moist and the crust nice and crunchy. My wife fully endorsed the final product and said I should make it again.