Thursday, October 27, 2016

Cold tofu with fresh tomato sauce 冷奴の新鮮トマトソースかけ

We really like cold angel hair pasta with tomato sauce. We made this dish multiple times this summer. Since the tomato sauce is so refreshing and good, I used it for our cold tofu.


To give a bit of a different taste, I garnished it with real wasabi and aonori. I also added a bit more mentsuyu めんつゆ or concentrated noodle sauce.


The cold tofu I used was from "Otoko-mae tofu". This is called "San-ren-chan" 三連チャン  (mahjong terminology) with three square tofu containers strung together as one package. When it is unmolded, you can sort of see the Kanji character "Otoko" 男 on the surface.


I just poured on the tomato sauce (skinned Campari tomato with olive oil and  3x concentrated Japanese "Mentsuyu" sauce, please see the previous post for recipe)


This was really good. I think this will work with either basil or perilla as well. Nice cold refreshing dish for summer.

Monday, October 24, 2016

Dry curry/Keema curry, Sort of ドライカレーもどき

Whenever we barbecue chicken we cook two, so that we have enough for sandwiches during the week but often, we end up with excess chicken meat. I have used the cooked chicken meat in many different ways making curry, soup, salad, terrine and more. This is another new variation. It is a type of curry I came up with one day. It is similar to a type of  Japanese curry called "Keema curry" or "dry curry". "Dry curry" must be a Japanese modification of "keema curry". It is called "dry" as opposed to regular Japanese style curry which has a thick "wet" sauce. I had these type of curries in mind but I did not even look up recipes until I started writing up this dish for the blog. This was my attempt at finishing up the barbecued chicken dark meat. I served this over rice and topped with soft poached egg and a side of assorted pickles shown in the small square dish on the right. The pickle at the top of the dish is homemade pickled watermelon rind, the white one below that is store bought rakkyo らっきょう and the red one on the bottom is "Fukushin zuke" 福神漬け.


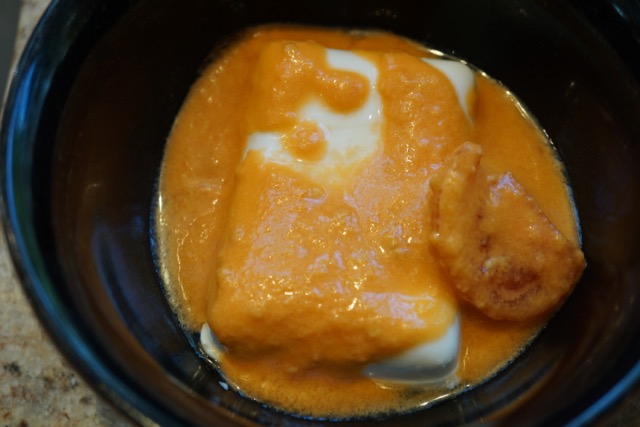
The poached egg had a nice runny yolk which is mixed into the curry and the rice. As per Japanese tradition, we ate it with a spoon not a fork.


The curry is made of finely chopped cooked chicken, and vegetables and I also include raisins which gives it a nice sweet taste. It does not have any sauce per se.


Japanese generally top this with chopped boiled egg, a raw egg or raw egg yolk but we like our egg soft poached.


Still the yolk is totally runny and almost same as using raw egg yolk (this is pasteurized Daividson's egg).


Ingredients (probably makes 4 servings):
Chicken meat, dark meat, barbecued (4 legs), meat separated and finely chopped
Onion, one medium, finely diced
Garlic, one fat clove, finely diced
Ginger, finely chopped, 1 tsp
Carrot, one medium, peeled, sliced on bias, julienned and finely diced.
Raisin, 1/3 cup
Japanese curry powder (SB brand) but any curry powder will do,  2 tsp or more
Garam masala, 1/2 tsp
Chicken broth (about 2-3 cups or as needed), I used Swanson no fat and low salt version
Olive oil for sauteeing (2tbs)
Salt and pepper to taste

Directions:
  1. In the pot, I added olive oil or any vegetable oil and when the surface started simmering, added finely chopped garlic and ginger.
  2. When the garlic and ginger got fragrant, I added the onion, carrot and kept sauteing for several more minutes.
  3. I added the chicken, the curry powder and kept stirring for a few more minutes and added the raisins. 
  4. I added the chicken broth just enough to cover the ingredients and simmered for 10-15 minutes.
  5. If the liquid is not enough add more chicken broth until everything is cooked and only some moisture left.
  6. I added the garam masala, salt and black pepper.


Assembly:
I placed cooked rice in a bowl and layered it with the dry curry and topped with soft poached egg.

This was a good new way to use leftover cooked chicken. Of course you could make this from other ground meats such as beef, lamb, chicken or pork. The curry was spicy enough that you feel the heat but not too hot. The egg yolk makes the curry a bit milder and these pickles went so well with this curry. Since this curry is "dry", you could use it over a cracker or a piece of bread as well.

Friday, October 21, 2016

Corn Rice cooked in corn broth とうもろこしご飯

Since we are still in the midst of corn season (early September) and piles of corn in husks are plentiful at the market, we, again, ended up with 10 ears of corn. Without having any specific plan of what to make with them, my wife went ahead and cooked the corn by briefly microwaving the ears covered with a paper towel for 4 to 6 minutes. I removed the kernels and my wife then made her famous corn broth from the corn cobs and onion. So we ended up with corn kernels as well as corn broth. Instead of making regular corn soup, I decided to make a Japanese style corn rice. After we made the corn rice, we made corn potage from the corn kernels and the broth.

Unlike the traditional Japanese recipe which uses sake, kelp or Japanese broth, I used my wife's very concentrated corn cob broth to make this rice.


Because the broth was not totally clear, the rice got slightly brown/yellow in color.


I served the corn rice with hot smoked trout cooked in our Weber using indirect heat and hickory wood chips. My wife skillfully deboned the fish for me and I served it with a side dish of cucumber, onion and dill salad.


This is how our hot smoked trout looked. The meat was very succulent with a nice smokey flavor and we liked it.


Ingredients for corn rice:
Corn kernels, raw or cooked about half cup (#1).
Rice, Japanese short grain, 2 cup (using the 200 ml cup that comes with the rice cooker)
Corn cob broth, reduced, (about 2 and 1/4 cups).
(You could add salt or light colored soy sauce but I did not. These can be added later jut before you eat).

Direction:
  1. Wash rice until water runs clear and drain.
  2. Add the washed rice and the corn kernels to the rice cooker.
  3. Add the corn cob broth to the mark (#2).
  4. After finished cooking let it stand for 10-15 minutes (#3).
  5. Gently mix and serve.


Using the concentrated corn cob broth made this corn rice very special. It had a very lovely corn flavor and a slight sweetness. We first tasted as is and then added butter and soy sauce which made it even better. This will be a regular seasonal dish from here on. 

Tuesday, October 18, 2016

Spanish Mackerel dishes, two kinds サバの味噌煮と竜田揚げ

We bought a whole Spanish mackerel from our nearby gourmet grocery store. Again, the exact Japanese name for Spanish Mackerel is unclear but  I will just call it "saba" 鯖 さば. Certainly it looks and taste like one. I asked the fishmonger to just gut the fish. I made miso-ni 味噌煮 simmered in miso sauce (left) and tatsuta-fry 竜田揚げ.


I made the miso simmered mackerel in the morning and reheated it just before serving. Then I fried up the marinated tatsuta mackerel. This one was well seasoned and did not require any sauce just a bit of lemon juice.


I garnished the miso simmered mackerel with thin julienne of ginger or "hari shouga" 針生姜 and thinly sliced scallion.


Preparation of the fish:
This was a rather large mackerel. I filleted it "sanmai-ni-orosu" or sliced it into three layers (two layers of fillets and one layer of backbone and head). I removed the belly portion and also removed the meat under the fins since there are many small bones under the fins. Using a Japanese bone tweezer, I removed any small bones which remained.


I cut the pieces into rectangles and scored the skin so it wouldn't break during cooking. I divided the pieces into two groups. I simmered one group in miso sauce and the other I fried into tatsuta.

1. Mackerel braised in miso sauce サバの味噌煮
Ingredients:
Mackerel, one fillet, cut into rectangles with the skin shallowly scored. 
300 ml water
100 ml sake
5tbs miso
3tbs sugar
4 slices of ginger

Directions:
I placed the water and sake with the ginger slices in a frying pan and brought it to a boil. I placed the mackerel in with skin side up. I removed some liquid and used it to dissolve a mixture of miso and sugar. Once dissolved I added it back to the pan (#1) and turned down the flame to simmer. I placed the otoshibuta (my usual silicone lid) on top (#2).
I simmered it until the sauce became thick and clung to the fish (for about 45 minutes to 1 hour) (#3).


2. Mackrel tatsuta fry 鯖の竜田揚げ
Ingredients:
Mackerel, one fillet, cut into rectangles.
Soy sauce and mirin (1:1 ratio)
1 tsp grated ginger
Potato starch for dredging
Oil for deep frying

Directions:
In a Ziploc bag, I marinated the mackerel for several hours in the refrigerator. 
I blotted the excess marinade using paper towels and dredged the pieces in the potato starch (#4).
I deep fried it in 350F oil for a few minutes turning once (#6).

Both dishes were quite good but we liked the miso flavored one best. Although these two dishes are good drinking snacks, we had them with rice. Especially the miso-ni was best on the rice (OTR). We were pleasantly surprised that the Spanish mackerel we got was very fresh and the resulting dishes were great.


Saturday, October 15, 2016

Chilli cheese shortbread 唐辛子とチーズのショートブレッド

This is my wife's savory cookie/shortbread which belongs to a similar category as the anchovy black pepper cookie she made before. This is seasoned with red pepper and worchestershire sauce.


This is not sweet at all and clearly calls for wine or some other drink to accompany it.


Ingredients:
2 cups AP flour
12 Tbs. butter
2 tsp Worcestershire sauce
1 tsp  red pepper flakes
1 1/2 cup shredded cheese (cheddar and gruyere)

Blend all the ingredients in a food processor. (Word of advice: This is a very dry flaky dough. Don't panic if it looks like it is not coming together. We had to dump it as crumbs out of the food processor and my wife worked at it diligently. Eventually she was able to make the ball shown in #1 below.) Wrap the dough in plastic wrap and put in the refrigerator for 15 minutes. Roll out dough as shown in #2. Cut out cookies whatever shape you want and put on a cookie sheet #3. Preheat oven to 325 degrees and cook for 15 to 18 minutes until golden. Put on a rack to cool #4. 


This is an ethereal cookie. It dissolves on your tongue leaving behind a slight saltiness (from the Worcestershire sauce) followed by a pleasant buzz from the red pepper that slowly kicks in and builds. Although anchovy is the main ingredient for Worcestershire sauce, this version of savory shortbread is much more subtle compared to the anchovy black pepper cookie.  Despite all the butter in this shortbread the texture is somewhat grainy and some libation helps nicely to wash it down. We had it with Spanish red wine which went really well.  

Wednesday, October 12, 2016

Negitoro-don ネギトロ丼

I (again) made negitoro (or more precisely pseudo-negitoro ネギトロもどき) from frozen yellowfin tuna sashimi block and decided to make "donburi" 丼 as a shime 〆 dish. Besides negitro, I added Japanese style scrambled eggs or "iritamago" 炒り卵, strips of nori sea weed and perilla.


I made the negitoro as before (#1). I also made scrambled eggs seasoned with sugar and light colored soy sauce (#2). For garnishes, I prepared a chiffonade of perilla leaves (#3). I placed sushi rice in the bowl first (#4) and added strips of nori (#5) which was followed by negitoro and eggs (#6).


This combination cannot go wrong. This was a quite nice small donburi perfect to complete the evening.

Sunday, October 9, 2016

Pocket stuffed with chicken and craisin チキン、チーズと干しクランベリーのポケットパイ

This is a continuation of my wife's "pocket" dishes. This started out as a question about what to do with the extra barbecued chicken from the previous weekend. I am not sure where she found this recipe. My contribution was chopping Jalapeno pepper and leftover barbecued chicken. Here is the end result pocket just out of the oven.


Nice buttery pie crust and smokey and cheesy stuffing.


I asked my wife to fill in the rest.

Ingredients:
1 cup chopped cooked chicken
2-3 Tbs. Mayonnaise
salt and pepper to taste
1/4 cup craisins
2 diced jalapenos (or to taste)
1/2 cup grated smoked mozzarella

Directions:
Mix ingredients together using just enough mayo to blend then stuff pockets. Cook stuffed pockets at 400 degrees for 18 minutes or until golden brown. 


We found this type of dish perfect starters when we come home. The smokiness comes from both barbecued chicken and  smoked mozzarella cheese and craisin add sweet and sour taste. Just pop in the pockets in the toaster oven and heat it up. This tastes great and fills the hollow in your stomach just long enough for dinner to arrive.

Thursday, October 6, 2016

New Macro lens, Broccoli, tomato and white asparagus マクロレンズとリングLEDライト、ホワイトアスパラ

I just got a new sony macro lens E 30mm F3.5 Macro (SEL30M35) for my Sony Alpha a6000. Before this, I was taking my foodie pictures mostly using a kit lens (16-50mm zoom) which I bought with the camera body.  Real close ups were difficult with the kit lens. I also get an LED ring light for macro lens. The below are the first pictures I took with this set up. I happened to have blanched broccoli and took this picture.


The LED ring light has a bluish color temperature and unless, you are taking really a really tight shot, the periphery gets dim and only the center gets well lit. But I am happy with the close up I took.


For these two pictures, I adjusted the color and exposure using a Mac photo program. The below are taken with natural light from the windows.


I also made white asparagus with a Bearnaise sauce variation. Instead of tarragon, I used concentrated  white asparagus broth.


The sauce is another variation of Beanaise-like sauce.


As before I peeled and cooked white asparagus in water with all the peels until soft and cooked. I then removed the asparagus but left the peels and further simmered it until only a very small amount of liquid was left which has a concentrated flavor of white asparagus. I added rice vinegar and reduced it further (2 tbs of liquid left). In the double boiler, I then added two egg yolks to the concentrated liquid and whisked. Since the sauce appeared a bit runny, I decided to add pats of cold butter while whisking (about 1-2 tbs). I seasoned it with salt and white pepper.  For color, I garnished it with chopped chives. 

Hope I can take better pictures in the future but since I do not spend enough time to set up the lighting or to compose good pictures (after all, we need to eat), the quality may not really improve but I am having fun with my new toy.

Monday, October 3, 2016

Dashimaki with tarako wrapped in nori 海苔巻きたらこのだし巻き

Although I have posted similar dishes. this one came out rather nicely (visually). This is an example of stuffed Japanese "dashimaki" omelet だし巻き. The most famous/popular is stuffed with eel called "U-maki" 鰻巻き. This time, I stuffed it with tarako cod roe which was wrapped in a nori sheet. I bought this "tarako" たらこ code roe, to make "tarako" spaghetti たらこスパゲッティ (actually using thin udon). I had one sac left over so and few days later, I made tarako dashimaki for the evening.


I removed the tarako roe from its sac (by cutting the sac open and scraping the content using a knife blade leaving the membrane) and wrapped it with a nori sheet (cut to match the width of the rectangular Japanese omelet pan). I just rolled this into the center of the dashimaki omelet.


The tarako was just barely cooked underneath the nori.


Salty cod roe, nori and sweet omelet went so well together. This type of dish really calls for sake.

Friday, September 30, 2016

Curry filled pocket カレー入りパイポケット

I stopped making a Japanese curry (from a package of curry roux) for some time because my wife took an interest in making more authentic Indian style curries. But, one weekend, I just had a hankering for the taste of classic Japanese curry.  So I made some using a package of "medium hot" curry roux and added chicken thighs, potatoes, carrots and onions, the usual suspects used in a Japanese curry. We ate a few curry dinners but we had some leftovers curry but not enough for another dinner. I mentioned in passing to my wife that another Japanese favorite is a fried bread stuffed with curry or カレーパン. She immediately came up with the idea of stuffing her "baked pocket" with the leftover curry. Here is the end results. The shell is made of a pie crust and baked.


You can't see much but it is filled with curry (she mashed the vegetables, particularly the potatoes to make it thicker in consistency and cut the chicken into smaller pieces so they would fit).


The original curry was made in the classic Japanese way with chicken thigh meat, sauteed onion, potato and carrot with a Japanese medium hot curry roux. She shredded the chicken and mashed vegetables to make more homogenous and thicker sauce (#1).  Using her pocket making gadget, she cut the rounds of pie crust (frozen packaged, thawed and rolled) and filled with the curry stuffinfg using a medium size ice cream scoop (#2). The edges were painted with a mixture of flour and water (sort of edible glue) and the pocket maker closed and pressed (#3) making perfect stuffed pie pockets (#4).


She baked this in a preheated 350F oven for 15 minutes. 

This is a great snack for weekdays when we came back from work and needed something to fill the holes in your stomach quickly. It heats up well in a toaster oven. Although it was a bit spicy, it was very satisfying almost like a comfort food. It also went well with a glass of cab.

Tuesday, September 27, 2016

Succotash soup with chicken salad サカタッシュ コーンスープ

This is my wife's corn soup made from corncobs. Since we had extra fresh corn and frozen edamame soybean leftover from when we made shrimp balls, we added them to her "corncob" soup and called it "succotash" soup. We had this cold as a weekend lunch (it was a hot day) and served with curry flavored chicken salad with cantaloupe.


This curry flavored chicken salad was served on a bed of baby arugula


 and topping of roasted walnuts. We also had my baguette.


There was a little bit of soup left so the next day, we made some modifications and finished it. We added corn pudding (again leftover) and cream.


This was also served it cold with garnish of soy beans and paprika for color.


Both of these dishes were quite a corn "festival". It's amazing what an intense corn flavor can come from just boiling some corncobs (with the corn removed) in water with onion. Adding the corn kernels back into the corn broth along with the edamame also added to the flavor and made it a very filling dish. The nice corn flavor of  the soup also went well with the sweet corn taste of the corn pudding.

Saturday, September 24, 2016

Big eye tuna toro and Ankimo メバチマグロとあん肝の刺身

We got spot prawn from Catalina offshore products. At the same time, we also got frozen bigeye tuna chutoro メバチマグロの中とろ and ankimo あん肝. This was the first time we tried frozen bigeye tuna from Catalina. Interestingly, this turned out to be a cross between ootoro and chutoro. Some portions had sinew separating the meat like some portions of ootoro and with a thin, a bit rough, layer of pure fat (must be from just under the skin). But it tasted really good.


We also got ankimo あん肝 or monkfish liver which was made  into a cylinder, steamed and frozen. This pack appeared to be a bit softer than usual but tasted good.


For this occasion, I thawed a tube of real wasabi and used it with the dish.


For a change, I used a Western-style plate and also served avocado slices as a part of the sashimi. For this sashimi combination, I made three separate sauces. From top Karashi sumiso 芥子酢味噌, mixture of soy sauce and mango chutney (about 1:2 ratio) マンゴーチャツネ醤油, and straight soy sauce.


Karashi sumiso 芥子酢味噌: My usual, mixture of miso, Japanese mustard (from a tube), sugar and rice vinegar. I added a small amount of mirin this time to adjust the consistency (or dashi broth, if you have it handy). This was meant to be used for the tuna in combination with the soy sauce.

Mango chutney soy sauce マンゴーチャツネ醤油: This is a variation of orange marmalade soy sauce I usually make for ankimo.  Since I had mango chutney, I used that to make a similar flavor profile of sweet and salty sauce for the ankimo. It worked very well. My wife actually thought this was better then the sauce I make with marmalade.

Of course, for the slices of avocado, wasabi and soy sauce are the best combination. This was a nice small sashimi plate for a weekend evening with our house sake "mu". The big eye tuna sashimi was way better than our back-up yellowfin tuna sashimi.


Wednesday, September 21, 2016

Potato balls for Harvest moon じゃがチーズもち

There are certain things in nature that my wife particularly likes; among them, are rainbows and bright Moons. Every time conditions are right to form a rainbow i.e. the sun comes out while it is still raining, she goes out to look for one. If she sees one she takes the time to admire it until it disappears. In the evening, if the sky is clear, she is on the look out for the shine of the Moon. So, when she learned about "Chu-shu-no-meigetsu" 中秋の名月 and the round shaped food that goes with "Tsuki-mi" 月見 or moon gazing, it was a done deal. Tsuki-mi took its place on our calendar. I suppose, making "Tsukimi dango" 月見団子 is most traditional but it is not particularly interesting to me (it is a sweetened rice flour dumpling--not one of my favorites). So when I saw this mashed potato ball recipe with cheese, there was no question that this was the one I would make. The picture below was taken before frying. I just wanted to make the correct 15 ball pyramid (3x3 base, 2x2 middle and two on the top) indicative of "ju-go ya*" 十五夜 meaning 15th night in a month before one potentially exploded while being fried.

*The moon that is the focus of tsuki-mi is the full moon before the fall equinox. In the U.S. that moon is called the harvest moon. According to the lunar calendar the 15th day after the new moon would be the full moon. Thus, "ju-go ya" means a full moon but using the Gregorian calendar, obviously, the 15th day of the month may not be the full moon. This year, the full moon before the equinox occurred on the 15-16th night in September. We could not see the moon, however, because of the clouds.


The original recipe was to deep fry the potato balls but I sauteed some, which were served immediately, in butter with a bit of soy sauce poured on top at the end.


Mashed potato, melting cheese, butter and soy sauce is a combination that cannot go wrong in my experience. 


This is inside of the ball showing the melting cheese--yum. I used smoked Gouda. I poured hot melted butter over the baby arugula.


Ingredients:
Potatoes, 3 medium.
Potato starch. 2-3 tbs
Melting cheese (I used smoked gouda), cut into small cubes
Salt

Directions:
  1. Boil the potatoes with skin-on on salted water until cooked.
  2. Remove the skin and mash them. 
  3. Add the potato starch and salt, mix well until elastic dough forms
  4. Using a small ice cream scoop, I portioned out the mashed potato (#1). (requires at least 15 to make a appropriate presentation. I made 20 just in case a few broke during the cooking).
  5. I encased a cube of cheese (#2) with the mashed potato and rolled it into balls between my palms. (#3). 
  6. I kept these potato balls in a sealed container in the refrigerator until I cooked and served them (#4).


The original recipe suggested either deep frying or baking them.  I thought if I fried them they would just taste like potato croquettes with cheese in the middle so I decided to sautee them in melted butter.  I kept the balls moving in the pan so that all the surfaces were cooked and browned. At the very end, I added a light colored soy sauce and kept moving the pan until all the surface was coated.

Certainly, this was rather good. The molten cheese center was too hot initially but cooled down quickly. Although the Harvest moon was hidden behind clouds, we enjoyed this "Tsukimi" food or moon-gazing food.

P.S. The next evening, we tried baking the potato balls. The cheese melted and seeped out leaving a hollow potato shell in a puddle of melted cheese. Sauteing would be the preferred method of cooking.