Showing posts with label Vegetable. Show all posts

Thursday, November 28, 2019

Japanese "Yakiyaki-san" smoke-less earthenware grill やきやきさん

In one of the Milk Street magazines, I saw an article about this Japanese smoke-less (or at least smoke reduced) grill which is made from the same type of "Iga" earthenware 伊賀焼 as "Kamado san" かまどさん rice cooker which we have and really like. We also found YouTube footage introducing this by chef Ming Tsai.  What makes this grill special is the way it is constructed; the lower "bowl" has a large groove around the periphery which is filled with water to form a kind-of moat. So during the grilling the oil runs down the grooves on the top plate into the water filled moat rather than onto hot metal or ceramic as it would on a traditional grill. As a result the run-off oil or grease doesn't get heated and start smoking. In addition, according to the manufacturer, the temperature of the earthenware disk does not go above 350C (on medium flame). This is unique to this product since other grills made of either metal or earthenware easily go over 350C and start smoking. Further they claim that the combination of the earthenware disk and its black glaze results in far-infrared heat which gives a "charcoal-fire" like effect or taste.


Being somewhat  of a "gadget" lover, the YouTube discussion convinced me I had to try this and I ordered one. After its arrival, it sat for some time but finally we had a chance to use it.  We were not sure how "smoke-less" this was so we tried it on the stove under the exhaust fan. I followed the instructions. First, I filled the moat to 80% with water and preheated it for 5 minutes on high flame and then turned the flame down to medium. I brushed the grill surface with olive oil and started cooking.


The picture below shows the end products. We grilled filet mignon, shiitake mushrooms, onions, small red potatoes and zucchini. (My wife added a pat of butter to the onion and zucchini when I wasn't looking). Since the meat was filet mignon and very tender I didn't want to overcook it so I did not leave it on the grill for long as a result, there were no char marks.


The meat was one medium sized filet mignon cut into 1/4 inch slices and seasoned with salt and pepper. I put a bit of olive oil on the gill sides of the Shiitake mushrooms and seasoned with salt. I sliced the the onion, and zucchini into1/8 inch thick pieces. I secured the sections of the onions with toothpicks and coated the vegetables with olive oil and seasoned with salt and pepper.


I first microwaved the small red potatoes in a silicon container until they were cooked then I cut them in half and seasoned them with salt and pepper.


I started cooking with the vegetables since I figured they would take much longer than the meat to cook. At medium flame, char marks did not develop so I cranked up the heat to high flame and finally the food started cooking with char marks but still there was no discernible smoke .


The picture below shows the nice crust that started forming on the potatoes and onions. When the veggies were cooked I added the meat. The meat took only few a minutes to cook to medium rare but with this short cooking no char developed. The juices from the meat added to the flavor of the veggies.


Certainly this is a good way to grill without decernable smoke. It is possible to use this grill on the table with a portable gas burner but we are not sure if the heat would be high enough. Besides, we just got rid of our aged portable cassette because we were worried about how safe it was given how ancient it was.

The food tasted really good. Although we did not use any sauce, there was enough seasonings on the food. Both the veggies and meat were perfectly cooked. Washing the grill afterward was not too difficult but we have to make sure it is totally dry before using it again.

Tuesday, October 15, 2019

Miso soup made with previously frozen Maitake and tobanjan 舞茸のピリ辛味噌汁

This was a lunch one weekend.  Since we still had extra maitake which I bought when I bought the matsutake and I saw this very interesting recipe for maitake miso soup, I  decided to make it. The mushrooms in and of themselves were very filling and combined with the other vegetables in the soup plus the freshly cooked rice and  simmered "kabocha" かぼちゃの煮物 and blanched broccolini I served along side, this turned out to be a very good but very big lunch. (as a result, my wife and I couldn't eat dinner that day.)


The bowls I used were much larger than regular miso soup bowls. The picture doesn't show the ingredients in the soup very well. The unique thing about this recipe, and the thing that caught my attention, was that it called for freezing the maitake (to enhance its flavor) and the addition of tobanjan 豆板醤. This, I just had to try because if it was possible to freeze the mushroom resulting in improved flavor that technique could come in handy for other recipes. I had to make some variations to the recipe, for example, since I did not have Japanese "Kabu" turnip which was suggested in the original recipe, I used daikon, carrot, wakame seaweed, and scallion.


The picture below shows the kabocha and broccolini. To make a typical "teishoku" 定食  i.e. dinner or a lunch set, we would have needed stukemono 漬物 or pickled/salted vegetables which we did not have.


Ingredients:
One package of maitake (1/4 lb), hand torn into bit sized pieces, quickly rinsed in water with the moisture removed using a salad spinner. Place mushrooms in a Ziploc bag and freeze overnight. (the recipe indicates that this process enhances the flavor of the maitake).

Daikon, peeled and sliced  in 1/4 inch thick rounds and cut in half (amount arbitrary)
Carrot, peeled and sliced in 1/4 inch thick diagonally (amount arbitrary)
Salt preserved  (or dry) "wakame" seaweed, salt washed and hydrated, cut into bite sized pieces (amount arbitrary)

Scallion, finely chopped

2 cups dashi broth (I used a dashi pack which included small dried fish called "iriko", which is more appropriate for miso soup)

1 tbs of miso
1/2 tsp of tobanjan (or more if you like it spicy)

Directions:
I added the broth, maitake (not thawed), daikon and carrot into a pan. I simmered it until the vegetables were cooked (for 10-15 minutes).
I added the wakame and dissolved the miso and tobanjan. I tasted and add more miso or tobanjan.
Add the scallion and when it comes back to a boil, shut off the flame and serve.

Although I added just a small amount of tobanjan, the soup was still rather spicy. It was ok with me but my wife thought it was too hot. She added yogurt to the soup. She said it calmed it down and tasted good. We are not sure freezing made any difference. I was afraid ice crystals would form in the maitake and make it spongy when it was frozen but that did not happen. It maintained a nice firm texture. This is a good soup and the freezing technique will be useful for making the maitake last longer. However, my wife said maitake is best if it was cooked with some oil.

Saturday, October 12, 2019

Another five "otoshi" appetizers お通し5種類

This is another example of 5 starting appetizers. This time, all five items were made by me--no store bought. Again, I used the long rectangular plates with five depressions.


From left to right; spicy tofu cubes ぴり辛豆腐, chicken square with dried fruit and gorgonzola cheese *ドライフルーツとゴルゴンゾーラチーズ松風焼き topped with figgy cranberry sauce イチジククランベリーソース.

*Instead of the usual dried figs, I used a combination of hydrated dried fruits (peach, pear, apricot and prune)


Sugar snaps blanched and soaked in dashi seasoned with salt スナップ豌豆の塩びたし and Cauliflower Montparnasse モンパルナスのカリフラワー. The next is  blanched  broccoli rabe and dressed with mustard soy sauce and wedge of Campari tomato skinned.


Finally, pork meat ball with ricotta and parmesan cheese  リコッタチーズ入りミートボール with my home made marinara sauce.


I heated up the tofu, chicken squares, and meat balls in the toaster oven. This is a good combination of vegetables and proteins.

Friday, September 27, 2019

Mackerel ceviche しめ鯖のサビーチェ

In our household, once an item goes into the freezer, it tends to "fall off the radar screen" and gets lost. When my wife digs deep into the freezer in search of something, she always finds some very old item. On one such occasion, she pointed out a package of pickled mackerel or "shime-saba" しめ鯖. I knew it was old but I had no idea how old. I defrosted it one weekend and it was not edible. So, on a subsequent weekend, I bought some "fresh" frozen pickled mackerel. I did not take any chances this time and, the next day, I made this dish. I got this idea from a recipe on line.


This is a good dish. Perfect with cold sake.


The addition of vegetables added more volume.


Ingredients:
One package frozen "shime saba" pickled mackerel (#2), Thin skin peeled off and cut into a
bite sized pieces (#3).
1/2 sweet  onion (I used Vidalia), cut into thin slices (#1)
2 skinned Campari tomatoes, cut into thin wedges (#1)
1 Jalapeño pepper, seeded, veined and cut into fine dice (#1)
lime juice (from 1 lime) or lemon juice
Salt and ground black pepper to taste
1-2 tsp olive oil (I used our favorite Spanish olive oil)
1/2 cucumber (I used American mini cucumber), thinly sliced for garnish


Directions:
Just mix it all up (#4) and dress with the lime juice, and olive oil. Season it with salt and black pepper (#4). Let it stand in the refrigerator for 10 minutes.
I garnished with the cucumber

This is better than just eating the mackerel like sashimi with soy sauce, wasabi or ginger. Since the shime-saba had just been bought, it was nice and not overly pickled. This is indeed a very good way to serve shime-saba. This dish is not as challenging to people who are not into sashimi and mackerel in particular.

Saturday, August 31, 2019

First myoga harvest in 3 years 三年ぶりの茗荷の収穫

We could not harvest our myoga (myouga) 茗荷 for the past three years due to various obstacles . More recently, most of our myoga plants disappeared for some reason. Possibly the rabbits ate them. (They did have signs of being tasted by some critter before they disappeared).  Or more likely,  they were removed by mistake by our gardener's nephew who was helping out with the fall clean-up. (I suppose they looked "weedy"; not like something we should have in the garden and they were taking over, which was OK with us).  We tried to purchase some myoga though the internet without success. So when our landscaper came to do some work in our yard this year we asked if he could get us some replacement myoga. He kindly gave us 4 myoga plant/rhizomes from his father's myoga patch (his father is a retired master Japanese garden landscaper).  We thankfully planted them this spring. Just to give a clear message to all involved (rabbits and especially gardener's nephews) we surrounded the plants with stakes and a plastic mesh fence to make it clear that these were not plants to be messed with.  In any case, later in the spring we discovered a few straggler myoga from the previous batch which we think survived because they were "hiding" behind and amongst other plants.

We have posted many uses of myoga including picked myoga. We still have some pickles left from 3 years ago in our refrigerator.  We are still enjoying them despite the fact they are "refrigerator pickles". They are still quite good and show no sign of going bad. But it is time to look for the new harvest. One weekend, my wife donned her  mosquito suit. On hands and knees with head buried in the plants, scrabbled into the dirt with her hands to uncover the buried flower buds of the myoga which is the part that is eaten. (They have to be harvested before they emerge from the ground. Once they bloom they become soft and mushy and aren't good.) It is not a pleasant task...but, hey, we really like myoga!  She found three developing buds (see below) from the old surviving myoga plants but none from newly planted myoga. (We'll probably have to wait until next year for them to be established enough to produce buds.)


My wife also said she uncovered a few very premature buds and covered them up again so they could grow bigger. We should wait for few more weeks to hopefully get a better harvest. In any case, we have not had fresh myoga for some time.  So, I served this as a garnish for cold "hiya-yakko" tofu 冷や奴.


The tofu is, as usual, one of the "Otokomae" 男前 tofu. I also garnished with chiffonade of perilla. For sauce, I used the usual, concentrated noodle sauce from the bottle.


Myogo may be acquired taste but we really love it especially fresh and it was wonderful to have their taste again. It has a very unique flavor that is hard to describe and there is no equivalent to which to compare it. Hope we will have more myoga harvest this year.

Friday, July 26, 2019

Zucchini muffin ズキニマフィン

I was not familiar with zucchini when I arrived in U.S. many years ago. (I wasn't the only one who didn't recognize zucchini. When my mother came for a visit and I made fried zucchini, she asked me why I was frying the cucumber). To me, even now, I find it it to be a rather taste-less vegetable. So when I encountered "zucchini bread", I did not quite understand the idea of putting this vegetable in bread. For that matter, carrot cake was also strange to me. Why put vegetables in cake?  But I learned that both zucchini bread and carrot cake are really good. You really do not taste the vegetable (especially zuccchini) but it makes a very moist cake and bread without adding too much fat or eggs. (I also surmise that this would be a good vegetable delivery system for kids since they would be eating vegetables without knowing it). My wife got zucchini and egg plant and I made ratatouille  as per her request but we had one more zucchini left so my wife decided to make zucchini muffins (using a zucchini bread recipe from "Beard on Bread").


If you would like to hide the fact it has vegetables, you could peel the green skin but we did not.  You can see some green zucchini and walnuts. Walnuts definitely add taste and texture in a very positive way.


The picture below shows them just as they came out of the oven and the muffin tins.


Ingredients (for 12 muffins):
3 eggs
1 1/2 cup sugar
1 cup vegetable oil
2 cups grated raw zucchini (#1 and 2)
3 tsp vanilla extract
3 cups AP flour
1 tsp salt
1/4 tsp baking soda
1 tsp baking powder
2 tsp ground cinnamon
1 cup coarsely chopped (toasted) walnuts

Directions.
Beat the eggs until light and foamy. Add the sugar, oil, zucchini and vanilla and mix. (This appears to be the "secret" of this bread. In effect it is an emulsion of the eggs, sugar and oil--almost a sweet mayonnaise #3.) Combine the flour, salt, baking powder and soda, cinnamon and add to the egg-zucchini mixture. Stir until well blended (#4), add nuts. Using an ice cream scope fill the muffin tin (#5). Bake pre-heated 400F oven for 22 minutes (#6). (For loaf, two 9x5x3 inch loaf pans and bake at 350F for one hour). Let the muffins cool a bit and remove from the muffin tins to finish cooling (#7 & #8)


This is a really great muffin. It is very moist and not too sweet (my wife reduced the sugar). The egg sugar emulsion results in a very nice texture. The nuts provide an additional flavor as well as texture. These are perfect for breakfast.

Friday, May 31, 2019

Asparagus stir-fry アスパラガスの炒め物

In our regular grocery store, we often find bags of colorful mini sweet peppers. My wife likes these peppers especially broiled with the skin and seeds removed. It is a bit of effort to prepare them this way.  I broil them in the toaster oven then place them in a Ziploc bag to steam. Once they have cooled I remove the skin and seeds. Despite the work, they are nice to have around because they are flavorful, colorful and when added to a dish can add a nice bright note. I made this dish just to use up some left-over vegetables  (I had green asparagus, some shimeji mushrooms, Campari tomatoes and the prepared mini sweet peppers).   I also added scrambled eggs for additional color. I did not follow any recipe.


I was not sure how I would season this dish when I started making it, Chinese? Italian? I ended up just using salt and pepper and let the vegetable flavors speak for themselves.


I used my wok and everything came together quickly.

Ingredients:
5 fresh green asparagus, woody bottoms removed and skin of the bottom half peeled, tips cut across, and the stalk sliced on a bias.
1 small onion, halved and cut in thin strips.
1/3 package of shimeji mushroom, root potion removed and separated.
4 skinned Campari tomatoes, cut into quarters.
1 Jalapeño pepper, seeds and veins removed and finely chopped.
4 prepared mini-sweet peppers (see above), cut into thin strips.
1/4 tsp dried red pepper flakes.
1 tbs olive oil
2 eggs (for scrambled eggs, optional).

Directions:
I heated up the olive oil in a wok and added the red pepper flakes until the oil was hot.
I then added the onion and the Jalapeño pepper and stirred until the onion was slightly brown for 5 minutes, then add the asparagus stems and cooked for another 3 minutes. I added the asparagus tips, the shimeji mushrooms, the sweet peppers and the tomatoes.
I seasoned it with salt and pepper and cooked it for another 3-4 minutes.


The red pepper flakes and the jalapeno pepper gave a mild slow heat. You could taste all the flavors from the vegetables which also gave the dish a slight sweetness. This was a good side dish.

Saturday, February 23, 2019

Five appetizers on a five compartment plate 新しいお皿とお通し5種

Some izakayas are known for giving multiple "otoshi" お通し appetizers to guests at the start of a meal.  For example we had six ostoshi at "Suiko" 酔香 and "Shuhai" 酒杯. We really love these types of dishes and often make similar ones at home. But sometimes multiple small bowls and dishes are a bit of work to arrange and clean. When I was browsing the "Korin" website recently, I found a long rectangular dish with five small square indentations and thought it would be a perfect way to circumvent the multiple-small-dish-cleanup issue. So, this is my first attempt at serving 5 small appetizers on this new plate. None of appetizers; only the dishes are new.


Shown below from left to right; #1 miso marinated cream cheese クリームチーズの味噌ずけ, and #2 "Jako" hatchling fish arima-ni ジャコの有馬煮. #1 was almost 10 days old and the flavor really got better over time as the cheese absorbed the salty nuttiness of the miso. I served this on thinly sliced mini-cucumber. #2 is the last of the leftovers from the Sushitaro osechi box (I heated it up in sake and soy sauce to make it last). This time since I was heating up other items in the toaster oven, I decide to include this. The result was a bit surprising and very good. The surface of the little fish got really crispy (nearly burnt) and they became nice crunchy bits.


Shown below #3 is chicken patty with dried fig and gorgonzola cheese いちじくとブルーチーズの松風焼きwhich was topped with figgy cranberry sauceいちじくクランベリーソース. #4 is braised spicy tofu ピリ辛豆腐 with blanched sugar snap.


Below, #5 is blanched broccoli dressed in sesame dressing ブロッコリーの胡麻よごし. It was an attempt to add vegetables for a "nutritionally balanced" appetizer.


Since I cook multiple dishes over the weekend, keeping them in the fridge then heating them up in the toaster over when we are ready to eat I could easily have added a few more items. Maybe, I should aim for the type of "Hassun*" 八寸 appetizers we got at "Kappa" 小料理屋河童  in  San Francisco which had 15 small appetizer dishes on one square plate.

* "Su-n" is a traditional  Japanese measurement (one "su-n" 一寸 is about 3cm, so eight "su-n" or "Hassun" is about 24cm). The idea here is to serve several small seasonal dishes on a "hassun" or "eight su-n" square cedar tray (or plate) which is usually the second course of a traditional "Kaiseki" 会席 or 懐石 course dinner.

Thursday, August 16, 2018

Couscous with fresh mint ミント入りクスクスサラダ

This combination of greens and salads was our lunch on one weekend. Among the three salads, salmon salad and potato salad are our usual but couscous salad with fresh mint is new. The greens are home-grown arugula, blanched broccoli, and sugar snaps. For color, I added skinned Campari tomato. After taking the pictures, I added my honey mustard dressing on the greens.


The couscous recipe came from WP food section as a way to use mint from your yard which may be profusely growing at this time of the year. The original included frozen sweet peas but we omitted it. Since we planted mint late spring this year, this was a recipe we had to try. The lunch included cheese muffins my wife made some time ago.  (She just realized we did not post the muffin recipe).


Ingredients (2 servings, for us more like 4-6 servings)
3/4 cup dried plain couscous.
1 cup chicken broth (our usual Swanson no salt and no fat kind).
1/4 tsp salt
2 tbs butter
1/4 cup finely minced fresh mint leaves.
1/4 tbs chopped parsley.

For dressing
1/4 cup live oil
1/4 rice vinegar
black pepper

Directions:
let the chicken broth with the salt, butter come to boil and add the couscous, remove from the heat and let it steep with the lid on for 15 minutes. Use a folk to fluff the grains and let it cool.
Add the minced mint and parsley (see below).


Mix the oil and vinegar together.


Mixed it into the couscous.


This is very refreshing couscous salad. Because of the dressing, it is not too dry and there is no danger of inhaling it (which can happen when eating dry couscous). Especially with the combination of other salads and greens, this is a really nice summer lunch. Once the salads are made up, it is a cinch to put together a lunch without having to do any cooking.

Monday, August 13, 2018

Nagaimo and daikon yukari-ae 長芋と大根のゆかり和え

These are small dishes we started the evening meal. Among the five items I served, only one is new which is in the blue bowl on the upper left. Upper center is squid stuffed with caramelized onion イカの飴色玉ねぎ詰 and tentacles, upper right is chicken liver simmered in red wine 鶏レバーの赤ワイン煮, lower left is sugar snaps soaked in dashi broth スナップ豌豆の塩びたし, and one in the small yellow container looking like a citrus fruit is uni or sea urchin "shuto" from Maruhide 丸秀のウニの酒盗.


This is a new item made from nagaimo and daikon. It is rather interesting and we like it.


As we mentioned before, when this squid dish is cold, I can slice it without separating the stuffing and the squid body. As you can see on the cut surface, quite few squid legs are stuffed. I drizzled our favorite spicy Spanish olive oil.


The below is another "teiban" 定番 in our household, red wine simmered chicken liver. This time I garnished with fresh thin slivers of ginger or "Hari-shouga" 針生姜.


Sugar snaps are good just blanched but this one was soaked in lightly seasoned Japanese broth. When you bite down, instead of water, you can get the subtle taste of the broth which makes an already good veggie nicer.


This is one of the five different kinds of sea urchin or uni "shuto" from Maruhide. When we got fresh uni last time, we also got these "shuto". Although frozen, they won't improve with age, so we have been hitting them regularly. This on is with hot chili and indeed the spiciness creeps up on you afterwards. This is almost as good as fresh uni.


For "Nagaimo no yukari-ae" 長芋のゆかり和えfrom E-recipe. I changed the amount of Yukari thinking the original recipe will make this dish rather salty.

Ingredients (for 2 servings, for the amount shown probably make 4 servings):
1 inch long daikon, peeled, sliced thinly and cut into thin julienne.
1 inch nagaimo, peeled, sliced thinly and cut into thin julienne.
1/2 tsp Yukari salt
1 and 1/2 tbs  sweet vinegar (300ml rice vinegar, 120-150 gram sugar and 5-10 gram salt)

Directions:
Put both the daikon and nagaimo in boiling water. When it comes back to a boil, drain and let it cool in a colander.
Dress with Yukari salt and sweet vinegar.

This is a nice dish. My wife thought everything was nagaimo but this is a mixture of daikon and nagaimo which give an interesting texture difference. Yukari (dried red perilla) salt and sweet vinegar combination is very good giving nice refreshing taste. This is another way to use nagaimo and more interesting than sushi vinegar and aonori combination. In any case, we had cold sake with these starters.

Friday, August 10, 2018

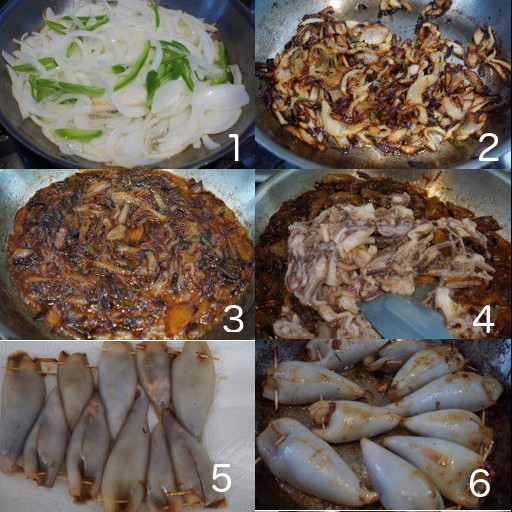
Squid stuffed with caramelized onion イカのアメ色たまねぎ詰

As usual, when I go to a grocery store and see cleaned small squid I end up getting it. I thought I should make something different with it this time. While I was searching for squid recipes I stumbled across a short video of a PBS cook show on YouTube by Jose Andreas. The video was a bit sketchy but I filled in some of the missing parts and made this dish.


I served this immediately off the frying pan and made a quick sauce by deglazing the pan with white wine. I garnished it with our favorite Spanish olive oil and parsley and served with wedges of lemon. My wife added small slices of baguette to soak up the sauce/juice.


This was quite good but when we cut into it while it was still hot the stuffing tended to separate and fall out. The next day, I served this cold. This time I sliced the squid before serving and the stuffing stayed put. We like this dish cold. The sweetness of the caramelized onion gets milder or smoother. I served it with a bit of the olive oil and our home grown arugula.


Ingredients:
1 lb cleaned squid with tentacles (I got 11 bodies and tentacles)
2 medium onion, cut in half and sliced
1 jalapeno pepper, de-veined and seeded, cut into thick julienne (original recipe uses green pepper)
2 tbs olive oil
1 clove garlic, minced (original recipe calls for crushed garlic without removing the skin)
1/2 cup of white wine (I used sauvignon blanc from France), devided into two potions
Salt and pepper to taste

Directions:
Sauté  the onion, garlic and pepper in olive oil on low-medium flame (#1)
Keep sautéing until caramelized (#2)
Deglaze the pan using 1/4 cup white wine (#3)
Add the tentacles (I cut them up into bite sized pieces) and sauté until done (1-2 minutes (#4) and season with salt and pepper.
Using a small spoon stuff the body of the squid with caramelized onion/tentacles mixture and close the end with toothpicks (original recipe does not closed the open end before cooking) (#5)
Add a bit more olive oil to the pan and cook one side for a few minutes and turn over and cook for another few minutes (#6)
I added 1/4 white wine and put on the lid to steam cook for 1 more minute. Remove the squid.
Reduce the wine while scraping any brown bits on the pan to make pan juice/sauce.


I used "Francois de La Roche Touraine Sauvignon Blanc 'La Coulée' 2016" in the sauce and also enjoyed "sampling" it while cooking. I served it with the squid dish.

Either warm or cold, this is a good and unique squid dish. The caramelized onion is very sweet and squid legs add additional texture. Using the same wine we are drinking somehow connects the dish and wine. Although we rarely drink white wine especially sauvignon blanc (sort of boring nothing wine usually). This one is not too bad. It had citrus and melons flavors and minerality with crisp acidity. By the time, we got to drinking this wine with the squid dish, the wine warmed up enough to have the flavors come alive. We really enjoyed the wine and the dish.

Saturday, August 4, 2018

Cold "shippoku" udon noodle with simmered vegetables 冷製卓袱うどん

Since we had several hot and muggy days recently in the Washington DC area, I made this cold noodle dish from ingredients I had on hand. I had cold simmered vegetables and prepared udon noodles (which were leftover for making cold fresh tomato pasta dish). I call this cold "shippoku" udon 冷製卓袱うどん. This (warm version) is a popular dish in the Southern islands of Japan (Shikoku 四国 and Kyushu 九州). I do not know the exact definition of it but I take it as a noodle (either soba or udon) dish with lots of cooked veggies and other toppings. I made this all cold for a hot summer day.


Cold cooked vegetables included daikon, carrot, skinned Campari tomato and sugar snap. Since I had Chinese-style simmered pork or "Chashu" チャーシュー (this one is made from pork butt and has much more fat than meat made from pork loin), I cut it into batons and added it to the dish.


The original simmered vegetables included daikon, carrot, shiitake mushroom, Campari tomato (simmered in Japanese broth which was lightly seasoned with light colored soy sauce and mirin. After the veggies were soft/done, I let it cool and then refrigerated it). We ate the veggies by themselves for several days so by the time I made  this dish only a few pieces of daikon, carrot and tomato were remaining. The sugar snap was just blanched and cooled. For the broth, I added more concentrated noddle sauce from the bottle to the broth in which the veggies were cooked.

This was all leftover control but it was nice cold refreshing dish, perfect for our lunch over the weekend.