Showing posts sorted by relevance for query myouga. Sort by date Show all posts

Monday, August 2, 2010

Myouga pickled in sweet vinegar 冥加の甘酢漬 Myouga asazuke 冥加の浅漬

This is probably the last installment of my "myouga" series. This year's crop was not as good as other years but we had enough myouga to enjoy.

The picture below is myouga in sweet vinegar. This is a rather common preparation of myouga and I was told you could get this as a commercial product (in Japan). The recipe is rather simple. I first make sweet vinegar by dissolving sugar in Japanese rice vinegar (I used about 100m of vinegar with 4 tbs of sugar but the proportion is to your taste. I thought this was a bit too sweet but my wife thought it was just fine). I just microwaved it for 30-40 seconds or until the vinegar is warm enough to dissolve the sugar completely. Do not boil, it will make the vinegar less potent. (On the other hand, you may want to gently boil it in a pan to make the sweet vinegar more mellow). I then blanched the cleaned myouga, drained and added it to the sweet vinegar while the myouga are still hot. I keep this in a refrigerator for at least 3 days before eating. The one shown here is about a week old and still nicely crunchy with a sweet vinegar flavor mixed with the distinctive myouga taste. I do not know how long this will keep but I am sure, at least, several weeks. This is perfect for sipping sake or with rice.

This is an assortment of asazuke 浅漬け (cucumber, carrot, daikon, in the back from left to right) and beer marinated daikon (front left) but the main item is, of course, myouga. I made the other vegetables exactly the same way as I posted before but I did not add ginger or hot pepper flakes. In addition to the nice myouga buds, I also added the chopped up stalk of myouga as well. This one has a purely myouga flavor with nice crisp texture.

I think I am running out of myouga recipes. You could of course use finely chopped myouga as a condiment for anything including cold tofu 冷や奴, miso or clear soup, chawanmushi 茶碗蒸し, noodle dishes, sunomono 酢の物 dishes etc.

Sunday, September 22, 2013

Eggplant and Japanese pepper "Age-bitashi" with pickled myouga 獅子唐芥子と茄子の揚げ浸し

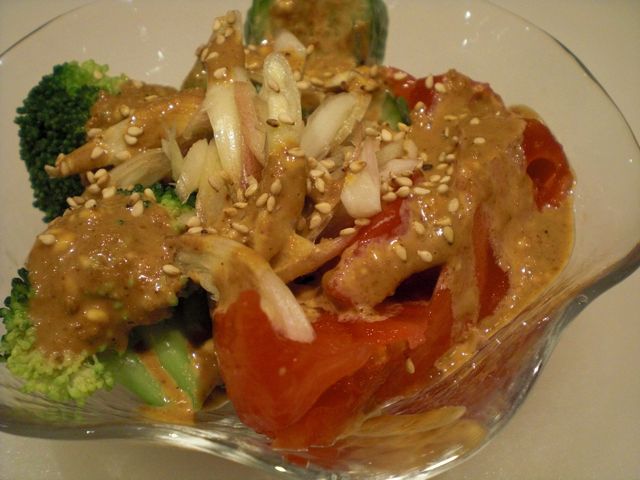
“Age-bitashi” 揚げ浸し is a rather classic Japanese cooking technique which I previously posted. This is another variation. “Age” means to "deep fry" and “Bitashi” or "Hidashi"means to soak. ). First a vegetable (eggplant is the classic) is deep fried and then “soaked” in a seasoned broth. This dish is either served at room temperature or chilled (especially in hot summer).

I had a half used package of Japanese small green pepper called “Shishi-tougarahi” 獅子唐辛子 or “Shishitou”ししとう for short. I decide to make it either “Yaki-bitashi” (grilled first and then soaked) or “Age-bitashi (fried fist and then soaked). At the grocery store, I found a nice looking Zebra eggplant and decide to make “age-bitashi” with eggplant and shishitou.

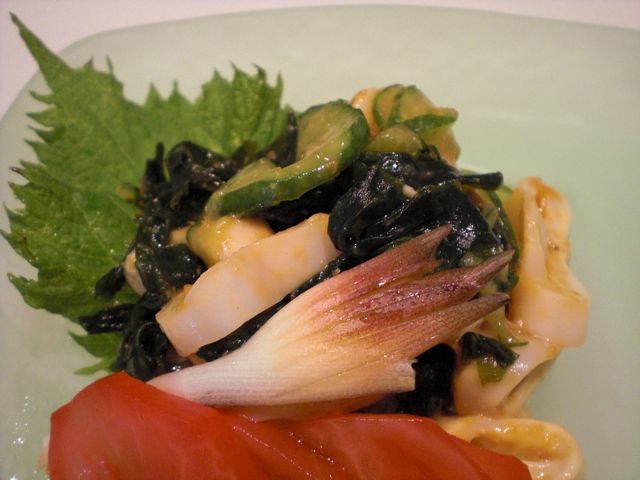
Here I served the resulting dish chilled with garnish of picked “home grown” myouga and thinly julienned ginger (“Ito-shouga” 糸生姜 or ginger-threads). This was a nice cool drinking snack to start. The only problem for me was that one of the peppers I ate was atomically hot* . I had been lured into complacency with several mild peppers. Without thinking I just popped the hot one into my mouth.  I had already chewed and swallowed when my tongue “caught on fire” and continued burning for sometime despite my efforts to put out the fire. My wife, however, did not suffer a similar misfortune

*Although shishitou in Japan appears to be always mild, shishitou grown in American soil for some reason occasionally reverts back to its original ancestor and is atomically hot. We equate eating US grown shishitou to Russian Roulette--you never know when you’ll get a “hot one”.


Shishi Tougrashi: I had about 10 leftover. I removed the stem and made a slit in the middle (To prevent exploding during cooking).

Eggplant: This is a small Zebra eggplant. I removed the stem end, cut in half lengthwise and then made half inch thick half moons.

Pickled Myouga: I posted this previously. I made some variation this time namely not blanching it before pickling (see below).

Broth: I took some short cut here. I used "Shiro dashi" 白だし from the bottle. This is concentrated dashi broth made from kelp and bonito shavings and seasoned with "shiro-zouyu" or colorless soy sauce. It is very strong and only need a little bit. I added 1 tbs of the concentrate into about 1 and half cup of water in a small sauce pan. I tasted it (dashi flavor was OK but needed a bit more saltiness) and added "Usukuchi-shouyu" or light-colored soy sauce (about 1/2 tbs). I needed some subtle sweetness and added about 1 tbs of mirin. I then let it come to a gentle boil and turned off the heat.

Instead of deep frying, I decided to sauté the vegetables. I added 2 tbs a light olive oil (or vegetable oil) into a non-stick frying pan on medium heat. I waited until the oil was almost smoking and added the eggplant. I fried one side until nicely brown (3-4 minutes) and then turned over (I added a bit more oil since eggplant soaks up the oil). After one more minute, I added the shishitou and moved them around for 2-3 more minutes or until the skin of the shishitou started blistering and brown marks developed.

I put the vegetables on the plate lined with a paper towel to remove excess oil. While the vegetables and the broth were both hot I put the vegetables into the broth, put on the llid and let them cool. After it came to the room temperature, I moved it to a sealable plastic container and placed it in the refrigerator for at least several hours or until thoroughly chilled.

The combination of shishitou and eggplant is excellent but if I have to choose I like eggplant better.

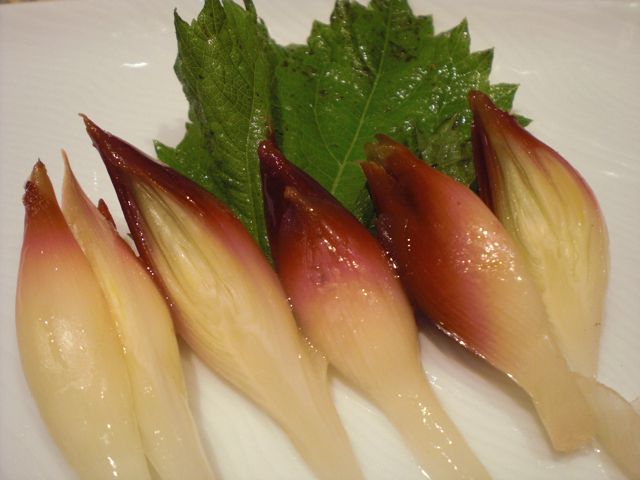
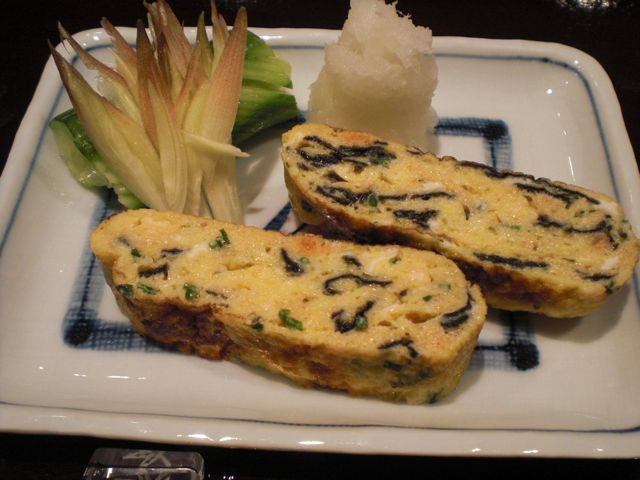
Sweet vinegared Myouga or 冥加の甘酢漬け
Although I previously posted about myouga and sweet pickled myouga, this year, I changed my recipe a bit taking my wife's input and re-posting it here. I think this recipe is better in preserving the unique myouga flavor.

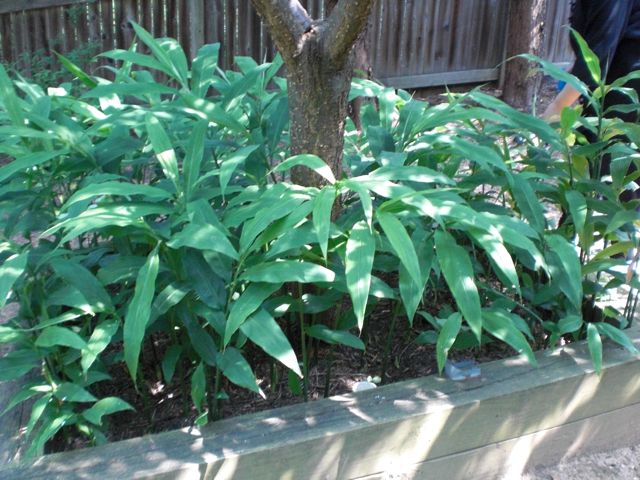
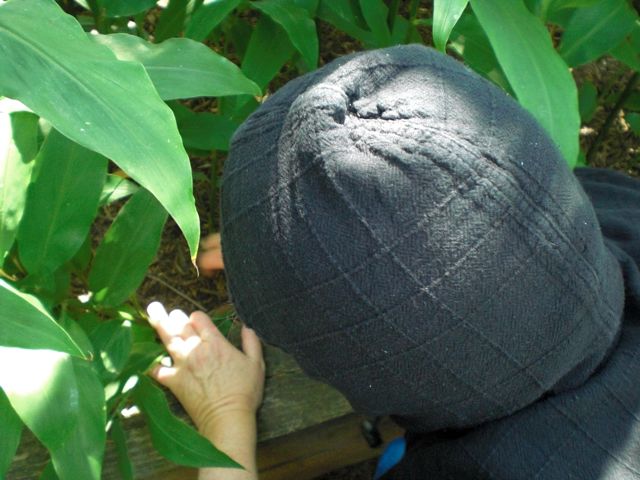
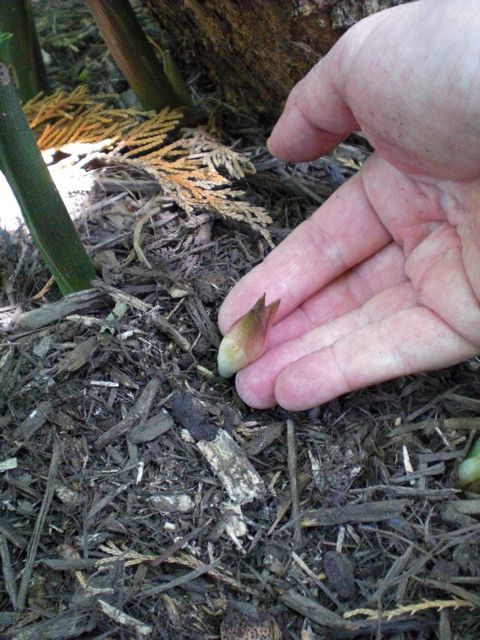
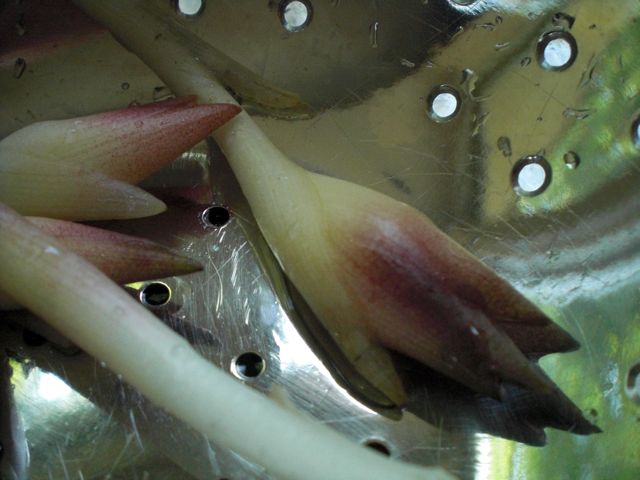
As you can see below, despite the risk of being eaten alive by the mosquitos we managed to harvest some myouga. After removing the outer layers, I washed it several times to make sure no dirt remained attached (left upper). I then cut them into half and dried them on paper towels (right upper).

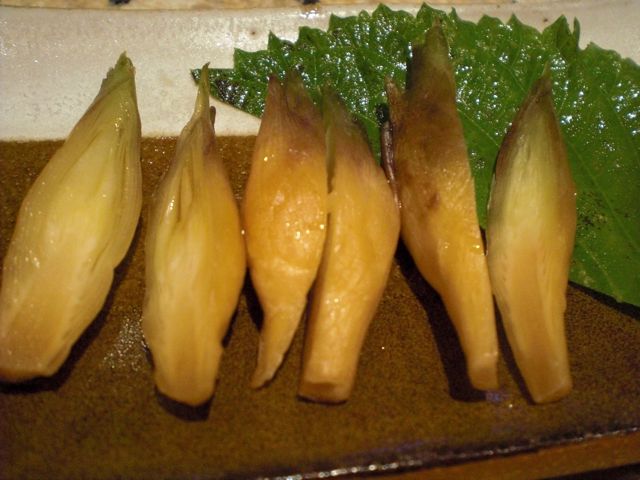
In the past, I blanched the myouga, which is part of the standard recipe, but my wife thought the parboiling reduced the myouga flavor in the final product. So this time, I did not blanch the myouga. I packed them in a sealable plastic container (middle left) and poured in warm sweet vinegar (middle right). As you can seen in the bottom row, the  myouga were mostly submerged. After a few days in the refrigerator, more moisture came out and the myouga was totally submerged. We started enjoying the pickled myouga after 4-5 days.

Sweet vinegar marinade: This time I also change the recipe a bit. I added 180ml of rice vinegar, 4 tbs of sugar and 1/2 tsp of salt in a sauce pan (middle right in the picture above) on medium low flame. When the sugar  dissolved and come to gentle boil, I cut the flame.

After 3-4 days, this is ready to enjoy. I think without blanching, the myouga remains a bit more crispy and the unique flavor is better preserved.

Monday, July 5, 2010

Myouga Harvest 茗荷の収穫

This may look like small bamboo but these are myouga (myoga) plants. Some years ago, Chef Kudo of Tako Grill gave a cutting (root) to us after he served us his home-grown myouga and learned that we both love myouga. We planted it in several spots in our backyard but it chose to grow in this one under the Japanese plum tree. It is good that this is confined to the raised bed, this plant keeps sending underground shoots and could overtake the entire yard under the right conditions.


This is a very strange plant (and I guess it could be said that those who grow, harvest and eat it may be also be considered somewhat eccentric--including us). In any case, the portion of the plant which we eat grows underground. Around this time of the year, the plants send out subterranean buds. These will produce a delicate white flower that eventually makes its appearance above ground. The flower looks like a white butterfly floating just above the soil in the dark shade under the foliage. While this flower is beautiful and indicates that the bud is just below the surface once it has made its appearance it is too late--the bud which is the part that we eat is "past its prime". Once the buds flower they become mushy and lose their flavor.

Because the edible buds of the plant are literally buried, they are extremely difficult to find. You have to literally dig down into the soil, scrabbling with your fingers to search for the hidden delicacy which frequently can only be found by feel.  If you use a tool, it is highly likely you will damage the buds. Add to this difficulty the fact that the myouga grows in the part of our back yard heavily under the domain of "dark friends" (mosquitoes). These small Asian mosquitoes are quite vicious to anyone entering the part of the yard they claim as their own. But never fear when it comes to purloining a Japanese delicacy for her husband, my intrepid wife fearlessly sallies forth. She dons a black "Ninja suit" consisting of a long sleeved hoodie (with hood pulled up and tied) balloon pants with cuffs tucked into black socks as protection against the mosquitoes--black because mosquitoes seem less attracted to dark colors. With head deeply buried in the foliage she scrabbles bare-handed in the hard dirt in search of the tasty little buds sometimes buried inches under the soil. (Harvesting myouga wrecks havoc on a manicure). As I said those who grow, harvest and eat myouga may be considered somewhat eccentric--including us


After some searching, my wife found one. (the picture shows the bud after it has been partially dug out). The buds are still very small and it will probably take another week for them to grow to a good size. But if you let it go too long, everything will bloom when you least expect it and its "game over" until next year. Oh, well, my wife will just have to go back out again.

Here are what we harvested today but maybe, next week we may have a better luck. Dishes using myouga will definitely be forthcoming.


Sunday, July 11, 2010

Grilled squid, wakame and myouga in vinegar miso sauce イカとワカメ, 茗荷の酢みそ和え


This is a made-from-leftover dish and very similar to  the dish I posted previously but since we harvested the very first myouga 茗荷, this is a preview of the myouga dishes to come. We grilled marinated squid (in lemon zest, olive oil, fresh thyme etc) few days ago but it was not a roaring success. I used this leftover squid, combined with a type of sea vegetable called "wakame" 若布, and cucumber to make this small starter dish. I added the star attraction--a garnish of myouga.

I thinly sliced cucumber (American mini cucumber) and salted the slices. I squeezed out the excess moisture and lightly dressed it with sushi vinegar. For "wakame", after re-hydration, I squeezed out the excess water and also lightly dressed it with sushi vinegar. Before dressing with  a "sumiso" sauce, I again squeezed out excess liquid from both the cucumber and wakame. I sliced the left over grilled squid into thin rings.

Karashi sumiso sauce: This is my regular sumiso sauce with miso (I used red miso this time without any particular reason), sugar and rice vinegar with Japanese hot mustard.

After dressing everything in the sumiso, I garnished with a perilla leaf, sliced Campari tomato, and fresh myouga (just a cameo appearance of myouga here). Because of the karashi sumiso, the squid tasted better and the myouga has such a unique taste it really added to the dish.

We are still waiting for the myouga to get a bit larger.

Tuesday, July 27, 2010

Myouga, chicken and duck tenderloin tempura 茗荷、鶏と鴨の笹身の天ぷら

We do not particulary like to make tempura of myouga because the myouga seems to lose its flavor when cooked, but this one came out ok. Again, the myouga was used as a part of the tempura assortment rather than the main item.

The chicken tenderloin was stuffed with minced pickled plum or "umeboshi" 梅干し which is called "bainiku" 梅肉, then wrapped in perilla leaves. This is exactly the way I usually make this dish (Left in the back in the above picture). Since I separated the tenderloin from the duck breast when I made a duck breast dish, I wrapped it with a small rectangular sheet of nori 海苔. Whenever nori or aonori is used in this fashion or mixed into the tempura batter, it is called "Isobe age" 磯辺揚げ meaning "Rocky seashore fries" (Right in the back ). The tempura batter is my usual; a mixture of ice cold water and cake flour (I did not add potato starch this time because I was a bit lazy). I also fried this using the shallow frying method rather than deep frying.

I fried the myouga last, briefly and at a higher temperature than other items, which helped retain the flavor. When you cook myouga (such as in a miso or clear soup) the unique flavor of myouga diminishes quickly. I served this with an wedge of lemon and green tea salt.

Sunday, September 17, 2023

Cold Thin Udon Noodle with Home-made Ponzu 自家製ポン酢、冷やし糸うどん

Cold noodle dishes using somen 素麺, soba 蕎麦 and ramen noodle “Hiyashi chuka” 冷やし中華 or “Hiyashi ramen” 冷やしラーメン are common especially on hot summer days in Japan. Cold udon うどん dishes are less common, except, as I understand it, in Osaka where you can have many combinations of cold/hot soup and cold/hot udon noodles. I made this cold udon dish just like cold ramen or “hiyashi ra-men” just substituting the ramen noodles with thin udon.


Since I made two kinds of pork a few days ago; Simmered pork and Barbecued pork, I cut some julienne pieces off of both kinds. We have a profusion of perilla in our herb garden and I added a chiffonade of perilla. My wife just harvested myouga 茗荷 and I made myouga picked in sweet vinegar. I included both fresh and pickled myouga as a topping (in the center). Other toppings included “Gari” ガリ pickled shouga ginger, cucumber and golden thread omelet or “Kinshi-ran” 金糸卵. For the sauce, I used my home-made ponzu-shouyu mixed with dark sesame oil (just a few splashes). I also added Japanese hot mustard and yuzu kosho shown on the rim of the plate (upper right).


Our myouga patch was doing well in terms of the foliage but the underground buds were slow to mature this year. But finally we had a good harvest. Myouga is such a unique herb/vegetable. We like to enjoy fresh as a topping or type of salad but pickled in sweet vinegar is also a very good way to prepare the myouga. At least for one or two weeks, the color of myouga becomes very red and sweet vinegar adds to the flavor. Then eventually the color fades to white.


I did not post about the home-made ponzu. This is just for my convenience. Since it is difficult to get fresh yuzu, I used bottled yuzu juice plus lime juice.

Ingredients:
100 ml yuzu juice (Either freshly squeezed or bottled) plus freshly squeezed lime of lemon juice to make 100ml
150 ml soy sauce
I small square of “konbu” kelp
I small package of bonito flakes

Directions:
Just mix the yuzu juice and soy sauce. In a clean sealable container (I used a clean and empty rakyo pickles plastic container) and added the kelp and bonito flakes.
Place in the refrigerator for 1-2 weeks (I kept it for 2 weeks)
Strain the kelp and bonito flakes and transfer the ponzu in clear sealable container and keep it in the refrigerator.

I think my home-made ponzu is slightly better but not much better than the commercial one since I could not use freshly squeezed Japanese citrus such as yuzu. This was a cool refreshing dish for a hot day. 

Monday, December 2, 2013

Chicken breast, pickled myouga salad 鶏肉、冥加甘酢サラダ

This is a small starter dish I made from leftovers and it was not bad.

I made a sautéed chicken breast a few days ago using a technique I saw on-line which results in a very moist chicken breast when cooked. Essentially, the chicken breast was cut into bite sized pieces. It is then pounded to break some of the muscle fiber and then kneaded with a small amount of "shiro-dashi" 白出し, sake and potato starch. It is left to sit for 10-15 minutes. I then pan fried both sides. It appears the chicken breast was more flavorful and more moist than when cooked by other methods but any cooked chicken will do for the salad I am describing here..

CIMG6068

For this small salad, I added the cooked chicken. I also cut American mimi-cucumber in snake belly or Jabara 蛇腹 and then cut into 1 inch chunks. I finely chopped pickled myouga 茗荷. I mixed the chicken, cucumber and pickled myouga and dressed them with  some pickling sweet vinegar. I placed baby arugula on the bottom of a shallow glass bowl, I placed the mixture of  the chicken, cucumber and myouga on top. I also placed a dab of "moromi-miso" 諸味味噌 and garnished it with a pickled myouga.

Each items has its own flavor and the gentle taste of sweet vinegar was complimented by the nutty, sweet and slightly salty flavor of moromi miso.

Sunday, August 20, 2017

Appetizer snacks 4 kinds酒の肴4種類

We have been enjoying Izakaya food as appetizers but I have not posted them since I have not made anything new for a while. Although nothing shown here was new, this was the starting lineup one evening . From left to right are Spanish mackerel simmered in miso sauce 鯖の味噌煮, cold silken tofu cube 冷奴 and cold simmered Japanese eggplant and shishi tougrashi 茄子とシシトウの揚げ浸し. Since we harvested myouga 茗荷 from our backyard a few weeks ago and made sweet vinegar pickled myouga 茗荷の甘酢ずけ, I used it to garnish the tofu and eggplant dishes.


The fresh Spanish mackerel came from Whole Foods.


You can have so many garnish variations for cold tofu cubes. This time I used perilla leaves, pickled myouga and chives with wasabi. After the picture, we added soy sauce.


This eggplant dish is usually deep fried first and then simmered in broth. I sautéed the eggplant in light olive oil, instead. Since I had Japanese "shishito" green pepper, I also cooked it in the same manner. I garnished it with pickled myouga and threads of ginger root.


Here is another view with a better look at the eggplant. The skin is scored so it is easy to eat. Even the myouga has the back cut into strips for easy eating.


The 4th snack was my regular "teiban" 定番 pork belly simmered in soy sauce and sugar 豚の角煮. The pork belly also came from Whole Foods. This time, I bought almost 3 lbs. Although I did not change the way I cooked it, this batch came out extremely well. Even the red meat layers were extremely tender and not dry at all. Making a bit larger quantity is more efficient in terms of my effort and we can enjoy this dish longer.


This was served warm (microwaved) with green beans (previously blanched) and a dab of Japanese mustard.


I think we had our house sake Daiginjo sake "Mu" 大吟醸 ”無” with the first three dishes and then switched to Cabernet for the pork (I don't remember which red wine we had). This was a mighty good start of the evening.

Sunday, July 25, 2010

Miso pickled Myouga みょうがの味噌漬け

Myouga 茗荷 has a very interesting taste but is usually used for garnish--rarely as a stand-alone dish. This is one of them. Miso 味噌 is a wonderful condiment and pickling or marinating in miso will add a nice salty nutty flavor. You could pickle any vegetables (root and hard vegetables are most suited) this way or tofu or even cheese such as cream or cheddar cheese.

In any case, I just smear enough red miso to coat all freshly harvested, washed and dried myouga. I put them in a Ziploc bag for over 10 days in a refrigerator and it is ready to eat. This is about 2 weeks old. Just wash off the miso and cut in half and serve. This is a perfect accompaniment for sipping sake. The myouga is still tastes fresh and is crunchy yet has an added nutty salty miso flavor.

We have been harvesting myouga every weekend for the past few weeks. This year's crop is not as plump, big, or numerous as other years. The flavor, however, is very strong. Nonetheless even though small, some started flowering (far left). As I said before, once it flowers, the bud became loose and soft and does not taste good.

Saturday, November 23, 2019

Baked tofu namerou  豆腐のなめろう

This is an interesting recipe I saw in the new Izakaya cookbook called "The real Izakaya cookbook". This is supposedly "namerou" but instead of fish (usually blue skinned fish like mackerel), this recipe uses tofu--not raw but baked. I served this with warm sake. Recently, I am fond of having "Hakutsuru" junmai sake 白鶴純米 as warm sake.


This "namerou" is, as I said, actually baked. The original recipe just said "spread on aluminum foil and bake". I thought it would stick to the foil, so I put it on parchment paper which turned out to be a wise move. I was able to remove it from the pan just by using the edges of the paper to lift it.  I cut it into the two portions, still on the paper, as seen below. (The edges of the parchment paper are just visible.)


With this, I served my ususal mackerel simmered in miso. I also served marinated spicy tofu.


This recipe came from an Izakaya cookbook I recently acquired. The book has mostly standard Izakaya recipes but there are some interesting and unique dishes. I will make some more dishes and will include the description of this cookbook the Izakaya cookbook section of this blog. Again, I changed the amounts and made some modification since I did not have myouga)

Ingredients: (For two small servings, the original recipe used a 12 oz block of tofu, and myouga. I didn't have myouga or any thing I thought I could use as a substitute. I added Italian parsley)

Silken tofu 5oz (140g)(#1) To remove excess moisture I wrapped it in a paper towel and put it between 2 cutting boards to weight it down. The upper cutting board was heavy and wooden. I left it that way for 1 hour (#2).
Ginger root, grated (or from tube) 1/4 tsp
One egg yolk (#3)
1 tbs miso (#3)
1/2 tsp soy sauce (#3)
1 spring onion, finely chopped
1 sprig Italian parsley, stem removed and finely chopped (optional, if available use myouga)


Direction:
Using a knife, I chopped and mixed all ingredients (#4).
Spread thinly on parchment paper (this was my addition, without it the namerou would most likely stick to the aluminum foil) on aluminum foil covered baking sheet.
Bake at 400F for 10 minutes (#5, I used my toaster oven on convection mode).
Lift the baked namerou using two ends of the parchment paper, cut into two squares and serve hot with the parchment paper still attached (#6)

This is indeed a very unique and interesting dish. I could have seasoned it a bit more aggressively (more miso) and a hint of sweetness (maybe mirin instead of soy sauce) may have worked better. This is not like "nameous" made from raw fish like mackerel but still, a quite good small dish that goes well with sake.

Thursday, October 6, 2011

Baked marinated tofu with cheese 豆腐とチーズのピリ辛オーブン焼き

This is a variation (euphemism!) or, more precisely, a leftover control, of the baked  marinated tofu which I made yesterday. I could have just warm it up but I added cheeses and spruced it up a notch.


I just put the leftover cubes of marinated and baked tofu into a small ramekin as seen above. I added slices of fresh Mazarella cheese and freshly grated Parmesan cheese on the top.  I drizzled a small amount of good fruity olive oil on the top and baked it for 10 minutes in 450F preheated toaster oven. Since I happened to have myouga harvested on the weekend, I added thinly sliced myouga (strictly optional) on the top and cooked it for another 5 minutes. I garnished it with a chiffonade of perilla.

This addition of cheese make it a much richer (less healthy) dish. Although the addition of myouga is subtle (cooking reduces myouga's flavor), it added one more dimension to this dish. 

We  had this with a red wine from Priorat, Genium Cellar Red Blend 2005. This is a blend of old-vine garnacha (60%) and the remaining balance consisting of cariñena, merlot and syrah. It is a good, rather big red especially if you are thinking of wines made from granache from elsewhere (Rhone). This wine would be good one to have with roasted red meat but this tofu dish has a "meaty" quality so the wine went very well.

Thursday, July 29, 2010

Myouga, broccoli and cumber salad with sesame mayonnaise 茗荷、ブロッコリ、キュウリの胡麻醤油マヨネーズ和え

This is still a part of my "myouga" series. This is a variation of Japanese salad called "goma-ae" 胡麻和え. Since I had home grown tomatoes and fresh myouga 茗荷, I made this small salad. For dressing, I add a few twists and  made sesame-soy-sauce-mayonnaise.

For two servings like the one in the picture, I blanched broccoli florets (about 8) and shocked them in ice cold water, so they are green and crunchy. I peeled and cut  one medium tomato into 8 wedges (this was very ripe home grown-by my friend- tomato), and halved and thinly sliced myouga (4-5), and  cut a cucumber in "Jabara" 蛇腹 (1 American mini-cucumber)which was further cut  into a bite size (a bit larger than half inch chunks) and lightly salted.

Dressing: I dry roasted white sesame seeds (2 tbs) in a frying pan for 2-3 minutes until they slightly browned and fragrant. I tipped them into a Japanese mortar or suribachi and ground them coarsely (some oil will come out). I added sesame paste (1 tsp) and soy sauce (2tsp) and mayonnaise (2 tbs, happened to be home made) and mixed. Taste and adjust the amount of soy sauce if needed.

I just arranged the vegetables, poured the dressing and topped it with white sesame seeds.
This is a hybrid Japanese/Western salad but the combination worked well.

Friday, December 20, 2013

Potato salad with pickled myouga and rakkyo らっきょうとミョウガ入りのポテトサラダ

You may not think potato salad is  Izakaya cuisine but it is one of the most popular items especially as "Otoushi" おとうし. The Japanese version of potato salad is a bit different from the usual American versions, however. For example, the potato salad served in Suiko 酔香 had smoked picked daikon called "Iburi-gakko" いぶりがっこ which gave a unique smoky flavor and crunch. The last time we were back in Sapporo visiting my mother, she added rakkyo らっきょう to her potato salad saying she usually did not have cucumber pickles. We really liked the addition of rakkyo. Rakkyo is cross between scallion and small onion and is usually served as a condiment for a Japanese curry.

For the version below, I added chopped pickled myouga and rakkyo (in sweet vinegar from a jar) to my usual potato salad instead of cornichon. I also added fresh cucumber sliced, salted and dressed with sushi vinegar just before serving. Although thinly sliced fresh cucumber is often included in Japanese potato salad,  I usually do not add it because I am concerned that the cucumber could go bad before the other items in the salad.

I added skinned and sliced tomato arranged in rose shape with seasoned with salt and pepper and a dab of mayonnaise.

In an other version I garnished it with pickled myouga and rakkyo.

Or, served just as is.

We rather like these variations. Both rakkyo and myouga add unique flavor and texture to my potato salad, a perfect small dish to start the evening.

Wednesday, November 9, 2011

Microwave sake steamed chicken with black vinegar gelée and myouga マイクロウェイブ酒蒸し鶏胸肉とミョウガの黒酢ジェレー

This is another nothing quick dish but a perfect Izakaya food. Recently, I have been making sake steamed chicken breast by microwaving chicken in a silicon steamer for microwave. I usually do not cook anything in the microwave (just re-heat), so this is new development for me. But if precisely timed and allowed to rest for 10 minutes or longer, the chicken comes out perfectly and cleaning up is much simpler.

Here is how I do it. I usually get bone-in and skin-on split chicken breasts. I remove the bones (do not leave the wish bone behind) and tenderloins (use for another dish). I remove any excess skin and fat but I keep the skin. Keeping the skin makes the chicken moist during the microwaving. If you like the skin, you could leave the skin or remove the skin after cooking. After removing excess fat from the cooked skin, I cut it in thin strips and use it in salad etc but this is totally up to you.

In any case, I placed two half breasts in a silicon microwave steamer after somewhat liberally salting both sides.  I then added slices of ginger root, and scallion (two stalks lightly bruised). I poured sake (3-4 tbs) (image below left) and put on the lid (image below right) and microwaved it for 5 minutes and 30 seconds (Mine is 600W, please adjust the time depending on the power of your microwave).

I let it steam in the container with the lid on after I remove it from the microwave. Some times, as it cools, the silicon container may buckle since the lid is rather tight. I place the container on a plate to prevent possible spillage (Spillage has not happened to me so far). When the chicken cools down enough so that you can handle it safely (10-15 minutes), you can use it in whatever dish you like.

This time, I had fresh myouga 茗荷. So I halved and thinly sliced the myouga. I also made jabara cucumber. I sliced the chicken after removing the skin. I scraped off any excess fat from the back of the skin and cut it in thin strips. I put the strips of skin on the top of the chicken slices resting on a base of baby arugula. I sprinkled yuzu-souyu sauce (from the bottle) and garnished with small chuncks of black vinegar/soy sauce gelee (top image).

I think the chicken turned out better than the conventional way of sake steaming. Few important tips include finding out the exact timing, getting equal sized half breasts which will snuggly fit in the silicon steamer, and letting it steep in the container with the lid on until cool. Before I got the timing right, I undercooked and overcooked it few times. Now this is so easy and quick to make. Once I made the chicken this way, I keep it in a sealed container in the refrigerator and make small Izakaya dishes and sandwiches. The liquid left in the container is also very flavorful and lightly congeals in the fridge. You coudl just coat the slices of chicken with it or add it to you sauce, which adds wonderful mouth feel and flavor.

Friday, July 16, 2010

Omelet with tarako and nori 鱈子と海苔入り卵焼き

I made this dish at the same time I made "Braised shirataki and tarako" since I had extra tarako. This is one of many variations of Japanese omelet called "tamagoyaki" 卵焼き which I posted one previously.

Tarako mixture: First, remove tarako roe by slicing the membrane and, using a back of the knife, scrape off the roe from the membrane and put it in a small bowl. For three eggs, I used two small sacs of tarako but the amount is totally arbitrary. I add 1-2 tbs of sake and dash of Tabasco (optional) and mix so that it will have nice thick saucy consistency.

For two to three servings (two to three slices per serving), I crack eggs (three, large) in a bowl  and add mirin (1 tbs). I then add the tarako mixture and coarsely crumbled nori (half sheet),  beat it using chop sticks to mix well. I also add chopped chives but this is optional.

As usual I use a Japanese square frying pan. On a medium flame, I add vegetable oil (1/2 tbs) and add 2/3 of the egg mixture and gently scramble until it is semi-solid. Using a silicon spatula, I push the egg mixture to one end of the square frying pan to make it into a rectangle shape. If needed, I add more oil in the empty portion of the frying pan and add the remaining egg mixture. Again using the spatula, let the egg mixture flow under the rectangle of the eggs by lifting the rectangle. Wait a few moments until the egg on the bottom is set but the surface is still wet. Start rolling the rectangle of eggs so that the surface is all covered with the last layer of the egg mixture. Make sure the end of the seam is well set (you may have to flip it over several times so that all four surfaces are set). I take it out and wrap it in parchment paper to shape (if need be, further wrap it in a bamboo sushi mat to shape - I did not do this this time) and let it cool. The end result is like the image below, a nice rectangular shaped omelet.

I sliced it and served it with grated daikon or "daikon oroshi" 大根おろし (add soy sauce just before eating), finely cut myouga and salted and vinegared cucumber cut in jabara 蛇腹. This is, again, a perfect small dish for sake. Myouga really added to this dish. Myouga flavor is very difficult to describe but it is not scallion or ginger-like and it is just unique.

Saturday, August 21, 2021

Simmered eggplant and shime-saba with grated daikon 茄子の忘れ煮としめ鯖のおろし和え

These are four appetizers we started with one evening. I tend to make the same things we like but this time, for a change, I made two new dishes. In the picture below, clock-wise from upper left are vinegar cured Japanese mackerel or "shime-saba" in grated daikon dressed in ponzu しめ鯖のおろし和え, long simmered Japanese eggplant or 茄子の忘れ煮, squid "shiokara" 塩辛 and salmon "nanban" 鮭の南蛮漬け.


I bought a package of frozen vinegar cured Japanese mackerel or "shime-saba" from the Japanese grocery store and realized I already had another package in the freezer. So I decided to use the old package. I have served this several different ways including simple sashimiしめ鯖の刺身, ceviche  鯖のサビーチェ, and moulded sushi 鯖の押し寿司. I saw this recipe on line and made some modifications. This is very similar to what I made using tuna sashimi 鮪のおろし和え, previously. I garnished this with chiffonade of perilla and a wedge of lemon. I served this the evening I made it and then, again the following evening. After some time in the fridge, the flavors amalgamated and it got much better.


Ingredients:
One package of shime-saba, thawed, lightly washed with sake, patted dry, thin skin removed, and then cut into thin (1/4 inch) slices.
2 tbs ponzu shoyu ポン酢醤油 (from the bottle, or equal mixture of rice vinegar or citrus juice and soy sauce)
2 inch long daikon, peeled and grated and excess moisture drained*
Rehydrate dried seaweed mixture, arbitrary amount (optional)
Chiffonade of perilla and lemon wedge for garnish

*I use a grater with a meshed receptacle inside the bottom container which automatically drains excess moisture from grated daikon (or any other items). I made  sure to taste before assembling into the dish since some daikon is atomically hot. This one was ok.


Directions:
In a bowl, add the shime-saba, grated diakon, seaweed and ponzu and mix, I also added additional yuzu juice (from the bottle) for a good measure. I let it marinate for several hours to overnight, then topped it with the perilla and lemon.

This is a good dish. The daikon really makes this dish and goes perfectly with cold sake.

I made the eggplant dish since I got 2 Japanese eggplants at the Japanese grocery store a week ago and did not immediately use them. (My wife was kind enough to reminded me that eggplant, even the Japanese kind, does not improve with age.) The dish is also from the same web site I got the recipe for the mackerel dish. I decided to make this since it does not use any oil and looked healthy and simple. The Japanese name is "Wasure-ni" 忘れ煮 meaning "forgot that it was still simmering" indicating involving long simmering. The original recipe calls for "hoshi-ebi" 干しエビ, small dried shrimp, which is used to add "umami" flavor and fresh "myouga" 茗荷 but I did not have either one so I skipped the shrimp and substituted fresh myouga with vinegard myouga 茗荷の甘酢漬け we made almost one year ago as a garnish. I added slices of ginger in the simmering liquid whihc was not part of the original recipe. I served this with blanched broccoli rabe which is the closest we can get to "Nanohana" 菜の花.


Ingredients:
One Japanese eggplant (this one was on the larger side), remove the stem end, cut in quarters lengthwise, multiple thin slice cuts on the bias through the skin into the flesh but not all the way through and immediately soak in salted cold water for 10-20 minutes.
2 slices of ginger
Threads of ginger root for garnish (skin, slice thinly and then cut into thin threads).

For broth
1 cup Bonito broth (I made it from a dashi pack)
1/3 cup of concentrated Japanese noodle sauce (or mirin and soy sauce in equal amount).
two slices of ginger (original recipe calls for 1 tbs dried shrimp)

Directions:
Heat up the simmering broth until boiling
Put the prepared egg plant, the ginger slices and cover with a inner "otoshi" buta 落とし蓋 (I used a silicon "otoshi-buta" or cover it with an aluminum foil made it to a round, slight smaller than the pot opening, place the lid and simmer for 20-30 minutes.

This is a really good dish. The eggplant got really soft and absorbed the flavors of the broth. I served it cold which is perfect for summer.

The picture below is the usual salmon dish I make which is always good with cold sake.


Shown below is frozen "shiokara" from the pouch. Again, only the drink that goes with this is sake.


So, we enjoyed all four appetizers with a sips of cold sake. Our home Izakaya is not bad at all.

Wednesday, August 1, 2018

Indian-style pork "Vindaloo" curry with pickles インド風ポークカレー

I asked my wife to make this curry from leftover barbecued pork butt since it was getting to the end of it's life. This is my wife's version of pork "Vindaloo" which we posted few years ago. Instead of using uncooked pork, she used barbecued pork cut into cubes this time. Since I used dry rub (roasted cumin, smoked paprika, salt and pepper) for the barbecue, these spices were automatically added to the curry.


She added roasted mustard seeds, you can see the seeds in the curry which gave small pops and bursts of mustard  flavor. Instead of coconut milk, she used yogurt (since we do not particularly fond of the taste and flavor of coconut milk), it broke a bit but still tasted good. Despite the addition of yogurt and reduce cayenne pepper to 1/4 of the lower end of the amount suggested in the original recipe (about 1/4 tsp), this curry was hot enough for us. Despite using cooked pork, it was tender and quite enjoyable. This is another way for taking care of leftovers.


Since I had a fresh green and yellow zucchini (really yellow zucchini not yellow squash), I added panfried coins of zucchini seasoned with salt and pepper, grilled fig with balsamic vinegar. In addition, I added pickled cucumber and carrot I made.


I just used the sweet vinegar I used to make pickled myouga since we used up the pickled myouga from this container. I placed cucumber (American minicucu), carrot and skinned Campari tomato into the leftover sweet vinegar. I let it pickel for several days in the refrigerator.


We decide to have a store bought mini baguette (which was partially baked and frozen). I  finished baking in 350F toaster oven in convection mode for 15 minutes. This went well with the curry. Next time, we will make naan, though.

Wednesday, April 9, 2014

Three "Otoshi" appetizers お通し3品

Ok, this is a sort of padding post. These were three small snacks I made on a weekday evening, using some left overs from our March birthday party. Since I forgot to take a picture of the asparagus with tofu dressing from Tako Grill, this is a good chance to show how this dish looked since I used some of it here. Of course, the idea of multiple small "Otoshi" came from "Suiko" 酔香 and "Shuhai" 酒杯.

From left to right; asparagus with tofu dressing アスパラの白和え, potato salad with rakkyo and pickled myouga ラッキョウと冥加いりポテトサラダ, chicken salad* チキンサラダ.

Here is the close up of asparagus with tofu dressing. For this presentation, I further sliced the asparagus pieces on a slant and also added drops of light colored soy sauce to add a bit more saltiness appropriate for a drinking snack.

You cannot see well but there are sliced home-made pickled myouga (this was the last batch from the last year’s harvest) and picked Japanese cocktail onion or "rakkyo".

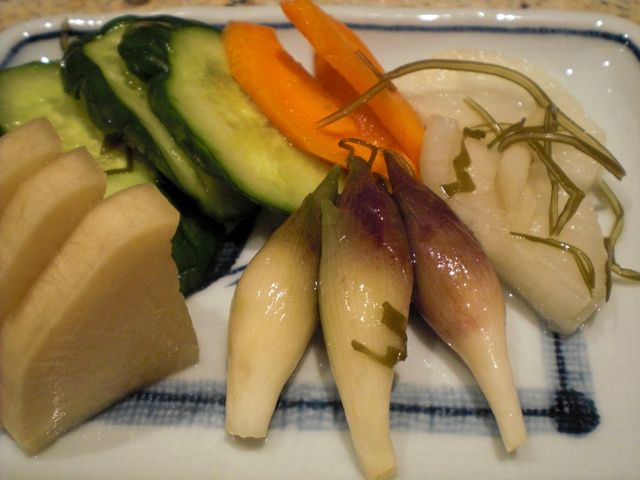
* I did not take a picture of  the "chicken salad". I just used breast meat from a leftover Weber hot smoked chicken which I shredded in small strands by hand and dressed with mayonnaise, Dijon mustard, lemon juice with finely chopped  celery.
For a week day evening, this was a rather stupendous "otoshi" drinking snack—if I do say so myself.

We opened Havens Spring Mountain Cabernet Sauvignon 2010. This has a rather classic Napa Cab profile of nice black fruits and tons of vanilla upfront. These three "otoshi" are rather neutral and go well with either sake or wine and certainly went well with this California Cab.