Tuesday, January 25, 2011

"Kazunoko" Herring roe 数の子

This year, my mother's "care" package for New Year was delayed because she could not send it by air due to the package bomb scare (which is now lifted according to my mother). In any case, her package finally came rolling in after almost one and half months at sea. We fully expected the package to be a complete "write-off" but surprisingly, everything she sent including the salt-preserved kazunoko 数の子 or herring roe was still in good shape and edible. This was probably because the majority of the "goodies" consisted of some form of dried or otherwise preserved fish. Although the kazunoko did not make it to the new year's day feast, I decided to prepare it for a post-New Year's feast to celebrate its belated arrival.

Nishin 鰊 or herring was abundant in Hokkaido in the past and some master fishermen or "amimoto" 網元 made fortunes from them. They built large buildings on the beach called "Nishin goten" 鰊御殿 or "Herring castle". After the world war II, over-fishing and changes in the cold currents almost totally decimated the once abundant herring fisheries on the coast of Hokkaido. In those hay days, herring and their roe were cheap and abundant. Once the schools of herring disappeared from waters of Hokkaido, both herrings and, especially, herring roe became luxury items. Since it is golden in color and made of numerous eggs, it is a symbol of prosperity and wealth and considered good luck food for new year.
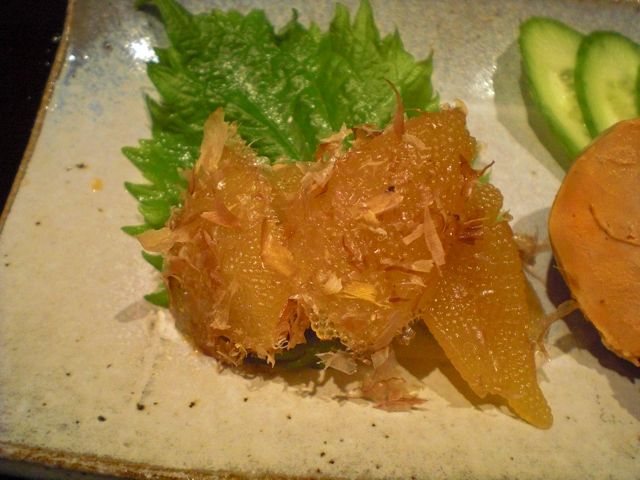
I served kazunoko as a part of a starter dish this evening. In the image below, the left is kazunoko, the center ankimo with grated daikon and ponzu soy sauce and the right is boiled octopus leg sliced with vinegared daikon and renkon garnished with salmon roe.
Since I did not post how I prepared kazunoko last year, I decided to post it this year.

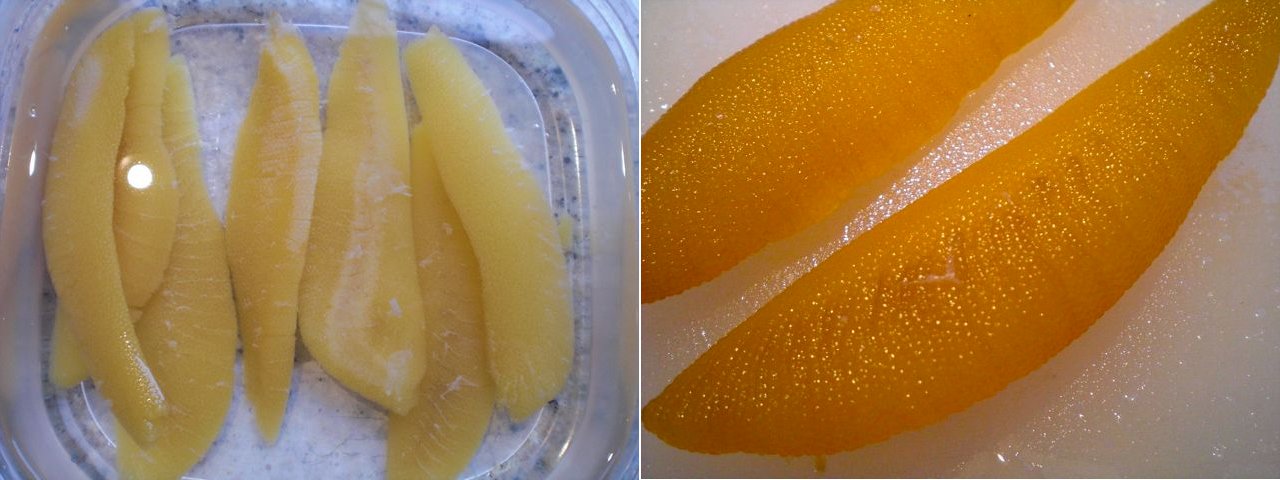
First, I have to remove the salt from the kazunoko (called "shionuki" 塩抜き) by soaking it in weak salted water (I taste the salted water; just a nice salty taste you can drink if you wanted to). Although you could start with water and then finish "shionuki" with salted water. I prefer to use salted water from the beginning and change it several times in 3-4 hour periods. The reason is that if you remove the salt completely, kazunoko will taste "bitter". So, you need to leave some saltiness behind. Using salted water prevents the complete removal of the salt even if you forget and soak it too long. While soaking, I removed the thin white membrane which covers the roe by rubbing the surface with my finger tips under water. After "shionuki" and removing the membrane, herring roe is ready as shown in the lower left image. I tasted a small piece from the edge to make sure it is not too salty. I sometimes thinly slice this and serve it like sashimi with wasabi and soy sauce but I usually marinate it.

For the marinade, I make dashi broth from a kelp and bonito dash pack. I season with light colored soy sauce (to preserve the golden color) and sake. The amount of sake (or mirin if you like it sweet) and soy sauce are up to your taste but I tend to make a strong dashi packed with "umami" and go light on soy sauce. I gently boiled the mixture for few minutes to make sure the alcohol has all evaporated and tastes amalgamated. I let it cool to the room temperature and then refrigerate. I marinated the prepared herring roe for, at least several hours or over night in the refrigerator (The right lower image shows the roe after marinading). You should eat this in few days.
I sliced it into small bite sized pieces and then mixed them with dried bonito flakes or kezuribushi 削り節 and served. It has a very interesting crunch and is an excellent drinking companion for cold sake. After eating it, my wife asked, "Why does it suddenly feel like New Year?"

Sunday, January 23, 2011

Sauteed "Ankimo" Monkfish liver with simmered Nagaimo 鮟肝と長芋

Last time we had a shipment of sashimi from Catalina, as usual, we also got frozen ankimo 鮟肝 or monkfish liver. I thawed it one weekend thinking we would eat it that evening. But we had impromptu dinner guests who, most likely, would not have appreciated ankimo and we did not serve it. So, the next day and the day after, we had to finish it before it went bad (eating that much ankimo was tough job but someone had to do it). Besides my usual ankimo with grated daikon and ponzu sauce or with orange marmalade sauce, I needed to come up with a new way to eat ankimo. I got an idea from the sauteed ankimo and simmered daikon dish that I saw on the web (It came from a beautifully done blog, I highly recommend the blog but it is in Japanese). I also remembered that I had said I would post a simmered nagaimo dish next after posting several ways to enjoy Japanese slimy potato "Nagaimo" 長芋 or "Yamaimo" 山芋.  All this led me to come up with this dish.

Nagaimo: I peeled and cut the nagaimo into about 1 inch thick disks. I simmered it in dashi broth (about 1 cup, which I made using a kelp and bonio dashi pack). I added sake and "usukuchi" 薄口醤油 or light-colored soy sauce (about 1 tbs each). I simmered it for 20 minutes or so and let it cool in the broth. I did this several hours before serving.

Sauce: This is a variation of the orange marmalade sauce. I borrowed the broth from the nagaimo simmering liquid (2 tbs) and dissolved orange marmalade (2 tbs) in a small sauce pan on a very low flame. After the marmalade completely dissolved, I added soy sauce (2 tsp). The sauce is slightly thick because of the marmalade. I kept it warm.

Ankimo: I sliced the ankimo into disks about the same thickness as the nagaimo (1 inch thick which is thicker than I would have cut it for the other presentation). I dredged it in flour and sauteed it in a frying pan with butter (1/2 tbs) on a medium flame. I browned the surface (the butter browned as well but did not burn) for 1-2 minutes and flipped over and browned the other side as well.

Assembly: I reheated the nagaimo before sauteing the ankimo. After placing the sauteed ankimo on the top of the simmered nagaimo, I put the sauce on and garnished with thinly sliced scallion.

This was a really wonderful dish. Both the ankimo and nagaimo were soft enough to be cut with chopsticks. The nagaimo was nicely soft but still maintained some crunch. Although I did not sweeten the broth, the nagaimo had a nice natural sweetness which was enhanced by cooking--it did not have any hint of sliminess. The ankimo was very unctuous; similar in texture and taste to foie gras but better. The browned butter added a "nutty" note. The sauce was also perfect for this dish with a nice orange flavor and sweetness. We will definitely add this to our "teiban" 定番 or regular list of home Izakaya dishes.

We had this with Gekkeikan "Black and Gold". I decanted the sake into a sake pitcher. We have collected several over the years but we use them only rarely. Since the shape of the bottle (a fat "tokkuri" shape") of "Black and Gold" makes pouring from the bottle with one hand a bit difficult for us (we can't one-hand a basket ball either), this pitcher/decanter was perfect. This is also from Kitaichi glass 北一グラス, Otaru 小樽, Hokkaido. We have matching "guinomo" ぐいのみ glasses but did not use them this time.

This is an extremely satisfying dish and perfect for cold sake but I think it will go very well with good sturdy reds such as Cabernet or Syrah or even crisp whites with some acidity such as Sauvignon blanc. Another good pairing will be dry or semi-dry sparkling wine. (In other words it will go with almost anything.)

Friday, January 21, 2011

Stuffing cake スタッフィングのケーキ

This is a mere leftover control dish but it tasted pretty good. We had leftover stuffing which my wife made for Christmas. I needed a shine dish to end a meal and this was a perfect solution.

I added one beaten egg to whatever amount of the leftover stuffing we had. I melted butter and placed two ring molds in a frying pan on a medium-low flame. I made two thin disks (1/2 inch) of the stuffing by pressing it firmly into the ring molds using a silicon spatula.  I fried one side  for one to two minutes. I then removed the molds (the disks should hold shape) and flipped them over and cooked the other side for 1 more minute. I garnished it with good old fashioned American ketchup. This retained the stuffing taste but had a nice crunchy crust while still being moist on the inside. It is a quite nice "shime"  締め or ending dish.

Wednesday, January 19, 2011

Fried oyster redux カキのフライ再登場

This is a repeat of my post from about one year ago. The reason I am posting this again is that this was one of  the best fried oysters I have ever made and probably I have ever tasted (kindly allow me to boast). Although the oysters came in a glass jar pre-shucked, they were quite large and equal in size without any broken pieces. I proposed several options including an oyster nabe to my wife. After my report of the quality of the oysters, she said fried oysters, and I gladly obliged.

The recipe is the same as before. This time, though, because of the good quality of the oysters and the fact that I fried them perfectly (just luck). They were light and crunchy outside and juicy, soft and flavorful inside. We just enjoyed them with a squeeze of lemon and cold sake.  We both thought the quantity of oysters was a bit too much for us to finish, but both of us ate everything. The side was the usual, my variation of coleslaw with honey mustard dressing.

Monday, January 17, 2011

Salmon kelp roll 鮭の昆布巻き

This is typically served as a New Year's day dish. The reason, I think, is that "kelp" in Japanese is "kobu" こぶ or "Konbu" 昆布 which sounds like a part of the phrase "yorokobu" よろこぶ meaning rejoice. In any case, I did not make kelp rolls until last year. Once I made them, we realized how much better they could be than the commercial ones (even compared to an expensive variety from Hokkaido that my friends sent me one year). Since I did not post how to make this last year, I decided to post it this year.

The picture above shows the salmon kelp roll served with my marinated salmon as a drinking snack; both were leftover from New Year's dishes. The kelp rolls are not too difficult to make and the effort is definitely worth it. I made this based on a recipe from e-recipe but I made the seasoning much lighter than they suggested.

Kelp: A good dried kelp--one that gets soft when cooked and is therefore good for eating. "Hidaka" 日高 kelp is especially desirable, since it gets softer more quickly than other types of kelp such as Rausu 羅臼 or Rishiri 利尻 kelp. I soaked a 5-6 inch long piece of dried "Hidaka" kelp in water until it returned to its "natural state" and became pliable (30 minutes to 1 hour). I used 4 strips to make 8 good sized rolls. I trimmed the ragged ends to make a nice rectangular piece. I reserved the soaking liquid.

Kanpyo: This is mostly to tie up the rolls so they don't unravel but it does have some texture and taste. I washed and then massaged several pieces of kanpyo with salt and washed again. I soaked it in water for 30 minutes to one hour but did not cook.

Salmon: I used fresh salmon. I cut the fillet into 1/2 inch wide strips with the skin left on. I trimmed the end to make it fit the width of the kelp.

I rolled the kelp around the salmon strip in the center and tied it off in two places using the kanpyou as shown below (this pictures is after cooking). I placed all 4 rolls in a shallow pan in which they fit snuggly (I used a square Pyrex baking pan with a glass lid). I then poured in the kelp soaking liquid. Since I also had a soaking liquid left over from rehydrating dried shiitake mushrooms (used in another dish), and the mushrooms had imparted some good flavor to the liquid I also added that. I added sake (2-3 tbs) as well. The kelp rolls should be just covered with water. I simmered it with the lid on for 1 hour or until the kelp is soft.


Seasoning: The seasoning is essentially sweet and salty (soy sauce) which is a typical Japanese seasoning. As a rule, the "sweet" of the seasoning is added first. So I added sugar (1 tsp) over the rolls and let it simmer for 5 minutes with an otoshibuta 落 とし蓋. I then added more sugar (1 tsp) and soy sauce (1 tbs) and simmered it for 10-15 minutes. At the end of  cooking, the liquid was reduced in half. At the very end, I added mirin (2 tsp) and soy sauce (2 tsp) for a fresh taste. Again, the seasoning is up to your liking; you could add more sugar, mirin and soy sauce. I did not want to season it too strongly. I let it cool in the cooking liquid. The picture above shows it after it cooled and was ready to be cut.

The standard way is to cut the roll in half to make two rolls as seen above but that would have resulted in pieces that were too big to eat in one bite. For a drinking snack, I cut the individual rolls into three smaller pieces as seen in the first picture. 

The kelp is soft but not mushy. It has a lovely unctuous mouth feel. The salmon is lusciously tender with a slight sweetness and mild soy sauce flavor. It is hard to imagine how a dish this good could be transformed into the product sold commercially. While my wife did not dislike the commercial product it was not the first thing she chose from the New Year's box. She liked this one so much it could "star" as a drinking snack. Maybe this dish "isn't just for New Year anymore."

Saturday, January 15, 2011

Ratatouille ラタトゥユ

Izakaya and bar food tend to be more often meat than vegetables (especially Western bar food) and deep fried. We try to eat more vegetables if we can and one of the easiest vegetable dishes I can make to eat during the week, either warm or cold, is my version of ratatouille. I am sure my version is not the authentic true Provençal dish but we like it and it is very versatile. It goes well with red wines (particularly lighter reds such as Rhone, Croze-Hermitage etc) but also goes with cold sake as well.


I sometimes cut all the vegetables rather small and sometime a bit larger, but never very chunky. The vegetables I usually use are zucchini, yellow squash, egg plant, tomato (canned plum tomatoes) with onion and garlic. My wife does not like green or red peppers in Ratatouille so I do not use them. I do not add any liquid but the amount of liquid that exudes from the vegetables is amazing. I have to make a conscious effort to reduce the liquid. I also use finely minced anchovy (canned, salted and preserved in olive oil). I also like the vegetables well cooked and soft--not too crunchy. The amount of vegetables is arbitrary but I make a relatively large batch as seen below because they also reduce in size as they cook.

I finely chop red onion (one medium) and garlic (3 fat cloves). I skin and cut egg plant (1 Italian, large) into small cubes. I cut half moon slices of zucchini (3 medium) and yellow squash (2 medium). I first saute onion in olive oil (2-3 tbs) on a medium flame until the onion become soft and semi-transparent, add the garlic and saute for another 3-4 minutes. I, then, add the eggplant and saute for 3 more minutes. Finally, I add zucchini and yellow squash and mix well. I add a small amount of salt to encourage the moisture to come out of the vegetables and turn down the heat. I add canned whole plum tomato (8oz can), either crushed by hand or cut up leaving the excess liquid in the can but I do not drain the tomatoes.

I add dried oregano (1/2 tsp), basil (1/2 tsp), (or sometimes thyme) and whole bay leaves (3) and put on the lid. I simmer for 20-30 minutes. After the liquid comes out, I put the lid askew and turn up the heat a bit to let the liquid evaporate. Instead of salt,  I use a small can of anchovy fillets finely cut up. The anchovies are very salty, so I start adding the anchovy in stages, tasting until desired saltiness is attained. I am not sure where I got this idea but I must have gotten it  from one of the recipes I read. It certainly adds a more complex "je ne sais quoi" quality to the dish.

I try to remove all 3 bay leaves since they could be a hazard if swallowed by the unsuspecting. This dish is good, warm or cold. Just simply prepared like this, the vegetables end up surprisingly sweet. The is a perfect side for pork, lamb or chicken dishes.

Thursday, January 13, 2011

"Nametake" cooked and seasoned enoki mushroom ナメタケ

Enoki and Nametake mushroom are the same mushroom but enoki is cultivated and grown in the dark causing it to grow long and white. Nametake, is grown wild in the light and therefore larger than the enoki in size and brownish in color. Confusingly, commercial products made from enoki mushroom is widely sold as "Nametake" in a jar as a condiment.In any case, I had a package of enoki mushrooms that I had to cook before they went bad. I posted enoki cooked in butter and miso, so this time, I made enoki mushroom cooked in soy sauce and mirin (or nametake in the second meaning described above). I added dried nori seaweed 海苔 and meat of umeboshi 梅肉 or pickled plum for make it slightly more interesting.

Making this is simple. I first made a mixture of mirin and soy sauce (about 1 to 1,  or reduce soy sauce for milder, sweeter variety. For one package of enoki, I used 2 tsp each. If you do not like it sweet, use sake or a sake and mirin mixture). I cut off the bottom 1/3 of the enoki mushroom and combined the mushrooms with the above seasoning in a small pan and let it simmer. I also added about 1/2 of the umeboshi cut up in small pieces. I also added a half sheet of dried nori torn up in small pieces (by hand). The dish can become salty very quickly depending on the how salty your umeboshi is and how much soy sauce you use. I cooked it for 5 minutes or so on simmer or until most of the liquid is gone. I served this as a small dish that goes with sake but you can use it as a rice condiment as well. This came out a bit on the salty side but it is perfect for sipping cold sake--encouraging you to drink more sake than you intended