Tuesday, March 15, 2022
Uni shutou with salmon roe 雲丹酒盗いくら入り
Saturday, March 12, 2022
Pirogi ピロギ
The recipe is from Washington post. I am sure my wife modified the recipe. So I will ask her to take over.
2 russet potatoes
4-6 tablespoons unsalted butter (or to taste)
1 small yellow onion, finely chopped and caramelized in a sauce pan.
2 cups of shredded sharp cheese (I used a combination of smoked gouda, Monterey Jack and Irish cheddar)
Salt to taste
1 teaspoon freshly ground black pepper
Chopped fresh chives, dill or scallions, for garnish (optional)
1/2 package (about 20) gyoza skins
Directions:
To make the filling: Cook the potatoes, skin on, in the micro wave (about 10 minutes). Peel and mash in a bowl adding all the other ingredients (#1).
To assemble the pierogi: Wet the edges of the wonton skin with water. Add about 1 tablespoon of the potato filling to the center of the Wonton skin. (I used the smallest ice cream scoop). Fold over the skin to enclose the potato mixture and press firmly to seal making sure there are no air pockets. (I used the handy-dandy presser (see picture below).
To finish, bring a large pot of well-salted water to a boil. Drop the pierogi in a few at a time, so as not to crowd the pot, gently stirring them so they don’t stick together (#3). Cook until they begin to bob to the surface, about 4 minutes. Remove with a slotted spoon. Drain them on a rack (#4) While still hot coat with olive oil so they don’t stick together after they cool.
My wife admitted that while good, these pirogi were only vaguely reminiscent of the pirogi of her childhood. (Maybe an afternoon spent swimming is required seasoning for this dish?) Although the cheese flavor wasn’t pronounced, the overall flavor was very rich. The caramelized onions were very nice. Served this way with the tomato sauce, the pirogies were more like ravioli (can’t go wrong with that).
Monday, March 7, 2022
Mini Lasagna cups ミニロザニアカップ
One day, all of a sudden, my wife asked if we still have wonton or gyoza skins. I said we had leftover gyoza skins frozen. I was not sure why she was asking this. I found out that she saw a recipe for “mini-lasagna cups” which uses wonton skins as the pasta. This is a good dish to make since I have been reheating my marinara sauce once a week for several weeks now to make it last. It was time to use it up. In any case, the picture below shows the mini-lasagna cups she made. They are perfect for a lunch or appetizer. The combination of flavors is very nice.
I am not sure where she saw this recipe but I’ll ask my wife to take over. (Note from wifey: I found the recipe in the Washington Post and as usual treated it as just advisory.)
Ingredients:
1 cup cooked spinach
1 cup ricotta cheese
1/2 tsp. salt
2 cups shredded cheese (I used a combination of dry mozzarella, smoked gouda and cheddar.)
1 1/2 cups husbandito’s marinara sauce
36 wonton skins (3 per 12 muffin cup tin)
Directions:
Mix the spinach, ricotta cheese and salt together. Put half of it in a separate bowl and stir in 1/2 of the shredded cheese. Fit a wonton skin into the bottom of a 12 cup muffin tin. (I used muffin papers to make it easier to get the finished product out but it turned out they weren’t necessary.) Evenly divide the ricotta spinach blend into each cup (#1). Fit another wonton skin on top. Spoon the marinara sauce on top (#2). Cover with another wonton skin. (Note that at this point I ran out of wonton skins so I used cooked pasta as shown in the left side of #3) Evenly divide the ricotta shredded cheese on top (#4). Top the mixture with remaining marinara sauce and grated cheese (#5). Cook in a 375 degree oven for 12 to 15 minutes until cheese on the top is melted, browned and bubbling (#6).
Friday, March 4, 2022
Home-made cream cheese 自家製クリームチーズ
Recently there has been a shortage of cream cheese . For several weeks we tried to order cream cheese from our regular grocery store and found out all cream cheese and its derivative products were out of stock. Since making cheese has become my wife's thing, she decided to address this shortage the same way she addressed other shortages during covid by making her own. She searched the web for a cream cheese recipe. One thing she noticed was that the recipes for buttermilk on the web were basically ‘take milk and add acid (lemon juice, vinegar, etc). Then the recipes on the web for cream cheese were also basically ‘take milk and add acid.’ Huh? Acidulated milk is the panacea for all things cheesy on the net? She also noticed that other recipes involved such things as rennet or cream cheese cultures that she didn’t have.
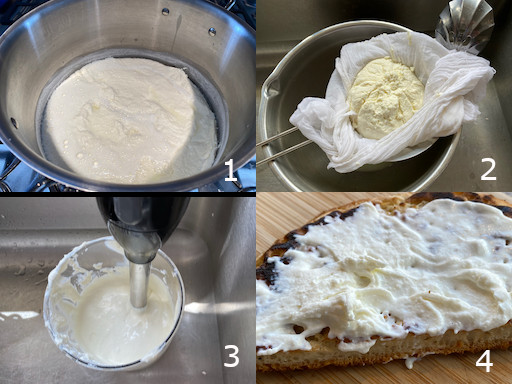
She decide to make her own recipe incorporating various aspects of the recipes she read and her own experience making cheese curd. The basic approach seemed to be combine milk and cream and curdle. She had success making cheese using buttermilk to curdle the milk so she decided to use a variation on that technique. For example, she saw that the rennet based recipes used a ratio of milk to cream of 4:1. She also used an approximation of the ratio of buttermilk to other ingredients that worked for the other cheese she made. She used those ratios to make the cheese (see the ingredients listed below). Then instead of pressing the curd as she did before, as per some of the recipes she read, she whirred it in a food processor to make it creamy and the consistency of cream cheese. The result was really fantastic. If she can make this, we do not need to buy commercial cream cheese. The picture below is "schmear" of the cream cheese she made on a crumpet she also made. It was very good!
Ingredients:
8 cups whole milk
Directions.
Combine the ingredients in a large heavy bottomed pan. Slowly heat mixture until it starts to separate into curds and whey (#1). (This will start to happen just before the mixture reaches 212 degrees.) Remove from the heat and let rest for 10 minutes. Ladle the curds into a colander lined with 3 layers of cheese cloth (#2). Squeeze out as much whey as possible. Then add the curds to a food processor (I used a motorboat blender) and whir until the curds reach creamy consistency. Stir in salt to taste. The consistency will become thicker as the mixture cools. Spread a “schmear” on a piece of toast and enjoy.
Tuesday, March 1, 2022
Octopus and cucumber in sumiso dressing 蛸のぶつ切りと胡瓜の酢味噌あえ
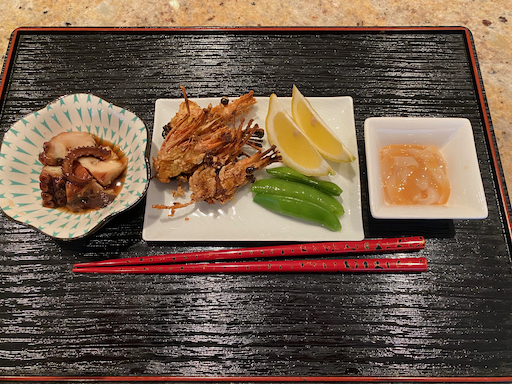
This is nothing new; just a continuation of frozen and boiled Spanish octopus from Great Alaska Seafood. This is a good example of how an octopus leg cut can make a big difference in texture. Boiled octopus can be sliced thinly with a wave cut or cut into chunks called "Butsu-giri" ぶつ切り. The cut that is used depends on the firmness of the cooked octopus meat. Firm texture octopus it is quite chewy. A thick slice would be too difficult to eat. The thin wave cut provides a manageably chewy piece and the wave pattern catches any sauce that is used. Alternatively if the octopus meat is soft, the thinly slice wave cut doesn’t have any texture and basically dissolves when eaten so cutting it into chunks is the better choice. Since this octopus was a bit on the soft side, I opted for the chunky cut and made this classic "octopus and cucumber sumiso-ae" 蛸のぶつ切りと胡瓜の酢味噌あえ. I served this with store bought squid shio-kara (right)
Since this octopus leg was more tender than ones from Japan, this "Butsu-giri" cut really worked. It is not too chewy but has nice texture.
Saturday, February 26, 2022
Tender simmered octopus たこの柔らか煮
Ingredients:
Boiled octopus leg, thawed
200ml Japanese dashi (I made this from dashi pack).
1tbs soy sauce
2tbs mirin
2tbs sake
several think ginger slices
Directions:
I used an Instant pot with a small metal container insert with a silicon lid (you could use the inner pot of the instant pot).
I added the octopus and the seasoning liquid into the insert and put on the lid.
I added 1/2 cup water to the pot and using the metal holder that came with the insert, lowered it into the instant pot.
I cooked it on high pressure for 30 minutes with natural depressurization.
The picture below is after cooking.
One of the problems with the Instant Pot cooking is that the simmering liquid does not reduce at all.
So I decided to put the leg and the simmering liquid in a frying pan and cook it on medium flame for 15-20 minutes until the liquid reduced by half.
Tuesday, February 22, 2022
Crumpet Version 4 クランペット 第4弾
This is the 4th version of crumpet we (my wife) made. She essentially combined V2 ingredients with V3 cooking method. She got much better at regulating the flame and made really good crumpets. Compared to thin and small crumpets (V2), V4 has nice crunchy crust but much softer inside. We liked V2 flavors and liked cooking method of V3 (using an 8 inch frying pan). So, this is culmination of all the good aspects of crumpets we made.
Ingredients:
(makes 7, 8 inch crumpets)
2 cups AP flour
1 cup plus 2 Tbs. cake flour
600 ml. warm water
1 1/2 tsp. Salt
2 tsp. Sugar
3 tsp. Baking powder (The recipe said baking soda doesn’t work as well)
3 tsp yeast
3 tbs. warm water
Directions
Bloom the yeast in the warm water. Put the flour, water and salt in the bowl of an electric mixer and beat on speed 5 for 1 minute until smooth paste forms. Add the yeast mixture, sugar and baking powder and mix on speed 5 for another 30 seconds. Cover with cling wrap and put in a warm place for 15 to 30 minutes. The surface should get foamy but it will only increase in volume by 10 to 15 % (#1 picture below).
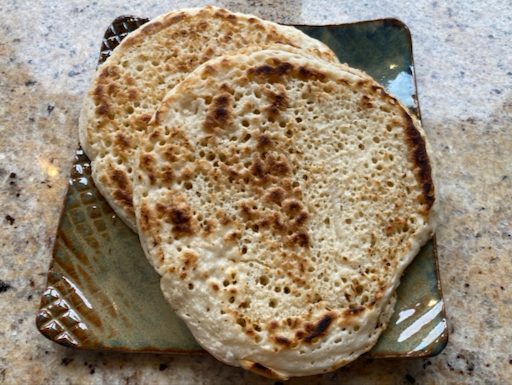
As can be seen in the picture 3 the bottom of these crumpets came out nicely lightly browned. These crumpets were really good. They had better flavor than V3 because the batter was cooked in butter, which gave it a browned butter taste. In addition we avoided the last step in V3 of adding additional water. We used the batter straight from the proofing stage. As a result it still made the required bubbles but the lovely yeast flavor came through. The texture of V4 was better than the texture in V2 because of the addition of the cake flour. When toasted the surface was crunchy with a browned butter taste. The interior was soft with a nice yeasty flavor. Slathered with butter that dripped into the many holes that formed in the cooking process this made a really nice breakfast bread.


