This was certainly a great steak. (Of course, it was perfectly cooked, if I do say so myself). The wasabi flavor did not come through as much as I expected. Is it better than U.S. prime stake? I am not so sure. The oven fried potatos were excellent. They had a crunchy crust and creamy soft inside (my wife's contribution). We were still enjoying the wonderful 2007 Caymus Cabernet Sauvignon with this steak.
Friday, April 13, 2012
American Wagyu New York strip steak アメリカ和牛のニューヨークストリップステーキ
This was certainly a great steak. (Of course, it was perfectly cooked, if I do say so myself). The wasabi flavor did not come through as much as I expected. Is it better than U.S. prime stake? I am not so sure. The oven fried potatos were excellent. They had a crunchy crust and creamy soft inside (my wife's contribution). We were still enjoying the wonderful 2007 Caymus Cabernet Sauvignon with this steak.
Tuesday, March 8, 2016
Toriten 鳥天
Saturday, February 13, 2016
Potato Croquette with cheese チーズ入りポテトコロッケ
Sunday, June 21, 2015
baked potato with bacon fat
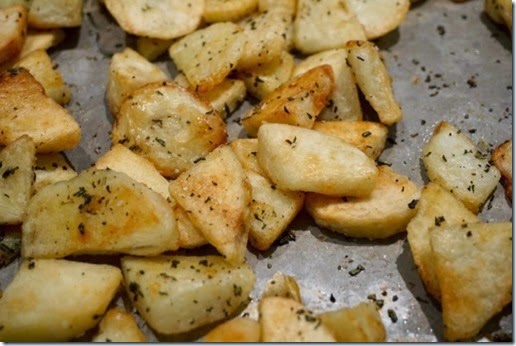
The process was same as before, parboiling the white potatoes with the addition of baking soda. The main difference is that she added bacon dripping instead of duck fat. She also used all purpose (AP) potatoes instead of yukon gold.
The final result? It was very good oven fried potatoes but we did not taste much bacon flavor. We smelled the bacon while the potatoes were baking but somehow that did not translate into the flavor. We felt the same about the duck fat potatoes. Also the use of AP instead of Yukon gold potatoes doesn’t seemed to have mattered either. Maybe, for us, just olive oil would do the trick and that would be slightly healthier.
Friday, November 24, 2023
Kabocha Squash Cookies
Ingredients
1/2 cup flesh from cooked/roasted winter squash* (may substitute yam, sugar pumpkin or sweet potato. We substituted kabocha squash)
1 large egg yolk, lightly beaten
1 1/2 cups almond meal/flour, or more as needed
3/4 cup sugar
1 teaspoon vanilla extract
Finely grated zest of 1 lemon
Pine nuts, for coating (optional)
Shredded coconut, for coating (sweetened or unsweetened; optional)
1/4 cup sugar plus 1/4 teaspoon ground cinnamon, for coating (optional)
*We used kabocha squash, cooked in a microwave oven and mashed. We further use a ricer to make it smooth.
Ingredients (X2)
1 cup flesh from cooked/roasted winter squash* (may substitute yam, sugar pumpkin or sweet potato. We substituted kabocha squash)
2 large egg yolk, lightly beaten
3 cups almond meal/flour, or more as needed
1 1/2 cup sugar
2 teaspoon vanilla extract
Finely grated zest of 2 lemon
Pine nuts, for coating (optional)
Shredded coconut, for coating (sweetened or unsweetened; optional)
1/4 cup sugar plus 1/4 teaspoon ground cinnamon, for coating (optional)
Sesame seeds for coating (optional).
Directions:
Combine the squash, egg yolk, almond meal/flour, sugar, vanilla extract and lemon zest in a mixing bowl, stirring to form a smooth, very soft dough. Cover and refrigerate for 30 minutes or up to 1 day. If the dough seems too pasty and wet, add a little more almond meal/flour, keeping in mind that the dough will firm up further as it chills.
Preheat the oven to 350 degrees. Line two baking sheets with parchment paper or silicone liners.
Divide the dough into 24 equal portions (about 2 teaspoons), rolling each one into a ball. Before spacing them on the baking sheets at least 1 inch apart, roll some of them in one or more of the coating options listed below. Bake (middle rack) for 15 to 20 minutes, during which time the cookies should not spread much.
Cool completely on the baking sheets before serving or storing.
All three version were very good. The cookie itself is moist and soft with a mild slightly sweet squash/pumpkin flavor. Not quite a typical cookie but very good. And three different coating worked excellently. We really like this cookie.
Monday, May 31, 2021
Tarako from Korean grocery store Hmart 焼きたらこ
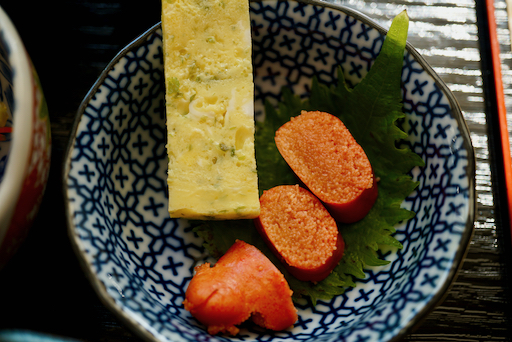
Lightly grilled salted "tarako" たらこ cod roe is not really a new dish as I posted it many years ago, but it is a very common dish in Izakaya and goes perfectly well with sake. I usually get tarako (frozen) from our Japanese grocery store, but this time I got it from Hmart, the Korean grocery store, through Instacart. The groceries were delivered while I was not at home so my wife received them. During a subsequent phone call, she mentioned that it was not a completely successful grocery run since the three types of fresh mushrooms and the mackerel we ordered were not available. The good news was that the "tarako" did arrive. She said something was wrong, however, because it was covered with a red goopy stuff and suggested that maybe the little egg sacks had somehow ruptured spilling their contents. (Not good!) So when I got back in the evening and inspected the tarako I found it was coated with a Korean hot sauce "gochujang". We were both relieved and had a good chuckle. Since we are not into very hot spicy food, I quickly rinsed off the hot sauce. I made "Tarako" pasta たらこスパゲッティwith it and it was just fine. I made the dish shown below from the last sac of tarako. I just cooked it in the toaster oven until the surface was cooked but the insides were still raw. I served it with a Dashimaki omelet だし巻き I had made.
Saturday, October 17, 2009
Grilled Tofu with miso 豆腐の味噌田楽
Classically,"kinome" should be used as a garnish--it looks very nice and has a distinctive flavor. But "kinome" is very difficult to come by in the U.S., unless you have a "sansho" or "Sichuan or Japanese pepper" tree in your backyard. "kinome" is the young shoot of this tree. As long as you do not add any meat or egg yolk to the miso sauce (which are common variations of this type of miso sauce) and use kelp or vegetable dashi broth, this dish is strictly vegetarian.
I served this with a American mini cucumber cut in "jabara" or a snake belly style with a sweet miso sauce.
Sunday, October 21, 2012
Yakitori, two kinds 焼き鳥2種類、レバたれ、笹身のシソ梅肉
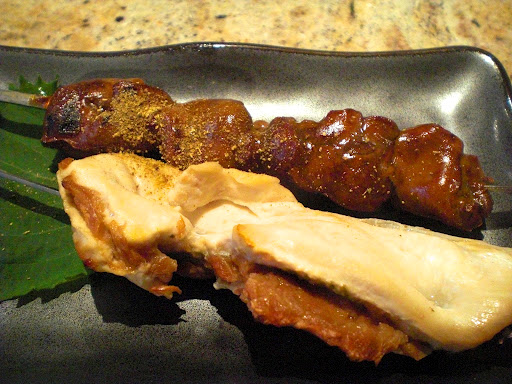
When I barbecue whole chickens, I usually discard the neck, gizzards and liver which are packaged in paper and tucked inside the cavity. (These are usually meant for making the American classic gravy-with-giblets). This time, I used the liver to make this small Yakitori while we are waiting for the whole chickens to finish cooking.
Since the Webber grill was otherwise occupied with the whole chickens and the mosquitos were still around making me reluctant to stand around outside tending the grill, I cooked these Yakitori in the toaster oven in “Hi-broil”.
Chicken liver: I removed attached fat, vessels etc and soaked them in sake for 20-30 minutes. I used a flat metal skewer. From two whole chickens, there was enough liver to make two small skewers (picture below).
Sauce: I made quick “tare” たれ or dipping sauce. It is a mixture of sake (1 tbs) mirin (1 tbs), sugar (2 tsp) and soy sauce (1 tbs). I first heated the sake and mirin mixture to boil, then dissolved sugar and added soy sauce. I then made a potato starch slurry (katakuriko 片栗粉 or potato starch plus sake). I streamed it in until the sauce was slightly thickened.
Chicken tenderloins: This is a variation of shiso and salted plum roll 梅しそ巻き which I previously posted. Instead of making it into a roll, I butterflied the chcken tenderloins, lined it with 1 or 2 leaves of perilla and smeared bainiku 梅肉 (I removed the meat of umeboshi 梅干 plum and minced it into paste with a small amount of mirin to make it a paste consistency). After closing the butterflied portions, I used a sawing motion to thread the skewer (see below).

I cooked the skewers on Hi-broil in the toaster oven (with the upper heating elements about 1 inch from the skewers) turning once or twice for 10-15 minutes. For the liver, I coated the surface of the cooked liver with the dipping sauce and broiled it for one more minute turning once. I put on one more coat of “tare” sauce and sprinkled “sansho” 山椒 or powdered Szechwan pepper corn on the liver.
Saturday, February 16, 2019
Green tea cake with "Kuromame" black beans 黒豆入り抹茶ケーキ
The cake is moist with a nice green tea smell and flavor. Although I did not brush the cake with brandy as suggested in the original recipe, the brandy flavor came from the black beans since they were soaked in brandy before baking. This is an excellent cake.
The below are English translation of the original recipe in Japanese.
Ingredients: (for one loaf of 19cm x 9cm)
100g unsalted butter, room temperature
65g sugar
50g AP flour
20g potato starch (Katakuri-ko)
40g almond flour
1/2 tsp baking powder
1/4 tsp salt
1tbs green tea powder (macha)
2 eggs, lightly beaten
3tbs plain yogurt
1tsp vanilla essence
Japanese "Kuromame" black beans in a syrup, arbitrary amount, drained and soaked in 2 tbs brandy.
200 g unsalted butter, room temperature
130 g sugar
100 g AP flour
40g potato starch (Katakuri-ko)
80g almond flour
1 tsp baking powder
1/2 tsp salt
2 tbs green tea powder (macha)
4 eggs, lightly beaten
6 tbs plain yogurt
2 tsp vanilla essence
Japanese "Kuromame" black beans in a syrup, arbitrary amount, drained and soaked in 4 tbs brandy.
1. I mixed all dry ingredients (including the sugar) together and sifted to remove any crumbs.
(I made the mistake of not creaming the butter with the sugar. My wife (always helpful) pointed out that this process is very common in cake making or cookie baking. So in an attempt to recover from my mistake, I punted).
2. I added the butter and eggs to the plastic mixing container for the immersion blender. Using low speed, I mixed the butter and eggs. I added all the remaining wet ingredients and further mixed (This worked. All wet ingredients were nicely mixed).
3. I added the wet ingredients to the dry ingredients and mixed until no dry ingredients were visible (#1).
4. Since we did not have a loaf pan of the size specified in the original recipe, we used a disposable aluminum baking pan, well-buttered with the bottom lined with parchment paper (in retrospect, we could have used a smaller pan which we did have). I placed half of the batter in the loaf pan and smoothed the surface (#2).
5. I drained the black beans soaked in brandy and mixed into the remaining batter (#3).
6. I layered the second batter on top of the first layer and smoothed the surface (#4). (This process results in the black beans being evenly distributed in the cake).
7. I baked the loaf in a preheated 350F oven for 40-45 minutes or until a bamboo skew inserted in the center came out clean.
8. After the loaf cooled down, I removed it from the pan (#5).
9. The black beans appear evenly distributed (sort of).
When the cake came out of the oven, the smell of green tea was really good. For the very first cake I ever made this is an unqualified success (thanks in part to my wife's guidance of course). We are thinking that instead of kuromame, we can make this cake without it or with nuts. We really enjoyed this cake. It is truly special.
Tuesday, May 25, 2021
Scalloped potato with cauliflower puree
My wife came up with this dish one day. A few days before I had made my usual Cauliflower puree. Beside eating it as an “adult baby” food, we have made Mac-and-cheese using the puree instead of Béchamel sauce. I am not sure how she came up with this dish but, it is essentially scalloped potatoes made with the Cauliflower puree, cheese, onion and jalapeño pepper. This was topped with several kinds of cheese and baked.
Two russet potatoes thinly sliced
2 onions thinly sliced
2 jalapeño pepper
1 cup of cheddar cheese grated
1 cup monterey Jack cheese grated
1/2 cup parmesian cheese grated
Several slices of smoked gouda to top.
Enough cauliflower puree to cover several layers
Directions:
Cover the bottom of an oven casserole dish with the puree. Distribute a layer of potatoes (#1) then the sliced onions, jalapeño pepper and the various cheeses (# 1&2) then the cauliflower pure (#3) Keep layering until all the ingredients have been distributed. End by putting on slices of smoked gouda (#4). Cook in a 400 degree oven covered for 30 minutes. Remove the cover and continue cooking for 30 minutes until the potatoes are tender and a knife slides in easily. Let cool for 15 minutes before serving.
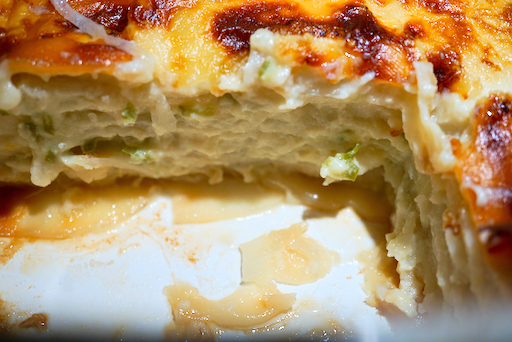
This is a very comforting dish with thin layers of potatoes between custard like layers of warm cheese. The jalapeño peppers and onion give a nice flash of flavor. You would never guess that cauliflower was one of the main ingredients. It heated up nicely in the microwave. This would the a staple for any menu.
Sunday, March 31, 2013
Chicken breast with yuzu flavor 柚子鶏
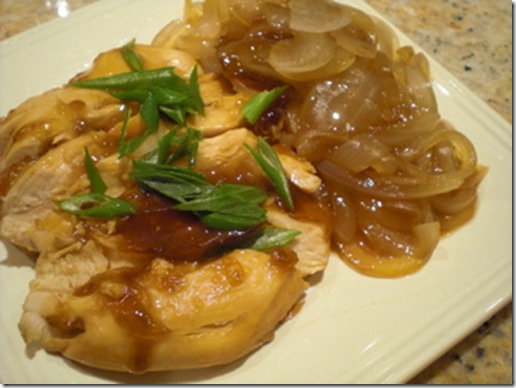
I followed the recipe with very minor modifications (I did not add sugar to the marinade).
Ingredients:
Chicken breast, boneless skinless (one, large)
Salt (1/4 tsp)
Potato starch (1 tsp)
For marinade:
Soy sauce 1 tbs
Mirin 1.5 tbs (original 1 tbs)
Sake (rice wine) 1/2 tbs (original 1 tbs)
Rice vinegar 1 tbs
Soy sauce 1 tbs
(Sugar 1 tbs, I omitted this)
Yuzu koshou 2tsp
For the side:
Onion, sliced, 1 medium
Scallion for garnish
I first removed the tenderloin from the chicken breast. Following the original recipe, I "stabbed" the chicken breast with the tip of my knife to make multiple cuts across the grain of the meat. Then, I flattened it using my meat pounder (with a smooth flat bottom). I placed the marinade and the chicken in a Ziploc bag, massaged, removed as much air as possible and sealed it. I let it marinate at room temperature for 30 minutes.
I placed the chicken breast in a silicon microwave container. sprinkled in the potato starch, poured the marinade over and place on the lid. I microwaved it on high for 2 minutes and checked (it appeared that the sauce was getting thick and I added a small amount of hot water). I flipped the chicken over and microwaved for 1-2 more minutes. (Our microwave is 800KW, and this timing has to be adjusted depending on the wattage of your microwave oven). I let it cool down a bit with the lid on for 10-15 minutes.

Meanwhile I put the sliced onion in a separate silicon microwave container, put the lid on and microwaved it on high for 2 minutes. I then put the cooked onion in the sauce with the chicken.
When the chicken was warm but cooled down enough to handle, I sliced it (The first picture is one small serving which is half of the breast), put the onion on the side and garnished with chopped scallion (green part for color).
I thought this was quite good and had a nice yuzu-citrus favor from yuzu-koshou. It is not spicy at all despite the yuzu-kosho. My wife thought this was on par with my microwave sake steamed chicken. I thought this tasted more interesting. In any case, this is a perfect snack with sake or even wine. Actually we had a cold ginjou 吟醸 sake from Shizuoka 静岡 prefecture called "Wakatake Onigoroshi 若竹鬼ごろし" Devil slayer. This is a slightly sweet gentle sake but has a nice fruitiness and went well with this dish.
Saturday, June 12, 2010
Roast beef ローストビーフ
Some time ago my niece asked me how to make roast beef. Since we rarely eat roast beef and when we do, we usually barbecue it using a Weber kettle, I could only give her general instructions gleaned from other sources such as the "Joy of Cooking" cookbook. I decided to make roast beef with gravy and post the process, so that my niece can refer to it. Here, we served the slices of roast beef with gravy and oven fried potatoes. (For her, I added Japanese text à la Hiroyuki's blog).
The cut of the meat I bought was a 3 lb top round (upper portion of the hind leg muscle) but it was not well cut and had a somewhat odd shape. So, this may not have been the best example of a good cut for roast beef (image below left, before trussing). It is important to truss it properly so that, it will cook evenly (Image below right).
For seasonings, I use fresh rosemary from our herb garden, garlic, salt, and freshly cracked black pepper. First, I thinly slice peeled garlic cloves (I use 4 cloves). I then make multiple deep slits in the meat and insert the garlic slices. It is important that the garlic slices are completely hidden below the surface so that the garlic will not burn during roasting. I remove the rosemary from the stems and finely chop (4 small sprigs) and mix with 2-3 tbs of olive oil and generously smear the mixture on the surface of the meat. I make a mixture of freshly cracked back pepper and kosher salt (half and half, about 2 tbs) and rub the mixture on the surface of the meat. (image below, left). Ideally, the meat should be at a room temperature before putting it in the oven. Actually my wife did the roasting part. Preheat the oven to 425 F and roast for 15 minutes. Then lower the temperature to 350F and roast for about 20minutes more/pound. So, a 3 pound roast will take about 60 minutes more. I start taking the temperature at the center of the roast after 45 minutes and for medium rare, I am looking for an internal temperature of 140F (Image below right).
This roast took a bit longer to cook than we expected (the center may still have been cold after it was taken out of the refrigerator). Transfer the roast to a plate and loosely cover it with aluminum foil to keep it warm and let it rest for 15-20 minutes before carving. Our roast was a bit more done that we wanted (Image below) but still rosy in the middle.
Now making gravy; I remove the metal grate of the roasting pan which collected some dripping in the bottom and the edges are nicely browned (below left). I place the roasting pan across two burners on the stove on medium low flame and add port wine and chicken broth (1/4 cup each) (since we did not have beef broth) and deglaze all the nice brown bits using a silicon spatula (below right).
You could add vegetables to the bottom of the roasting pan during roasting but we prefer to roast the vegetables (onion, garlic-skin on, potato,sweet potato, carrot etc) in a separate pan by just coating them with olive oil and seasoning with salt and pepper. This way, you have better control of the doneness of the meat and vegetables.
Sunday, February 28, 2016
Grilled cod marinated in sake lees 鱈の粕漬け焼き
I grilled the marinated cod in our toaster oven. This has to be done very carefully because it is very easy to "burn".
Sake lee marinade base "Kasu-doko" 酒粕床
Ingredients:
Sake lees: one package, 300grams, frozen.
Miso: 30grams
Sugar: 3 tbs
Salt 1/2 tsp
Sake and hot water: as needed depending on how dry sake lees is (see direction).
Direction:
1. I broke the sake lees in to small chunks (#1). Since my sake lee was kind of dry, I added about 50ml of hot water and covered and let it steep to soften.
2. I added miso, sugar and initially using a potato masher and then switched to a silicon spatula to mix as I added sake in small increments (probably ended up using about 100ml, #2).
3. I mixed it well until the sugar dissolved, then mixed in the miso until I attained the consistency of soft miso. The amount of hot water and sake totally depends on how dry the sake lees was to start with (#3).
4. I placed the sake lees mixture to sealable flat container (#4).
Preparation for cod:
I got two pieces of cod filet; serving for two. I washed and patted it dry using sheets of paper towel. I salted both sides and let it sit in the refrigerator for 30 minutes to 1 hour.
Monday, August 7, 2017
Gnocchi ニョキ
Gnocchi
Ingredients:
16 oz. of mashed potatoes (3 cups)
4 oz. of AP flour (3/4 cup)
1 egg
1 tsp. salt
Ingredients X 1 1/2
24 oz. (1 lb. 8 oz.) of mashed potatoes
1 1/8 cup of AP flour (may need more to make a workable dough)
2 eggs
1 1/2 tsp. salt
Ingredients X 2
32 oz. (2 lb.) of mashed potatoes
1 1/2 cup of AP flour (may need more to make a workable dough) (I actually used 2 1/4 and it worked out OK)
3 eggs
2 tsp. salt
Directions:
Press the mashed potatoes through a sieve. Add the flour and gently mix with a fork. Add the egg and salt and again gently mix with a fork until everything comes together into a dough.
Gently roll into 1/2 inch diameter logs. Cut into the desired size.
The pieces can be rolled on the back of a fork to make ridges to better hold the sauce but that didn't work out so well so our pieces generally didn't have any ridges.
Fill the dutch oven with water. Add 1 Tbs. Salt and several bay leaves. Bring the water to a boil. Lower the heat and gently add the gnocchi to the water. Heat just below the boil for a few minutes in salted water until they float to the surface. Then remove from the water and put into the sauce. Or for use later put in a bowl and coat with olive oil to prevent them from sticking together.
Thursday, February 8, 2024
Grated Lotus Root and Tofu Ball レンコンと豆腐まんじゅう
Ingredients:
200 grams lotus root, peeled and grated, moisture drained out naturally
300 grams tofu, moisture drained
3 tbs Potato starch
1/2 tsp grated ginger
1 tsp miso (original recipe calls for 1/2 tbs soy sauce, I used miso since the dough was bit runny)
Flour for dredging.
Oil for deep frying.
Directions:
Add the grated lotus root, tofu, potato starch, ginger and miso and mix well until smooth. Add more starch if too watery/soft.
Using the ice cream scoop, make equal sized balls, dredge in the flour and deep fry at 160-180F oil for 3-4 minutes turning a few times until the outside is nicely brown (picture #2).
Initially, I served these hot but it can be heated up nicely in the toaster oven. It is seasoned but you could add soy sauce with grated ginger or some type of hot broth. If I make this again I could add chopped scallion, cut up shrimp, ginko nuts, mushrooms etc to make it more interesting.
A few days later, I tried to make a dish (soup) with the leftover renkon balls (picture #3). I made this for lunch. I made it a few hours ahead and re-heated just before serving. The idea was good but the execution was not so great. While the renkon balls were sitting in the broth they absorbed the broth and mostly disintegrated as you can see in the picture #3. It still tasted good.
This is mostly leftover control and there is no recipe but this is how I made it.
Ingredients: (for the soup)
4 Renkon balls, cut in half
Half package of brown shimeji mushroom, root end removed and separated
1 inch daikon, peeled and drained
1 spring onion, finely chopped
Cooked udon noodle, amount arbitrary, this was leftover
For broth:
2 cup Japanese broth (from dashi pack)
1 tbs each of sake and mirin
1/4 cup of x4 concentrated Japanese noodle sauce (or taste)
Directions:
Add the ingredients for the broth in sauce pan and heat to simmer
Add the grated daikon, renkon balls and mushroom and simmer.
Add the noodles and scallion
Serve while hot*
* as I mentioned, I made this ahead of time and reheated before lunch. That was a mistake, the renkon balls absorbed the broth and mostly disintegrated. Nonetheless it tasted good and the addition of grated daikon added flavor and cut the oily taste from the renkon ball.
Friday, August 14, 2015
PA Dutch Wet Bread stuffing

Ingredients (for 8 servings):
2 1⁄4 lbs potatoes, peeled and chopped
4 slices white bread, torn into pieces (My wife used Pepperidge Farm flavored bread stuffing about 2 cups). Several of the recipes go into great detail on how to handled the bread such as toasting it, frying it, and other methods to dry it out.
1⁄2 cup diced onion
1⁄2 cup diced celery
Salt and pepper
Directions:
- Saute the onions and celery until the onions are just translucent and soft
- Bring a large pot of salted water to a boil.
- Add potatoes and cook until tender but still firm, about 15 minutes.
- Drain, mash, salt and pepper to taste. Add enough milk and butter to give the mashed potatoes a very creamy texture. They should be a bit more liquid than usual for mashed potatoes because the dried bread soaks up the extra liquid. At this point just the potatoes themselves are good.
- Preheat oven to 350 degrees.
- Lightly grease a 2 quart casserole dish.
- In a large bowl, mix together the potatoes, white bread (or flavored stuffing), onion, celery, salt and pepper. (First picture below)
- Pour into prepared casserole dish, dot with pads of butter (second picture below) and bake for 1 hour. (Final picture below).
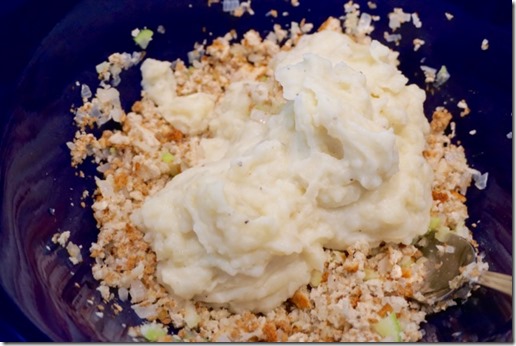
(Fill casserole and dot the surface with butter).

(Bake for one hour at 350F).
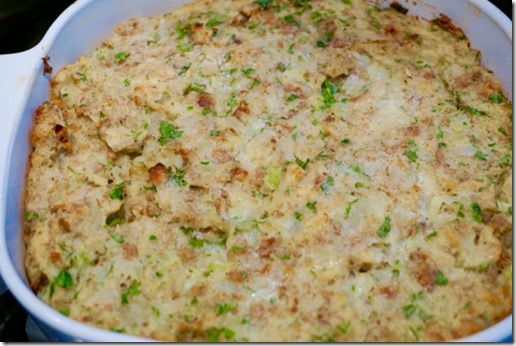
This was not exactly the dish she remembered from her childhood. For one thing, there was no gelatinous texture and it was very good. The bread stuffing completely amalgamated with the potatoes. The flavored stuffing really made the dish savory. It was like mashed potatoes but different. It must have been a great way for PA Dutch cooks to use stale bread and leftover mashed potatoes. The first day, it didn't hold together and we spooned it onto the plate as shown in the picture above but a few days later it could be sliced. My wife is still curious about the concoction she ate as a kid but from her descriptions of it, I'm glad this was not it.


