Sunday, July 23, 2023

Assorted sashimi from Riviera Seafood club リビエラシーフードクラブから ”美味しい刺身パック”

This is the second time we got super-frozen assorted sashimi called “Oishii Sashimi Pack” from Riviera Seafood Club. (“Oishii” means delicious). I forgot to take pictures when I served the akami and chu-toro tuna from the pack but it was identical to what I posted some days ago.  The package also contained 6 Hokkaido “hotate” scallops and tuna chunks (for poke I assume). I re-vacuum packed the scallops into packages consisting of two scallops each which was perfect for us. From the tuna chunks, I made two dishes; tuna avocado cubes 鮪とアボカドの角切りand pseudo negitoro 擬制ネギトロ the other day. (But did not take pictures). The tuna chunks are a mixture of toro and akami and the quality is good. In any case, we had hamachi and the last of the scallops this evening. As before, the hamchi had skin attached and had a dark chiai 血合い portion. Although the hamachi chiai is not as gamy as tuna, I removed it and made “namerou” なめろう (I did not take a picture). In any case, I served the scallop sashimi on little dishes of actual scallop shells. (Turns out over the years we have accumulated quite a few). I made three version of hamachi sashimi. I also added two kinds of wasabi (one kind included chopped wasabi plant stalks). I also included yuzu kosho and Japanese red pepper paste. For sauce, I served “sashimi shouyu” 刺身醤油 (with a dab of wasabi) and home-made ponzu 自家製ポン酢 (with a dab of red pepper paste).


I sliced the scallops in half horizontally. These were really good scallops, very sweet and fresh tasting. They went well with the wasabi that included chopped wasabi plant stalks and soy sauce.


I served three slices of the hamachi as is.


I served two slices as “zuke” which were marinated in 4x Japanese noodle sauce for 1 hour in the fridge. The hamchi became very rich with dashi taste.

The last two slices of hamachi are “Kobu-jime” 昆布締め which added “umami” from kelp and removed some of the moisture. This was best with the ponzu.


My wife really like “yuzu kosho” instead of wasabi for these sashimi.

The picture below is from the Riviera website. It shows the collection of fish that makes up the “Oishii Sashimi” package. Although this is a lot of sashimi, each portion is relatively small and we could handle it better than the larger potions we got before from other places. We have not started on the salmon yet. More to follow.


Thursday, July 20, 2023

Roasted pepper blini ローストパプリカビリニ

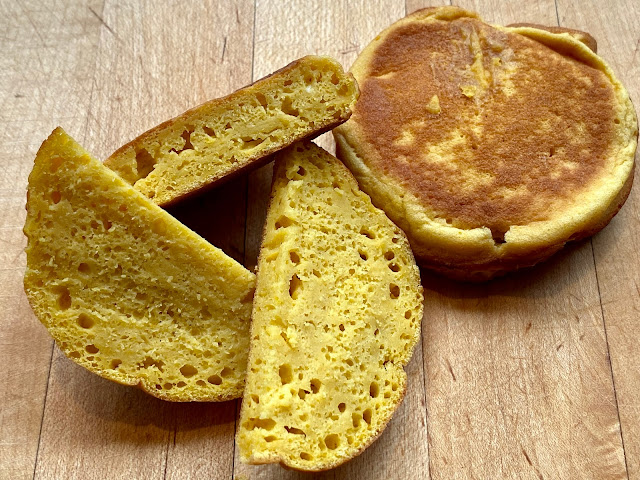
We recently got a bag of assorted bell peppers from Whole Food. This time, the bag contained 2 red, 2 yellow and 1 orange peppers. As before, I roasted/baked them in our toaster oven (450F for 30 minutes turning occasionally and then placed them in a Ziploc bag for 20-30 minutes or until cool enough to handle). I removed the stem ends, skin, seeds and ribs. We were pondering how to use this when my wife found an interesting “blini” recipe using roasted pepper. (The original recipe calls for red peppers in a jar while we were using fresh peppers.) We had both yellow-orange and red peppers but we decided to use the yellow. The flavors appear to be the same regardless of the color. The resulting blini has a nice roasted pepper smell. We ate this for breakfast, and it does have a distinctive roasted pepper flavor.


For the evening, we used the roasted pepper blini with onion and chive cream cheese spread, smoked salmon and ikura salmon roe garnished with dill. We did not taste much of the roasted pepper flavors since the other items have such strong flavors. For the smoked salmon and salmon roe combination, in the future we will use our regular buck-wheat blini.


I asked my wife to take over as ususal.

Ingredients: (makes 7 blini)
4 oz. roasted yellow (or red) bell pepper, stem end, seeds, ribs and skin removed
2 tbs melted butter
1/4 cup cream
2 large eggs, beaten
2/3 cup all-purpose flour
1 1/2 teaspoon baking powder
1/2 teaspoon kosher salt

Ingredients (X2) makes 14 blini
8 oz. roasted yellow (or red) bell pepper, stem end, seeds, ribs and skin removed
4 tbs melted butter
1/2 cup cream
4 large eggs, beaten
1 1/3 cup all-purpose flour
1 Tbs baking powder
1 tsp salt

Ingredients(X2.5) makes 17 blini
10 oz. roasted yellow (or red) bell pepper, stem end, seeds, ribs and skin removed
5 tbs melted butter
1/2 +1/8 cup cream
5 large eggs, beaten
1 2/3 cup all-purpose flour
3 3/4 tsp baking powder
1 1/4  tsp salt

Ingredients(X3) makes 21 blini
12 oz. 1 1/3 cup roasted yellow (or red) bell pepper, stem end, seeds, ribs and skin removed
6 tbs melted butter
3/4 cup cream
6 large eggs, beaten
2 cups all-purpose flour
1 Tbs + 1 1/2 tsp. Baking powder
1 1/2 tsp salt

Directions:
In a food processor, puree the bell pepper until smooth; scrape into a medium bowl. Add the egg, the melted butter and cream, then add the flour, baking powder and salt and whisk until well blended. (You may need to add more liquid so the batter is the consistency of pancake batter.)

In a cast iron platar, melt 1 tablespoon of butter. Use the melted butter to grease each of the platar cups before adding the batter . Pour the batter into the cups until they are 1/2 full. Cook over moderately low heat, turning once, until set, about 3 minutes per side. Repeat with the remaining butter and batter.


This is a good blini but we like it best for breakfast as though it is crumpet.

Monday, July 17, 2023

New Divided Plate and 9 Otoshi Appetizers 9つ仕切り皿にのせたお通し9種類

This is on the theme of multiple small “otoshi” appetizers. Previously we used a 5 segmented plate to serve 5 appetizers. A few days ago, I found a 9 segmented square plate available on Amazon which was reasonably priced so I got two. I thought it would be hard coming up with 9 appetizers but I managed it with 8 dishes I made. The ninth dish was an exception since I didn’t make it. It was the fried shrimp head which came from Tako Grill when we had our sashimi/sushi take-out. (Shrimp head is a by-product of “botan-ebi” 牡丹海老 sashimi/sushi). In any case, I was surprised that once I started thinking otoshi I was on a roll and could have served two or three more appetizers if I wanted to. This was a nice start of the evening but even very small dishes are filling for us and we ended up with a  “shime” 〆ending dish after this.


In the 1st row, left, is a sugar snap in salt broth スナップ豌豆の塩びたし. We used to be able to get decent sugar snaps from our regular grocery store but recently, we have had to go to gourmet grocery stores to get decent ones This was crunchy, sweet soaked in salt dashi broth.


In the 1st row, center, are cucumber onion salad and stir fried shirataki, jalapeño pepper and enoki mushroom.


In the 1st row, right, is the cheese curd my wife made  but instead of jalapeño pepper, she added “Yuzukosho” 柚子胡椒, soy sauce and cream. I added a dab of yuzukosho on the side to provide an added “schmear” of yuzukosho flavor if desired.


Tsukune on a slice of lotus root 蓮根つくね.


Uni-shuto” ウニ酒盗 from Maruhide. As I stated before this is the best uni aside from fresh uni. I served it with cucumber and perilla leaves.


I refried the shrimp head kara-age which was part of take-out from Tako Grill a few days ago. Shrimp head has a good amount of meat and is very crunchy but you have to be careful how you eat the prickly legs so as to not injure your mouth.


Recently, we discovered that Whole Foods carries fresh quail eggs. We really like boiled quail eggs. Although we can get canned boiled quail eggs, boiled eggs prepared from fresh quail eggs are much much better. I served it with marinara sauce, basil and sprinkle of salt.


Blanched asparagus with sesame mayonnaise. The dressing is a mixture of mayo, Japanese sesame paste or nerigoma 練りごま and soy sauce.


Salmon salad. My usual. The dressing is mixture of mayo, Greek yogurt and Dijon mustard.


We really like our new plates. If I serve 9 appetizers for two of us in small bowls, we have to wash a total of 18 bowls but here we had to wash only two plates. We really like the many small dishes we had here; true Izakaya-style.

Friday, July 14, 2023

Stir-fried “Shirataki” with Jalapeño Pepper and Enoki Mushroom 白滝、えのき茸、ハロペニョペッパーのピリ辛炒め

I was taking inventory of what Japanese food items I had in the fridge, I realized that I have three bags of “shirataki” 白滝 (meaning “white cascade”) which is a noodle form of “konjac” or “kon-nyaku” こんにゃく. To reduce the inventory of shirataki, I quickly made this dish with what I had available. I intended to make this stir-fry slightly spicy. For an impromptu dish, not following any recipe, this was not bad, a perfect small “otsumami” おつまみ dish. It is slightly spicy since I used Japanese red pepper flakes or “ichimi-tougarashi” 一味唐辛子 but the jalapeño pepper was not spicy since I removed the ribs and seeds.


Ingredients:
One 7oz or 198g bag of shirataki in water (see picture below), drained, washed in running water and parboiled, drained and again washed (to reduce the unique smell). Cut into shorter lengths for ease of eating.
One 3.5 oz bag of enoki mushroom, root end cut and discarded
One large jalapeño pepper, cut in half lengthwise, seeds, ribs removed and cut on the bias into thin julienne.
1 tbs soy sauce
1 tbs mirin
1 tsp peanut oil with a splash of dark sesame oil
1/4 tsp Japanese “ichimi-tougarashi” red pepper flakes or more if you so prefer.


Directions:
In a wok on high-flame, add the oil and when it is hot, add the Japanese red pepper flakes. Sitr for 10 second and add the shirataki, stir until almost all the moisture evaporates; for 1-2 minutes
Add the Jalapeño pepper and enoki mushroom. Stir another one minute.
Add the mirin and soy sauce and stir until most of the liquid is gone
If preferred, add more red pepper flakes
Served hot or cold

It is a perfect small dish goes well with sake and because it is made with konyaku it has the characteristic of the ingredient; very low in calories..

Sunday, July 9, 2023

Corn Sage Muffin Variation コーン、セージ、マフィンバリエーション

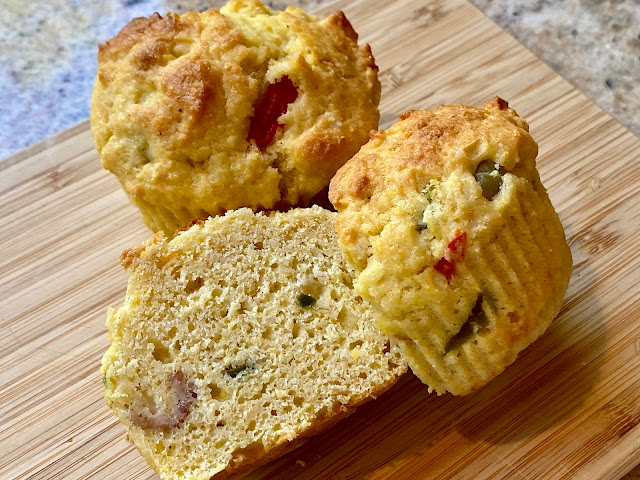
It is getting to be the season for fresh corn and we have gotten quite few ears of it recently. We (mostly my wife) love corn and we’re making quite a few corn dishes. This particular baking project started out as one of my wife’s regular sage corn bread (in muffin form) but she realized the recipe called for 1 1/2 cups of corn puree and she only had a cup; not quire enough of the corn puree required to make the batch of muffins. Then she remembered we had left-over corn, roasted red pepper, edamame and bacon salad that we had made a few days ago. She thought, ‘That salad included corn. If I substitute the salad for the missing corn, wouldn’t that make up the shortfall?’ She first contemplated pureeing the salad and adding it to the corn puree but in the end, she decided to just put a cup of the salad into the batter to add some additional texture.   I will never fathom how my wife (the queen of substitutions in recipes) comes up with these things but this substitution happened to result in a very good muffin. The red in the picture is the roasted red pepper. The green is the jalapeños pepper and boiled edamame. The flavors of these ingredients, particularly the roasted red pepper really comes through and went beautifully with the over all corn sage flavor of the muffin. This is a variation well worth repeating.


The picture below shows the salad she added.


The ingredients and directions for the two recipes she combine are shown below for convenience

Ingredients: For the muffin
1 cup grated corn
1 stick butter
6 large sage leaves (or several sprigs of rosemary)
1 cup of corn salad (this is the current variation in the recipe) (Salad recipe below)
1 1/2 tsp salt
2 large eggs
1 cup buttermilk
3/4 corn flour (or corn meal)
2 cups All Purpose (AP) flour
1/2 tsp baking soda
2 tsp baking powder
1/4 cup sugar (or more for a slightly sweeter muffin)

Directions:
Grate the ears of corn on a stand grater. Scrape the ears with the back of the knife to get the remaining "corn milk" . Melt the butter in a saucepan (do not allow it to boil or brown). Mix in the grated corn, salt, and sage leaves. Cook until creamy and thickened, making a kind of polenta. Remove the sage leaves. To achieve a really smooth emersion blend it further in a “motor boat” blender. Allow the mixture to cool. Add the buttermilk and eggs and mix until blended.

In a large bowl sift together the corn flour (or corn meal), AP flour, baking soda, baking powder, and sugar. Add the 1 cup of corn salad and mix in the dry ingredients to coat with a bit of the flour. Add the liquid ingredients and stir until blended. Scoop into the prepared muffin tin. Cook in 400F degree oven for 18 to 20 minutes for muffins, or until a skewer comes out clean and the muffins are nicely browned.

Ingredients: For the corn salad
1 roasted red pepper, skin, ribs and seeds removed and cut into small squares
2 ears of fresh corn on cob, microwaved wrapped in wet paper towel for 2 minutes or more until cooked
1 sweet (Vidalia) onion, finely chopped
2 strips of bacon, cooked to crisp and crumbled
1 large jalapeño pepper, seeded, deveined and finely chopped
1 cup of boiled edamame, shelled (or lima beans)

For dressing:
1 tbs Dijon mustard
1 tbs honey
2 tbs rice vinegar (or any vinegar)
8 tbs or more fruity olive oil
salt and pepper to taste

Directions:
For roasted red pepper
I roasted them at 450F in the toaster oven on convection mode for 20 minutes turning a few times so that all the surface was cooked/charred. I then put them in Ziploc bags to steam for 30 minutes. Once cooled down, remove the stem end, skin, ribs, seeds and peel. (The skin will come off easily).

Combine all the ingredients, add the dressing and stir well.

Thursday, July 6, 2023

Sous Vide Chicken Breast with Red Pepper Sauce 低温調理鶏胸肉のロースト赤パプリカソース添え

In my book, the best way to cook chicken breast is using the sous vide method. As I posted before, skin-on and bone-in split chicken breast appears to work best. Sometimes this type of chicken breast is hard to come by since most people seem to prefer skin-less and bone-less chicken breast. So when skin-on bone-in chicken breast is available, we like to stock-up. This time we got a “family” pack which contained 4 large chicken breasts. I sous vide all of them and froze three. I prepared one of the sous vide breasts into three dishes. I hand shredded the tenderloin and dressed it with sesame/mayo sauce. I made half of the main breast meat into curry-flavored chicken salad and I served the rest sliced with roasted red pepper sauce.  I served this dish at lunch with two salad sides; celery mushroom feta salad (right upper) and corn, red pepper, edamame and bacon salad (right lower).


When we made corn, red pepper, edamame and bacon salad, we had an excess of roasted red peppers since we got a bag of 6 red peppers. So, I made a roasted red pepper sauce. The sauce went well with sous vide chicken shown here with mayo and blanched broccoli added to the plate.


I am sure there are many ways to make roasted red pepper sauce, but the one shown below is my improvised sauce.

Ingredients:
Two roasted red peppers, stem end and skin removed, seeds and ribs removed, cut into small size (for pureeing)
1/2 sweet (Vidalia) onion, finely chopped
1 tbs caper
1 tbs lemon juice
3-4 tbs olive oil
Salt and pepper to taste

Directions:
Add all the ingredients except the salt and pepper in a cylindrical container for an emersion blender.
Puree on high-speed until smooth. Taste and add salt and pepper

This sauce went very well with the sous vide chicken breast. The chicken cooked this way is very moist and tender but can taste a bit bland. The sauce really added a nice slightly tangy flavor. We still have a lot of sauce left so there will be more to come.

Monday, July 3, 2023

Matcha Almond Pancakes, 抹茶アーモンドパンケーキ

We like pancakes as a breakfast. Our all time favorite is buttermilk blueberry pancake when blueberries are in season. Another one we like is a green pancakes made with spinach and mint. We decided that the flavor comes from the mint but not the spinach so we modified the recipe to use just mint. We like the flavors as well as the striking “verdant”  green color. Recently, we saw a recipe for “matcha almond pancakes”. We both thought ‘we have to make this’. So here they are. A stack of matcha almond pancakes


They were quite good. We had this as a breakfast sitting outside on the patio with a cup of cappuccino and mango yogurt made with home-made yogurt with pureed and small cubes of champagne mango mixed in. These pancakes reminded us of the “Matcha green tea cake” we made a few times before.


Ingredients: (The original recipe indicated it makes 8 pancakes but we doubled the recipe and got only 7 pancakes)

1/2 cup plus 1 tablespoon (68 grams) whole-wheat pastry flour or all-purpose flour
1/2 cup (60 grams) almond flour
2 teaspoons baking powder
1/4 teaspoon fine salt
1 tablespoon matcha
1 cup (240 milliliters) whole, reduced-fat or plant-based milk
1 large egg
1 tablespoon neutral oil, such as avocado or canola
2 teaspoons vanilla extract
Maple syrup, for serving

Directions:
In a medium bowl, thoroughly whisk together the pastry flour, almond flour, baking powder and salt until combined. Sift the matcha into the mixture and whisk again to thoroughly combine.

In another medium bowl, whisk together the milk, egg, oil and vanilla until combined. Add the milk mixture to the flour mixture and stir just to combine. Do not overmix; it’s okay if there are some small lumps. Let the batter hydrate for 5 to 10 minutes. (The batter will initially appear quite watery but over the 5 to 10 minutes the flours thoroughly hydrate and it becomes thicker. Nonetheless it was still runnier than our usual pancake batters.)

Heat a large nonstick skillet or griddle over medium-high heat until hot. (To test, drop a dime-size amount of batter into the skillet and if it starts to bubble and brown right away, the pan is ready.)

Working in batches as necessary ladle the batter onto the skillet. Cook until bubbles form on top and the underside is nicely browned, about 2 minutes, then flip and cook until browned on the other side, and cooked through, 2 minutes more. Adjust the heat as necessary to prevent the pancakes from browning too fast before they’re cooked through. Transfer the pancakes to a plate and repeat with the remaining batter.

Serve with maple syrup.

These pancakes were quite good but not great. They were fairly thin in texture. The macha flavor really came through though. They reminded us of the macha cake we made previously. Next time we want a macha pancake we will try just adding some macha to our favorite buttermilk pancake recipe.

Addendum:Culinary grade vs. drinking/sipping matcha:


We have taste tested “Culinary” and “Drinking” grade matcha. Since we are not connoisseurs of matcha, we could not tell the difference. We bought the large can of “culinary matcha” from “Matcha Love” which is run by a Japanese tea company called “Ito-en” 伊藤園. For this type of cooking, this is quite good and reasonably priced.