Showing posts sorted by relevance for query kelp condiment. Sort by date Show all posts

Sunday, September 20, 2009

Simmered Daikon with miso ふろふき大根

Simmered Daikon with citrus miso ふろふき大根柚子味噌かけ
Kelp condiment 昆布の佃煮
This is another classic Izakaya food especially in winter. Since it is getting cooler, I made this classic Daikon dish. (Mark's book has a similar dish with pork Miso sauce, p20). I made this with a more classic citrus flavored miso sauce. It is best to use ripe yellow "yuzu" citrus, but I used a combination of lemon and lime zest. The quality of daikon we can get here is not great. It tends to be more fibrous than good quality daikon in Japan.

Again, preparation for this dish requires some work. Peel the daikon and cut the peeled daikon into 1 inch or so thick rounds. Shave off or bevel the sharp edge of the round 面取り and make several shallow cross cuts 隠し包丁 on the side which will become the bottom when served. This is, I think, how I was taught by my mother and it appears to be authentic since similar steps are described in Mark's book. Simmer the daikon in water with a pinch of uncooked rice grains or in the turbid rinsing liquid 米のとぎ汁 from washed uncooked rice, for 10-20 minutes. (I am not sure what this step does but it certainly removes some of the smell, common in cruciferous vegetables such as daikon.) Discard the water and rinse the daikon in cold running water, add a square of dried kelp 昆布 in the bottom of the pan (wipe the surface of the dried kelp with a dump paper towel before using to remove surface dirt) and add fresh water to cover the daikon. Simmer until daikon is soft (probably at least another 1-2 hours). You may want to pull out the kelp after 30-40 minutes if you like the daikon to be very white otherwise, the kelp will slightly discolor the diakon as you can see in our photo. Meanwhile, make the miso sauce. In a small pan mix together 1 tbs of white miso, 2 tsp of sugar. Add mirin and dashi (2 tsp each) (I use the simmering liquid instead of dashi since it is now a kelp broth). I eyeball everything and taste and adjust accordingly rather than measure the ingredients. Put the pan on a low flame, stir and reduce to a saucy consistency. Let it cool down a bit (5 minutes) and add citrus zest (Here, I used 80% lime and 20% lemon since I did not have yellow "yuzu").

To plate, place the kelp square, put the diakon uncut side up on top of the kelp, top the daikon with the miso sauce. Serve while the daikon is hot. The daikon should be soft enough so that it can be cut using chopsticks (may require some chopstick skill).

The sake glass shown in the picture is part of a "husband and wife" めおと set. The "husband" glass is blue and "wife" glass is red. These are hand-cut crystal by Hoya. The chopstick pillow 箸置き is Hagi-ware 萩焼 which is shaped like a sand dab. We purchased this when we visited one of the numerous Hagi kilns in the city of Hagi. The chopsticks are, again, part of "husband and wife" set and, I believe,  are Wakasa-nuri  若狭塗り which were a gift.

Kelp condiment 昆布の佃煮
The kelp used to cook the daikon can be transformed into a condiment "tsukudani" 昆布の佃煮 which goes very well with sake or white rice. Julienne the left-over kelp, simmer with soy sauce and mirin and sake (the proportion is again up to you depending on your taste) until only small amount of liquid remains. Add shaved and dried bonito flakes 鰹節, stir until incorporated. Final product should not have any excess liquid. The above is the one I made after I finished making this diakon dish. This one is not as salty as some of commercial "tsukudani" and go well with Sake as is.

Friday, March 5, 2010

Japanese winter stew おでん

"Oden" おでん is classic Izakaya food. Yakitori 焼き鳥 and oden are the two main pillars of drinking food in Japan.  Although any given Izakaya may serve up oden and/or yakitori among other items,  there are drinking places specialized just in "oden" or "yakitori".  Often I used to go to a drinking place that specialized in oden, "oden-ya" おでん屋, in Sapporo, called "Katsu-ya" かつや.  The original and name-sake proprietor has passed away, and it has moved from a quaint blind alley off the Oodouri 大通 to the basement floor of a building near Sapporo train station. One of her daughters has taken over the business. It appears that the quality of the oden and atmosphere are unchanged. It is still a very cosy welcoming place and always very crowded with salary men on the way home. I found the image of inside Katsuya on the Internet in one of the blogs (hope the author will not mind my using his picture here). Once, my wife and I visited Katsuya in this new location long time ago when we visited Sapporo. This picture really brings back memories.
かつや

"Oden" was said to be derived from "dengaku" 田楽 which I posted before. Dengaku is skewered squares of tofu, 
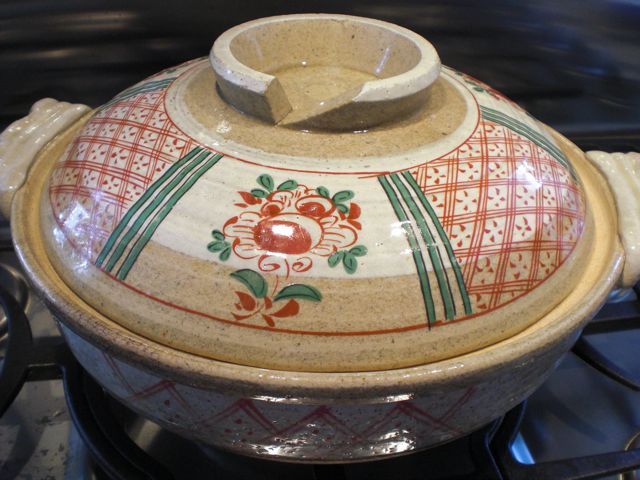
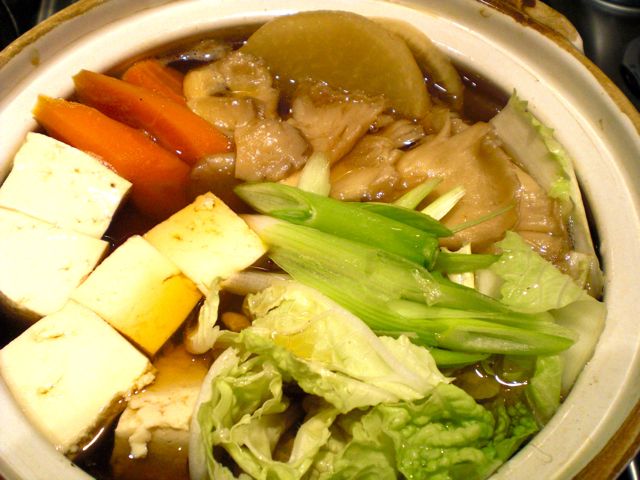
konnyaku and vegetables grilled and then eaten with miso-based sauce. Later, after the invention of soy sauce, instead of grilling, skewered items are cooked in a soy sauce flavored broth. Eventually, it lost even the skewers (some oden items, such as meatballs-- two or three skewered together, still keep their skewers). There are many variations including regional differences in oden. My oden is definitely influenced by the types of oden Katsuya served. In commercial establishments like Katsuya, they have a large stainless steel vats with multiple segments so that different items will not mix and cook properly as seen above, but at home, it is most common to use a large donabe 土鍋 or earthen pot like the one I used (below). You could use any pot with a wide opening. You could place a portable cooker on the table, place the pot on the cooker and let diners serve themselves. I ususally cook oden on the stove and serve whichever items I like on a plate returning frequently for a subsequent selection of different items. One of the reasons for this is that we rarely sit at the table to eat. I cut some of the items such as eggs and "Kinchaku" (see below) using a pair of kitchen scissors to make it easier to eat with chopsticks.

I usually prepare oden in the order below at least several hours before serving.

Broth: I used a piece of kelp (2x8 inches) which was first soaked in water for 30-40 minutes or longer (4 cups or about 1 liter) or whatever amount is appropriate for your vessel. I then put the pot on a medium low flame. When it comes to a boil, I reduce the flame to very low and add dried bonito flakes or "Kezuri (katsuo)bushi" 削り(鰹)節. I use a special large teabag-like bag called "Dashi bukuro" だし袋 in which the bonito flakes are placed and the opening sealed (about 20 grams). This is just for convenience so that I do not have to filter the broth later (I usually take out the bag with bonito flakes when the vegetables are all cooked). You could just put the bonito flakes in the pot and simmer for 10-20 minutes and then strain using a fine mesh strainer. You could also set aside a portion of unseasoned broth just in case the broth get too salty.

Daikon 大根: Daikon is a must in any oden and requires some preparation. I peel the skin and cut the peeled diakon into 1 to 1.5 inch thick rounds and bevel the sharp edges, mentori 面取り. I pre-cook the daikon in a separate pot with enough water to cover the daikon and one pinch of raw rice grains for 20-30 minutes and then transfer to the oden pot.

Carrot and potato: These items may not be most common items in oden but "Katsu-ya" served them and we like them very much. Just peel and cut into the size you like (not too small) and bevel the sharp edges and place it in the oden pot.

Boiled eggs: This is also the must-have item. I just boil eggs for 10 minutes, peel and place them in the oden pot.

Konnyaku コンニャク: It does not have much taste on its own and it is mostly for texture.  most of Westerners will not appreciate this item but it is nonetheless a classic oden item. I make multiple shallow crosshatch cuts on both sides so that the broth will penetrate better. I then cut it into bite sized pieces (I cut this into a triangle which is traditional) then, par-boil it in plenty of water for one or two minutes. I drain the konnyaku and then place it in the oden pot.

Seasoning: At this point, I  season the broth. I use soy sauce, mirin, sake and salt (I use salt to prevent the broth from becoming too dark which would happen if I added too much soy sauce to get the desired saltiness especially because I usually use a reduced salt soy sauce. Alternatively, you could use "light colored" soy sauce or "usukuchi shouyu" 薄口醤油. You may even like a dark broth, in that case, just use soy sauce. I cannot give you an exact amount but I will err on the side of under seasoning and go light on mirin (Vegetables add some pleasant natural sweetness). You can always adjust the seasoning later.

Now, I put on the lid and let it simmer about 1 hour. It really should not boil at any time. After the vegetables are cooked and soft, I add more items listed below which do not require long cooking. If they were frozen, thaw first and the items which have been previously deep fried should be treated by pouring hot water over them in a colander (called "abura-nuki" 油抜き) to remove any excess oil and off flavor before adding to the pot.

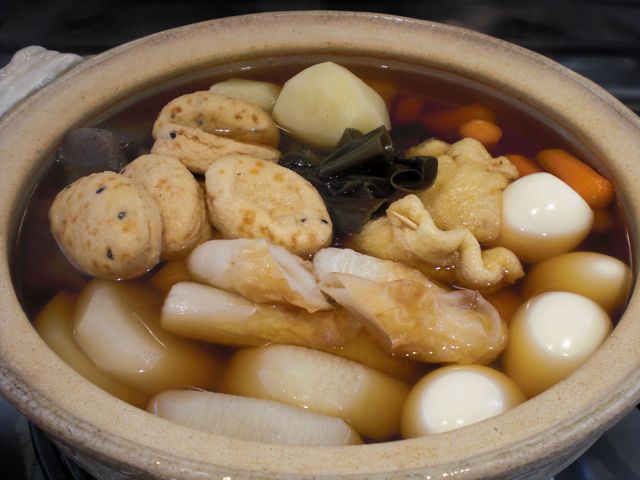
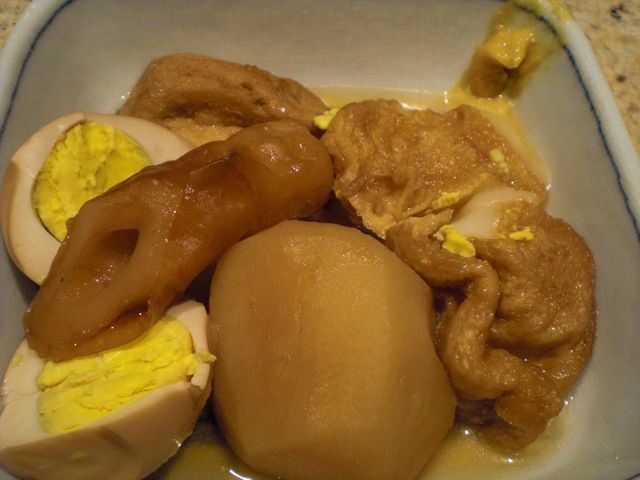
Chikuwa 竹輪: Cylinder-shaped fish cake (ground white fish meat with some binder and seasoning is boiled and lightly grilled and is sold frozen here in the U.S.) with a hole in the center shaped like a bamboo. Cut diagonally in the center (in the picture above it is shown in the center of the pot above the Daikon.  In the picture below it is shown on the lower right).

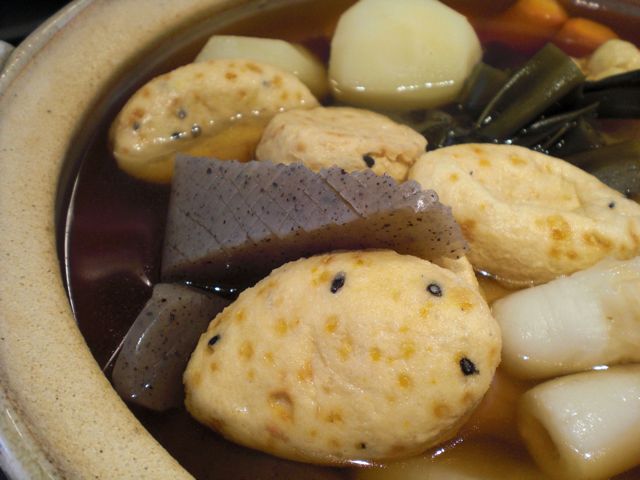
Ganmodoki がんもどき: Deep fried oval patty made of tofu, egg white, black sesame seeds and other shredded vegetables (tan oval item with black specs -sesame seeds- in the picture below). Often, this is shortened as "ganmo".

Mochi in fried tofu pouch or mochi kinchaku 餅巾着
: "Kinchaku" is a transitional Japanese purse. If you stuff anything in a tofu pouch or "Abura-age" 油揚げ, it is called "Kinchaku". Mochi 餅 is a rice cake made of pounded cooked rice.  I cut one end of a small rectangular abura-age and place mochi inside and close the pouch with tooth picks (This pouch is shown between the eggs and kelp in the picture above). This is the same type of preparation I do for the new year soup. (If you are an oden officinado, you would order this item using its short form name "mochikin"). After 5-10 minutes, the mochi will become soft and sticky but contained in the tofu pouch it is easier to eat. (They are seen in the picture above between eggs and kelp.)

Tied kelp 結び昆布: I happend to find this kelp preparation in a bag (cut in small size, tied in knots, steamed and dried) called "Musubi Konbu" or tied kelp at a Japanse grocery store. I put them in the pot after hydrating for 15 minutes. It does not taste that good and disintegrated after some time so this is the first and will be the last time I use this.

In the above picture, the dark triangles are konnyuku, tan oval ones with black specks (sesame seeds) are ganmodoki and tubes on the right are chikuwa. In the back, you see potato, kelp,  and carrot.
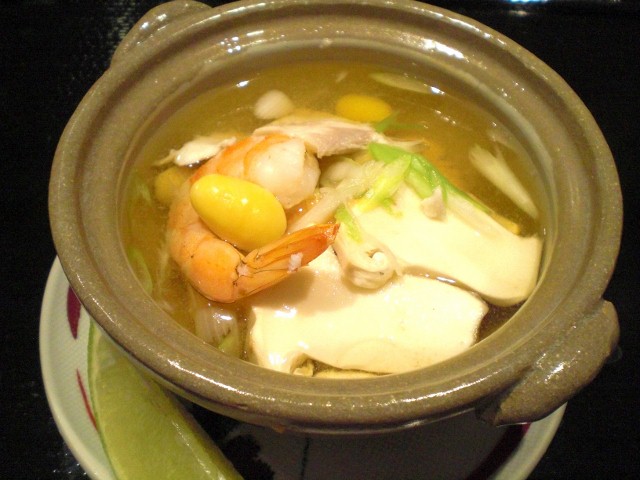
Just 10 minutes before serving, I add large cubes of tofu. Tofu should just be warmed through.  As seen in the above picture, I garnish the tofu with chopped chives (or scallion). the daikon here is very soft and you can cut it with just chopsticks. The yellow stuff at the far right corner is Japanse mustard which is very hot but a necessary condiment for oden.

Eggs are wonderful especially the egg yolks mixed into some of the broth and mustard. In the above picture, on the right is "mochi kinchaku", which is cut and showing the mochi inside. Between the eggs is chikuwa and the center front is potato.

This is a perfect dish for cold winter days with sake. Warmed sake is the classic accompaniment but we like cold sake even with oden. Depending on what you like, you could use many other items in oden such as tough sinewy parts of beef, "Gyu-suji" 牛筋 cooked for long time, octopus leg "Tako" 鮹 (these are Kansai 関西 or West of Japan items), thick Japanese omelets with crab meat ("Kanitama" かに玉), many other types of fishcakes especailly white soft square ones called "Hanpen" はんぺん, and satsuma-age 薩摩揚げ. A bit unusual are "tara no shirako" タラの白子, which is the sperm sac of cod fish (It does not sound appetizing but it does taste very good), a Japanese style stuffed cabbage ロールキャベツ, a type of small conch or sea snail called "Tsubu" つぶ and so on. We really like oden but only problem for us is that there are so many goodies in one pot and it fill us up too quickly.

Saturday, November 27, 2010

Nabemono 鍋物

Nabe 鍋 means "pot". Nabemono is an all inclusive term of any hot pot dish but often the dish itself is called "nabe". Any dish you cook (usually on the table) in a pot (most often earthenware) with broth is called "nabe" or "nabemono". Sukiyaki  すき焼き, shabu-shabu しゃぶしゃぶ and oden おでん may be considered types of nabe in a broad sense but I do not think it is appropriate to include them in "nabemono". Depending on the ingredients and seasoning of the broth, you have many variations and many names of "nabe". Whatever the name, in cold winter days, nabemono is one of the most comforting  and warming dishes. The types of broth seasonings could be;

1) Dashi without seasoning; When your broth is not seasoned, you use a dipping sauce such as ponzu. Tarachirinabe タラちり鍋. Mizutaki 鶏の水炊き, and Yudoufu 湯豆腐 are three such examples.
2) Dashi and soy sauce based; Yosebabe 寄せ鍋 is the best example.
3) Dashi and miso based; Chankonabe  ちゃんこ鍋, Ishikarinabe 石狩鍋, and Dotenabe 土手鍋 are three such examples.

Since other ingredients will impart lots of flavor to the broth, the starting broth is usually a simple kelp broth. In terms of the ingredients, you could limit them to only a few items (like yudoufu in which only tofu or tofu and nappa cabbage are usually used) or you could add anything including sea food, meat, vegetables, tofu, fish cake and more, as is done in chankonabe and yosenabe. There are no rules (although there are some guide lines). The name of the nabe changes based on the ingredients, locality, and types of broth.
Here is one example I made one evening in a small one person pot. I am not sure what I should call this. A type of yosenabe but I used mostly vegetables and at the very end decided to add shrimp. I first made dashi from kelp and a "dashi pack". This is like a tea bag but instead of tea, combination of pulverized bonito flakes, dried fish and kelp (there are several different kinds) are placed in the bag. It is much better than granulated instant dashi but still very convenient. I seasoned the broth with mirin, sake and soy sauce (to taste, since I did not measure). I started with the ingredients which take the longest time to cook. In my case, I added daikon (halved and thinly sliced) and carrot (sliced a bit thicker than the daikon) first, then after 10 minutes or so, I added the white part of Nappa cabbage or Hakusai 白菜, tofu 豆腐, followed by (after 5 minutes) maitake mushroom 舞茸, green parts of Nappa, scallion, and finally shrimp.

The ingredients I could have added include fish (usually a white meat, hardy fish such as cod), chicken (cut up thigh meat), fish cakes, and shell fish. As a condiment, I used seven flavored Japanese red pepper powder 七味唐辛子. To finish the meal, I could have added cooked rice to make porridge, or noodles such as udon noodles but I was too full just eating the items I cooked. Traditionally, warm sake is the choice of drink but we like cold sake even in winter and with nabe.

Sunday, August 26, 2012

Salt "koji" pickles 塩麹の浅漬け

I was told that “Shio-koji” 塩麹 is “all the rage” in Japan. Although preserving or marinating vegetables and fish in salt and “koji” is a very old technique, it appears to have made a big come back. I resisted jumping onto the band wagon, until I succumbed at the first sighting of a package of dried koji at the local Japanese grocery store.

Digression alert: Before fermentation can happen, complex carbohydrates or starch have to be converted to fermentable sugars. All cultures somehow figured this out to make alcohol. The most primitive form is to chew cooked grains and spit the masticated starch out into a vessel. Diastase in saliva will convert starch into sugar and fermentation can produce a primitive “jungle” beer.  For true beer making, enzymes formed during sprouting of barley (malting) is used to convert starch in the barley and other grains to sugar (“mash). The Japanese/Chinese figured out that certain mold (yes, “mold” called Aspergillus oryzae, which produce several enzymes including amylase) can convert the starch of cooked rice into fermentable sugar. Many Japanese food items are based on “Koji” to produce; sake 酒, chochu 焼酎, miso 味噌, and shouyu 醤油 (soy sauce).  But koji or cooked rice inoculated with this mold by itself can be used in different dishes. If this was used in pickling or “tsukemono” the vegetables, sugar will mostly ferment into acid (lactic acid by lactobacillus) rather than alcohol. Thus, it imparts sweet (sugar), sour (from lactic acid) and salty (from added slat) and additional “je ne sais quoi”  components from whatever develops during fermentation.When I was growing up in Hokkaido, there was a fermented and preserved condiment/side dish called “Nishin-zuke” 鰊漬け or Herring pickles (picture below) and my mother used to make it. Essentially, vegetable and filets of dried herrings were mixed with “koji” and salt and left to ferment for several months in a cold place (there were many “cold” places in winter in Hokkaido houses).

nishinzuke
In recent years, “koji” is making a big come back especially as “shio-koji” in Japan as a magical marinade and meat tenderizer. Since I found dried “koji” in the near-by Japanese grocery store, I decided to prepare “shio koji”. After making “shio koji”, this is the first dish I made.

I used daikon cut into quarter circle (1/4 inch thick), cucumber (1/2 inch thick), radish (a kind called “French breakfast” which is small, elongated and a bit sweeter than regular radish with red and white color, cut into thin slices). The amount was totally arbitrary but I weighed the entire amount of the vegetables, and it was about 500 grams. The reason I weighed the vegetables was because the recipe calls for 10% of shiokoji to the weight of the vegetables. I just wanted to get the feel for what constituted 10%  of the weight. I mixed and kneaded the vegetable and shiokoji. The recipe said just massage the vegetables with shiokoji in a Ziploc bag and leave it in a refrigerator for half a day but I decided to use a “Tsukemono” pot with a plunger to apply pressure and left it overnight in the refrigerator until ‘water” came out and submerged the vegetables (or “mizu ga agaru” 水が上がる meaning the water is up).
You could see the fragments of rice kernels from the shiokoji attached to the pieces of vegetables. This is good but we did not think it was all that different from simply salted asazuke 浅漬け. This version adds a slight sweetness and some complexity to the taste. The addition of thinly cut kelp, red pepper, ginger to the simple salted version also can give a different kind of complex flavors to the asazuke. If you already prepared shiokoji, this is a good use for it but I would not make this dish with shiokoji just for the sake of making it.

Shiokoji preparation: I bought pre-made and dried koji and simply followed the instructions that came with the product. As I said you could get the koji mold ( from a home brewing place) and make koji from scratch. In Japan, I was told that a ready made shiokoji is readily available in a jar but I have not seen it sold here in our area. Here, I bought premade and dried koji (#1). I added the amount of water and salt as per the instruction which came with this (#2).
After a few hours, the dried koji absorbed the water and swelled up (#3). I left this container with a lid lightly sealed (with some gap to let the gas escape) on the kitchen counter (room temperature) for 9 days mixing it once a day (#4). It developed some viscosity with a faint slightly sweet smell and the rice kernels got soft and could be crumbled between finger tips easily (#4). I pronounced this “done”, put the lid on tightly and moved it to the refrigerator. According to the instruction sheet, this final product will last at least 6 months in the refrigerator. I suspect you will be seeing this in future preparations.

Saturday, May 6, 2017

Chicken and pork miso sauces 肉味噌2種類

Nikumiso 肉味噌 is a rather common Japanese condiment meaning "meat and miso". It is used to top simmered daikon or furofuki daikon 風呂吹き大根 or warn cubes of tofu. I had leftover barbecued pork and chicken and decided to make two different kinds of miku-miso; one was spicy with Jalapeno pepper (left) and the other with Yuzu ginger flavor.


I topped simmered daikon (cooked in water with a pinch of raw rice to 20 minutes and then simmered with water and a piece of kelp for another 30 minutes) with a side of broccolini (we can not get "nanohana" in the US).  This version was made with white miso and chicken and had a gentle Yuzu citrus and ginger flavor.


The second one is much more assertive with red miso and pork and spiced with Jalapeno pepper, garlic and Sriracha hot sauce.


Niku-miso is usually made of uncooked ground meat but I used cooked pork and chicken since this was leftover control.

Ingredients:

Niki-miso with white miso and chicken:
Barbecued chicken breast, finely chopped, 1/2 cup
White miso, 2 tbs
Sugar, 1tbs
Mirin, 1 tbs
Sake, 2 tbs
Grated ginger, 1/2 tsp
Sesame oil, 1 tsp
Yuzu skin, frozen, 1/4 tsp (or orange or lemon zest)

Niku-miso with red miso and pork:
Barbecued pork, finely chopped, 1/2 cup
Red miso, 2tbs
Sugar 2 tbs
Mirin 1 tbs
Sake 2 tbs
Garlic, 2 cloves, either pressed or finely chopped
Sesame oil, 1tsp
Jalapeno pepper, 1, seeded and veined, finely chopped
Sriracha hot sauce, to taste

Directions:

Both are made similarly. Combine all the ingredients (except for Yuzu skin in the chicken version) in a small sauce pan and mix and stir until the mixture develops the consistency of miso. Add sesame oil and mix. For the one with chicken, take the pan off the heat and the add  theYuzu skin.

The white miso one was very gentle with nice ginger Yuzu flavor. The red miso one was much stronger and I made this a bit too spicy (especially for my wife). She mixed in yogurt which calmed the spiciness down. Both sauces went well with simmered daikon.

Wednesday, September 29, 2010

Matasutake "Dobin-mushi" style clear soup 松茸の土瓶蒸し風

This is a classic dish utilizing matsutake 松茸. It is a type of clear soup but you enjoy the broth and the items in the broth separately. This dish is made in a special "dobin" 土瓶 container (a type of rustic teapot) with a small sake cup or guinomi ぐい飲み so that the exquisite broth can be poured into the cup and enjoyed. Then diving into the pot, the matsutake and other ingredients can be savored. Since I do not own a "dobin", I served this in a mini-donabe. In the classic method, after putting the ingriedents and broth in the dobin, it is steamed ("mushi" means "to steam") but I made everything in a sauce pan. I served this with a porcelain spoon ちりれんげ and a small guinomi sake cup so that we could enjoy the broth and the matsutake and other items separately.
Matsutake: I chose two rather small matustake for two servings. I cleaned and then sliced it thinly without separating the head and the stem.

Broth: For this dish, I think you have to make the dashi from scratch. I made a classic ichiban dashi 一番だし with kelp and bonito flakes. I seasoned it with light colored soy sauce, sake, mirin and salt. I did not want a very strong seasoning here. The main ingredient is matsutake--you have to let it speak for itself. When matsutake is cooked with other ingredients in the borth, it becomes much more complex albeit still very subtle.

Other items: Many cooks use chicken meat for this dish but I do not. Chicken is too strong even breast meat. Instead I used thinly sliced pieces of fluke (a type of flounder or other white meat fish without a strong flavor), boiled ginko nuts or "ginnan" 銀杏 (from a can in my case), small shrimp (frozen) and thinly sliced scallion. In a gently simmering seasoned broth, I placed the fish first, shrimp, ginnan and matsutake and gently cooked (or warmed through) for a few minutes. I then put sliced scallion (More traditional condiment will be "mitsuba" 三つ葉 but I did not have it.) If available, a Japanese citrus called "kabosu" カボス, which is very similar to "yuzu" 柚子 is traditionally used. Since I do not have easy access to those, I served it with a wedge of lime. Just before eating, I squeezed the lime juice over the dish. The way to enjoy this dish is to sip the broth and then have some mushroom etc. (Did I say etc? I was told nobody uses "et cetra" any longer. My wife told me etc. means "entire thought collapse"). This was a reasonable approximation of the classic dish. You definitely need cold sake for this delicate dish.