Thursday, March 28, 2024

St. Patrick’s Day Dinner, Lamb Chops and Cabbage with Bacon セイント パトリクス デイ

While taking inventory of the deep depths of the freezer, my wife came upon 2 thick cut lamb chops; perfect for St. Patrick’s day dinner.  So we cooked the lamb chops and served them with a side of cabbage and bacon as well as rice pilaf (#1). For a change, I managed to cook the lamb to near perfect medium rare. After seasoning with salt and pepper, I seared the chops without any oil on both sides and finished them in a 350F oven. After 5 minutes I started measuring the temperature at the center of the chops. Around 10 minutes, it reached 135F.


We also made cabbage, onion with bacon.


We just cooked this without any particular recipe.

Ingredients:
4 cabbage leaves, center thick veins removed and cut into 1/2 inch squares
1 medium onion, sliced
3 strips of bacon
3 tbs chicken broth or water
Salt and pepper to taste

Directions:
Fry the bacon strips until crispy and set aside on a paper towel lined plate leaving the bacon dripping in the pan
Sauté the onion until well cooked and brown
Add the cabbage and mix
Add water or chicken broth, place the lid and steam until liquid almost all gone
Add the crumbled bacon and season with salt and pepper to taste

This was a great somewhat traditional way to celebrate St. Paddy’s day. Even though it was completely spontaneous and not planned, things don’t get better than this. Next stop the spring equinox.

Monday, March 25, 2024

Mary Walsh's Currant Cake マリイウオルシュのカラントケーキ

We like food themed travel shows. One of which was by Phil Rosenthal. It started as a PBS show “I’ll Have What Phil is Having” which evolved into a Netflix show called “Somebody feed Phil”. Although we had forgotten about it, turns out we had a copy of “Somebody feed Phil The book”. We rediscovered it while looking for another cookbook on the book shelf. It is an interesting read of behind-the-scene stories of the first 4 seasons but it also contains recipes provided by the local chefs they visited during the show. Among those recipes, was one titled “Mary Walsh’s Currant Cake”. Since St. Patrick's day was coming up and the current cake was basically an Irish soda bread my wife decided to make it. According to the book, although it was called current cake one of the secrets of why it tasted so good was that Mary didn’t use currents. She used sultanas (golden raisins) instead. Maybe she used sultanas because she didn’t have any currents. We, of course, didn’t have any currants either (we also didn’t have any sultanas). So my wife used raisons and dried fruit medley from Harry and David. (So really we should probably call our version dried fruit medley cake). As the queen of ingredient substitution in recipes my wife did not stop there. The recipe called for orange and lemon zests but we did not have any oranges. We did, however, have some Meyer lemons which have a flavor that is a cross between a lemon and an orange. So she used that instead and it worked well.

You can see the dried fruit medley and raisins on the cut-surface (picture #1)


Ingredients:
2 ounces (½ stick/55g) unsalted butter (room temperature), plus more for the pan
3¼ cups (450g) all-purpose flour, plus more for dusting
2 tablespoons (25g) castor or light or dark brown sugar
½ teaspoon baking soda
½ teaspoon kosher salt
Zest of 2 Meyer lemons
1 cup dried fruit medley
1 cup of raisins
1 large egg
1¼ cups (300ml) buttermilk
2 tablespoons (30ml) heavy whipping cream
1 tablespoon brown sugar

Directions:
Preheat the oven to 425°F (220°C) and place a baking rack in the lower third of the oven.
Lightly butter an 8-inch round cake pan. In a large bowl, mix the flour, brown sugar, baking soda, and salt together. Use your fingers to rub the butter into the dry ingredients. Use a citrus peeler to zest the Meyer lemons. Add all the zest and the dried fruit to the bowl with the flour mixture and stir until well combined.

Put the egg in a medium bowl and whisk in the buttermilk and cream. Set aside 2 tablespoons of the buttermilk mixture.

Make a well in the center of the dry ingredients and pour in the remaining buttermilk, stirring to make a very moist, shaggy dough. Or, use your hands: grip the edge of the bowl with one hand, stir with a broad circular motion with the other. Turn the dough out onto a well-floured work surface and dust your hands lightly with flour. Gently shape the dough into a thick, roughly 6-inch (15cm) round and use a bench scraper or large spatula to transfer the dough to the center of the cake pan.

Brush the top and sides of the dough with the reserved buttermilk mixture and sprinkle the remaining brown sugar on top (#2). Put the cake pan in the oven, reduce the temperature to 400°F (180°C).


Bake for about 40 minutes until the bread is lightly golden brown on top and sounds hollow when tapped (#3). Transfer the bread to a wire rack and let cool for about 20 minutes. Cut the bread into thick slices and serve it warm with butter.


This is a very nice soda bread. Perfect for Saint Patrick’s day. It had a dense moist texture and a mild slightly sweet taste. The robust flavor of the butter milk as well as the citrus note from the Meyer lemon zest came through nicely. The dried fruit added a nice burst of sweetness.

Friday, March 22, 2024

Duck Tender Cutlet and Arancini 鴨ささみのカツレツ

Looking ahead to the up coming Easter dinner my wife ordered a bone-in forequarter lamb roast from D’Artagnan.  She also ordered lamb tenderloins (which we’ve had before) and something we have never had before but which she wanted to try; duck tenders. They came as a fairly large quantity frozen in a single package (picture #4). I was intrigued by a french recipe which I saw in D’Artagnan website entitled “Yakitori de canard” 鴨ささみの焼き鳥. It was in french and although I did not look at it my wife assured me she could probably translate it if I wanted to try it. Nonetheless I can easily imagine this would be made exactly like chicken tender yakitori. (Hence no translation necessary.) But that is beside the point because I also wanted to make “arancini” for this meal. So it was “cutlet de canard” on the menu instead. In the picture #1, the top are arancini cut in half showing melted mozzarella cheese and the bottom shows the duck tender cutlet.


The duck tender is dark meat as opposed to chicken tender (picture #2) and has much more flavor.


The arancini was made of leftover shiitake mushroom risotto.


There is nothing special about making duck tender cutlet. After semi-thawing this is the amount we had (picture #4). They were frozen in a big one mass. I had to separate each tenders and vacuum packed 5-6 tenders per bag. I left one package for immediate consumption. Initially I was thinking of marinating the tenders before cooking but taking my wife’s suggestion that since we have never had them before we should taste them as is without any flavoring that might mask the original flavor. I opted to just lightly salt and pepper then breading them and cooking them the same as any other type of cutlet.


I was afraid of the duck tender to become dry after cooking but that was not the case and had much more flavor than chicken tender. I will definitely try to make “Yakitori de canard” next.

Wednesday, March 13, 2024

“Roman” Gnocchi ローマンニョキ

We like gnocchi and every time we cook chicken or pork on the Weber grill, we also cook potatoes and my wife often makes gnocchi from any potatoes left over. She cooks the gnocchi and then freezes them. To serve we heat them up in the toaster oven. Recently, she saw a recipe for “Roman” gnocchi on the Washington post web site and decided she had to make it. This gnocchi is not made with potato but, instead, semolina flour. Also, instead of boiling and then pan frying it is baked (or more accurately oven fried in melted butter). We served this one evening as a part of multiple small “otoshi” snacks. It has nice crust with soft inside with buttery flavor quite different from traditional gnocchi.


The original recipe came from Washington Post.

Ingredients:
8 tablespoons (1 stick) unsalted butter, cut into small pieces and divided, plus more for greasing the dish
4 cups whole milk
1/4 teaspoon fine salt, plus more to taste
1 1/2 cups (9 ounces) semolina, preferably coarse
2 large egg yolks
3 ounces pecorino Romano cheese, finely grated and divided (1 1/2 lightly packed cups) (She used parmegiano reggiano
Freshly ground black pepper

Although I made the gnocchi according to the original recipe these are the changes I would make to the original recipe if I made it again. I would halve the recipe. I would significantly reduce the butter because under the original recipe the gnocchi was swimming in butter when it came out of the oven. I would cook the semolina in the milk slightly differently as described below.

Ingredients: (1/2 recipe)
2 tablespoons unsalted butter, cut into small pieces and divided, plus more for greasing the dish
2 cups whole milk
1/8 teaspoon fine salt, plus more to taste
3/4 cups semolina, preferably coarse
1 large egg yolks
3/4 cup ounces finely grated cheese finely grated and divided (1 1/2 lightly packed cups)
Freshly ground black pepper

Directions:
Position a rack in the middle of the oven and preheat to 400 degrees.
Use a little butter to grease a 9-by-13-inch baking dish (if using the original recipe, the smaller baking dish if using the changed recipe).

In a medium saucepan over medium-high heat, combine the milk and salt. Stirring and scraping the bottom of the pot with a rubber spatula to prevent scorching, bring to a simmer and reduce the heat to medium-low to prevent a boil-over.

Then sprinkle in the semolina, stirring constantly as you do. Cook, stirring, until the mixture is so thick that the spatula can stand in the middle without falling over, 2 to 3 minutes. (Although this is what the recipe suggests when I did it the semolina hit the hot liquid and immediately formed lumps. So in the future I suggest adding the semolina to the cool liquid and then gently heating it up. This way the semolina can be evenly distributed in the liquid before it starts to firm up when heated.)

Let cool for a few minutes, then add half of the butter (4 tablespoons) and 1/2 cup of the cheese, stirring until the butter and cheese melt and the mixture is thoroughly combined. Add the egg yolks, one at a time, and stir until incorporated. The mixture should be the texture of thick mashed potatoes.

Scrape the semolina mixture onto a large sheet pan and use wet hands, a damp knife or offset spatula to spread it out evenly, and pat the top to smooth it. (It should be about 1/2 inch thick, but it’s okay if it’s a little thicker.) Let cool to room temperature, about 5 minutes.

Fill a small bowl with water. Dip a two-inch cookie cutter, biscuit cutter or drinking glass in the water and use it to stamp out rounds, re- dipping frequently, or use a knife to cut it into two-inch squares. If cutting into rounds, mush together and spread out the scraps again and keep cutting, repeating until all of the mixture is used.

Arrange the pieces in overlapping rows, like shingles, in the buttered baking dish (#2). Sprinkle them with the remaining cheese, and top with the remaining pieces of butter.

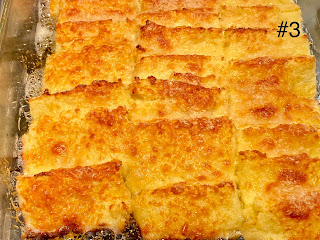
Bake for 15 to 20 minutes, or until the cheese is browned in spots (#3). Grind a generous amount of pepper on top and serve warm.


This is very different from the gnocchi made with potatoes but it tasted pretty good and has real potential with a few changes. The outside was crispy and the inside soft. It had a pleasing mild flavor of the cheese. It may not be good for you since it has lots of cheese, egg yolks and then oven fried in melted butter. My wife thinks she could cut down on the butter next time. Although the gnocchi was litterly swimming in butter when it came out of the oven the melted butter in the baking dish was completely absorbed as it cooled.

Sunday, March 10, 2024

Lobster Salad ロブスターサラダ

For the Valentine’s day dinner, we had “Surf-and-Turf” from what we had in the freezer; the meat from a package of several frozen lobster tails (we do not know where we bought them) and frozen filet mignon (from Omaha steak). I initially, thought the lobster tails which were out of the shell were raw and was going to sous vide both the lobster and the steaks. But once we thawed them, it became obvious that the package contained cooked lobster tails and several cooked pieces of claw meat. So the only thing I had to sous vide were the steaks which I then seared and covered with a port wine sauce I made. I sauteed the lobster in butter with fresh tarragon from the inside garden we have at the window and lemon juice. Both the steak and lobster were quite good. Nonetheless there was quite a good amount of lobster left over; about 4 tails and several pieces of claw meat. So, the next evening, I made this lobster salad. This was remarkably good despite the fact the ingredients were pre-cooked, frozen, thawed and cooked again. We added arugula from the window garden and skinned Campari tomatos.


Ingredients:
Cooked lobster tails (about 4) and several pieces of lobster claw meat.
1 tbs unsalted butter 
2 tsp lemon juice

1 Campari tomato, skinned and halved (optional)
Arugula (from the window garden, optional)

Dressing:
1 stalk of celery, strings removed, finely diced
2 tbs mayonnaise
 lemon juice from 1 lemon (I used Meyer lemon) and lemon zest
One scallion, finely chopped and soaked in water for 5-10 minutes, drained and moisture squeezed out
Salt and pepper to taste

Directions:
Mix the ingredients for dressing and set aside
Melt the butter in a frying pan on medium heat
Sauté the lobster for a few minutes until warmed up
Add the lemon juice and remove from the heat and let it cool down for a few minutes
Dress with the dressing and serve with the tomatos and arugula

The cooked and frozen lobster was not of the best quality but this tasted really good. It was a good decision to sauté  the lobster in butter and add lemon juice. The dressing worked well with nice crunchy celery and lemony flavors.

Thursday, March 7, 2024

Salted Oatmeal Cookie 塩味オートミールクッキー

We are a big fan of savory cookies. My wife came across this recipe for “Salted oatmeal cookies” and decided to make it. It turned out this is not quite “savory” but has a nice contrast of salty and sweet and pretty good.


The recipe came from Washington Post.

Ingredients (made 33 small cookies)
12 tablespoons (1 1/2 sticks/170 grams) unsalted butter, softened
1 cup (220 grams) packed light brown sugar 1/2 cup (100 grams) granulated sugar
1 teaspoon baking powder
1/4 teaspoon baking soda
1/4 teaspoon ground cinnamon
2 large eggs
1 teaspoon vanilla extract
2 cups (180 grams) rolled oats (do not use quick-cooking or instant)
1 3/4 cups (219 grams) all-purpose flour Flaky sea salt, for sprinkling

Directions:
Beat the butter in the bowl of a stand mixer or handheld electric mixer for a few minutes on medium-high speed until light and fluffy. Stop to scrape down the sides of the bowl.

Add the brown and granulated sugars, baking powder, baking soda and cinnamon, beating on medium speed until the mixture is well blended. Reduce the speed to medium-low; add the eggs and vanilla extract, mixing until well incorporated.

Reduce the speed to low; add the oats and flour stopping to scrape down the sides of the bowl as needed and mixing just until incorporated. Cover the bowl and refrigerate the dough for at least 1 hour, until needed.

Position a rack in the middle of the oven and preheat to 375 degrees. Line a large sheet pan with parchment paper.

Form the dough into golf ball-size balls and place about 2 inches apart on the prepared sheet. Sprinkle generously with flaky salt (the second picture).

Bake one sheet at a time for about 15 minutes, or until the cookies are puffed and beginning to turn golden, being careful not to overbake. (The cookies should have a tender interior.) Transfer the cookies, still on the parchment paper, to a wire rack to cool completely.


The contrast between the salt and the sweet are what really make these cookies. The out side is crunchy and the inside is soft. As you can see in the picture the oats retain their shape and provide an additional element of crunch.

Monday, March 4, 2024

Instant Pot BBQ Baby Back Ribs バーベキューベイビーバックリブ

Some time ago, we received an Instant Pot as a Christmas gift from my wife’s sister who recommended BBQ baby back ribs cooked in the pot was one of the best dishes she made. We did not have a chance to make it until now. I also made BBQ sauce. This was very good. The meat just slides off the bone and is tender but not mushy. It is a bit sweet to our taste, though. I served this after I removed the bone (picture#1).


The recipe is an amalgamation from several sources.

Ingredients
1 rack of baby back pork ribs membrane removed

Rub:
2 tbs  brown sugar (I should omit this next time)
1 tsp salt
1 tsp black pepper
1 tsp cumin
1 tsp garlic powder
1 tsp onion powder

Rib Pot:
1 cup Water
1/2 cup rice vinegar vinegar (the usual is to use apple cider vinegar)

1/2 cup BBQ Sauce (recipe below)

Directions:
Combine the Rub ingredients in a small dish. Rub on the front and back of the ribs.
Pour Rib Pot ingredients in the bottom of the Instant pot and then place the trivet in the pot.
Place the ribs inside the pot, standing on their side, wrapping around the inside of the pot.
Choose “Stewed meat” which will set the Instant pot to high pressure and 25 minutes. I turned off “Keep warm”. Release the pressure 10 minutes after  the cooking is completed (or let it depressurize naturally)
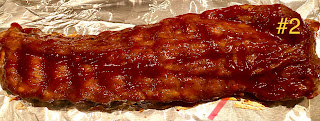
Remove the ribs from the pressure cooker and set on a foil lined baking sheet. Brush with BBQ sauce (picture #2) and set under the broiler until sauce begins to caramelize, about 5 minutes (picture #3).


BBQ Sauce:
Ingredients
1 1/2 cups brown sugar (319.5 grams) packed 1 1/2 cups ketchup (352.5 grams)
1/2 cup apple rice  vinegar (119.29 ml)
1 tablespoon Worcestershire sauce
2 teaspoons paprika
2 teaspoons onion powder 1 teaspoon black pepper
2 teaspoons kosher salt

Directions:
1. Combine all the ingredients in a small sauce pan over medium heat.
2. Bring to a boil. Reduce to a simmer and cook for 15 minutes, stirring occasionally.

The length of the cooking in the Instant pot determine how tender the meat will be. We cooked it for 25 minutes which appears to be just right. It is tender and bone comes out easily but not too mushy. Next time, I will omit the brow sugar form the dry rub and reduce the brown sugar from the BBQ sauce.

Friday, March 1, 2024

“Maitake” Hen of Woods Mushroom in Brown Butter and Sage 焦がしバーターとセージ風味舞茸

We like mushrooms. We used to get fresh mushrooms from Oregon mushrooms (on-line order) and Whole Foods but recently, we have been getting many different kinds of fresh mushrooms from Weee. Besides the usual kinds of mushrooms, we can get from any grocery store, we can get shiitake 椎茸 (Good quality), enoki エノキ, kikurage 木耳 (wood ear), shimeji しめじ, king trumpet, and maitake 舞茸 (hen of woods), and hiratake 平茸  (oyster).We usually get several kinds of mushrooms when we order groceries from them. This time beside the usual shiitake and shimeji, we got maitake. When we had shad roe, I served maitake cooked in brown sage butter as a side which was really great. (My wife may have liked the mushroom more than the shad roe.)


This recipe came from “Foragerchef.com”. The original recipe calls for a large amount of mushrooms. I scaled it down.

Ingredients
One package (35g)  fresh hen of the woods (This was the size of the package I got), separated into a few fronds each in thin, long pieces
2 tbs (or about 40grams) unsalted butter
1 garlic clove finely chopped 
5-6 fresh sage leaves (from our herb garden, I used whole leaves, since they would be easier to remove from the browned butter later)
2 tbs dry white wine (I used sake)
2 tbs chicken stock (our usual Swanson low salt no fat)
1⁄4 teaspoon kosher salt
A few turns of the pepper mill to taste
A squeeze of fresh lemon juice to taste

Directions
In a frying pan with high sides, add the butter and the sage. Heat the butter on medium heat until melted and sizzling and brown bits appear (usual brown butter process). When the butter has reached the desired level of brown, remove the sage leaves. Then add the stock or water, salt, a few turns of fresh pepper from the pepper mill and the mushrooms. Cover with a lid, increase the heat to medium high and cook, stirring occasionally to coat the hens with the pan juices for about 10-15 minutes.

Finishing and serving
Continue cooking the mushrooms until the liquid is gone and there’s only butter. Stir the mushroom to coat with the juices, then taste a piece and adjust the salt as necessary until it tastes good to you.
Cook until the mushrooms have just started to brown lightly on the edges. Turn the heat down a bit. Add the garlic and cook for a minute or two more. Add the wine and the squeeze of lemon, simmer for a minute to cook off the alcohol.

This maitake is very good with sage and brown butter and garlic flavors are nice with the almost meaty texture and flavor of the mushroom.