Showing posts with label Baked. Show all posts

Saturday, April 2, 2022

Firefly squid grilled in miso-scallion sauce ホタルイカのネギみそ焼き

 One of the delicacies of Spring in Japan is firefly squid or “hotaru-ika” ホタルイカ.  Like last year, we got boiled firefly squid from Regalis Food. Since I started seeing “Hotaru-ika” in the Japanese food blogs I follow, I checked the Regalis site but they were not available yet so I asked to be notified when they came in. A few days later, I got an email saying firefly squid was available. I looked for something else to purchase from their site but nothing drew my attention so I decided to fill out the order with two packages of the squid. A major part of the preparation of this squid is removing the stone hard eyes and beak before serving/cooking. (It is more difficult to remove the beak than the eyes. Unfortunately I was not completely successful in beak-removal on some of the squid as my wife so kindly pointed out to me after crunching down on several of the ones I accidentally left behind). I served the firefly squid with “sumiso” 酢味噌 with “wakame” 若芽 seaweed twice which is the most common and basic way to enjoy this. For some reason, this year’s firefly squid tasted better than the ones we got last year. Since this is such a simple way of serving the squid the quality really makes a difference. I then proceeded with other preparations to serve.

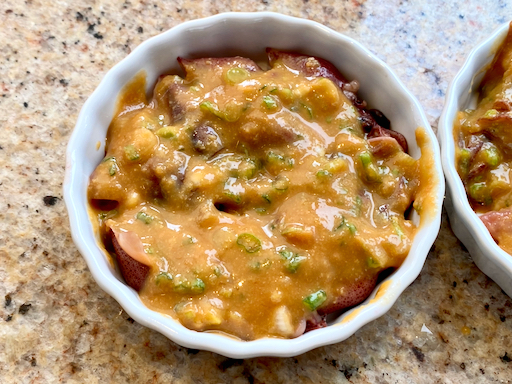
One of those new preparations is shown below;  “firefly squid grilled in miso scallion sauce”. This is a perfect drinking snack and went so well with the cold sake we were having. 

The recipe came from e-recipe (in Japanese).

Ingredient: (for two small servings)
Firefly squid, about 20, both eyes and beak removed.

For sauce:
Scallion, finely chopped, about 2 tbs
Miso 1tbs
Japanese “dashi” broth 1tbs
Sugar 1-2 tsp
Soy sauce and white sesame (small amount, optional)

Directions:
Mix the all ingredients for the sauce (taste and adjust the amount of sugar and broth).
Place the firefly squid in a single layer in a oven-proof ramekin (picture below).


Cover the squid with the miso sauce (picture below).


Cook in the toaster oven until the surface becomes brown (6-7 minutes in toast mode). If needed, broil the surface for additional browning. Serve immediately.


Since grilled miso by itself is great with sake, this combination with firefly squid makes this dish perfect. 

Tuesday, March 29, 2022

Shepherd's pie

It was St. Patricks day so what would be the best way to celebrate? My wife suggested that at the very least a shepherd's pie should be involved. Since St. Patricks day fell on a weekday, we made this shepherd's pie on the following weekend. I theoretically knew what shepherd’s pie was but I had never made it and I do not think I ever even tasted one. In any case, here is a Shepherd's pie made from ground lamb in small individual ramekins topped with cheddar cheese.  This one really tasted lamb-y/mutton-y with nice mashed potatoes on top. So to continue, shouldn’t a traditional Irish meal include some cabbage?  My contribution was a Japanese-style cabbage dish. (This is a simple home style dish my mother used to make. I realized I never posted it. Therefore, subject for future post).  This Irish celebration was rounded out with the addition of a slice of Irish soda bread my wife made recently. 


Ingredients: (from Washington Post, for 4 servings which made 8 small ramekins, see below #1)
1 tablespoon canola oil
1 pound ground lamb
1/2 teaspoon table salt
Freshly ground black pepper
1 medium onion, chopped (about 3/4 cup)
1 large carrot, peeled and diced (I chopped it in fairly small dice)
1 teaspoon minced thyme (I used dried thyme since we did not have fresh one)
1 tablespoon flour
1 1/2 cups low-sodium beef broth (I used chicken broth)
2 tablespoons minced flat-leaf parsley (Our parsley in the fridge was too old and we did not have dried one, so we skipped this altogether).

--The potato topping was my wife's territory---
2 russet potatoes
4 tablespoon unsalted butter
4 tablespoons onion & chive cream cheese
1 cup cheeses, grated (optional) (we used cheddar and smoked gouda).

Directions:
Position a rack in the middle of the oven and preheat to 425 degrees.

In a large skillet over medium heat, warm the oil until shimmering. Add the lamb and cook, stirring occasionally, for 5 to 7 minutes or until browned. Season with 1/4 teaspoon salt and pepper to taste. With a slotted spoon, transfer the meat to a medium bowl. Drain all but 1 tablespoon of fat from the pan. Stir in the onion and cook for 3 to 5 minutes, or until soft but not browned. Add the carrot and thyme. Cook, stirring occasionally, for 2 to 3 minutes. Add the flour and cook, stirring constantly, for 1 to 2 minutes. Gradually add the broth, increase the heat to medium-high and bring to a boil, stirring.

Return the meat to the pan, reduce the heat to medium-low and cook, uncovered, stirring occasionally, for 10 to 15, or until the lamb is cooked through and the sauce has slightly thickened. Stir in the parsley and adjust the seasonings to taste.

Meanwhile, for the potatoes: Cook in the microwave with skin on for about 10 minutes (5 minutes turn and another 5 minutes) until a screwer goes in easily. Peel and put in a bowl. Add the butter, cream cheese, salt and stir until smooth.

Using a large spoon, transfer the meat mixture to a medium casserole dish or 4 ovenproof 8-ounce ramekins (As you can see below, we used small ramekins which made total of 8 servings, #1). If there is any sauce left in the skillet, add it to the casserole or divide it among the individual ramekins. Drop spoonful of the mashed potatoes on top, then spread the potatoes across the meat mixture, forming peaks, and to the edges of the dish(es) (#2). Add the cheese (#3). Bake at 450 for 20 minutes (#4).


This was a great meal of Irish dishes (with a slight Japanese twist on the cabbage dish). The lamb/mutton taste was very pronounced (read: STRONG). My wife really likes lamb and thought it was great but it was a bit too strong for me. We think with this celebration we adequately honored St. Patty and his day. 


Monday, March 7, 2022

Mini Lasagna cups ミニロザニアカップ

One day, all of a sudden, my wife asked if we still have wonton or gyoza skins. I said we had leftover gyoza skins frozen. I was not sure why she was asking this. I found out that she saw a recipe for “mini-lasagna cups” which uses wonton skins as the pasta. This is a good dish to make since I have been reheating my marinara sauce once a week for several weeks now to make it last. It was time to use it up. In any case, the picture below shows the mini-lasagna cups she made. They are perfect for a lunch or appetizer. The combination of flavors is very nice.


You can see the layers in the picture below; layers of ricotta cheese and spinach and alternating layers of marinara sauce (actually one time when I reheated it I put in chopped up cooked chicken) separated by the wonton skins. She ran out of the wonton skins and some of the lasagna cups ended up having a layer of Pennsylvania Dutch noodles instead. (Because she had those and hey, they are a form of pasta).
 

I am not sure where she saw this recipe but I’ll ask my wife to take over. (Note from wifey: I found the recipe in the Washington Post and as usual treated it as just advisory.)

Ingredients:
1 cup cooked spinach
1 cup ricotta cheese
1/2 tsp. salt
2 cups shredded cheese (I used a combination of dry mozzarella, smoked gouda and cheddar.)
1 1/2 cups husbandito’s marinara sauce
36 wonton skins (3 per 12 muffin cup tin)

Directions:
Mix the spinach, ricotta cheese and salt together. Put half of it in a separate bowl and stir in 1/2 of the shredded cheese. Fit a wonton skin into the bottom of a 12 cup muffin tin. (I used muffin papers to make it easier to get the finished product out but it turned out they weren’t necessary.) Evenly divide the ricotta spinach blend into each cup (#1). Fit another wonton skin on top. Spoon the marinara sauce on top (#2). Cover with another wonton skin. (Note that at this point I ran out of wonton skins so I used cooked pasta as shown in the left side of #3) Evenly divide the ricotta shredded cheese on top (#4). Top the mixture with remaining marinara sauce and grated cheese (#5). Cook in a 375 degree oven for 12 to 15 minutes until cheese on the top is melted, browned and bubbling (#6). 

These were a bit tedious to put together but they were worth it. They had all the satisfying complex flavor of a full lasagne with all the elegance of a single portion. They made a perfect lunch with a salad or a small bowl of soup. 

Tuesday, February 22, 2022

Crumpet Version 4  クランペット 第4弾

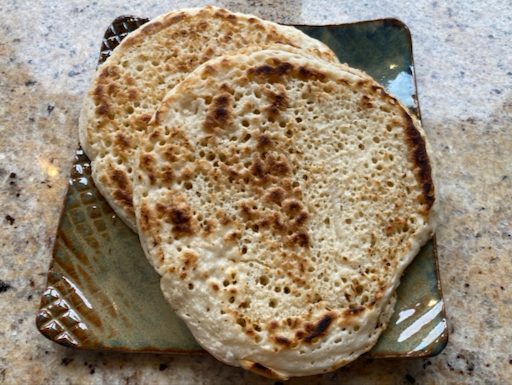
This is the 4th version of crumpet we (my wife) made. She essentially combined V2 ingredients with  V3 cooking method. She got much better at regulating the flame and made really good crumpets. Compared to thin and small crumpets (V2), V4 has nice crunchy crust but much softer inside. We liked V2 flavors and liked cooking method of V3 (using an 8 inch frying pan). So, this is culmination of all the good aspects of crumpets we made.


Ingredients:
(makes 7, 8 inch crumpets)
2 cups AP flour
1 cup plus 2 Tbs. cake flour
600 ml. warm water
1 1/2 tsp. Salt
2 tsp. Sugar
3 tsp. Baking powder (The recipe said baking soda doesn’t work as well)
3 tsp yeast
3 tbs. warm water

Directions
Bloom the yeast in the warm water. Put the flour, water and salt in the bowl of an electric mixer and beat on speed 5 for 1 minute until smooth paste forms. Add the yeast mixture, sugar and baking powder and mix on speed 5 for another 30 seconds. Cover with cling wrap and put in a warm place for 15 to 30 minutes. The surface should get foamy but it will only increase in volume by 10 to 15 % (#1 picture below). 

The whole secret of getting the little holes in the crumpets is in the cooking. (They need a burst of heat at the beginning of the cooking process for the water in the batter to form steam bubbles which create little holes when they burst on the surface of the cooking batter.)  Put 1 tsp. butter in an 8 inch skillet and heat on low for at least 5 minutes.  Increase heat to medium and heat skillet for an additional 1 minute.  Increase the heat to high and immediately pour enough batter into the skillet to cover the bottom. (This will give the batter a burst of heat to start the bubbles forming.) After the batter is in the pan quickly reduce the heat to medium low and contiue cooking until the edges are risen, set and beginning to dry out (about 4 minutes). Keep checking the bottom to make sure it isn’t burning. Take skillet off the heat. Place a dry flat spatula on top of the crumpet and pull up sharply to remove the excess batter and reveal the underlying holes (#2). Turn the crumpet over (#3). Return to the heat on medium until the edges on the second side are lightly browned. Remove to cooling rack (#4). Wipe any crumbs out of the pan. Add a little more butter. Turn heat to high pour in more batter and repeat cooking process.


As can be seen in the picture 3 the bottom of these crumpets came out nicely lightly browned. These crumpets were really good. They had better flavor than V3 because the batter was cooked in butter, which gave it a browned butter taste. In addition we avoided the last step in V3 of adding additional water. We used the batter straight from the proofing stage. As a result it still made the required bubbles but the lovely yeast flavor came through. The texture of V4 was better than the texture in V2 because of the addition of the cake flour. When toasted the surface was crunchy with a browned butter taste. The interior was soft with a nice yeasty flavor. Slathered with butter that dripped into the many holes that formed in the cooking process this made a really nice breakfast bread. 


Friday, February 18, 2022

Crumpet version 3 クランペット 第三弾

We have made crumpets a few times. The first attempt was basically a failure. They were certainly edible but did not develop the small multiple holes which makes a crumpet a crumpet. The second attempt was a great success.  Using a “platar” resulted in small crumpets which were the right size but the cooking process was kind of tedious. My wife found a recipe in "Cooks Illustrated 2020" using an 8 inch frying pan to make a large crumpet. It is served cut into wedges. So, she tried it. The serving is shown in the picture below liberally slathered in butter; Yum. 


Ingredients
1 cup (5 oz) AP flour
1 cup (4 oz) cake flour
2 tsp. yeast
3/4 tsp baking powder
1/2 tsp salt
1 1/2 cup warm water (1 1/4 into dough before rising, 1/4 into dough after rising)

Directions:
Combine AP flour through salt in an 8 cup measuring cup (the measuring cup makes it easier to pour the batter into the pan). Add 1 1/4 warm water and mix until smooth. Cover and let rise until double (about 40 minutes). The whole secret of getting the little holes in the crumpets is in the cooking. Put oil in an 8 inch skillet and heat on low for at least 5 minutes. Meanwhile add the remaining 1/4 water to the batter and mix until smooth. Increase heat to medium and heat skillet for an additional 1 minute. Using a paper towel wipe the excess oil out of the skillet. Pour 1/3 of the batter into the skillet. Increase the heat to high and cook on high for 45 seconds. Reduce heat to medium low and contiue cooking until the edges are risen, set and beginning to dry out (about 4 minutes). Take skillet off the heat. Place a dry flat spatula on top of the crumpet and pull up sharply to remove the excess batter and reveal the underlying holes. Turn the crumpet over. Return to the heat on high until the edges on the second side are lightly browned. Remove to cooling rack. Immediately add half of the remaining batter to the pan, turn up the heat and repeat the cooking process.

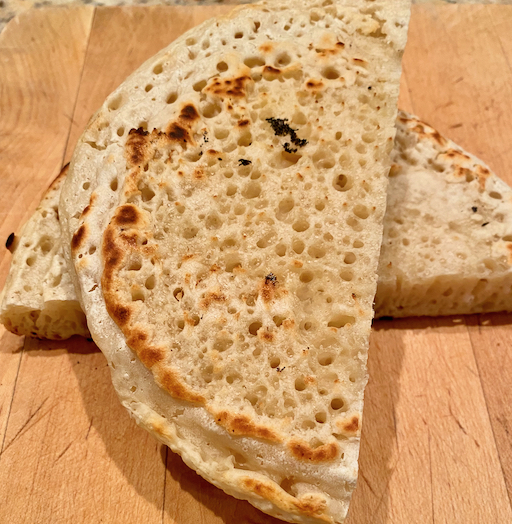
The picture below shows the crumpet soon after it comes out of the skillet. As you can see there are many nice holes to collect the melted butter or honey. 


The method works well to elicit the necessary nooks and crannies to collect the toppings. The picture below however shows what happened to the underside that was exposed to the high heat to create those lovely holes. No matter how we did it this happened with the batter actually smoking. The good news is that although the surface turned black it apparently was not burned and tasted just fine.

This process of cooking the crumpet is certainly less tedious than our previous method. The crumpet was very nice; crunchy on the outside and soft on the inside. It also held what ever topping we used very well. It tasted pretty good although I think the previous recipe we had tasted better. Also, I'm not sure about adding the additional 1/4 cup of warm water after the batter has risen to double. The recipe says the water in the batter converts rapidly to steam when the high heat is applied creating the bubbles that form the holes before the batter firms up. But this would also have the effect of deflating the rise created by the yeast. The next step would be to use the previous recipe with this cooking method to see what we get. 

Monday, February 7, 2022

Mayonnaise muffins マヨマフィン

 I am wondering if I should change the name of the blog since my wife’s baking is more frequent than my Izakaya dishes these days. In any case, here is another of my wife’s baking projects. This is an installment of what she is now calling her new series “cooking with mayonnaise” which evolved after she made the mayo/miso peanut butter cookies logged onto the Hellmans mayonnaise web site and found more baking recipes.** This is a mini muffin. It has a relatively dense texture and sweet taste including the topping. We think it makes a nice sweet mouthful as a desert rather than as a breakfast As usual I ask my wife to provide us with "how-to"s.

**Note: we just found out this mayo is called Hellman’s in the eastern U.S. and Best Foods in the western U.S. 


Ingredients: Makes 24 mini muffins
For the muffin
1 cup AP flour
1 cup sugar
1/2 cup mayonnaise
2 eggs
1/2 tsp. Vanilla

For the topping
(Original recipe) (I recommend reducing the amount of topping. See below)
1/2 cup AP flour
1/3 cup sugar
1/4 cup mayonnaise
1/2 cup toasted walnuts finely chopped
1/4 tsp. Cinnamon

Half quantity of topping
1/4 cup AP flour
1/6 cup sugar
1/8 cup mayonnaise
1/4 cup toasted walnuts
1/8 tsp. Cinnamon

Directions:
To make the topping, combine all the topping ingredients in a bowl. Using your fingers mix into crumbs and then set aside. For the muffin, beat together the sugar through vanilla until completely combined. Whisk in the flour until combined. Pour into greased muffin tins (I recommend using mini muffin papers. It will make it much easier to get the muffins out of the pan.) Top with the prepared crumbs. Cook in a 350 degree oven for 20 minutes or until a toothpick inserted in the centers comes out clean. Cool 5 minutes in the pan. Remove from the pan an cool further on a wire rack.


The next picture shows the muffins right out of the pan. 


I recommend reducing the amount of crumb topping because the next picture shows what happened to the topping when I tried to take the muffins out of the tin. It mostly all came off and went all over everything. But not to despair. I did not throw it away. I gathered it up and I am using it as a topping for yogurt in the morning which is working out well. Maybe because of the flour/mayo combo the crumbs don’t dissolve in the yogurt and they add a nice sweet crunch. 


I see why the recipe calls for making these as mini rather than full sized muffins. They are very rich and sweet.  A full muffin could easily be “too much of a good thing”. The muffin has a moist dense texture and pleasant vanilla flavor. The topping adds a nice crunch element and the nutty flavor of the toasted walnuts. The combination makes the perfect desert bite. 

Thursday, January 27, 2022

Breakfast croissant casserole クロワッサンキャセロール

 One day my wife decided to make this croissant casserole dish she saw at an on-line recipe site. It is a cross between quiche and French toast but closer to a crustless quiche. It is the usual milk, egg, and cheese mixture but instead of a pie crust or regular bread this dish uses croissants. Although this was entitled "breakfast croissant casserole", we had this as a lunch with cucumber tomato salad.


She cut the recipe in half and used small store bought croissants. This is a good quiche-like breakfast dish but I was not too crazy about it especially knowing how much bacon, egg and cheese went in. I will let my wife to provide the ingredients and directions.


Ingredients: This is a reduced recipe amount because we weren't feeding a crowd)
4 strips of bacon (crisped and then crumbled)
2 onions chopped
3 eggs
1 cup whole milk
1 tsp. Dijon mustard
1/2 tsp salt
1 cup grated cheese (I used smoked gouda and cheddar)
3 croissants

Directions:
Crisp the bacon. Set aside. Using the bacon drippings saute the onions until slightly brown. Cool slightly. Mix the eggs, milk, Dijon, salt, crumbled bacon and cheese together. Arrange the croissants in the baking dish. Pour the liquid egg mixture over the croissants making sure they are submerged. Cover and put in the refrigerator overnight. The next morning cook in a 375 degree oven for 30 minutes until golden brown. (I used the small blue pyrex baking dish and cooked it in the toaster oven).

This turned out to be an entirely ho-hum form of savory bread pudding. The croissants seemed to dissolve into the pudding like egg mixture which contributed to the quiche like consistency. Don't get me wrong it was quite good and makes an interesting egg alternative to an omelet.

Monday, January 24, 2022

Mayonaisse biscuit マヨネーズビスケット

This is another one of my wife's baking projects. When she made the mayonaisse/miso/peanut butter cookies, using the recipe in the freebee cookie cookbook we got from the grocery store, she saw an advertisement for Hellmann’s mayo beside the recipe. It stated “great cakes take Hellman’s”. She knew this to be true because many years ago a friend gave her a recipe for chocolate mayonnaise cake and it was a great hit. Further down the page she saw the following: “for this recipe and many more, visit Hellman’s.com. Intrigued she logged on and found a goldmine of recipes. This one for mayonnaise biscuits caught her eye particularly after making two versions of butter milk biscuits. So this was a “must bake”.


As usual she took the original recipe as advisory and made her own alterations


Ingredients:
2 cups all-purpose flour
1 Tbs. baking powder
1 Tbs. Sugar
1/2 tsp. salt
1/2 cup mayonnaise
3/4 cup milk (I used butter milk)
1 cup cheddar cheese grated

Other optional additions:
1/2 tsp. Dried basil
1/2 tsp. Dried dill weed
2 Tbs. Finely chopped onion
1/3 cup pepper jack cheese

Directions:
Preheat oven to 450°.
Combine flour, baking powder and salt in medium bowl. In another bowl combine the mayonnaise and buttermilk (#1). Shred the cheese (#2). Stir the mayo/buttermilk mixture and shredded cheese into the dry ingredients. On a baking sheet, lined with parchment paper, drop the batter by 1/4 cupfuls (#3). (I used a medium size ice cream scoop) .
Bake 10 minutes or until slightly golden (#4).


These are amazing biscuits. They have an outside “crust” that almost has the consistency of a very well made very thin pie crust. It gives the biscuit a very pleasing crunch. The inside is very soft and moist. It took a little while for the cheddar cheese flavor to come through but when it did it added another pleasing dimension of flavor. These are so easy to make they could be done at the drop-of-a hat or at the drop-of-an-ice-cream-scoop full. 

Wednesday, January 19, 2022

Miso-Mayo-Peanut butter cookie 味噌マヨネーズ, ピーナッツバタークッキー

This unusual recipe came in a freebie cookie recipe book from the local Giant grocery store. This recipe drew my wife’s attention because of the unusual combination of ingredients, i.e. miso, mayonnaise and peanut butter.  She came to me and asked which miso she should use (I have a collection of miso). Since it was for a cookie, I suggested “Saikyo” miso 西京味噌 which is a white sweet miso famous in Kyoto 京都 (“Sai” 西 meaning “West” and  “kyo” 京 meaning “capital” i.e. “West capital” which is “Kyoto” as opposed to “To(u)” meaning “East” 東”  and “kyo” 京 meaning capital which is “Tokyo”  東京).  In any case, she made this cookie which was quite good. I could certainly taste the peanut butter but if I had not been told I would not have guessed “mayo” and “miso” were included. Although I have to say they probably added to the overall peanut butter taste which was very rich; more so than other peanut butter cookies I've tasted. She also added a Hershey’s chocolate chip in the center of the cookie for "good measure".


I will ask my wife to fill in the rest.

Ingredients:
2 cups AP flour
1 tsp. baking soda
1/2 tsp. baking powder
1/2 tsp. salt
1/4 cup (1/2 stick) butter at room temperature
1/4 cup mayonnaise
1 cup brown sugar
1/2 cup granulated sugar
1 large egg
1 tsp. vanilla
1/4 cup miso paste
1/3 cup creamy peanut butter
Hershey's chocolate chip (optional)
Sugar to coat the cookies


Directions
Mix together the dry ingredients flour through salt. In another bowl cream the butter, mayo and sugar until fluffy. Add the egg and vanilla mixing to combine. Then add the miso and peanut butter mixing until completely combined. Slowly add the butter, egg, miso, peanut butter mixture to the dry ingredients to form a dough. Refrigerate the dough for at least and hour until it is thoroughly chilled and can be rolled into the ball. Roll the dough into 1 inch balls. Roll the balls in the coating sugar and place on a parchment covered cookie sheet about 2 inches apart. Cook in a 350 degree oven for 8 to 10 minutes until the edges are golden brown. Remove from the oven and while they are still hot press a chocolate chip into the middle of the cookie. 

These are without a doubt the best peanut butter cookies we've ever had. They are nicely chewy but the main thing is the flavor is very intense and rich. We figure this must come from the umami provided by the mayo and the miso. They are also very good slightly heated in the microwave. 

Sunday, January 16, 2022

Matcha crinkle cookie 抹茶クッキー

My wife was into baking cookies before Christmas. I saw this recipe called "Matcha Crinkle cookie" on the website “No recipe” by Mark Matsumoto.  Although we already had enough cookies, I thought these might be a good addition. So I showed the recipe and images to my wife. It was not a hard sell. These have a very interesting crinkle. They are a cross between cake and cookie with nice sweetness and tea flavor.


Ingredients:
Dry Ingredients
2 cups (280 grams) all purpose flour
6 Tbs. (30 grams) matcha powder
2 teaspoons baking powder
1/4 teaspoon salt

Wet Ingredients
4 large eggs 
1 1/3 cups (268 grams) granulated sugar 
8 Tbs. (114 grams) unsalted butter melted

For Dusting
1/3 cups (140 grams) granulated sugar
1/3 cups (80 grams) powdered sugar

Optional:
kuromame beans 黒豆 (traditional Japanese New Year black bean)
tuck a bean into the interior of the cookie or place on top 

Directions:
Pass the flour, matcha, baking powder and salt through a fine mesh sieve to sift them (#1). Add the eggs and sugar to a mixer bowl fitted with a wire whisk and beat together until light in color. Slowly beat the melted butter into the egg mixture until it's fully incorporated. The mixture will have the consistency of mayonnaise. Add the wet ingredients to the dry ingredients.  Mix together until there are no dry areas and the dough has the texture of soft frosting (#2). Refrigerate the dough for at least an hour or until it is firm enough to scoop. Line a baking sheet with parchment paper. Prepare a bowl with the remaining 1/3 cup of sugar and another bowl with 1/3 cup of powdered sugar (#3). When the dough is ready measure out the dough and roll the pieces into a small ball. (I measured the total weight of the dough then divided it by 24 to get the weight of 24 equal sized cookies.) Drop the ball into the granulated sugar. Roll it around in the sugar to coat evenly (#3). Transfer the ball of matcha cookie dough into the powdered sugar and roll it around until the ball is totally white (#4). Place the sugar-dusted ball onto the prepared cookie sheet and repeat with the remaining dough. Put the oven rack in the center position and preheat to 320°F. Bake the cookies until they've flattened out slightly and the tops have cracked, but the cookie is still soft in the center (about 10 to 15 minutes) . When the cookies are done, remove them from the oven and let them cool for a few minutes before transferring them to a cooling rack to cool completely (#5 and 6).


This is a good cookie. Very unusual and good with unique green tea flavor. It is a cross between a cake and a cookie. We had this with “sencha” 煎茶 green tea.

Thursday, December 23, 2021

Buttermilk biscuit redux バターミルクビスケット 第二弾

This is one of my wife's baking projects. Since we really liked our old friend the “tried-and-true buttermilk biscuit she used to make many years ago and reintroduced to our diet recently, when she found a recipe labeled “better” buttermilk biscuits, she had to try it.  This is basically a "redux" of the previous recipe with some improvements. The major difference is that it includes an egg. It also has a slightly different way of doing the envelop folds that cause the flakey layers such as those shown in the picture below. The end product is very flakey but a bit more moist which makes it a bit better than the previous recipe. As usual I will ask my wife to  with "how-to"es.


Ingredients:
3 cups (360 gr.) flour (or 2 cups AP flour and 1 cup plus 2 Tbs. Cake flour)
3 Tbs. Sugar
2 1/2 tsp baking powder
3/4 tsp. Salt
1/2 tsp. Baking soda
1 1/2 stick (170 gr.) cold butter cut into small cubes (I froze the butter cubes)
1 large egg
3/4 cup (180 Milliliters) cold buttermilk

Directions:
Mix the dry ingredients (flour through soda) in a bowl. Using your hands quickly work the butter into the dry ingredients until the pieces of butter are the size of small beans. (It’s ok to have the butter in visible chunks because that is what contributes to the flakiness). In another bowl combine the egg and the buttermilk. Whisk with a fork to combine. Add the wet ingredients to the dry ingredients. Lightly mix until a crumbly dough forms. Turn out onto a floured surface and using a rolling pin roll the dough into a 1 inch thick 2 1/2 inch wide strip with the narrow end facing you. Fold the dough into thirds as you would a letter. (This creates a thin but long strip of dough which is a slightly different from the usual configuration of a square which is then folded). Turn the dough one quarter turn, roll out into 1 inch thick 2 1/2 inch wide and fold again. Turn, roll it out and fold again. Roll it out one final time and cut into 12 pieces. Put on a cookie sheet covered in parchment paper. Cook in a 400 degree oven for 18 to 20 minutes until the biscuits are golden brown. (If you used frozen butter you may cook a little longer to make sure the centers are cooked.) Cool on a rack.

These biscuits were excellent. They were flakey, had a slight sweetness, the tang of the butter milk and and taste of butter. While they were nicely flakey they were also very moist on the inside. (The biscuits made with the previous recipe while still very good were a bit drier.) This will probably be the buttermilk biscuit recipe we will use in the future. 

Saturday, December 11, 2021

Buttermilk mini pie (Tassie) バターミルクミニパイ

While my wife was browsing the Washington Post, she found several small pie (tassie) recipes for the holidays. One was called "Buttermilk chess tassie". We are not sure of the origin of "chess" but it is reportedly a classic southern pie. "Tassie" is not a word we were familiar with but it means a small pie or tart and reportedly originated from the Scottish word "tass" meaning a small goblet. In any case we will call this "Buttermilk Mini Pie". This is perfect for us since it uses buttermilk (of which we have an abundant supply since my wife started making it) and it is small. A perfect single sweet bite as a dessert.


The below was C&P (cut and paste) from WP recipe.

Ingredients:
For the crust
4 tablespoons (2 ounces/60 grams) unsalted butter, softened, but still cool to the touch
1 1/2 ounces (40 grams) cream cheese, softened, but still cool to the touch
1/2 cup plus 1 tablespoon (70 grams) all-purpose flour

For the filling
1/3 cup (65 grams) granulated sugar
3 tablespoons buttermilk
1 large egg, cold
1/2 teaspoon vanilla extract
1/8 teaspoon fine sea salt or table salt
2 tablespoons (30 grams) unsalted butter

Recipe doubled:
For the crust
8 tablespoons (4 ounces/120 grams) unsalted butter, softened, but still cool to the touch
3 ounces (80 grams) cream cheese, softened, but still cool to the touch
1  cup plus 2 tablespoon (140 grams) all-purpose flour

For the filling
2/3 cup (130 grams) granulated sugar
6 tablespoons buttermilk
2 large eggs, cold
1 teaspoon vanilla extract
1/4 teaspoon fine sea salt or table salt
4 tablespoons (60 grams) unsalted butter


Directions:
To make the crust: In the bowl of a stand mixer fitted with the paddle attachment — or, if using a hand mixer, in a large bowl — beat together the butter and cream cheese until smooth, about 2 minutes. Stop the mixer and add the flour. On low speed, mix until no streaks remain and the dough starts to come together, about 1 minute. Scrape any stray dough from the sides of the bowl, gather into a ball and flatten into a smooth rectangle or disc. Cover tightly and refrigerate for 1 hour.

Cut the cold dough into 12 equal pieces, (I did this by dividing the total weight of the dough by 12 to get the gram weight of each piece. That way they would at least be somewhat equal). Using your fingers, evenly press each piece into the bottom and up the sides of 12 mini muffin cups, making sure there are no holes. (This part was a bit tricky because it was hard to get the dough evenly distributed. Rolling the dough into a round does not work well. I found the best way was to make a small ball out of the dough, put it in the cup then using my thumb push down on the center of the ball forcing a depression in the center and the displaced dough up the sides of the cup.) Also, I wasn’t sure how easy it would be to get the little pies out of the cups once cooked so I put half of them in mini-muffin papers and the rest just in the greased cup. Turns out there is enough butter in the recipe that the papers were not necessary. Refrigerate uncovered, while making the filling.

Position a rack in the middle of the oven and preheat to 350 degrees.

Make the filling: In a medium bowl or 1-pint glass measuring cup, whisk together the sugar, buttermilk, egg, vanilla and salt until just combined. In a small skillet over high heat, melt the butter until it foams, 1 to 2 minutes. Continue cooking, stirring occasionally, until it starts to turn brown and smell nutty. Use some of the butter to temper the egg mixture. Then add the rest of the butter and stir until blended.

Retrieve the muffin pan from the refrigerator, and add 1 heaping tablespoon of filling into each dough cup, filling it almost to the top. (I used the smallest ice cream scoop).

Bake for 15 to 20 minutes, or until the crust is golden brown and the filling is set.

Transfer the pan to a wire rack and let cool completely before removing the tassies.
In any case, this was sweet smooth with some tang from the buttermilk. The browned butter gives it a rich nuttiness. I am not a dessert eater but I had no trouble “choking” this down.

Sunday, November 28, 2021

Swedish cardamom buns カルダモンロール

This is one of my wife's baking projects. She saw this recipe in the "Milk Street” magazine. It is a sweet roll seasoned with ground cardamom. We were not sure whether we would like the cardamom flavor in a  sweet roll but my wife decided to try it. This was a great success. It is sweet and the sugar/cardamom mixture melted and made a nice crust especially on the bottom.


Ingredients:
For the dough:
390 grams (3 cups) AP flour
103 grams (3/4 cup) bread flour
80 grams (6 Tbs.) White sugar
1 Tbs. Yeast
1 tsp. Ground cardamom (more if you want stronger cardamom taste)
3/4 tsp. Salt
1 1/4 cup whole milk warmed to 100 degrees F.
113 grams (8 Tbs. Butter) melted and cooled
1 large egg separated (yolk for dough. White to brush on buns before baking)

For filling
170 grams (12 Tbs.) Salted butter at room temperature (maybe try less butter to keep it from running out and puddling during cooking.)
163 grams (3/4 cup) packed light brown sugar
2 tsp. Ground cardamom
27 grams (2 Tbs.) white sugar

Directions:
To make the dough: in a stand mixer with dough hook mix AP flour through salt to combine. Add together the wet ingredients (milk through egg yolk). Then with mixer running slowly add the wet mixture into the dry ingredients and mix until the ingredients form a sticky dough. Increase mixer’s speed and knead until the dough becomes smooth and elastic (about 10 minutes). Line a 9 X 13 baking dish with parchment paper (#1). Put in the dough and press it with your hand to flatten it into an even layer. Cover with plastic wrap and let rise until almost doubled in size (about 1 hour). Transfer to a refridgerator and chill for at least 2 hours or up to 24 hours. (I chilled the dough overnight.)

When ready to fill and shape the rolls first make the filling by mashing the butter through cardamom together to form a well combined paste. Set aside. Turn the chilled dough onto a large cutting board. Roll out into a 12 X 16 rectangle. Spread the filling in a even layer on the dough spreading out to edges (#2). Do a three envelope fold with the dough (fold bottom third to middle then top third over that fold (#3). 

Rotate the dough 180 degrees so the short side is facing you. Roll the dough out into a 12 X 16 rectangle and repeat the envelope fold.

To form buns: Rotate the rectangle so the long side is parallel with the counter’s edge. Cut the dough crosswise into 16 even strips (#4). Pick up one strip by the ends and gently stretch it to about 16 inches by gently bouncing it against the counter while very gently pulling on the ends. At the same time twist the ends of the strip in opposite directions while gently stretching to create a looose spiral about 16 inches long. While holding one end of the strip in place between your thumb on one side of the dough strip and index, middle and ring fingers on the other side of the strip wrap the strip around your 3 fingers (index, middle and ring) without untwisting the spiral. Then tuck the end under and up into the center while sliding the resulting turban shaped knot off your fingers (Rt. Side of #4). Using 2 cookie sheets lined with parchment paper put 8 of the buns on one sheet and 8 on the other sheet using the pattern shown in #5 below. (Using this pattern is helpful because the muffins expand and they can cook without touching.) Cover and let rise until doubled. When doubled in size add 1 Tbs of water to the egg white beat the mixture together and then brush on the buns. Top with 1/2 of the white sugar listed in the filling ingredients list. Bake each sheet one at a time in a 400 degree oven for 15 to 18 minutes until the buns are a deep brown (#6). (When the trays are cooked separately it allows the muffins to be exposed to equal heat all around and helps caramelize the sugar to make a crunchy candy like crust.) 


As shown below it is a good thing to cover the sheets with parchment paper because it is normal for some of the filling to seep out and caramelize on the baking sheet.


Once the overflow cooled it became a nice candy/caramel with crispy texture (as shown in the next picture). We enjoyed some of it as a snack.


This is a perfect roll for breakfast. It is best soon out of the oven because it is covered in a crispy light caramelized candy crust both top and bottom. While not too sweet, the crust provides a wonderful crunchy texture over the softly chewy bread inside. Although the bun tends to lose its crispy candy crust over time as it melts into the bread and  it is still extremely good. Although we were initially unsure of whether we would like the cardamon flavor, it was gentle and went extremely well with the buttery caramelized flavor coming from the sugar. This bun has everything going for it as a breakfast. 


P.S. As I was browsing a Japanese newspaper web site (Asahi Shinbun 朝日新聞), I came across a series of articles describing a number of amazing bakeries in Japan. One of the articles was about a family-run bakery in Urawa ward of Saitama city さいたま市浦和 called "Bake house Yellow knife".  Among the amazing breads they bake was Swedish cardamon rolls. It appears that this kind of artisanal bakery with dedicated bakers paying attention to every detail is becoming more common in Japan now-a-days.

Monday, November 22, 2021

Buttermilk biscuit バーターミルクビスケット

This is another one of my wife's baking projects. She used to make these biscuits (and tarts) often but she has not made them for quite some time. Since she started making buttermilk using the heirloom starter from "Culture for health", she has to make it regularly to keep the culture healthy and productive. So she has to make the next batch before the current batch gets too old. With this constant stream of buttermilk, she also has to find ways to use it. She remembered our old favorite; buttermilk biscuits. Then we realized she used to make them BB (before Blog). So that synched it. It was a “two-fer”; a way to use the buttermilk and a new blog entry. This was the perfect one to make. Back in the day she used  to  make them with "crisco" but she stopped using hydrogenated fat and now uses real butter instead. In any case, these biscuits came out really nice and flakey.


Ingredients:
2 1/2 cups AP flour
1 cup plus 2 Tbs. Cake flour
1 tsp salt
4 tsp baking powder
3 tsp sugar (or more for sweeter biscuit)
1 tsp baking soda
10 tbs. Butter
1 1/2 cups buttermilk 

Directions:
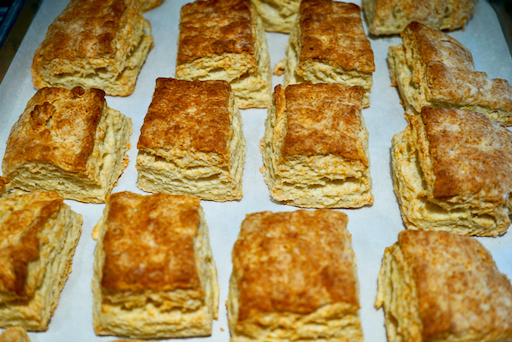
Sift together the dry ingredients (flour through baking soda). Cut in the butter. Add the buttermilk and lightly mix. Turn out onto a cutting board. (The dough will look dry and like it won’t possibly come together but don’t panic keep gently kneading it and it will). Roll out into a square about 1/2 inch thick. Make an envelop fold (bottom third over middle third and top third over both). Turn 180 degrees roll out to 1/2 inch thick again and do another envelop fold.. After rolling it out again, cut into squares of desired size (first picture below). (I cut the dough into squares instead of rounds because it requires less working of the dough. With a round you have to roll out the dough that remained after cutting out the circle. The less the dough is worked the flakier it will be). Put on a baking sheet covered with parchment paper. Cook in a 450 degree oven for 10 to 12 minutes or until golden brown (second picture).


Oh what an old classic friend these biscuits are. They are multilayered flakey. The crust has a satisfying crunch and the interior is soft and buttery. The buttermilk gives it a slight tang.  Can’t be beat for breakfast or any other meal. 

Friday, November 19, 2021

Skillet caramelized cabbage スキレットカラメライズドキャベツ

My wife and I are always looking for new and interesting recipes. One day, we simultaneously and independently both came up with the same cabbage recipe that appeared in the Washington Post. The article touted how glorious this cabbage dish was. Although, in general, we are not fans of cooked cabbage, we thought this might be an exciting new preparation which would significantly change our opinion much like blackened  Brussels sprouts revolutionized our appreciation of that vegetable. The picture below shows the dish just as it came out of the oven after one hour of baking.


We served a portion as recommended in the article with a dollop of Greek (strained) yogurt and dill (we did not have fresh dill so we used dry dill).  To our disappointment after all was said and done this dish was just "cooked cabbage" with a slight caraway flavor.  If you are a fan of cooked cabbage this is the dish for you. We, on the other hand, were much less than impressed. My wife said she will attempt to transform this it to something better (subject of future post).


Ingredients
1 medium head green cabbage (about 2 1/2 pounds)
4 tablespoons olive oil, divided
1 medium yellow onion (about 8 ounces), halved and sliced
2 cloves garlic, minced or finely grated
1 teaspoon caraway seeds
1/2 teaspoon fine sea or table salt, plus more to taste
1/4 teaspoon freshly ground black pepper
1 1/2 cups low-sodium chicken or vegetable broth
1 tablespoon apple cider vinegar
1/4 cup fresh dill fronds
3/4 cup plain Greek yogurt (nonfat, low-fat or whole)

Directions:
1. Position a rack in the middle of the oven and preheat to 350 degrees.
2. Cut the cabbage in half through the core, then cut each half into four wedges, making sure that each wedge retains some core to hold it together, so that you have 8 wedges.
3. In a large, ovenproof, high-sided skillet over medium-high heat, heat 1 tablespoon plus 1 1/2 teaspoons of the oil until shimmering. Add four wedges of cabbage to the skillet and sear until the cabbage is well browned and slightly softened, 3 to 4 minutes per side. Transfer the cabbage to a plate, and then repeat with another 1 tablespoon plus 1 1/2 teaspoons of the oil and the remaining cabbage, transferring the cabbage to the plate once browned.
4. Add the remaining 1 tablespoon of the oil to the same skillet. Add the onion and cook, stirring, until softened, about 3 minutes, then stir in the garlic and caraway and cook, stirring, until aromatic, 30 seconds more. Return the cabbage to the skillet, overlapping the wedges as needed. Season with the salt and pepper, then add the broth and vinegar and bring to a simmer.
5. Transfer the skillet to the oven and bake, uncovered, for 60 to 75 minutes, or until the cabbage is very tender and the liquid has reduced to about half.
6. Serve garnished with dill fronds and dollops of yogurt, and seasoned with additional salt, if desired.

We were a bit underwhelmed since our expectations were high. It was another cooked cabbage. As I mentioned, my wife is going to "make it better". She is threatening to make "cabbage curry". We will have to see.

Wednesday, October 13, 2021

“Hoshigaki” (dried persimmon) muffins 干し柿マフィン

 We bought dried persimmon or "hoshigaki" 干し柿 from Japan through the Japanese taste. We ate some and made a few small dishes. Although they were still good they were not getting any younger in the refrigerator, so we decided to make a concerted effort to use them. My wife tried to find recipes for dried persimmon on the U.S. (English language) internet and there seemed to be a few for fresh persimmon but basically none for dried aside from ‘eat them as-is for a snack.’ In contrast I found numerous recipes for dried persimmon on the Japanese internet. (I guess they are used more commonly in Japan.) In the dried fig stuffed muffins blog, my wife warned that a variation on the recipe using dried persimmon could be in the future so she decided to make good on her threat and use a variation of that recipe for the persimmon muffins.  Since many of the Japanese recipes paired dried persimmon with rum as a hydrating agent my wife decided there must be a good reason that combination appeared so consistently so she decided to use rum too. These muffins were very good. Since we used rum to flavor and loosen up the hoshigaki, the muffins were a bit rummy/boozy but had a nice subtle sweetness and texture.  These could also be a very nice dessert.


Ingredients (hoshigaki stuffing):
1 lb dried persimmon (#1 they are dusty white from the sugar that came out) trimmed and chopped
1 cup rum 

Directions (for hoshigaki stuffing)
Carefully remove the seeds (#2), some had seeds and some did not.
Finely chop (they are sticky and it is not very easy but using the heavy chef's knife, I was able to finely chop them.  The final weight was about 390 grams which made the stuffing for 17 muffins and some leftover).
In a small sauce pan, add the chopped hoshigaki and the rum and gently heat/mix.
Using a submersible blender, further chop it fine but not completely pasty (#3).

Ingredients: (For muffin batter)
2 1/2 cup AP flour
1 1/2 cup whole-wheat flour
2  tsp baking powder
1 tsp. baking soda
1 tsp salt
1 cup unsalted butter melted and cooled
1 cup sugar plus 2 Tbs. molasses (original recipe calls for dark brown sugar)
1/2 cup honey
2 eggs, lightly beaten
1 1/2 cups rum


Directions:
Liberally grease the muffin tins (or use paper muffin cups #4). In a large bowl mix the dry ingredients. In another bowl mix the wet ingredients. Add the wet ingredients to the dry ingredients. Add half the dough to the bottom of the muffin cups. Top with the fig mixture. Don’t let the fig mixture touch the side of the muffin cups (#4). Top the fig mixture with the remaining half of the dough (#5). Bake in a 400 degree oven for 15 to 20 minutes until golden brown. Let cool for about 5 minutes and remove from the tins to a cooling rack.


The hoshigaki-stuffing made a really nice and unique muffin. The butter used in the dough really came through in the final product and surprisingly the butter flavor really complemented the rum flavor. The flavor combination of dried persimmon, butter and rum really worked well together. (Those Japanese recipes really knew the right flavor combination to use with dried persimmon). Since my wife used rum, the muffins were slightly boozy; maybe not the breakfast choice for everyone (although no problem for us) they would be perfect for dessert.

Sunday, August 29, 2021

Wacky waffle cake bowl with ricotta cheese topping

In trying to decide how to use the waffle bowls we made a few days ago, my wife was inspired by two items. The first was the realization that there are several Pennsylvania Dutch desserts such as funny cake or shoofly pie  that are essentially cakes in a pie shell. In addition she thought of Japanese melon pan which is essentially a cakey bread covered in a cookie (and wasn’t the waffle bowl a kind of cookie?) So based on these inspirations, she decided, as an experiment, to fill several of the waffle bowls with a PA Dutch cake called Wacky cake topped with ricotta filling. She chose wacky cake because it is so simple to make. If the experiment didn’t turn out, it wouldn’t be a great loss. In fact the “experiment” turned out quite nicely. The picture shows a whole wacky waffle cake plus one cut in half to show how the ricotta filling dips into the cake as it cooks.


The waffle bowls were cooked again and got really brown and crispy. Then after some time, stored in the refrigerator they became a bit soft again. My wife  heated them up in the toaster oven just before serving which made the bowls crispy. I turn the platform over to my wife to describe how she made them.

Ingredients:

For the cake 
1 1/2 cups all purpose flour
1 tsp baking soda
1/4 tsp salt
1 cup sugar
1/3 cup cocoa powder
1 tsp. vanilla
1 tbs. vinegar
1/3 cup oil
1 cup water 


For the ricotta filling
1 cup ricotta cheese
1 egg 
1/8 cup sugar
1/4 tsp. salt
1/2 tsp vanilla


Directions:
Mix all the ingredients for the ricotta filling until smooth and set aside. Mix the dry ingredients from the flour thru the cocoa powder in a bowl. Mix the wet ingredients in another bowl. Add the wet ingredients to the dry ingredients until smooth. I put the waffle bowls in a tin for large muffins to provide support as the cake cooked (and in case the waffle bowls fell apart during cooking the mess would be contained.) I then filled them with the cake mixture and topped them with a scoop of the ricotta filling. (These are shown in the bottom row of muffins in the next picture). I had some batter left over after filling the waffle bowls so I just made some large muffins by putting the batter directly into the muffin tin and topping them with the ricotta mixture. (These muffins are shown in the top row of muffins in the picture). I cooked them at 350 degree for about 30 to 35 minutes until the ricotta topping firmed up and a skewer came out clean. 


The wacky waffle cakes were surprisingly good. Even though the shell was double cooked and got a bit high done it was nice and crispy and tasted very good. The combination of cookie-like crispiness, soft sweet chocolate cake and smooth moist ricotta filling made each chew a nice complex texture experience. The three different flavors of each element also went very well together. I think I may be onto something here. Stand back! 

Thursday, August 26, 2021

Butter, butter, butter, butter, rolls バター、バター、バターロール

My wife recently bought a cookbook called “Fast Breads” by Elinor Klivans and these were the first things she made from it. The are called buttery rowies. She thought they looked like croissants but were much easier to make so she gave them a try. 


Ingredients:
2 1/4 cups unbleached AP flour
2 tsp. Salt
2 1/4 tsp. Yeast
1 cup warm water (recipe calls for water 130 degrees F. I thought that was too hot and would kill the yeast. I don’t know what the purpose of such a high temperature would be.)
1 cup (two sticks) of butter softened for 20 minutes to room temperature

Directions:
Put the flour, salt, and yeast in the bowl of stand mixer. Add the water and mix until the ingredients are combined then beat for 4 minutes. Cover the bowl and let the dough rest for 15 minutes. Cut the butter into 1/4 inch slices. Pat and roll the dough into a 10 X 8 inch rectangle about 1/2 inch thick. Distribute the 1/2 of the butter pieces on the rectangle (picture on the left below). Using a spatula spread the butter evenly over the dough leaving a 1 inch border all around. With the long edge facing you fold the dough over into thirds and pinch the edges tightly to seal. (The dough should now measure 3 X 8.) Roll the dough out into a 12 X 6 rectangle. Distribute the remaining butter over the rectangle. Again using a spatula spread the butter evenly over the dough rectangle leaving a 1 inch border all around. With the short side facing you fold the dough into thirds pinching the sides to seal tightly. Let the dough rest 5 minutes.

Line baking sheet with 1 inch sides with parchment paper. Gently roll the dough into a 10 x 8 rectangle. Using a sharp knife (I used a pizza cutter), cut the dough into 2 inch squares. Place the squares on the baking sheet one inch apart, cover and let rolls rise for about 30 minutes. (They will not rise much but will soft and puffy). Bake in a 400 degree oven for about 20 to 25 minutes until golden brown (picture on the right). (Some of the butter will leak out so they will be baking in bubbling butter).
Let cool about 10 minutes then serve.


These rolls are basically a butter deliver system for those who like butter but are too embarrassed to just gnaw on a raw stick of it straight out of the package. To get an idea of how much butter was involved, the ratio of butter to flour is one stick of butter for each cup of flour. Also the picture on the left above, just shows half the butter used. Twice the amount of butter shown there goes on the same rectangle of dough. When the rolls came out of the oven they were literally swimming in melted butter. My wife tipped the baking sheet and ladled spoonfuls of butter over the top of the rolls to use it up. While the rolls were crispy on the outside they were completely soaked in butter on the inside. In short this is a prime example of “too much of a good thing”. This was way too much butter. My wife couldn’t eat them. I think they could be quite good, however, if made with half the amount of butter. 

Wednesday, August 18, 2021

Not-fried "Kara-age" fried chicken 揚げない唐揚げ

My wife really likes the chicken kara-age I make. I have not made it for some time. One weekend, we got chicken thighs specifically to make this dish but somehow I didn’t get around to it over the weekend. I just prepared the chicken (removed the bone and cut the meat into bite sized pieces). I marinated it in soy sauce, mirin, sake, sesame oil, grated garlic and ginger in a Ziploc bag. I thought, maybe, I could fry it up one weekday evening. But I did not have the energy or time to do that. So, instead, I baked it in our toaster oven on convection mode. We have baked such dishes as chicken wings before in the toaster oven instead of frying them. This version of kara-age was not as good as deep fried but good enough. I served this as an appetizer with cucumber and tomato salad.


Ingredients:
4 bone-in, skin-on chicken thighs, excess fat removed and bone removed, cut into bite sized pieces with some skin on.
1/4 cup "Katakuri-ko" potato starch

Marinade:
4 tbs soy sauce
2 tbs sake
2 tbs mirin
1/2 tsp grated garlic (from tube)
1/2 tsp grated ginger (from tube)
2 tsp dark sesame oil
Hot sauce such as Sriracha to taste

Directions:
Place the marinade and the chicken in a Ziploc bag, massage, remove the air, seal and let it marinate overnight in the refrigerator.
Remove the chicken, blot off the excess marinade and dredge with the potato starch shaking off excess starch.
Preheat the toaster oven to 380F (I could have used a higher temperature like 400F, but I was afraid it might burn since the marinade contained mirin).
I covered the baking tray with aluminum foil  (still the chicken stuck, I could have used parchment paper), lightly oiled, placed the chicken and baked for 25-30 minutes (shorter with higher temp may have been better).


This was not bad but it may have been better if I could have cooked it at a higher temperature. I didn’t because of the sugar in the mirin, it could easily burn. Maybe, next time, I may just use soy sauce and  sake in the marinade omitting the mirin.

In any case, this was good especially weekday night and it heated up nicely in the toaster oven in the toasting mode next day.

Sunday, August 15, 2021

Stuffed mini waffle bowls

 After making mini-waffle bowls, my wife suggested several ideas for filling them. For desert, ice cream and fruit appear standard. She wanted something for breakfast. Since we usually eat a bowl of home-made yogurt, she suggested filling the waffle bowls with the yogurt and blueberries. This was good but kind of difficult to eat the waffle and yogurt together. If you just eat the fruit and yogurt and then eat the waffle bowl, the waffle tends to get a bit soggy. I tried to chomp on the waffle and yogurt together but it was a bit messy. Using a knife and folk, cutting a wedge sort of works. But in the end, I’d rather eat the yogurt and waffle separately.


The next morning, my wife suggested filling the waffle bowls with her favorite sweet Lebanon bologna and scrambled eggs. This sort of worked using a knife and folk to cut a wedge and then eating the waffle, sausage and egg together.


It seems the major role of these waffle bowls is in the presentation. They had a nice crisp cookie taste but its a little awkward eating bowl and contents together. Nonetheless, never daunted, I suggested stuffing the waffle bowl with ice cream then freezing the entire thing. I am not sure if my wife bought the idea. We have to see.