Showing posts sorted by date for query yakitori. Sort by relevance Show all posts

Tuesday, November 12, 2024

Marinated Chicken Tender Cutlet 鳥のささみのカツレツ

We like chicken “sasa-mi” 笹身*  tenders and made quite a few dishes and posted them in the past. One of the problems with chicken tenders is that they tend to get dry when cooked. The best way is to make sous vide skin-on, bone-in chicken breast , then remove the tenders from the breast after cooking. This will provide succulent and chicken tenders. I serve these tenders by teasing them into small strands by hand and usually dressing them in sesame dressing. But only one tender can be had per chicken breast half. Other ways of cooking including Yakitori 焼き鳥 works well but over cooking happens if you are not careful. Japanese will serve undercooked (on purpose) or even “raw” chicken tenders but it is not safe to do so here. In any case, I came up with marinading the tenders in ponzu and mirin mixture (hoping the acidity of ponzu may further tenderize and keep them moist and the sweetness of the mirin mitigates the sour taste of the ponzu). I marinate them at least a couple of hours before breading and deep frying them (Chicken tender cutlet). The night I made these chicken tenders they had been marinating over night. Since I had hot oil when I cook them this way, I also fried some arancini I had made some time ago from left-over mushroom risotto. (I shaped the risotto into balls with cubes of Mozzarella cheese in the middle then breaded and froze them. I discovered you can deep fry frozen arancini and they come out really nice.) I served this with fried “renkon” 蓮根  lotus root marinated in X4 Japanese noodle sauce and then dusted with flour. I also served spicy tofu cubes (previously cooked and just heated up before serving in the toaster oven) (pictures #1). 

*Chicken tenders are called “sasa-mi 笹身” in Japanese. “Sasa” is a type of smaller bamboo plant (broad-leaf bamboo) and the shape of its leaves are similar to that of chicken tenders. “mi 身” means “meat”.


The chicken tender cutlets were indeed very nice. The tenders came from Whole Foods. We usually do not buy chicken from Whole Foods but these tenders are one of the best we can have. The round item shown on the left in the picture is the arancini cut in half (you can just see the melted mozzarella in it). The center item is the chicken tender cutlet and beside that on the right is renkon (picture #2).


Ingredients:
One package (1.5lb) chicken tenders

Marinade*
2 tbs Ponzu shoyu
2 tbs Mirin

(*Addendum 12/11/24: Now I use a new marinade which makes the chicken really tender and moist.)
2 tbs mayonnaise
1 tbs soy sauce (or x4 concentrated Japanese noodle sauce which also adds a bit of sweetness and dashi-based umami)

Flour, egg water and panko for breading
Peanut oil for frying

Directions:
In a quarter gallon Ziploc bag add the ponzu and mirin, and the chicken.
Knead to spread the marinade and remove the air as much as you can and let it marinade at least few hours or overnight in the refrigerator

Remove the chicken leaving the marinade.
Bread it with the flour, egg water and Panko bread
In 180F oil, fry for 3-4 minutes turning until crust is golden brown and the center of the thickest part is opeque.

This was quite a meal. The tenders, arancini, and fried renkon were really good. Plenty of crunch with different profiles of flavors. (My wife really likes chicken tender cutlets made this way). The left-overs warm up perfectly in the toaster oven. 

Tuesday, September 17, 2024

Chicken Tender Fry with Salted Plum Sauce and Perilla ささ身の梅大葉揚げ

We were trying to use up frozen items hidden deep in the freezer. At one time, we bought chicken from a special poultry on-line store. We were not particularly impressed with the quality of the chicken we got. One of items was chicken the tenders. We decided they had matured long enough in the freezer so it was time to use them up. This is a variation on the chicken tender yakitori with perilla and salted plum sauce and is  based on a recipe posted on line. This time I shallow fried (picture #2) instead of cooking in the toaster oven.

Because it was fried with a batter coating, it has a crispy outside and soft inside with flavors of perilla and umeboshi 梅干 salted plum (picture #1). This combination works well. This heated up nicely in the toaster oven as well.


Ingredients:
10 chicken tenders, tendons removed and bi-valved (not cut through, just make a pocket)
10 perilla leaves

For Umeboshi  梅干しsauce or “Bainiki 梅肉 sauce
3 umeboshi salted plumes, meat cut off and finely chopped
1tsp mirin
1 tsp sake
1 tsp soy sauce
1 small pack of “kezuri-bushi” 削り節 bonito flakes 

For Batter
Equal amount of ”katakuri-ko” potato starch

Peanut oil for frying

Directions:
Umeboshi sauce
Add the chopped umeboshi fresh into a Japanese “suribachi” mortar, add the mirin, sake and soy sauce. Mix and grind using a pestle until smooth. Add the bonito flakes and mix to incorporate.

Smear the umeboshi sauce inside the bi-valved chicken tenders, close the tender and put the batter on one side of the perilla and encase the cut side, coat it with the batter and fry in the 180F oil, 1-2 minutes per side turning once (picture #2). Drain, cut in half and serve.


The umebishi sauce and perilla flavors are a very nice combination and frying makes it better. So there is no argument this is a good small dish to have.

Sunday, September 8, 2024

Yakitori de le Canard 鴨ささみで焼き鳥

Last time we had duck tenders as a cutlet, we said we will make Yakitori using the duck tenders (a.k.a. “Yakitori de le canard” 鴨焼き鳥). Finally we managed to do it. I thought about how to prepare it and decided to marinate it and then cook it in the toaster oven. Since it is duck, and Japanese generally think “kamo” or duck goes well with “negi” or onion more precisely Japanese “tokyo” scallion I also served grilled onion. (digression alert *). Since we recently got some really good green beans (which doesn’t happen all that  often), I also added blanched green beans on the side. The combination worked well and “Yakitori de le canard” was a great success (Picture #1).

* The Japanese expression is “鴨がネギを背負ってくる” meaning “duck flies in with onion on its back”. This expression is used when something fortuitous happens in your favor with little or no effort on your part. Or (if you are a conman) it refers to the perfect victim coming to you with money outstretched in their hand.


Ingredients (2 small serving of 4 duck tenders per serving)
8 Duck tenders
One medium onion cut into small wedges
2 tbs Ponzu soy sauce (from the bottle or equal mixture of citrus juice and soy sauce)
2 tbs sake

Directions:
Mix the sake and ponzu in a ziploc bag, place the duck tenders inside and remove as much air as possible and let it marinate overnight in the refridgerator.
Drain the marinade and pat the surface of the tenders dry
Skewer the tenders using a bamboo skewer (picture #2)
Skewer the onion wedges (picture #2)


Line the toaster oven tray with an aluminum sheet. Place the tenders and onion on a metal grate over the sheet and broil the duck tenders and onion 5-7 minutes per-side turning once until done (picture #3).


This was a good “yakitori”. The marinade (sake and ponzu) made the duck meat very tender and flavorful. I may have over cooked it a bit and the meat was lightly dry. the sweet onion went well with the duck. Next time, I can skip the skewering and  cook it in a frying pan.

Friday, March 22, 2024

Duck Tender Cutlet and Arancini 鴨ささみのカツレツ

Looking ahead to the up coming Easter dinner my wife ordered a bone-in forequarter lamb roast from D’Artagnan.  She also ordered lamb tenderloins (which we’ve had before) and something we have never had before but which she wanted to try; duck tenders. They came as a fairly large quantity frozen in a single package (picture #4). I was intrigued by a french recipe which I saw in D’Artagnan website entitled “Yakitori de canard” 鴨ささみの焼き鳥. It was in french and although I did not look at it my wife assured me she could probably translate it if I wanted to try it. Nonetheless I can easily imagine this would be made exactly like chicken tender yakitori. (Hence no translation necessary.) But that is beside the point because I also wanted to make “arancini” for this meal. So it was “cutlet de canard” on the menu instead. In the picture #1, the top are arancini cut in half showing melted mozzarella cheese and the bottom shows the duck tender cutlet.


The duck tender is dark meat as opposed to chicken tender (picture #2) and has much more flavor.


The arancini was made of leftover shiitake mushroom risotto.


There is nothing special about making duck tender cutlet. After semi-thawing this is the amount we had (picture #4). They were frozen in a big one mass. I had to separate each tenders and vacuum packed 5-6 tenders per bag. I left one package for immediate consumption. Initially I was thinking of marinating the tenders before cooking but taking my wife’s suggestion that since we have never had them before we should taste them as is without any flavoring that might mask the original flavor. I opted to just lightly salt and pepper then breading them and cooking them the same as any other type of cutlet.


I was afraid of the duck tender to become dry after cooking but that was not the case and had much more flavor than chicken tender. I will definitely try to make “Yakitori de canard” next.

Monday, January 1, 2024

Table of contents 2024


January 2024
January 1,    Happy New Year 2024 明けましておめでとう2024 
January 5,    Tomato and Egg Stir-fry with Wood Ear and Natto 納豆、トマト、木耳の卵炒め
January 22,   Goat Cheese Scallion Muffin ゴートチーズと青葱マフィン
January 25,   White "Pineberry" and Red "Koyo" Stawberries 白いイチゴと昂揚イチゴ
January 28,   Beef with Kon-nyaku and Vegetable "Kimpira" Stir Fry 牛肉と蒟蒻の金平

February 2024
February 3,     Chestnut Brown Butter, Sage Muffin 栗の粉とセイジマフィン
February 8,     Grated Lotus Root and Tofu Ball レンコン豆腐饅頭
February 11,    Sweet Onion Bread Pudding 玉ねぎのブレッドプディング
February 15,    Shad Roe from South Carolina 南カロライナからのシャドロウ
February 18,    Cranberry Camembert Cheese Bites クランベリーソース、カマンベールチーズ バイツ
February 21,    Simmered Shad Roe with Vegetables シャドロウの煮付け
February 24,    Shad Roe Pasta  シャドロウパスタ
February 27,    Pickled Cucumber キュウリの漬物

March 2024
March 1,    “Maitake” Hen of the Woods Mushroom in Brown Butter and Sage 焦がしバターとセイジ風味舞茸
March 4,    Instant Pot BBQ Baby Back Ribs バーベキューベイビーバックリブ
March 7,    Salted Oatmeal Cookie 塩味オートミールクッキー
March 10,  Lobster Salad ロブスターサラダ
March13,    “Roman” Gnocchi ローマンニョキ
March 22,   Duck Tender Cutlet and Arancini 鴨ささ身のカツレツ
March 25,   Mary Walsh’s Currant Cake マリーウオルシュのカラントケーキ
March 28,   St. Patrick’s Day Dinner, Lamb Chops and Cabbage with bacon セントパトリックのディナー

April 2024
April 6,    Pumpkin “Kabocha” salad カボチャのサラダ
April 10,    Mini Fruit Galettes ミニフルーツガッレト 
April 21,    Spinach Soufflé (easy version) ほうれん草のスフレ 
April 30,    Frangipane Rolls フランジパンロール 

May 2024
May 13,    Pickled Micro Cucumber and Daikon 小さなキュウリと大根のピクルス 
May 15,    Steamed Carrot Buns with Ginger Custard 人参蒸しパン生姜カス... 
May 18,    Braised Eggplant with Oyster Sauce 茄子と椎茸のオイスターソース炒め
May 21,    Creamed Spinach with Cauliflower Puree カリフラワーピュレのク
May 24,    Anchovy Salad アンチョビサラダ
May 27,    Daikon Steak and Two Appetizers 大根ステーキ
May 30,    Focaccia Bread Baked in Breville Pizzaiolo Indoor Pizza Oven 

June 2024
June 2,    Steak and 2004 Joseph PhelpさんInsignia ステーキディナーと2004 インシグニア
June 5,    Gyoza made with New Round Gyoza Skin 日本風の餃子の皮で作った餃子 
June 8,    Filled Wool Bread 毛糸のパン 
June 11,    Shrimp Shumai 海老焼売 
June 14,    Pumpernickel Boule ドイツ黒パン 
June 17,    Ice Breaker “Summer” Sake 玉川アイスブレイカー酒 
June 20,    Carrot Panna Cotta 搾りたて人参ジュースのパナコタ
June 23,    Miso-marinated Firefly Squid ホタルイカの味噌焼き 
June 26,    Wood Ear Mushroom and Wakame Salad 木耳とわかめの和物 
June 29,    Nine “Otoshi” Appetizers お通し九種類

July 2024
July 2,    Egg roll 春巻き
July 5,    Red and Green Udon “Pasta” with Prosciutto 生ハムのせ赤と緑のうどんパスタ
July 8,    Pizza Made in Indoor Electric “Pizzaiolo” Pizza Oven 
July 11,    Garlic Chive Dumpling ニラ頭饅 or 韮菜万頭
July 14,    Mitsuba ミツバ 
July 17,    Dassai 45 and Dassai blue comparison 獺祭45とDassai Blue 50 飲み比べ 
July 28,    Cucumber in soy sauce 胡瓜の醤油漬け
July 31,    Tofu, Egg and Garlic Chives Stir Fry 豆腐ニラ玉、木耳入り

August 2024
August 9,    Home Coffee Roasting 緑コーヒー豆の自家焙煎 
August 12,    Icelandic Pumpernickel (Rye) Bread アイスランドのライ麦パン

September 2024
September 2,    Smelt Fry シシャモフライ
September 5,    Pesto Blini ペストビリニ 
September 8,    Yakitori de le Canard 鴨ささみで焼き鳥 
September 11,    Vegetables in Cold Broth 冷製のトマトの煮浸し 
September 14,    Pesto Blini Prosciutto Cheese Sandwich ペストビリニの生ハムチーズサンド
September 17,    Chicken Tender Fry with Salted Plum Sauce and Perilla ささみの梅大葉揚げ 
September 21,    Simmered Dried Daikon Threads 切り干し大根の煮物 
September 24,    Fresh Corn Blini コーンビリニ 
September 27,    Stir-fried Eggplant and Shiitake in Oyster Sauce 茄子と椎茸のオイスターソース炒め... 
September 30,    Mashed Potato Blini マシュポテトのビリニ

October 2024
October 3,    Five appetizers お通し5品
October  10,    Hen-of-the-Woods Grilled Cheese 舞茸のチーズ焼き
October 13,    Strawberry Blini いちごビリニ 
October 16,    Enoki mushroom frittata エノキ オムレツ/フリッタータ 
October 19,    Kabocha salad カボチャサラダ 
October 22,    Matsutake (from Weee) Touban-yaki 松茸の陶盤焼き 
October 25,    Black Cod Marinated in Saikyo miso 銀鱈の西京(味噌)焼き
October 28,    Egg-wrapped Kabocha カボチャの黄金焼き 
October 31,    Almond Olive Oil Cake アーモンドオリーブオイルケーキ

November 2024
November 3,    Hiyaoroshi Sake Dewanoyuki “Sho-nai Bijin” 出羽ノ雪 冷やおろし庄内美人
November 6,    Hiyaoroshi Sake “Shichi Hon Yari” 七本槍 純米ひやおろし 
November 9,    Prosciutto-wrapped Haddock 生ハム巻きハドック (コダラ) 
November 12,    Marinated Chicken Tender Cutlet 鳥のささみのカツレツ
November 15,    Crispy Enoki Mushroom エノキのパリパリ焼き
November 18,    Bagel ベーグル 
November 21,    Chestnut Apple Soup クリとリンゴのスープ 
November 24,    Norwegian Mackerel Teriyaki 冷凍ノルウエイ鯖の照り焼き 
November 27,    “Imo-ni” Stew famous in Yamagata 芋煮庄内風 
November 30,    Matsutake and beef cooked in an Aluminum Foil Pouch 松茸と牛肉のフォイル焼き

December 2024
December 8,    Chestnut olive oil bread 栗とオリーブオイルケーキ
December 11,    Marinated Tofu and Egg Sir fry 味付け豆腐の卵炒め 
December 16,    Braised daikon with carrot, wood ear, and fried tofu 大根と人参の炒め物
December 19,    “Taco Carnitas”-ish タコ カルニタもどき
December 21,    Tofu in Warm Broth ミニ湯豆腐

Wednesday, September 20, 2023

Tsukune with Lotus Root and Perilla 蓮根大葉つくね

This is a hybrid of “Renkon Tuskune”  蓮根つくね and “Tsukune with perilla” つくねの大葉焼き. Since our perilla is growing profusely in our herb garden, we are using perilla leaves whenever we can.  This is also the last segment of fresh lotus root we got from Weee asian grocery delivery service. We found that we could make the lotus root last longer by separating the fresh lotus root into its individual segments, wrapping the segments in paper towel and vacuum packing them. With this preparation they last for a long time under refrigeration (at least 1 mouth or more). Beside using a slice of the lotus root as a base for the Tuskune, I also included chopped up lotus root in the tsukune itself to give it nice crunch without using chicken cartilage. The perilla leaves add an additional unique flavor.


I served this with “kinpira” braised lotus root 金平蓮根 I made to finish up the last of the renkon. I also served simmered “kabocha”  かぼちゃの煮物 Japanese pumpkin.


Ingredients:
8 slices of lotus root, skin peeled and sliced into (4-5mm) thick plus two or three slices chopped up (to mix into the tuskune itself)
8 perilla leaves (if too large cut in half to make 8 pieces)
4 oz (114 gram) of ground chicken (this was low-fat breast meat ground chicken)
1/2 tsp ground ginger root
1/2 tsp ground garlic
1 tsp mayonnaise (optional, to compensate low-fat ground meat)
1 tsp miso
1 tbs “katakuri-ko” potato starch
1 tbs vegetable or olive oil

Directions:
In a bowl, mix the chicken, ginger, garlic, mayonnaise, miso and chopped up lotus root. Mix well by hand until the mixture is elastic and binding together (if too loose, you could add potato starch, if too stiff, you could add a beaten egg)
Coat the slices of lotus root with the potato starch thinly (to improve the adhesion of the meat mixture)
Place 1/8 of the chicken mixture onto the lotus root on the cutting board and press lightly so that the mixture will go into the holes of the lotus root.
Place the perilla leaf on and press lightly so that it adheres to the meat mixture (see below)
Add the oil to a non-stick frying pan on medium heat, and start cooking the lotus root side down first (see below) and cook a few minutes or until the lotus root browns a bit
Gently turn it over and turn down the heat to low and cook a few more minutes with the lid on for the last 2 minutes to make sure the meat mixture is cooked through.
Optionally you could add a mixture of mirin and soy sauce at the end but I did not.


Drain excess oil on a paper towel.


This tsukune is seasoned enough for us but you could add “Yakitori sauce (equal mixture  of mirin and soy sauce) ” as mentioned before. This re-heats nicely in a toaster oven. It is a nice contrast in textures and taste. The chicken portion is almost fluffy in texture which is a nice contrast to the crunch of the renkon on the bottom layer and distributed through out the meat. The perilla adds a nice fresh minty spiciness.

Tuesday, December 20, 2022

Nattou ball 納豆つくね

This recipe also came from a YouTube episode by the original Japanese Iron chef Rokusaburo Michiba 道場六三郎. He made two dishes from nattou 納豆, the infamous sticky and smelly Japanese dish of fermented soybeans, which often appears as part of breakfast. Nattou is most commonly eaten over rice for breakfast. Another less common but popular way is in miso soup for a dish which is called “Nattou-jiru” 納豆汁. Even among the Japanese, some (especially from “Kansai” 関西 west part of Japan) do not eat it and some love it. (I belong to the latter category). 

For many years my wife referred to nattou as the one Japanese food she just could not eat—the smell, the sliminess, the fermented taste.  (Every culture seems to have a dish like this; an acquired taste developed in childhood. Think ripe French cheese or Australian vegemite. And for me, believe it or not, cooked oatmeal).  Then my mother learned that the natto-nastiness could be alleviated by stirring it. She recommended several hundred turns would do the trick. The stirring apparently enters air into the natou that helps remove the smell and stringy sliminess. All of a sudden natto was on my wife’s menu. 

I have made quite a few dishes with nattou, many of which are focused on reducing the stickiness and the smell. In any case, Michiba made a miso soup but, instead of mixing nattou into the soup, he made nattou into balls which he called “nattou-tsukume*”  and then put it into miso soup. I made it as a small appetizer one evening.  I put a small amount of miso soup (made it a bit stronger) as a sauce and topped it with Japanese mustard (see picture below)

* “Tsukune”, “Tsukuneru” which means “knead” or “mix”, and is usually made from ground chicken and a most common item in “Yakitori” 焼き鳥.


I served two other small dishes; from left to right simmered “Kabocha” squash, miso simmered mackerel and nattou tsukune.


Ingredients (4 tsukune balls):
2 small individual packages of nattou (if frozen, thawed) with packets of sauce and mustard
1 stalk of chopped scallion
1 tbs katakuriko potato starch
2 cups of Japanese dashi broth
1-2 tbs miso
Japanese hot mustard (from tube) slightly diluted with water for topping

Directions:
Prepare the natou by adding the sauce, mustard and the scallion. Mix well (stir over 100 time if you have the time), add the potato starch and mix.
Using two spoons, moistened, I made four quenelles (or moisten your hands and make small balls) and drop them in the simmering broth.
Cook it for several minutes (see below).
You could dissolve the miso and serve this as “miso soup”. I wasn’t ready to serve the dish so I separated the nattou balls and the broth and placed them in a sealed containers and in the refrigerator.
Before serving, I warmed up the nattou balls in the preserved broth. I took out a small amount of broth and dissolved the miso to taste.
I served the miso broth in a small dish, with the nattou ball and topped with the mustard


This is a very interesting dish. The hot Japanese mustard made this dish. Although the nattou balls tasted like nattou to me, the texture and smell is quite acceptable (especially for my wife’s palate). “Mikey liked it!”

Tuesday, June 7, 2022

Scattered sushi ちらし寿司

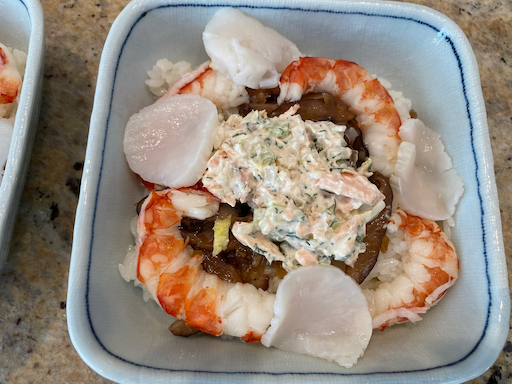
When we have salmon, I make salmon salad from the leftover cooked salmon. My wife thinks the combination of sushi rice and mayo-based items go well together (which I totally agree). We have made a roll sushi and “Gunkan” sushi from the salmon salad. One weekend, we realized our store of frozen cooked rice was getting low (it is always so convenient to have frozen rice), so we decided to make fresh rice for lunch to increase the frozen rice reserve*. Then my wife asked, “How ‘bout using the fresh rice to make scattered sushi or “chirashi-zushi” ちらし寿司 using the salmon salad (which I had just made in the morning) ?” As I posted before, scattered sushi is just a bed of sushi rice and the topping can be almost anything from totally vegan to all kind of sashimi fish. So, this is what I came up with which does not involve any raw or sashimi fish but, in addition to the salmon salad,  I added cooked shrimp and scallops.

* Frozen rice reserve: Making fresh rice this time did not help increase our frozen rice reserve. In addition to eating several portions as sushi for lunch, we then decided to have Yakitori 焼き鳥 in the evening since the weather was so nice and we had 4 chicken thighs we needed to cook. My wife greatly appreciates having grilled rice balls or “Yaki onigiri” 焼きおにぎりwhen we do Yakitori.  So, I also made four small rice balls in preparation. As a result there was not much of the freshly made rice to freeze as a reserve.


I may have gone slightly overboard especially since this was a  lunch.  The garnish included golden thread eggs or “Kinshi-ran” 金糸卵, pickled ginger or”gari” 生姜の甘酢漬け or ガリ, cucumber seasoned with sweet vinegar きゅうりの酢の物 and nori threads or “Kizami-nori” 刻みのり.


We made fresh rice, using rice we got from the New York Rice factory and is grown in Hokkaido “Yumepirika” 夢ぴりか. I used sushi vinegar from the bottle (Mizkan brand). I used as much sushi vinegar as the rice could absorb (about 10% of the weight of rice). I made the sushi rice in a Japanese “hinoki” cedar  tub or “han-giri” 半切 that we bought in Japan many years ago and amazingly still has a beautiful hinoki smell. I covered the seasoned rice with a wet dish towel and let it sit for 5-10 minutes so the rice could absorb the seasoned vinegar.

I added the sushi rice to the bottom of the bowl (square bowl we got in Sapporo just after we got married so many years ago).


For the scallops and shrimp (both were frozen and came from Great Alaska Seafood),  I thawed and gently poached them in salted water with a dash of sake. I made the scallops into several thin slices. After removing the shells, I halved the shrimp length wise.

I placed the salmon salad on the center of the rice and spread seasoned sliced shiitake mushroom (brown circle around the salmon salad). Then I distributed the scallops and shrimp around the shrimp salad and mushrooms. 


Then, I added the garnish as seen in the previous pictures.

This was a really luxurious lunch. This dish once again confirmed my wife’s notion that sushi rice and mayo-based toppings go well together. 

Friday, July 5, 2019

Chicken breast wrapped in perilla 鶏胸肉の青じそ巻き

This is inspired by a recipe in one of the food blogs I follow. I have previously posted yakitori 焼き鳥 dishes made with a combination of chicken meat, perilla and "umeboshi" 梅干し salted plum paste (this is a classic combination). One such dish used chicken tenderloin  another used chicken made into a roll with shiso and umeboshi paste, cut into medallions and skewered. This is the same combination of flavors with some different twists.   I cut the chicken into bite sized pieces, pound the pieces to break down the fibers, and marinate them before making the skewers as the recipe suggested. This preparation really made the chicken breast much more moist and tender. (My wife asked if this was sous vide chicken breast). I served the pieces un-skewered and instead of adding plum paste in the marinade as suggested in the recipe I put it on the top which has a more direct impact.


Ingredients (For the three skewers seen here):
One half of boneless and skinless chicken breast, cut into bite sized pieces, pounded with a meat mallet to break down the fibers.
Perilla leaves (We have a forest of perilla in our herb garden, 4 feet tall!)
Light olive oil for cooking.

For marinade
2 tbs sake
1tbs light colored soy sauce
1 tsp potato starch (katakuri-ko)

Directions:
I placed the chicken in a Ziplock bag with the marinade ingredients. I kneaded the bag to mix the meat and the marinade. I removed the air as much as I could before closing the bag. I refrigerated it for a few hours.
I cut the perilla leaves to the width of the meat and long enough that it wrapped the meat all the way around (some of our perilla leaves were quite large and had to cut them into several pieces). I wrapped the chicken pieces and put them on a skewer. (Althouhg I cooked the chicken in a frying pan rather than over charcoal, it was much easier to flip the skewers and keep the perilla leaves on the meat) (#1).
I added a small amount of light olive oil to a non-stick frying pan on low flame (#2), Put on the lid and cooked it for several minutes and then turned them over (#3). I used an instant thermometer to make sure it read 165F and the chicken was done before taking the skewers off the heat.  (#4).


I was going to use a tube of salted plum paste but it was near-empty and looked old. So, I made plum sauce or "Bainiku" 梅肉 sauce from "umeboshi" 梅干し salted plums (my mother's last batch sent to us a few years ago) (#5). I removed the meat from the stones and chopped it finely and put it in a Japanese "suribachi" すり鉢 mortar (#6). I gradually added mirin みりん until the ground plum became a thick saucy consistency. I smeared the sauce over the chicken (the first picture).

Although this is a variation of a "golden" combination of chicken meat, perilla, and salted plum sauce, this variation was really good because of the tender and moist texture of the chicken.

Monday, September 4, 2017

Country pate version 2 田舎風パテ第二弾

This is my second attempt at making "Country pate". One weekend, I got ground pork and chicken liver to make the pate but the chicken liver looked really good so I made "Yakitori" and liver simmered in red wine instead. Since I had the ground pork, I decided to make country pate using bacon instead of the chicken liver. I read a few recipes and came up with my own rendition. It came out quite nice. The texture was better than my first attempt. I served this with Dijon mustard, thinly sliced cornichon and skinned Campari tomato.


Besides pork and bacon, I added shelled pistachio nuts, shiitake mushroom and onion.  Seasoning included thyme, black pepper and reduced brandy.


Ingredients (made 3 small loaves):
1.25 lb ground pork
2 strips of thickly cut bacon, uncooked, finely chopped
1 large onion, finely chopped
1 clove of garlic, finely chopped
4 fresh shiitake mushrooms, stem removed, bottom cut off, torn length wise into thin strips, caps and stems, finely chopped
2 tbs light olive oil for sauteing
1 large egg
2 tbs cream
1 cup brandy (I used Christian brother VS which I use for cooking) reduced to 1/3 cup (#2)
1/4 tsp thyme (I used dry)
1/4 tsp Freshly ground black pepper
2 tsp Kosher salt
1 cup shelled pistachio nuts
3 bay leaves

Directions:
1. Cook the onion and garlic in olive oil. When cooked, add the shiitake mushrooms and continue cooking for several more minutes. Then season with salt and pepper and place the mixture in a metal bowl and let it cool to room temperature (#1)
2. Meanwhile reduce 1 cup of brandy to 1/3 cup (#2), be careful not to ignite the alcohol while reducing.
3. Mix together the bacon, ground pork and #1 and #2, pistachio nuts, egg, cream, thyme, black pepper, salt, and mix well (#3).
4. Grease the bottom of a small loaf pan and place a piece of parchment paper on the bottom and one bay leaf (#4).
5.  Place the meat mixture in the pan, tapping a few times to remove any trapped air (#5) and tightly cover the opening with aluminum foil.
6. In a 350 F oven, cook the pate in a  bain marie (fill a large baking dish with boiling water which comes to half way up the depth of the loaf pan) for 1 and half hours (or until the center of the pate registers 166 F).
7. Let it cool down to room temperature and refrigerate overnight.
8. To remove the pate from the pan soak the bottom of the loaf pan in warm water; the pate comes out easily (#6).
9. Wipe off the excess fat and gelatin from the surface and wrap the pate in plastic wrap and refrigerate for one more day before serving.


We like this version much better than the first version I made. It has a better texture. Although we did not taste the shiitake mushroom, it must have contributed to the texture. We are not sure that the reduced brandy did anything either. In any case. this pate is perfect accompaniment for red wine.

Saturday, August 26, 2017

Chicken livers simmered in red wine 鶏レバーの赤ワイン煮

Although chicken livers may not be a very healthy food, both my wife and I like them. So sometimes we buy a small plastic tub full of chicken livers when it is available at the local grocery store. I was thinking of making a re-match of country pate with pork and chicken liver but when I examined the livers, they were pretty good quality without any broken pieces. I changed my mind and decided to make "Yakitori" style with my tare sauce 鶏レバーの焼き鳥. I made this dish from the livers that remained after I made the yakitori. It looks very dark almost black and reminded us of whole truffles, but the inside was still the color of liver. I added freshly ground black pepper just before serving.


The white specks on the surface is ground pepper.


Ingredients:
230 grams (0.5 lb) fresh chicken livers, cleaned, soaked in cold water, cut into bite size.
130 ml red wine (I used Tempranillo since I happened have an already open bottle)
1 tbs Mirin
1 tbs Soy sauce
1 tsp sugar
1/2 tsp ginger, finely julienned

Directions:
In a sauce pan, add all simmering liquid ingredients and let it come to a simmer.
In a large amount of boiling water, add the livers and wait until the water comes to a boil again. Remove the livers and place them in the simmering liquid (see below).


Cook/reduce the liquid to a small amount 30 minutes or more (see below).


I did not add freshly ground black pepper while cooking but added it just before serving. I served this dish cold next day with a glass of red wine. This liver had very pleasing dense texture; almost pate-like with some sweetness and nice red wine/tannin flavors. It went perfectly well with a good sturdy red wine. We both really liked this dish.

Friday, May 6, 2016

Braised chicken liver with garlic chive 鶏レバーとニラの炒め物

Weather in the DC area has been heavenly the past week and, for the first time this year, we had Yakitori 焼き鳥 outside. We did our usual chicken wings, pork with onion, and chicken livers. We also grilled fingerling potatoes and yaki onigiri 焼おにぎり (grilled rice balls). Since our usual grocery store did not have any fresh chicken livers, I went to another gourmet grocery store and got a container of frozen chicken livers. The livers were whole and less damaged or fragmented than the ones from our regular grocery store. In any case, we did not grill all the chicken livers for yakitori so I made this dish since we also had spring garlic chives in our herb garden.


Despite the very generous amount of fresh garlic chive I used, the garlic chive flavor was not as strong as I would have thought it should be.


I did not use any particular recipe, just "winged" it.

Ingredients:
Chicken liver, frozen thawed, washed and soaked in water, cut into bite sized pieces (1 container - about 1 lb minus the two skewers of liver I used for Yakitori).
Garlic, 3 small cloves, finely chopped 
Garlic chive, cut into 1 inch lengths (Picture below)
Sake
Mirin
Soy sauce
Black pepper, freshly ground


Directions:
The chicken livers were a bit bloody after thawing but all the livers were intact and in much better shape than the usual chicken livers we get. I cut the livers into bite sized pieces and soaked them in cold filtered water changing the water several times. I blotted off the moisture with sheets of paper towel and seasoned the livers with salt and black pepper. In a frying on medium flame, I put in vegetable oil. Once the oil heated, I placed the liver in the pan and turned it several times until all the sides changed color. Then I added the garlic. After several minutes of stirring, I added sake (1 tbs) and put on the lid to steam (below). After a minutes or so, I removed the lid and turned up the flame and let the liquid evaporate.  


I added the garlic chive and stirred for few minutes.


I added mirin and soy sauce and further reduced the liquid while shaking the pan.


Once the liquid reduced just coating the liver, I cut the heat and seasoned further with freshly ground black pepper. I tasted it and decided I did not need to adjust the seasoning.

For the libation, we chose Joseph Phelps Pino Noir,  Freestone Vineyard, 2013. Since we are a member of the wine club, we just received this Pinot from them. I thought this could go well with this dish. This pinot predominantly tasted of red fruits (cherry, raspberry and also a hint of strawberry) upfront and showed an almost effervescent acidity with some spice elements. This went well with slightly "iron-ny" liver with sweet /salty and peppery savory seasoning.

The only disappointment I had with this dish was that the garlic chive flavor did not come through much at all. Maybe, I have to add more garlic chive just before cutting the flame. For that matter, I did not taste garlic that much either. We thought this frozen liver was quite good and even better than the "fresh" liver we get from our regular grocery store which appears to be roughly handled resulting in many fragmented pieces. This dish is similar to one I posted before with onion and garlic. We like both.

Wednesday, December 30, 2015

Tako Grill assorted sashimi plates タコグリルの刺身の盛り合わせ

Our Izakaya substitute Tako Grill moved to its new location some time ago. The new restaurant is somewhat smaller, without sake bar, than the old one but it is a nice brand-new space nicely decorated. The new location has its own parking lot. While parking is a bit more expensive, even after validation from Tako Grill, than parking on the street at the old place, it is so convenient. It is worth it not to have to jump up in the middle of the meal to go feed the 1 hour street parking meter so as not to get a ticket. 

Mr. Segawa 瀬川さん has now started serving authentic yakitori 焼き鳥 cooked on a real charcoal grill (I keep forgetting to take pictures). Among the yakitori items, chicken liver or "reba" レバ and chicken meat ball or tsukune つくね are two standouts. We always have a great meal at Tako grill but the sashimi dishes we have had recently have been particularly outstanding. They have included a good variety of impeccably fresh fish prepared to highlight their best qualities. Here are some pictures of the assorted sashimi plates Chef Jose Calderon prepared for us.


Beside the usual toro トロ and ma-saba 真鯖 or chub mackerel, this evening geoduck or mirugaiミルガイ, sea urchin うに and octopus タコ (which was prepared at the restaurant) were excellent. The geoduck had a crisp crunch and fresh ocean taste; one of the best we've eaten.


This was another occasion featuring a similar line up in a different arrangement.


This evening, the scallops ホタテ were wonderful as well as the octopus and pacific saury さんま. And don't ignore the uni.


This was what we had on our most recent evening. The sumi-ika スミイカ or cuttle fish was by far the standout.  As an example of how the fish is prepared to accent its best characteristics Chef Jose, did a slight shimofuri* 霜降りtreatment for the squid. As a result the squid had a nice firm texture but was not chewy and had a pleasant sweet flavor. The Japanese halfbeak or sayori サヨリ was also excellent. On the several occasions, we have had sayori fish at Tako, it has always been good. We particularly like the way they take the head and skeleton, which was used as decoration, and then deep fry it. With this preparation, we could eat everything including the head; it was like a crunchy potato chip with great flavor. After moving to the new location, the chance of getting a variety of excellent sashimi has improved and the restaurant is always seems to be crowded while we are there. We even witnessed a line forming at the entrance one evening.

*Shimofuri: Means "frosted" since the surface turns white and opaque like frost. This is done by dunking raw fish or meat into boiling water very briefly and then immediately cooling it down by soaking in ice water. This slightly cooks the surface the fish.

Disclaimer: The above sashimi assortments are not on the menu. It is a sort of "omakase" sashimi assortment and may not be always available.

Information:
Tako Grill
4915 Hampden Ln, Bethesda, MD 20824
301-652-7030

Sunday, August 23, 2015

Grilled sanma さんまの塩焼き

During this DC summer, we happened to have a rare low-humidity-not-too-hot couple of days. Since mosquitos on these days were less aggressive, we decided to have sanma 秋刀魚 (Pacific saury) grilled outside. I have pontificated about sanma previously so I will not repeat myself. I got frozen sanma from our Japanese grocery store but I am not sure if this came from Japan or somewhere else. It was still early in the sanma season in Japan (the catch had just started in Hokkaido) and these may not have come from Japan.

In any case, I charred the fish a bit too much. It tasted good, though. I served it with traditional grated daikon. This time I gutted the fish but left the head just for esthetics. I even found a long plate which accommodated sanma in one piece. The plate was made by one of the local artists which we got at one of their yearly sales.


I also grilled Japanese pepper "shishi-tou" 獅子唐芥子 (miraculously none was atomically hot) and fresh shiitake mushroom. I brushed the shiitake with olive oil and after I turned the gill side up, I poured a small mount of soy sauce on just before removing from the grill.


Using lump charcoal and Looft lighter, it is easy and mess free to prepare the fire in our yakitori grill.


Within 15 minutes, fire was ready.


I cleaned and gutted the sanma after thawing. I salted and placed them on a paper-towel lined  aluminum pan and kept them (uncovered) in the refrigerator for several hours before grilling.


The fire was a bit stronger than I intended and the skin charred rather quickly.


I brushed olive oil and then salted shishi-tou  before grilling.  It took only few minutes on each side to grill.


This was a definitely bonus day for us as we could grill sanma outside.

Friday, July 24, 2015

Two appetizers 酒のつまみ 2種類

These are not new but one evening we had these two small dishes with sake.

We got a pound of salmon filet. When we get salmon filet, I always ask for the head portion because it includes the belly meat  or "harasu" はらす (thin and oily). I usually separate this portion from the rest of the salmon so the two sections are of even thickness. Besides, the belly portion makes a good small appetizer. We had the rest of the salmon for dinner. (Diversion alert: for some reason the fish fillets sold here are not scaled. Maybe people don’t eat the skin? So however I cook the fish my first step in preparation is scaling them.)

I marinated the belly portion in  "Yuuan-ji" 祐庵地  (soy sauce, mirin and sake in equal amounts) in a Ziploc bag for 30 minutes. I cut the belly into two pieces (one for me and the other for my wife) and skewered them using long flat metal skewers for Yakitori we got from Kappabashi 合羽橋 on our recent trip to Japan. The new skewers made my job much easier since they are long enough to span the length of the baking dish I use in the toaster oven (the ones we had before were too short). I grilled the meat side first and then the skin side to make the skin really crispy. I served this with daikon namasu 大根なます garnished with tobiko roe and slices of my Japanese cucumber pickles.


The second dish shown below is also grilled in the toaster oven. Whenever we get bone-in split chicken breast, I separate the tenderloins from the breast meat. I used two tenderloins for this appetizer (I used the rest of the breasts for chicken paillard). The tenderloins were soaked in sake (mostly to help preserve the meat). I skewered and lightly salted the tenderloins. Then, using the same type of flat metal skewers I used to grill the fish. I grilled the chicken on both sides in the toaster oven. When the meat was almost done, I smeared on some umeboshi  梅干し sauce (I removed the meat of umeboshi - I still have my mother's home made - placed it in a Japanese Suribachi 擂鉢 mortar added mirin and ground it to paste). I grilled for 30 seconds more (mostly to warm up the sauce). I served it garnished it with chopped perilla from our herb garden.


These are nothing new but they are really good appetizers for sake. We had the rest of the salmon (pan fried and then finished in the oven with crispy skin) and rice for dinner.