Sunday, April 25, 2010

Rice porridge with salmon roe and grilled tarako お粥とイクラ、焼き鱈子


This is another example of "shime" 締め or 〆, an ending dish. I just made simple rice porridge using leftover cooked rice. I add about twice the amount of water ("dashi") to cooked rice (if you start with raw rice, add volume of water 5 times the volume of rice) in a pot (I use ceramic "ukihira" 雪平/行平 or single handled lidded ceramic pot specifically designed for making rice porridge but any pot will do). I did not make "dashi" from scratch this time and used granulated instant dashi. I simmered for 15-20 minutes in a very low flame. Toward the final 10 minutes, I added sliced fresh shiitake mushroom. When the porridge is done, I add thinly sliced scallion and a beaten egg and mix, let it stand for 1-2 minutes and serve. I intentionally did not add any salt since the condiments are rather salty. 

The condiments are salmon roe (ikura), beer marinated daikon 大根のビール漬け, blanched broccoli rabe or rapini (taste similar to "annohana" 菜の花), and broiled cod roe. This partially cooked tarako is a rather classic way of serving tarako called "yakitarako" 焼き鱈子. For adding to a bento box or to rice balls or "onigiri" おにぎり, you almost always use "yakitarako" rather than raw tarako. I use a toaster oven and place a sac of tarako on aluminum foil and "toast" as though you are toasting slices of bread. I repeat the process after turning the tarako 90 degree. You have to have all the sides cooked but the center should be uncooked. Somehow, partially cooking the tarako will add another dimension and texture contrast. Feel free to put these condiments into the porridge and enjoy.


This is a very comforting dish to end your Izakaya feast.

Friday, April 23, 2010

Omelet with semi-dried baby sardines シラス卵焼き (Mark's book P116)

Japanese like this salty, semi-dried tiny hatchling fish called "shirasu" シラス or "chirimen jako" 縮緬雑魚. The 
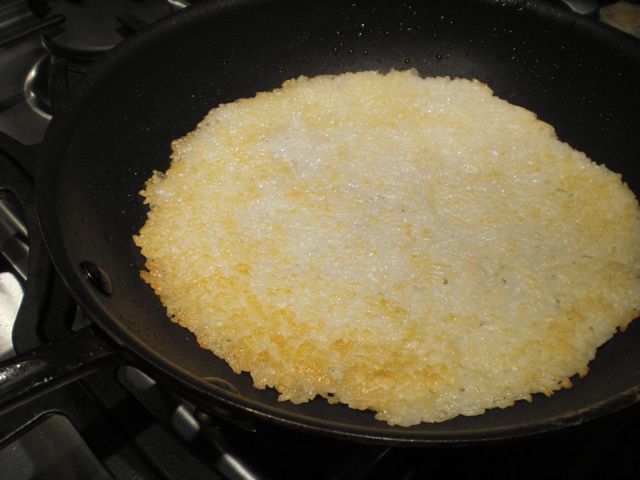
difference between these two may be regional and/or degree of dryness but they appear to be essentially very similar. This is based on the recipe on Mark's book p116 but to make two small servings from two egg omelet, I used a Japanese rectanglar frying pan (for making "dashimaki"  だし巻き Japanese omelet). Please see the picture below. This is a home-use version of a rectangular pan and has a non-stick surface. I should have taken pictures while I was making the omelet to be more informative but this was an afterthought.

I essentially followed the recipe but I made a slight modification and made it like "dashimaki" or Japanese sweet omelet, which I may be able to post in near future. First, I beat two large eggs, and added one package of shirasu (about 2 tbs), one chopped scallion (about 2 tbs), dashi (2 tbs, I added it as though I was making "dashimaki" but it is optional), ground pepper (I use white pepper just for esthetics). I did not add salt or sugar. I heated the frying pan on a medium-low flame and added a small amount (1 tsp) of vegetable oil. I poured 2/3 of the egg mixture in the pan and scrambled the eggs using a silicon spatula. When the eggs were semi-cooked, I pushed all the eggs to one of the narrow ends of the frying pan to make 1 inch wide
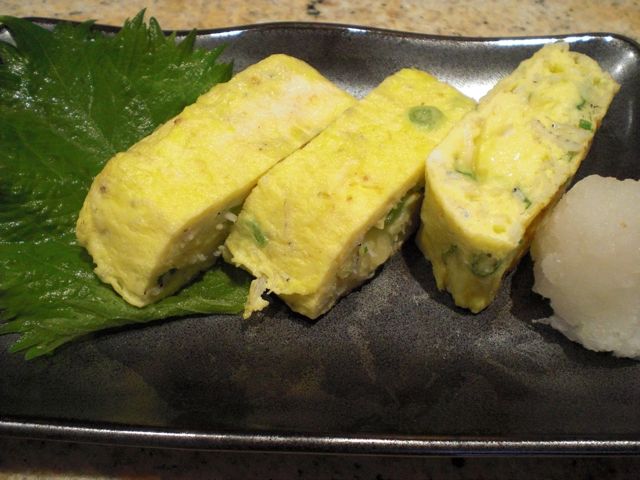
rectangle, leave it for 10-20 seconds and then flipped it over using a spatula. I added the remaining egg mixture and spread it in the empty part of the pan and then lifted the rectangle of omelet, so that the egg mixture went under the rectangle. I waited 10 seconds so that the bottom of the new egg mixture is set but the surface is still runny. Again using a spatula (or kitchen chopsticks if you so prefer), from the end where you made the rectangle of omelet, turn it over several times (wait few seconds at each turns) so that the surface is covered with the final layer of omelet. When the surface of the omelet is cooked (you may have to push the sides of the omelet to the sidewalls of the frying pan and flip over once to make sure all the surface is set and the final layer of the omelet is adhering to the center), take it out on a cutting board and cut into six equal pieces. Serve it with grated daikon or "daikon-oroshi" 大根おろし and soy sauce. The small fish add saltiness, as well as interesting flavor and texture.

Wednesday, April 21, 2010

Duck breast with red onion, grated daikon and Ponzu Soy sauce 鴨の胸肉ポン酢大根おろし赤タマネギ添え

This is a variation of serving duck breast and similar to the one in Mark's book p143. I made some modifications to most traditional way of serving duck breast and served the duck breast slices on a bed of thinly sliced red onion. This time, I slightly over cooked the breast (not intentionally) but it still tasted OK. The ways I cook the duck breast is the same as before.

I sliced the red onion into very thin slices, lightly salted, mixed and let it stand for 5 minutes. After ringing out the extra moisture, I soaked it in ice cold water (with ice cubes) for 5 minutes--ringing out the water in a paper towel. I then dressed it with a small amount of ponzu shoyu ポン酢醤油 and extra-virgin olive oil. Meanwhile I grated daikon and added ponzu shoyu. I sliced the cooked duck breast into thin pieces.

To assemble, I spread the dressed onion on the plate, layer the sliced duck breast and made a linear mound of the dressed grated daikon and garnished with thinly sliced (on the bias) scallion. I added a wedge of lime (in lieu of yuzu 柚子) and also a dab of Yuzukosho 柚子胡椒 just in case some more kick was needed. To eat, I usually make a small roll of the duck slices using chopsticks with the grated daikon and scallion in the center. You could enjoy this roll with a little of the red onion and with or without Yuzukosho. I sort of like eating the duck breast this way. With Ponzu, we had this with cold sake (our house sake Yaegaki "mu" 八重垣『無』).

Tuesday, April 20, 2010

Browned crispy rice with Parmesan cheese おこげのパルメザンチーズ

Although automatic rice cookers made cooking rice very easy and consistently successful, one major drawback is not having the burned or browned crust that formed on the bottom of the pot or "okoge" おこげ. As a kid, I remember "okoge" was a good snack. My mother used to make rice in a traditional Japanese pot called "okama" お釜 with a heavy wooden lid when I was a little kid. After the rice is cooked, rice has to be transferred to a wooden vessel called "ohitsu" お櫃 (see the image) leaving a charred crust on the bottom of the pot. This crust is called "okoge" and it was nicely crunchy and flavorful. With just a small amount of miso, you could have the entire meal just eating "okoge". 

This dish is trying to recreate this "okoge" with some Italian twists. I must have seen it in one of the many Japanese drinking food cook books that I have. I did not find or check the original recipe this time and I may have changed something but it is a simple preparation of leftover rice rather than a recipe.

I use leftover frozen rice (about one cup for two servings). I defrost it in a microwave oven so that rice grain can be separated but still cold. I add the rice and 1-2 tbs of chicken broth (my usual Swanson no-fat, low-sodium) to a small pan on a medium flame and mix them with a silicon spatula until the rice gets heated up and absorbs the broth and becomes somewhat sticky. Remove from the heat and place the rice in a metal bowl and let it cool down a bit. I then grate a good amount of Parmigiano-Reggiano cheese (about 3 tbs but the amount is arbitrary) and mix it in the rice.
Using a non-stick frying pan (on a medium flame), I add a very small amount of light olive oil (1/2 tsp) and add back the rice-cheese mixture. Using a silicon spatula, spread the rice mixture in a thin layer and brown (5-6 minutes on one side) and then flip over (either by siding it onto a plate and then transfering it back to the pan or just flipping it like a flapjack - remember "its all in your wrist!").

I browned the other side for another 5 minutes. When desired brownness and crispiness are attained, take it out and break it into small manageable pieces. I served this as the last shime 締め dish with sautéed (in butter) broccoli rabe (pre-blanched) seasoned with salt and pepper, which sort of matches the Italian aspect of this dish. To me, I still like just simple "okoge" and miso better but this is close albeit a bit "oily".

Sunday, April 18, 2010

Daikon marinated in beer #2 大根のビール漬け 二回目

As I promised in the prior post on Daikon marinated in beer, I played with the kind of beer I used and types of vegetables. The last time I used Sam Adams Summer Ale which is a more pilsener-like light-colored beer (ale). This time I used Sam Adams Brown Ale which is a bit more robust and darker ale. The proportion of other ingredients is about the same but I used a whole bottle of beer (350ml or 12 oz) and almost proportionally increased the remaining ingredients. Beer (12 oz), rice vinegar (50ml), sugar (100 grams), salt (50 grams), Japanese hot mustard powder (20 grams). Like before, I peeled and cut a daikon into 4-5 inch long pieces and quartered. I used a half of a large daikon. I also added small carrots (2) and mini-cucumber (3).

After 7 days, the daikon and carrot are good but may be a bit too mustardy (especially the daikon). The cucumber was a bit shriveled up. I added a new mini-cucumber and tasted it after one day. The above pictures are one day old cucumber and 8 day old carrot and daikon. All are good but by far, daikon is the best. I will reduce the mustard powder next time and leave cucumber probably for 2 days. This cucumber was not shriveled up but did not have enough flavor penetrated. I am not sure of the difference between the brown and summer ales but the brown ale appears to add more depth to the flavor. Among the vegetables, there is no question that daikon is the best as everybody has indicated.