Tuesday, May 18, 2010

Stewed rolled daikon and deep fried tofu 大根と油揚の砧の煮物

This is another high-labor simple ingredient dish (it is a value added item and "you can charge more for this dish than for a simple nimono or simmered dish" is what I remember it said in the cookbook from which I got this recipe). Although I cannot charge more for this dish, I decided to make it because my wife found several Ziploc bags of half used packages of deep fried tofu pouches or "obraage" 油揚げ in our freezer, apparently representing different vintages. Since these things do not improve with age, I tried to use up the older vintage aburaage.  I made this dish a few times before and I remember that it tastes pretty good. I made this at the same time I made "Kanpyo with checkered daikon and carrot" カンピョウの市松 and the original recipe came from the same cookbook ("Appetizers and a la carte small dishes for Izakaya" by Tadashi Shinojima.)

(This is the way I served it the day I made this dish)

First, I soaked 6 "Inari" 稲荷 or "koage" 小揚げ type (i.e. small) aburaage in boiling water to thaw and remove excess oil.  While taking care not to burn my hands, I squeezed out any water it may have absorbed by pressing it between my palms. I then cut three edges of the aburaage and opened it up into a flat rectangular sheet (about 3 by 5 inches). I repeated this process with the rest of the abraage and set aside.

(The next day, with sugar snap)

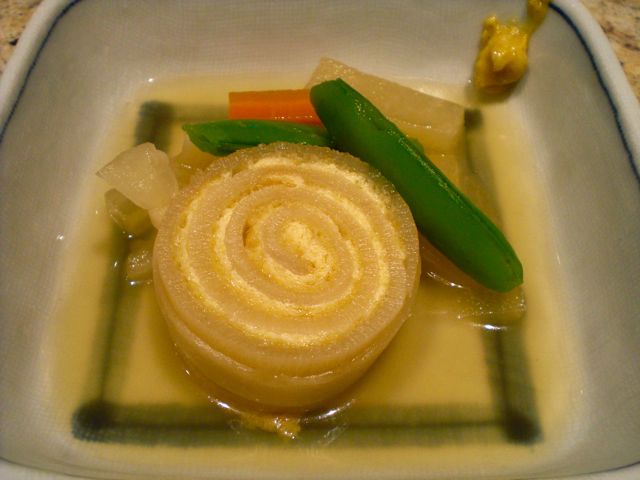
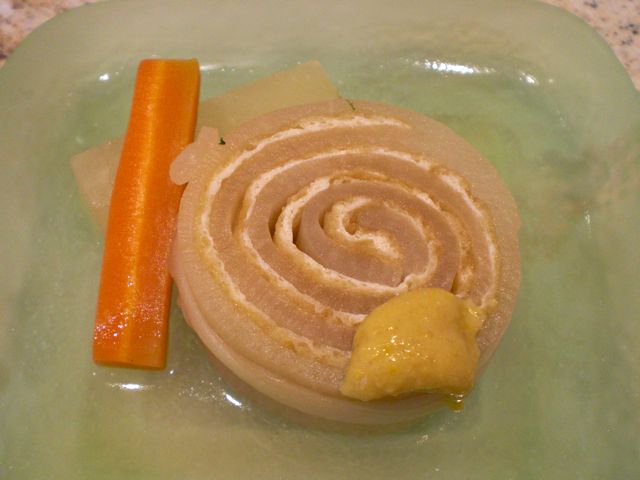
I happened to have a rather large good daikon. I cut about a 5 inch-long (corresponding to the width of the aburaage sheets) segment of daikon. Using "Katsura-muki" 桂剝き, after peeling off the skin, I made a long thin sheet of daikon (it should be thicker -about 3mm- than when you make a daikon garnish for sashimi).  I managed to make 3 sheets, each about 13-14 inch long. I blanched the diakon sheets for 5 minutes so that it would be more pliable. When it cooled enough to handle, I layered the aburage on top of the dakon sheet. You need two abuaage sheets to cover 80% of the diakon sheet leaving about 3-4 inches at the end (which makes the outer most layer). I rolled up both together and tied the upper and lower portions of the resulting cylinder with Kanpyo 干瓢 (I cut the width of the Kanpyo ribbon in half since this one happened to be rather wide). I made three rolls (each will be cut in half when served yielding 6 pieces). I placed the rolls on their ends in a small deep pot containing dashi broth (abut 2-3 cups--enough to just cover the daikon cylinder), mirin (3 tbs), "usukuchi" 薄口 soy sauce (3 tbs). The original recipe calls for dashi, mirin and sugar without any soy sauce but this does not make sense to me, so I omitted the sugar and added soy sauce. With "otoshibuta" 落とし蓋, gently simmer for 30-40 minutes. Before serving, I cut the cylinder in half between two Kanpyo ties to make two disks. Serve with the cut end up (looks much nicer) with a dab of Japanese hot mustard and a bit of the broth. The combination of texture (still slightly crunchy daikon and gentle softness of obraage), subtle and gentle sweetness from daikon and the broth, all produced a sublime experience punctuated by loud wake-up calls from the Japanese hot mustard. Sake is definitely called for.

Sunday, May 16, 2010

Cocktail カクテル


We very rarely drink hard liquor or cocktails nowadays. Red wine and sake are more agreeable most of the time. But if the occasion calls for it like today, we enjoy a cocktail. I usually go for a Martini and my wife for a Manhattan. I think that, the quality of the gin, bourbon, and vermouth or whatever you are using is, of course, important. There are other very important details that make the cocktails especially good. The first is the glass. It has to be a very thin rimmed crystal so that when it touches your lip, it gives you a nice sensation. A thick cheap cocktail glass actually made of glass does not do it. Second, the glass and the ingredients have to be very cold. I chill the glasses by pouring crushed ice mixed with cold water into them first. Using a cocktail shaker with enough crushed ice (-10F ice from a freezer is better than ice from a stand alone ice maker some establishments may use, which is not as cold) is also important so that  the cocktail is super cold. Tiny ice crystals should float on the surface when poured. Third, the garnish--a good stuffed green olive for the Martini and maraschino cherries for the Manhattan. In the case of my wife, make that two maraschino cherries. (Its a long story having to do with good family times, and the distribution, to the kids, of Maraschino cherries, one each, from a Grandma and Grandpa who liked Manhattans but not the Maraschino's that came in them).  Of course instead of having a cocktail in a dark and smoky bar, we like to have it in our backyard on the weekend when the weather is perfect--sunny, cool and no mosquitoes, like today. We had small canapes of creme fraiche, capers and smoked salmon on small squares of Pumpernickel with the cocktails. We had to admit, though, if there is a nice Izakaya nearby like this one, we may change our mind and venue (especially if it was a weekday evening).

Saturday, May 15, 2010

Spinach soufflé ほうれん草のスフレ

This is totally not Izakaya food but, this soufflé rose nicely (for a fleeting moment anyway) warranting the post. My wife's idea of a good time and good food are somehow tied to spinach soufflé and a Manhattan (cocktail). Because I volunteered for testing Japanese grill recipes for a cookbook, we had extra bags of spinach and leftover steaks. In addition, we had 4 egg whites left since my wife made a very nice bread pudding with a delicious but deadly Whiskey sauce (required 4 egg yolks) for dessert when we had dinner guests to evaluate these recipes. So we decided to make a spinach soufflé from the leftovers. My wife only knew Stauffer's frozen spinach soufflé until I made this dish from scratch for her some time ago.
Please do not follow my recipe (I am sure we are safe since nobody in their right mind would follow any of my recipes anyway). If you are going to make this dish, please use a more accurate recipe available elsewhere. I just do not measure things and can not give you accurate amounts of anything. This is just the process we went through for our own record.

Spinach: We had one and half bags of baby spinach (one of those pre-washed variety). My wife just cooked the spinach (no water added) on a low flame in a large sauté pan with the lid on--about 5 minutes or until it is wilted (mixing several times to keep the bottom from scorching). I squeezed out any excess moisture and chopped it finely. 

Bechamel sauce: I chopped one small shallot and sauteed in about 2 tbs of olive oil and 1 tbs of butter for 2-3 minutes in a frying pan on a low flame. I added about 1/4 cup of AP flour and cooked for one to 2 minutes and added cold milk (I used 1%). I think I started with about a cup and then added more milk in several increments until it become rather loose saucy consistency. I added grated cheddar and sheep milk Gouda (about 1 cup) and mixed into the Bechamel sauce (became Mornay sauce, I guess). I seasoned with salt, white pepper, and freshly grated nutmeg to taste. I then mixed in the spinach above. I am not sure about the exact amount but I think this yielded about three cups (or little less) of the creamed spinach.

Egg white: We had 4 egg whites left over from making the Whiskey sauce (remember it used 4  egg yolks! Are those arteries I hear hardening?). I did not know how much egg whites were needed, so I asked my wife to whip all 4 egg whites to the hard peak stage. I first loosened up the creamed spinach with several large spoonful of the whipped egg white and then folded in another several spoonfuls of the egg white until it looked and felt right (whatever that means, I guess I used 2 egg whites worth or maybe a bit more).

Soufflé dish: We used a 7 inch souffle dish which was buttered and dusted with grated Parmesan cheese. I poured in the above mixture (perfect, it came to 80% of the volume of the dish). I cleaned up the edge of the dish and put it in a 400F oven for 30 minutes and Viola!

Thursday, May 13, 2010

Kanpyo with checkered daikon and carrot カンピョウの市松

Kanpyo 干瓢, literally means "dried gourd", is a rather common item used in Japanese cuisines. The meat of the gourd (a certain edible kind, I suppose) is peeled like a narrow tape and then dried. You can buy it, in this dried form, in a Japanese grocery store. I do not think it has much flavor by itself but, certainly, it will absorb any flavors in which it is cooked. It is often used as an edible tie to tie off something. For example, when I stuff a deep fried tofu pouch or abraage with a rice cake or "mochi" in my version of the New Year Soup, I use kanpyo to tie the pouch closed. It is also a common item to be included in scattered sushi "chirashi-zushi" ちらし寿司 or sushi roll "norimaki" のり巻き. To prepare kanpyo, you first wash, rehydrate (30 minutes or longer), and briefly (5 minutes) boil in water. After this, you could cook further a few different ways. If you are going to use this to tie off something, I will just use it without further cooking. The dish I am describing here is one of the rare dishes in which kanpyo is used as the main ingredient. After using kanpyo as a string/tie for another dish, I had a lot of unused kanpyo and decided to make this dish.  It is very subtle in flavor and a bit of a chore to make but it looks more "professional" than "home made".

This dish is originally from a cookbook called (roughly translated into English) "Appetizers and a la carte small "idea" dishes for Izakaya" by Tadashi Shinojima. First, I make the center portion of the dish by cutting equally sized rectangular-shaped sticks of carrot and daikon measuring about 1/2 x 1/2 x 3 inches (2 each, total of 4) (for two small servings). Combining these sticks to make a checker board pattern on the end (this is called "Ichimatsu" 市松 pattern in Japanese which is named after a Kabuki actor in the late Edo period). I make sure the kanpyo ribbon is open and flat (not to be folded or twisted) and wrap this core of the carrot and daikon sticks, keep moving up and down so that the length of the carrot and dikon sticks are evenly wrapped. Use a butcher twine (or a more delicate thread if you prefer) to tie the end of kapyo. I simmer it gently with a "otoshibuta" 落とし蓋 in 2 cup of #2 or niban dashi, 3 tbs of mirin and (about) 2 tbs of light colored or "Usukuchi" 薄口 soy sauce for 30 minutes. Let it cool down in the broth to room temperature. For the sweet miso sauce, I mix 3 tbs of red miso, 3 tbs of mirin and 2 tsp of sugar in a small sauce pan on a low flame and stir until it reaches nice saucy consistency (for about 5 minutes). You should taste and, if needed, add more sugar. Cut the kanpyo roll into 4 equal disks and serve with the miso sauce. This is a rather classic Japanese dish; simple ingredients but lots of steps and time to prepare. It has a very subtle and pleasing flavors. Perfect accompaniment for sake.

Tuesday, May 11, 2010

Fresh corn Kakiage tempura トウモロコシのかき揚げ (Mark's book P47)


I found corn in the husk for the first time this year in our grocery store. I asked the woman, stocking the shelf, where the corn came from (thinking it must have come from a foreign country like Mexico). She showed me the mark on the crates they came in. It was clearly stamped "U.S.A." but she did not know where in the U.S. It appears that seasonal items become available earlier and earlier every year.  So I bought 8 ears (less than $2). They were white corn and rather small but the kernels were full and sweet when I tasted them raw. So I decided to make kakiage tempera かきあげ. Kakiage is a version of tempera where small items (sliced onions, julienned Burdock roots, small shrimp or fish etc are fried with a batter as a binder).


The "corn kakiage" appears on Mark's book p47, but it is a rather standard recipe except the use of corn is a bit uique. I made my tempura batter with cake flour (1/2 cup), potato starch or "katakuriko" (1 tbs) and egg yolk (1/2) and mixed in ice cold water (about 1/2 cup) to a desired cosistnecy. For Kakiage, I made it to the consistency of a loose pancake batter. I removed the kernels from the cob (one ear of corn yielded about 1/2 cup) using a knife and placed them in a bowl. I added enough tempura batter to coat every kernel and a bit more. Using a soup spoon, I slipped the batter and corn mixture into hot oil (170C or 340F) and fried until crispy and lightly browned, turning once (about 2-3 minutes on each side). I drained and served while hot and crispy. I also made my usual green beans and shiitake mushroom tempura. I served this with green tea salt and wedges of lime. The corn was very sweet with a nice light tempura crust. The lime juice added a nice citrus acidity and made the salt stick better. We had a bit of red wine left but switched to cold sake for this dish.