Friday, January 21, 2011
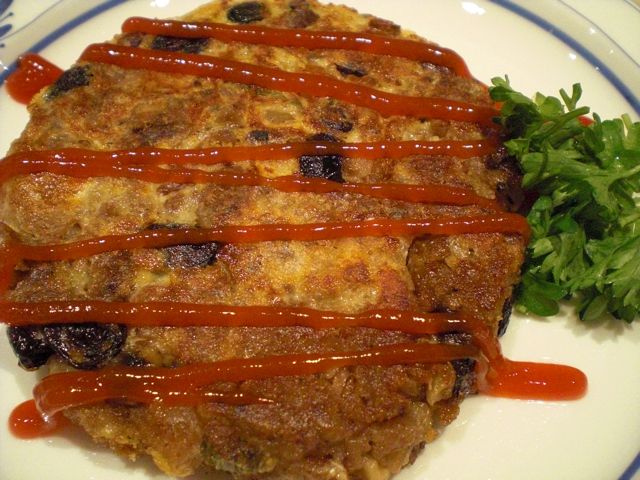
Stuffing cake スタッフィングのケーキ
This is a mere leftover control dish but it tasted pretty good. We had leftover stuffing which my wife made for Christmas. I needed a shine dish to end a meal and this was a perfect solution.

I added one beaten egg to whatever amount of the leftover stuffing we had. I melted butter and placed two ring molds in a frying pan on a medium-low flame. I made two thin disks (1/2 inch) of the stuffing by pressing it firmly into the ring molds using a silicon spatula. I fried one side for one to two minutes. I then removed the molds (the disks should hold shape) and flipped them over and cooked the other side for 1 more minute. I garnished it with good old fashioned American ketchup. This retained the stuffing taste but had a nice crunchy crust while still being moist on the inside. It is a quite nice "shime" 締め or ending dish.
Wednesday, January 19, 2011
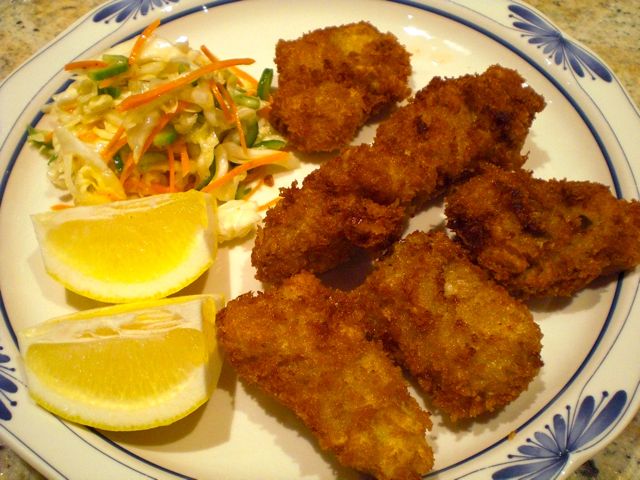
Fried oyster redux カキのフライ再登場
This is a repeat of my post from about one year ago. The reason I am posting this again is that this was one of the best fried oysters I have ever made and probably I have ever tasted (kindly allow me to boast). Although the oysters came in a glass jar pre-shucked, they were quite large and equal in size without any broken pieces. I proposed several options including an oyster nabe to my wife. After my report of the quality of the oysters, she said fried oysters, and I gladly obliged.

The recipe is the same as before. This time, though, because of the good quality of the oysters and the fact that I fried them perfectly (just luck). They were light and crunchy outside and juicy, soft and flavorful inside. We just enjoyed them with a squeeze of lemon and cold sake. We both thought the quantity of oysters was a bit too much for us to finish, but both of us ate everything. The side was the usual, my variation of coleslaw with honey mustard dressing.
Monday, January 17, 2011
Salmon kelp roll 鮭の昆布巻き
This is typically served as a New Year's day dish. The reason, I think, is that "kelp" in Japanese is "kobu" こぶ or "Konbu" 昆布 which sounds like a part of the phrase "yorokobu" よろこぶ meaning rejoice. In any case, I did not make kelp rolls until last year. Once I made them, we realized how much better they could be than the commercial ones (even compared to an expensive variety from Hokkaido that my friends sent me one year). Since I did not post how to make this last year, I decided to post it this year.

The picture above shows the salmon kelp roll served with my marinated salmon as a drinking snack; both were leftover from New Year's dishes. The kelp rolls are not too difficult to make and the effort is definitely worth it. I made this based on a recipe from e-recipe but I made the seasoning much lighter than they suggested.
I rolled the kelp around the salmon strip in the center and tied it off in two places using the kanpyou as shown below (this pictures is after cooking). I placed all 4 rolls in a shallow pan in which they fit snuggly (I used a square Pyrex baking pan with a glass lid). I then poured in the kelp soaking liquid. Since I also had a soaking liquid left over from rehydrating dried shiitake mushrooms (used in another dish), and the mushrooms had imparted some good flavor to the liquid I also added that. I added sake (2-3 tbs) as well. The kelp rolls should be just covered with water. I simmered it with the lid on for 1 hour or until the kelp is soft.

Seasoning: The seasoning is essentially sweet and salty (soy sauce) which is a typical Japanese seasoning. As a rule, the "sweet" of the seasoning is added first. So I added sugar (1 tsp) over the rolls and let it simmer for 5 minutes with an otoshibuta 落 とし蓋. I then added more sugar (1 tsp) and soy sauce (1 tbs) and simmered it for 10-15 minutes. At the end of cooking, the liquid was reduced in half. At the very end, I added mirin (2 tsp) and soy sauce (2 tsp) for a fresh taste. Again, the seasoning is up to your liking; you could add more sugar, mirin and soy sauce. I did not want to season it too strongly. I let it cool in the cooking liquid. The picture above shows it after it cooled and was ready to be cut.

Kelp: A good dried kelp--one that gets soft when cooked and is therefore good for eating. "Hidaka" 日高 kelp is especially desirable, since it gets softer more quickly than other types of kelp such as Rausu 羅臼 or Rishiri 利尻 kelp. I soaked a 5-6 inch long piece of dried "Hidaka" kelp in water until it returned to its "natural state" and became pliable (30 minutes to 1 hour). I used 4 strips to make 8 good sized rolls. I trimmed the ragged ends to make a nice rectangular piece. I reserved the soaking liquid.
Kanpyo: This is mostly to tie up the rolls so they don't unravel but it does have some texture and taste. I washed and then massaged several pieces of kanpyo with salt and washed again. I soaked it in water for 30 minutes to one hour but did not cook.
Salmon: I used fresh salmon. I cut the fillet into 1/2 inch wide strips with the skin left on. I trimmed the end to make it fit the width of the kelp.
I rolled the kelp around the salmon strip in the center and tied it off in two places using the kanpyou as shown below (this pictures is after cooking). I placed all 4 rolls in a shallow pan in which they fit snuggly (I used a square Pyrex baking pan with a glass lid). I then poured in the kelp soaking liquid. Since I also had a soaking liquid left over from rehydrating dried shiitake mushrooms (used in another dish), and the mushrooms had imparted some good flavor to the liquid I also added that. I added sake (2-3 tbs) as well. The kelp rolls should be just covered with water. I simmered it with the lid on for 1 hour or until the kelp is soft.
Seasoning: The seasoning is essentially sweet and salty (soy sauce) which is a typical Japanese seasoning. As a rule, the "sweet" of the seasoning is added first. So I added sugar (1 tsp) over the rolls and let it simmer for 5 minutes with an otoshibuta 落 とし蓋. I then added more sugar (1 tsp) and soy sauce (1 tbs) and simmered it for 10-15 minutes. At the end of cooking, the liquid was reduced in half. At the very end, I added mirin (2 tsp) and soy sauce (2 tsp) for a fresh taste. Again, the seasoning is up to your liking; you could add more sugar, mirin and soy sauce. I did not want to season it too strongly. I let it cool in the cooking liquid. The picture above shows it after it cooled and was ready to be cut.
The standard way is to cut the roll in half to make two rolls as seen above but that would have resulted in pieces that were too big to eat in one bite. For a drinking snack, I cut the individual rolls into three smaller pieces as seen in the first picture.
The kelp is soft but not mushy. It has a lovely unctuous mouth feel. The salmon is lusciously tender with a slight sweetness and mild soy sauce flavor. It is hard to imagine how a dish this good could be transformed into the product sold commercially. While my wife did not dislike the commercial product it was not the first thing she chose from the New Year's box. She liked this one so much it could "star" as a drinking snack. Maybe this dish "isn't just for New Year anymore."
Saturday, January 15, 2011
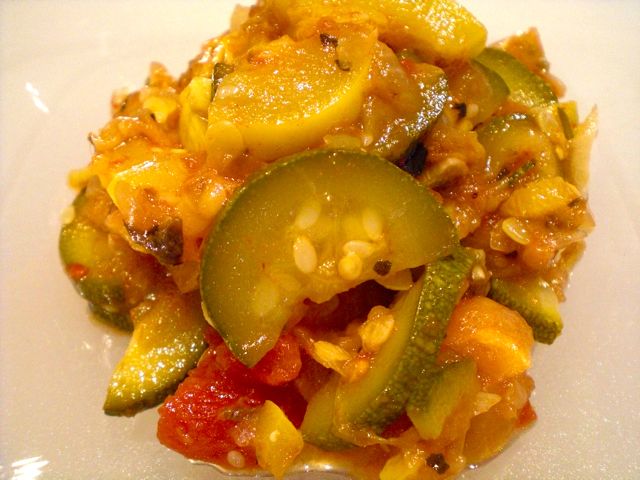
Ratatouille ラタトゥユ
Izakaya and bar food tend to be more often meat than vegetables (especially Western bar food) and deep fried. We try to eat more vegetables if we can and one of the easiest vegetable dishes I can make to eat during the week, either warm or cold, is my version of ratatouille. I am sure my version is not the authentic true Provençal dish but we like it and it is very versatile. It goes well with red wines (particularly lighter reds such as Rhone, Croze-Hermitage etc) but also goes with cold sake as well.

I sometimes cut all the vegetables rather small and sometime a bit larger, but never very chunky. The vegetables I usually use are zucchini, yellow squash, egg plant, tomato (canned plum tomatoes) with onion and garlic. My wife does not like green or red peppers in Ratatouille so I do not use them. I do not add any liquid but the amount of liquid that exudes from the vegetables is amazing. I have to make a conscious effort to reduce the liquid. I also use finely minced anchovy (canned, salted and preserved in olive oil). I also like the vegetables well cooked and soft--not too crunchy. The amount of vegetables is arbitrary but I make a relatively large batch as seen below because they also reduce in size as they cook.
I finely chop red onion (one medium) and garlic (3 fat cloves). I skin and cut egg plant (1 Italian, large) into small cubes. I cut half moon slices of zucchini (3 medium) and yellow squash (2 medium). I first saute onion in olive oil (2-3 tbs) on a medium flame until the onion become soft and semi-transparent, add the garlic and saute for another 3-4 minutes. I, then, add the eggplant and saute for 3 more minutes. Finally, I add zucchini and yellow squash and mix well. I add a small amount of salt to encourage the moisture to come out of the vegetables and turn down the heat. I add canned whole plum tomato (8oz can), either crushed by hand or cut up leaving the excess liquid in the can but I do not drain the tomatoes.
I add dried oregano (1/2 tsp), basil (1/2 tsp), (or sometimes thyme) and whole bay leaves (3) and put on the lid. I simmer for 20-30 minutes. After the liquid comes out, I put the lid askew and turn up the heat a bit to let the liquid evaporate. Instead of salt, I use a small can of anchovy fillets finely cut up. The anchovies are very salty, so I start adding the anchovy in stages, tasting until desired saltiness is attained. I am not sure where I got this idea but I must have gotten it from one of the recipes I read. It certainly adds a more complex "je ne sais quoi" quality to the dish.

I try to remove all 3 bay leaves since they could be a hazard if swallowed by the unsuspecting. This dish is good, warm or cold. Just simply prepared like this, the vegetables end up surprisingly sweet. The is a perfect side for pork, lamb or chicken dishes.
I sometimes cut all the vegetables rather small and sometime a bit larger, but never very chunky. The vegetables I usually use are zucchini, yellow squash, egg plant, tomato (canned plum tomatoes) with onion and garlic. My wife does not like green or red peppers in Ratatouille so I do not use them. I do not add any liquid but the amount of liquid that exudes from the vegetables is amazing. I have to make a conscious effort to reduce the liquid. I also use finely minced anchovy (canned, salted and preserved in olive oil). I also like the vegetables well cooked and soft--not too crunchy. The amount of vegetables is arbitrary but I make a relatively large batch as seen below because they also reduce in size as they cook.
I finely chop red onion (one medium) and garlic (3 fat cloves). I skin and cut egg plant (1 Italian, large) into small cubes. I cut half moon slices of zucchini (3 medium) and yellow squash (2 medium). I first saute onion in olive oil (2-3 tbs) on a medium flame until the onion become soft and semi-transparent, add the garlic and saute for another 3-4 minutes. I, then, add the eggplant and saute for 3 more minutes. Finally, I add zucchini and yellow squash and mix well. I add a small amount of salt to encourage the moisture to come out of the vegetables and turn down the heat. I add canned whole plum tomato (8oz can), either crushed by hand or cut up leaving the excess liquid in the can but I do not drain the tomatoes.
I add dried oregano (1/2 tsp), basil (1/2 tsp), (or sometimes thyme) and whole bay leaves (3) and put on the lid. I simmer for 20-30 minutes. After the liquid comes out, I put the lid askew and turn up the heat a bit to let the liquid evaporate. Instead of salt, I use a small can of anchovy fillets finely cut up. The anchovies are very salty, so I start adding the anchovy in stages, tasting until desired saltiness is attained. I am not sure where I got this idea but I must have gotten it from one of the recipes I read. It certainly adds a more complex "je ne sais quoi" quality to the dish.
Thursday, January 13, 2011
"Nametake" cooked and seasoned enoki mushroom ナメタケ
Making this is simple. I first made a mixture of mirin and soy sauce (about 1 to 1, or reduce soy sauce for milder, sweeter variety. For one package of enoki, I used 2 tsp each. If you do not like it sweet, use sake or a sake and mirin mixture). I cut off the bottom 1/3 of the enoki mushroom and combined the mushrooms with the above seasoning in a small pan and let it simmer. I also added about 1/2 of the umeboshi cut up in small pieces. I also added a half sheet of dried nori torn up in small pieces (by hand). The dish can become salty very quickly depending on the how salty your umeboshi is and how much soy sauce you use. I cooked it for 5 minutes or so on simmer or until most of the liquid is gone. I served this as a small dish that goes with sake but you can use it as a rice condiment as well. This came out a bit on the salty side but it is perfect for sipping cold sake--encouraging you to drink more sake than you intended
Tuesday, January 11, 2011
Stuffed Omelet オムレツ
This may not look like something you see in an Izakaya, but any good hearty breakfast item, in our opinion, can be had as a "shime" 締め or a mid-night snack after drinking--for those who are young and reckless. Stuffed omelets are very popular in Japan including ones stuffed with rice seasoned with ketchup called "Omuraisu" オムライス.

We are not big omelet eaters anymore but, in our reckless days, we often looked for nice brunch/omelet places over the weekend. While we were living in Los(t) Angles, our friend introduced us to one such place near the famous La Brea tar pit. We cannot remember the name of the place and I am sure it does not exist any longer. After that, I emulated how they made omelets at home. Omelets were cooked to order in front of the customers. There were many kinds of fillings to choose from, which were kept in a warming drawer.
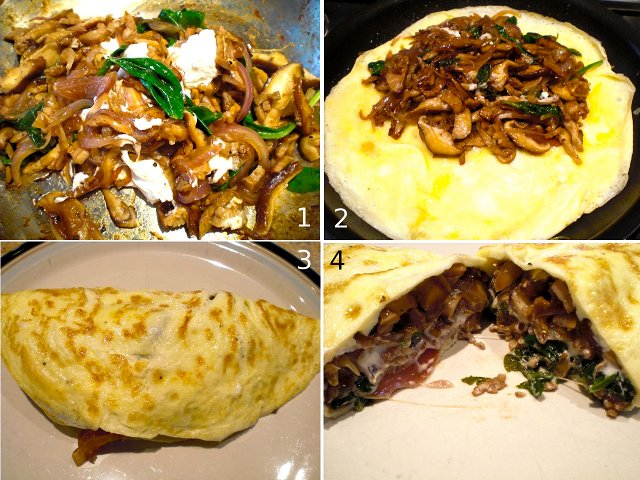
Filling: I use whatever is available at the moment. This time, for one two-egg omelet, I use red onion (thinly sliced, 1/3 medium), fresh shiitake mushroom (stem removed and sliced, 4-5 medium), leftover oven roasted pork fillet (4-5 thin slices cut into strips), baby spinach (a very small handful) and fresh goat cheese (3 tbs). I first saute the onion in the mixture of olive oil and butter, add the pork and shiitake mushroom. After they are cooked, I add spinach and saute until wilted. Season with salt and pepper. Since nice "fond" is formed, I deglaze it with a Marsala wine (1 tbs, optional) and cook it until liquid is all gone. I add crumbled goat cheese (I do not mix at this point) and leave the mixture on the stove on a very low flame (our stove has a very low simmer setting or use as a "warm" setting if you are using an electric stove top) (#1, image below).

This is very satisfying dish. Since I am not making a living doing this, it is kind of fun to make omelets every-now-and-then. I had to admit that we had this as a breakfast not as a mid-night snack and we share one omelet.
Filling: I use whatever is available at the moment. This time, for one two-egg omelet, I use red onion (thinly sliced, 1/3 medium), fresh shiitake mushroom (stem removed and sliced, 4-5 medium), leftover oven roasted pork fillet (4-5 thin slices cut into strips), baby spinach (a very small handful) and fresh goat cheese (3 tbs). I first saute the onion in the mixture of olive oil and butter, add the pork and shiitake mushroom. After they are cooked, I add spinach and saute until wilted. Season with salt and pepper. Since nice "fond" is formed, I deglaze it with a Marsala wine (1 tbs, optional) and cook it until liquid is all gone. I add crumbled goat cheese (I do not mix at this point) and leave the mixture on the stove on a very low flame (our stove has a very low simmer setting or use as a "warm" setting if you are using an electric stove top) (#1, image below).
Eggs: I used two brown eggs (for one omelet) beaten with the addition of cream (2 tbs) and seasoned with salt and pepper. If you use 3 eggs, it will be easier to form an omelet but you can do it with two eggs.
In a non-stick frying pan with low side or an omelet pan (8 inch) on a medium low flame, I melt butter (1 tbs) and pour in the egg mixture. When the bottom is set, I use a small spatula to lift one side of the omelet and let the excess uncooked egg flow under the cooked portion. I repeat this on all four quadrants until the desired amount of liquid egg remains (I like it almost all cooked). If you want to make pristine yellow, not-browned omelets, you have to cook the eggs on a very low heat with a lid on to cook the omelet through (for a stuffed kind not for a plain French style) but I like some brown markings on my omelets. I add the filling, which was kept warm allowing the cheese to melt, onto half of the omelet--the half opposite the handle of the pan (#2 in the image below). Take a plate in the left hand and hold the frying pan in the right hand grabbing the handle from underneath (I am right-handed), angle the pan and slide it out and then fold over the omelet using the edge of the frying pan to cover the stuffing (I should have recruited my wife to take pictures). The omelet is done (#3 in the image below). I am not sure what this shot (#4) is called in food bloggers parlance (I have to defer to Jon), here is the cut section.
Sunday, January 9, 2011
Grilled fatty salmon belly 鮭のハラスの祐庵焼き
If I was cooking outside with a charcoal fire, I would simply grill it with some salt, which is the most simple and wonderful way to eat this. This time, I marinated the salmon belly in Yuuan-ji 祐庵地 (sake:mirin:soy sauce=1:1:2) for about one hour. I skewered and broiled it in a toaster oven for 3-4 minutes each side. I could have made the skin a bit crisper but this is such a nice dish to start with a drink of cold sake. For sure, it is better for you than eating "pork" belly, which is another wonderful belly you can savor. I served this with my usual cucumber with moromi miso もろみ味噌 and Campari tomato with mayonnaise.
Subscribe to:
Comments (Atom)
