Saturday, July 2, 2011

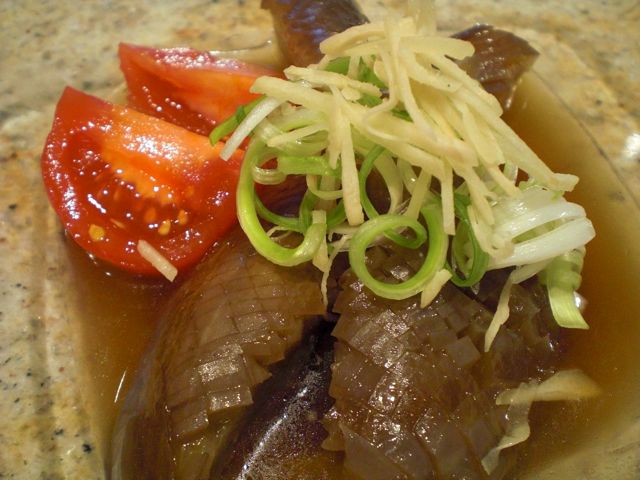
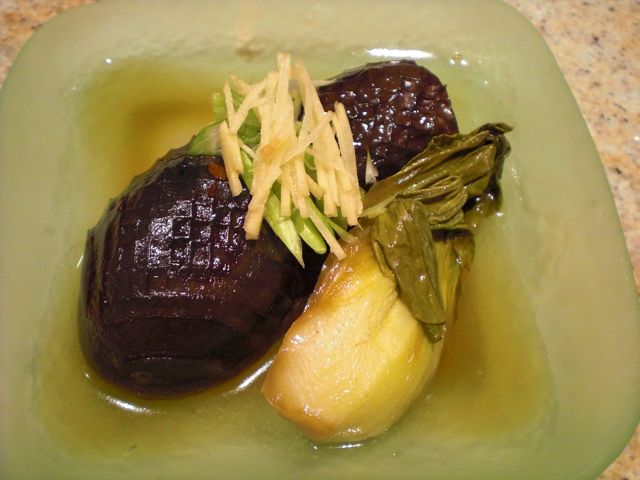
Stewed eggplant なすびの含め煮

As you know, eggplant and oil are a good combination.Eggplant parmesan is a good example--the eggplant absorbs a good amount of olive oil while being fried. Of course, modified recipes that try to reduce the amount of oil by baking the eggplant first instead of frying it are also popular.
Even in Japan, a classic recipe for stewed eggplant uses a technique called  "age-bitashi揚げ浸し. The eggplant is first deep fried and then simmered in a seasoning liquid. Although this produces an excellent eggplant dish, eggplants are like a sponge and absorb a large amount of oil.  So I made some modifications to take control of the amount of oil. Japanese eggplants (many different kinds of eggplant are available in Japan), are not readily available here. I do not particularly like the long slender and light purple "Asian" or "Chinese" eggplants. So I tend to use either small Italian eggplant or Zebra eggplant for Japanese-style eggplant dishes. 

Zebra eggplant version: I saw some nice looking small Zebra eggplants at the store the other day and decided to make this dish. 

I used Zebra eggplants (two, medium sized). I removed the stem end and halved them along the long axis. I made criss-cross shallow cuts on the skin and soaked them in water for a few minutes. I removed the moisture using a paper towel by lightly squeezing them. In a skillet large enough to hold 4 halves of the eggplant comfortably, I added light olive oil (2 tbs) and dark sesame oil (1 tsp). On medium flame, I fried the eggplant halves (the cut surfaces only, I did not bother with the skin side) for several minutes until most of the oil was absorbed. In the same pan, I added dashi (300 ml). I made dashi from a Dashi pack, mirin (2 tbs), sake (2 tbs), soy sauce (3 tbs) and sugar (1 tbs). I tasted the seasoning liquid and adjusted the amount of soy sauce and mirin. I also added several thin slices of ginger and a small amount of red pepper flakes for mild heat. I put on an otoshi-buta and simmered it for 30 minutes. I let it cool down in the broth and served it at room temperature with a garnish of scallion threads (shiraga-negi 白髪葱 and very thin juliennes of ginger hari-shouga 針ショウガ (both soaked in water for 10-11 minutes to make them milder). This tasted very good and had just enough oil to make it unctuous. the red pepper gave it a mild but pleasant zing. The meat of the eggplant was very soft and absorbed the nice gentle flavors of the broth and the skin was very tender (because of the scoring before stewing). The next day, I served it cold and it was even better. The only problem was the color, the Zebra pattern was all gone and looked gray and a bit unappetizing.

Italian eggplant version: So a few days later I made the dish using small Italian eggplant in the exactly same way.
This one tasted the same and was excellent. In addition, it retained a nice color. I added baby bok choy, quartered, cooked for the last 5 minutes in the same broth as the eggplants.

You could control the amount of oil being absorbed by the eggplants this way but the tastes and texture were as good as a classic deep fried "age-bitashi" eggplant dish. This dish goes well with any drink but, again, we went for cold sake.


Thursday, June 30, 2011

"Kakiage" tempura, two kinds かきあげ 2種類

When I posted soft shell crab tempura, I used a new recipe for the tempura batter which included Vodka. Soft shell crab tempura, however, was not the best way to assess the tempura crust. As promised, I did another test with "kakiage" tempura. Kakiage is tempura made of small pieces of ingredients bound by batter/crust. I made two kinds of kakiage.   

Sakura-ebi and onion kakiage: I used boiled and dried Sakura-ebi 桜 海老 which I kept in the freezer and thinly sliced red onion. To extract moisture from the onion, I mixed the onion slices with cake flour and a small pinch of salt. After 10 minutes, moisture came out and the flour sticks to the onion. I lifted the onion and shook it slightly to remove excess flour and mixed it with the sakura-ebi (whatever amount you like) before adding it to the tempura batter.

Fresh corn kakiage: This is the same as the one I posted before. We had fresh corn (not locally grown for sure). I removed the kernels by slicing them off the cob with a knife.

Tempura batter: This is the same as I posted before and based on the recipe from America's test kitchen. To briefly reiterate, I made the wet component by mixing water (or seltzer water, but I do not think this makes any difference) and Vodka in 1:1 radio. For two cups total, I added one whole egg, beaten. (The amount of egg should be proportional to the amount of water and vodka so reduce or increase the egg accordingly. For example, is the amount of water and vodka is reduced by half then use half and egg. The dry component is a mixture of cake flour and potato starch in 4-5:1 ratio.

First put the dry ingredient in a bowl and add the wet component to mix. The consistency I was looking for is like a runny pancake batter. For the fresh corn kakiage, I added corn and mixed in the batter. The amount of the batter is just enough to coat all the corn kernels and a bit more. Using a spoon, I put the mixture into hot oil (as usual peanut oil, 370F or so), turned over once during the frying. For the red onion and Sakura-ebi, I mixed them into the batter and just using cooking chop sticks, I put the mixture into the hot oil. I tried to make both kakiage into a sort of flat disk. Again, I turned it over once during the frying.

The results? Well, this new batter does create a lighter and crispier crust, although the difference is not gigantic. Both the traditional and Vodka batters produced good kakiage. As you can see we were in portion control mode here.

A few days later, I made a small "Kakiage donburi" かき揚げ丼 as a "shime" 〆 or ending dish from the leftover. I baked the kakiage in a 400F preheated toaster oven for 7-8 minutes placing the kakiage on a perforated metal tray over another deeper metal tray so that any excess oil which exuded from kakiage dripped down into the lower tray. The baking made the edges a bit dark but made the kakiage crispy and hot again.

I made a sauce with dashi, mirin, and soy sauce. I made it rather strong in taste but small in amount. I heated the mixture in a sauce pan and poured it over the kakiage and rice. I garnished it with blanched broccolini. For leftover kakiage, this was pretty good.


Tuesday, June 28, 2011

Pork belly, baby bok choy, scallion stir fry 豚の三枚肉、青梗菜、葱の炒め物

When I bought pork belly from the newly opened grocery store in our neighborhood, I made stewed pork belly or "kakuni" 角煮. I took a small block of the more meaty part with alternating fat and red meat layers and sliced it thinly to make "bara-niku" バラ肉 or "sanmai-niku" 三枚肉. This is a very common cut of pork in Japan. It was a really small amount and I made this starter dish one evening from it.

I cut scallions on a slant in 1 inch lengths (5, white part), baby bok choy (1, core removed, white root and stem parts cut into strips with green parts separated).

I marinated the pork in sake and soy sauce (1:1 ratio) with freshly ground ginger root (1/2 tsp) for 30 minutes or so.

In a hot wok on high flame, I added vegetable oil (1 tbs) with a splash of dark sesame oil. I stir fried the scallion and white part of the bok choy for several minutes. I removed the vegetables and set aside. I seared the pork slices on both sides (1 minute each), put back the vegetables, and stirred for 1 more minute. I added the green parts of the bock choy and added mirin (2 tsp), soy sauce (2 tsp) and freshly grated ginger (1/2 tsp) and very quickly braised. After I removed the wok from the heat, I added freshly ground white pepper.

This has very familiar taste and pork belly really adds to this simple dish. Since I cooked the stalk and green parts of bok choy in different timing, all came out nicely. The fresh ginger note and slight heat (from the white pepper and ginger) were also nice. A perfect Izakaya's "otoshi" dish as well as good for Bento or a Japanese lunch box. We had our house sake Yaegaki "mu" 八重垣 "無" in a hand cut colored glass tumbler with a rabbit motif; one gazing at cherry blossoms and the other watching fireworks, which came from Kitaichi glass 北一硝子 in Otaru 小樽. We should have gotten the autumn and winter ones as well.

Sunday, June 26, 2011

Baby artichokes sauté with Pancetta and olives ベィビィアーティチョークのパンチェッタとオリーブの炒めもの

We posted a baby artichokes dish before. Since it is (was) the season for baby artichokes, we got another dozen. As I understand it, baby artichokes come from exactly the same plant as regular artichokes but they are the smaller buds which grow on the lower branches. This time, I did the cleaning and cooking of the artichokes rather than my wife. I decided to make sautéed artichokes with pancceta and olives mostly because we had pancceta.


Preparing the baby artichokes: I used my usual quick cleaning method. I just removed the outer petals until I exposed the inner petals which were only top 1/3 green. I cut off the top 1/3 of the green parts. Using a small paring knife, I cut off the end of the stem and peeled the skin. I also quickly cleaned the remnants of the outer petals around the base. Unless it is very small, I cut the artichokes in half. I removed any chokes that may have developed using the tip of the knife. It sounds complicated and tedious but once you get used to this process, it goes fairly quickly. I threw the cleaned artichokes into acidulated water (water plus lemon juice) to prevent discoloration. 

Pre-cooking: I boiled the cleaned baby artichokes for 15 minutes in salted water (image below left). You can see one with undeveloped choke (right of the right image below) and one with the choke which was removed (left of the right image below).


Sautéing: In a frying pan, I added olive oil (1 tbs) and finely chopped pancceta (3 slices) on medium low flame. I rendered the fat from the pancceta and made it brown and crispy by sautéing for several minutes. I set the pancceta aside on a paper towel lined plate. In the same pan I added shallot (1 medium, finely chopped) and garlic (one clove finely chopped) on medium-low flame. After a few minutes, I added the baby artichokes, olives (I used an assortment of black olives, some requiring pitting). I sauteed for a few more minutes and added white vermouth (or white wine, 1-2 tbs) and kept braising until the liquid was almost all gone. I added salt, black pepper and chopped parsley. I served it topped with the crispy pancceta and shavings of Parmigiano Reggiano cheese.

This is a good accompaniment for wines; either white or red. We had this with Robert Young Estate Winery Red Winery Road Alexander Valley Cabernet Sauvignon 2005. This is a middle of the road decent cab--very good if not spectacular.

Friday, June 24, 2011

Parsnip potage パースニップポタージュ


We like to have soup or some kind of side dish we can eat on a weekday. We make these dishes in quantity on the weekend and then use it the rest of the week. My wife suggested we clean up parsnips パースニップ* in our fridge by making some kind of soup or potage. She said she would like to have pieces of carrot in the potage to provide texture and color. Without further detailed instructions from her, this is what I came up with (not based on any recipe).

(*Digression Alert!: I did not know this root vegetable until I came to the U.S.. I am not sure this is available in Japan. Parsnip is know as the most favorite food of Gub-gub the pig in Dr. Dolittle's story. I read the entire series as a kid. It was translated by Masuji Ibuse 井伏鱒二 into Japanese. But I do not remember how he translated "parsnip" into Japanese. Japanese Wiki states "オランダボウフウ" to be a Japanese name for parsnip but that does not help most Japanese readers.)

I used parsnips (6), peeled and cut into small cubes, onion (1 medium, finely chopped), fennel bulb (1/3 chopped, I just happened to have this leftover and is optional), celery (3 stalks finely chopped), garlic (2 cloves, finely chopped) and potatoes (2 medium, Yukon gold, peeled and cubed). 

In a large pot on medium flame, I added light olive oil (4 tbs) and sauteed the above except for potatoes and parsnips for several minutes or until the onion became semi-transparent. I then added the parsnips and potatoes. I poured in low-sodium Swanson chicken broth (32 oz), bay leaves (3) and let it simmer for 30 minutes or until all the vegetables are soft. I then pureed it using an immersion blender. I added light cream (1/2 cup) toward the end of pureeing.

Meanwhile, I cooked carrot (4 medium, peeled and cut into small round or half round) in the chicken broth with bay leaves (2) and black pepper corns (4-5).

I tasted the potage and added salt and fresh ground white pepper (I did not use black pepper to prevent black specks from floating in the white potage).

To serve, I added the cooked carrot and chopped parsley as a garnish. Parsnips have nice sweetness with a very distinctive flavor. The potatoes and cream added silky smoothness to the potage. Since carrot and parsnip are "relatives", this combination worked very well. Very satisfying and unctuous soup/potage to start and my wife was impressed with this parsnip potage. I said I could make a similar potage from "daikon" 大根 but she did not encourage me in that endeavor--can't understand why.

(The following was added on April 22, 2012)

Parsnip potage Version2

This is another variation of parsnip soup. One weekend, my wife decided to make another version of parsnip potage. The addition of apples made the potage very good and different from the original.

2 packages of parsnips cut into pennies (about 12 parsnips)
2 onions diced
2 apples diced
1 potato peeled and diced
1 1/2 Package of Low-sodium and non-fat chicken broth (Swanson bland, one package=32oz)

 sweat the onions, add the parsnips and potatoes and chicken broth. Cook until tender. Just before pureeing add the apple and let them cook a few minutes. Puree. Lovely fresh flavor. The apple and parsnips go well together.

Wednesday, June 22, 2011

Sake-steamed chicken with togarashi soy sauce mayonnaise 酒蒸し鶏肉の唐辛子醤油マヨネーズ

This is just another way to serve "sakamushi" 酒蒸し or sake steamed chicken. I just sliced sakamushi chicken breast and served it with a mixture of 7 flavored Japanese red pepper flakes 七味唐辛子, soy sauce and mayonnaise (actually I did not mix it, you need to mix it before dipping.) It looks like lots of red pepper but mayo dampens the heat.

This mayonnaise concoction reminds me of my old drinking days in Susukino 薄野, Sapporo. Many bars served grilled semi-dried "Komai*" fish with this mayo. I remember in the bars which had hostesses, they carefully removed the meat from the fish and dipped it in the mayonnaise concoction and fed you (you paid dearly for the attention, of course).

Komai こまい is a small fish which belongs to the cod family. The best season is in the coldest time of the winter in Hokkaido and traditionally fished by a net under the ice (after breaking the surface ice, of course). Thus, the kanji letter for this fish is 氷下魚 meaning under-the-ice fish. This appears to be rather peculiar to Hokkaido and was (at least when I was there) one of the popular drinking snacks in bars and drinking places in Sapporo. This is not unlike shishamo ししゃも and Hokkadoian (or Hokkaidoites?, an erudite English speaker will have to tell me which.) appear to like small semi-dried fish as a drinking snack.

In any case, I do not think I can find "komai" around here but this mayo concoction worked well with sakamush chicken.

Monday, June 20, 2011

Ginger pork cutlet 豚肉のショウガ味カツレツ

This is a hybrid between ginger pork and pork cutlet.  I just came up with this dish thinking it  would go well with a drink.  This could be a main dish if you serve a larger amount with veggies and a starch. This dish is also perfect for bentou 弁当 or Japanese lunch box.

I used the trimmings from a pork tenderloin which was pounded very thin. I marinated it with sake and soy sauce (3 tbs each or 1:1 ratio) and grated ginger (1 tsp). I purposely did not make the marinade sweet at all but you could replace half the amount of sake with mirin if you like slightly sweet. I coated the individual pieces with the marinade and then put them in a sealable container and let them marinade in the refrigerator for several hours. 

I could have sauteed the pork in the classic "sougayaki" 生姜焼き style but, at the very last moment, I decided to make it sightly different. After I removed the excess marinade from the pork using paper towels, I dredged it with potato starch or katakuriko 片栗粉. I added light olive oil (slightly more than for sauteing) in a frying pan on medium heat, and fried the pork (1-2 minutes per side) until both sides were crisp and brown. I added more oil as needed to cook all the pieces in small batches.

The resulting dish had a nice crispy crust with bright ginger and soy sauce flavor. Since it is highly seasoned, no need for any sauce. This turned out to be exactly how I intended; a cross between shouga-yaki and pork cutlet. Any drink will go with this. We had this with Casali di Bibbiano Argante Toscana Rosso Red Blend 2006 (This was our last bottle of this wine). If you are a white wine drinker, Chardonnay would be a good choice. Of course, beer and sake would be nice as well.