Sunday, August 21, 2011

Sardines escabeche イワシの南蛮漬け

This is the second dish I made from some fresh sardines we got. For this dish, I used two sardines. This is a classic preparation of "Nanban" 南蛮 or Japanese-style escabeche. Essentially, the fish was first fried and then soaked in sweet vinegar with other vegetables.

Preparation of sardines: For this dish, I decided to use filets rather than the bone-in whole fish. After scaling the fish, I filleted them into three layers; two fillets of fish flesh and one layer of back bone. In Japanese culinary parlance, this is called "san-mai oroshi" 三枚下ろし. I use my own quick way to do this which is more like the Western style of filleting fish than the more traditional Japanese way.  Using  a narrow-bladed boning or fillet knife (instead of more traditional "deba" knife), I cut across just under the gills until the blade hit the back bone (do not cut through). Then, I turned the blade, 90 degree towards the tail and sliced off the fillet along the back bone. I do not even bother to gut the fish beforehand. I turned the fish over and repeated. I ended up with two fillets and the head with back bone attached (hence "san-mai" or three "sheets").  Using a fish bone tweezers, I remove all visible small bones especially inside the belly portion of the fish (this is very tedious). I also cut off some of the edges. After that, I washed and patted the fillets dry. I seasoned them with salt and white pepper and sprinkled sake over everything and kept them in the refrigerator covered until I was ready to cook (#1 in the image below).
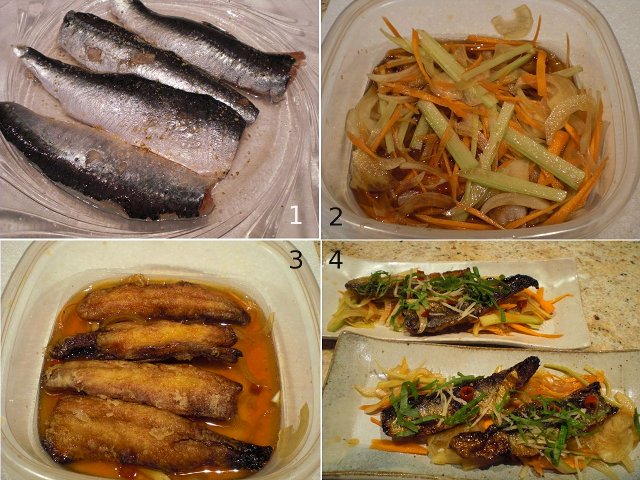
Sweet vinegar: Again there are many variations but, this time,  I used my short-cut method. I just mixed rice vinegar (3 tbs), soy sauce (3 tbs) mirin (2 tbs)  and sugar (1/2 tsp). I also added two dried hot peppers cut into small rings (removing the seeds).

Vegetables: I julienned carrot (one small) and celery (two stalks) in a slightly larger than match stick size. I also sliced Vidalia onion (1/2, medium). I like my vegetables to be "cured" so I added and soaked the vegetables several hours at room temperature in sweet vinegar in a sealed container.
Frying: I removed the excess sake on the fish filetts using a paper towel and dredged them in potato starch or "katakuriko" 片栗粉. I deep fried the fish in 170F or 340C vegetable oil for several minutes on both sides. I drained the excess oil by resting the fish on a wire rack (I use a small frying pan with just half inch of oil. I will not reuse this oil since the sardines make it taste "fishy").

Meanwhile, I removed the vegetables from the sweet vinegar and arranged them on two plates (#4 above). While hot, I soaked the fillets in the sweet vinegar and turned them over several times to coat nicely (#3 above). I placed the fillets over the vegetables and garnished them with finely julienned ginger and perilla leaves (#4).

It turned out that the red pepper I used (bought it in a Japanese grocery store) was atomically hot. Especially the vegetables got really spicy. The fish was nicely crunchy with a sweet vinegar taste. No need to worry about bones because of the preparation I did. For me, the spiciness was the higher boundary of "OK" but, for my wife, it was too much especially for the vegetables but she finished the fish with gusto. the only drink we can think of is cold sake for this dish.

Friday, August 19, 2011

Stewed sardines with pickled plums イワシの梅煮

Did I happen to mention that fresh sardines at our new grocery store often look like they just came out of a bar fight the night before? Well, today, they looked slightly better and I decided to go with the sardines. I got six and made two dishes. This is one of them.

Sardines and herrings are related but slightly different. For one, herrings can be rather large but sardines are usually smaller. The sardines we got today were larger than we see canned. So I decided to treat the sardines as though they were small herrings.


The first dish I made from four sardines is called "Umeni" 梅煮 meaning "stewed with plum". Since herrings/sardines are rather oily blue fish with a strong taste,  adding some sourness helps to cut the oiliness. This is very similar to the simmered Pacific saury or "sanma" which I posted before.

Cleaning sardines: The fishmonger at the grocery store was a bit surprised when I said I would do the cleaning myself--"so just give me the sardines as is." Scaling was rather easy since they have large, easy-to-remove scales. For this dish, I wanted to keep the shape of the fish. So I did not want to open the underbelly and gut it. Instead, I cut off the head first and from that opening, extracted the guts using a narrow blade boning knife (being careful not break the belly) and my fingers.

Pre-cooking: Some kind of preparation is in order to reduce oily fishiness of the sardines before the actual stewing. Some would just pour hot water over the fish and then washed in cold water. But I went further. I boiled them in vinegared water first. In about 1 cup of water I added rice vinegar (2 tbs) and placed the cleaned sardines. When it came to boil, I turned the flame down and simmered it for 5-7 minutes without a lid on. I poured the simmering liquid out and gently washed them in cold running water. The skin is very fragile as you can see image below (#1).

Simmering liquid: There are many variations but essentially soy sauce with some sweetness either from mirin, sugar or both. I used water (300ml), soy sauce (3 tbs), mirin (2 tbs) and sugar (1 tsp). I added two "umeboshi" pickled plums and several thin slivers of ginger root (#2) in a Pyrex pan in which 4 sardines snuggly fit (#3). I placed my favorite silicon "otoshi-buta" on the top. Since this is made of silicon, it conformed to even a square pan (#4). I put a reguar lid slightly askew over it on a medium flame. As soon as it started boiling, I turned it down to a gentle simmer and cooked it for about 40 minutes.

After 40 minutes, I removed the both lids and turned up the heat and let it boil gently so that the simmering liquid reduced a bit. I removed it from the heat and let it cool down with a lid back on for several hours to room temperature before serving.

As you can see in the first picture, I garnished it with thinly julienned ginger ("Harishouga" 針ショウガ) and perilla. If you do not like a strong ginger taste, you could soak the julienned ginger in cold water for 5 minutes or so and ring out the moisture before using. I also removed the meat of the Umeboshi and draped it over the fish.

This is another homey dish, probably only served at home, in a "taishu shokudou" 大衆食堂 (eatery for the public) or izakaya. This is a perfect side dish with rice or its liquified form, i.e. sake. We had this with the latter. To enjoy this dish, you need to be a chopstick jedi since the fish has  lot of small bones (remember the "herring-bone pattern"). My wife was not expecting so many bones. She described her first bite as like chomping into a toothbrush and having all the bristles come off the handle into her mouth. But once she realized the situation, she was an expert at removing all available meat from the bones. I admit this is a very labor intensive dish (both preparing and eating) but it is worth it especially if you do not have a neighborhood Izakaya or "taishu shokudou" to visit.

Wednesday, August 17, 2011

Grilled chicken and soba salad 焼き鶏胸肉のそばサラダ

Did I tell you we had three chicken breasts I had to dispatch quickly? I already made two dishes in the past two days and had one more breast to go. I decided to make some kind of salad with grilled chicken breast.

I used one bone-less and skin-less chicken breast (for two servings). I butterflied the thickest potion to make it even in thickness. I, then, smeared soy sauce and grated ginger root on both sides of the meat and let it stand for 5 minutes while my Foreman's grill preheated. I cooked the breast for less than 2 minutes or until just done.

The rest of the salad components were whatever was available in the fridge. I julienned carrot (one medium) and cucumber (one American Mini-cucu). I also finely chopped scallion (two). I also happened to have leftover cooked soba noodles.

Assembly: I placed the soba on the bottom of the plate and piled the carrot, cucumber and scallion on the top. I cut the grilled chicken in 1/2 inch strips and placed it around the periphery of the plate. 

Sauce: I just mixed "mentsuyu (x2 concentrated)", sesame oil, and grated ginger and poured it (not too much) over the salad. I garnished it with Wasabi flavored "frikake" which also contains sesame seeds and nori strips.

We had this as a lunch but this could be a perfectly good "shime' 〆 dish. Obviously you could make many variations of this type of Japanified salads.

Monday, August 15, 2011

Chicken breast scaloppini 鶏胸肉のスカルピニ

For some reason, we had excess chicken breasts which needed to be cooked before going bad. On a whim, I quickly made this dish.

I used one bone-less and skin-less chicken breast. I cut it into thin (1/4 inch) bite sized pieces using a shaving cut or "sogigiri" 削ぎ切り technique. I then seasoned it with dried basil, marjoram, salt, and pepper, dredged it in flour and sauteed it in olive oil in a frying pan. I used a bit more oil than for sauteing.

I served this with a side of onion-cucumber salad. This salad is very white, so for color, I sprinkled Paprika. If I made a caper lemon butter sauce, this could have been called "chicken piccata" but I did not make any sauce. This is one of making-something-from-the-chicken breast dishes but this was a good solid effort by me. I cannot remember, but we were having a red wine with this.

Saturday, August 13, 2011

Chicken breast karaage 鶏胸肉の唐揚げ

I had some extra chicken breasts which needed to be used before they went bad. So I decided to make kara-age 唐揚げ. The difference between kara-age and tastuta-age 竜田揚げ may be sometimes blurred and this one can be considered a type of tatsuta-age as well. I posted tatsuta-age using chicken thighs and marinade of soy sauce and mirin previously.

I used one bone-less and skin-less chicken breast for two small servings. I cut the chicken breast into small and flat bit size pieces using shaving cut or "sogi-giri" 削ぎ切り in which the knife blade is placed on a slant against the grain of the meat. I made about 12-13 pieces of 1/4 inch thickness.

I heated peanut oil in a frying pan (about 1/2 inch deep) to 340F or 170C on medium flame.

Just before frying, I put the chicken pieces in a small bowl and added enough soy sauce to coat (about 1 tbs) and grated ginger root (1/2 tsp, optional). I massaged or kneaded the chicken pieces so that soy sauce and ginger will evenly coat and somewhat penetrate the meat. Then, I dredged the pieces with potato starch or katakuriko 片栗粉 and fried it. Since these were rather thin pieces, they only needed to cook about 1 minute or less on each side.

I drained the oil and served the chicken pieces hot with my usual celery salad. Since the chicken was seasoned with soy sauce there was no need to salt. Compared to the thigh, this is much quicker to cook and also the taste and texture are different. Since I did not use mirin, it may be more suitable as a drinking accompaniment. Any drinks will go well with this dish but the best would be beer or cold sake.

Thursday, August 11, 2011

Asazuke "Mizunasu" Water eggplant 水茄子の浅漬け

This is the second dish (rather preparation) of "mizunasu" 水茄子 I bought the other day. We enjoyed half of it eaten "raw' and made the other half into "Asazuke" 浅漬け.

Instead of my usual way of making asazuke, I used brine (salt water about 4%, slightly saltier than sea water, red pepper flakes, thinly sliced kelp, and chopped ginger). As in "raw" eggplant, I made thin wedges using combination of tearing by hand and cutting with knife. I placed them in the brine in a Japanese pickling pot, cranked down the pressure plate and left them in the refrigerator overnight. 

I served this with asazuke of daikon, cucumber and carrot which I made prior to making the eggplant asazuke. This was very refreshing and we like it. Somehow, the eggplant attained a very slight sliminess on the surface and became softer in texture than we expected. Although this dish was very good, both of us prefer eating "mizunasu" totally "raw". But who knows if or when we will be able to get fresh mizunasu again.

Tuesday, August 9, 2011

Raw "Mizunasu" eggplant 生の水茄子

I mentioned that the types of eggplant available in Japan are quite different from those available here. To my surprise, we found two kinds of Japanese eggplant in our Japanese grocery store; "Mizunasu" 水茄子 ("mizu" means water and "nasu" eggplant) and "Kamonasu" 加茂茄子. I assume these were imported from Japan. Although we saw several Kamonasu in the refrigerated case, only one mizunasu was remaining (left in the image below). Although it did not look particularly great (middle), I decided to get it. This is a type of eggplants which is so mild that it can be eaten "raw", although "asazuke" 浅漬けpreparation is the most popular way to serve it. I decided to make half of it in asazuke and serve the remaining half "raw".

Since the skin had some blemishes, I peeled the skin in a "zebra" pattern using a vegetable peeler. I removed the stem end and cut into the top portion of the eggplant for about one inch and then tore it in half by hand. I did this to make a more irregular cut surface (both to increase the exposed surface as well as for aesthetic reason). I repeated this several time to make thin wedges and soaked them in weak salted water (about the saltiness of a soup). This prevents the eggplant from discoloring. It also takes out some of the bitterness and seasons it lightly. I kept it soaking until I was ready to serve (for about 15 minutes, images above right).
After 15 minutes, the water became slightly brown. I patted the pieces dry with a paper towel and arranged them on a plate. The garnishes and sauce can be anything you like. Here, I garnished it with finely chopped scallion, perilla leaves, and dried bonito flakes. For sauce, I used "yuzu shouyu" 柚子醤油 sauce from the bottle. Alternatively, you could use soy sauce, mentsuyu, sesame sauce or even mayonnaise (straight or mixed with other seasonings).

You would be surprised how mild and slightly sweet this raw eggplant is. The only problem is that getting mizunasu is not easy or consistent. It was totally fortuitous that it was available this time.