Thursday, February 9, 2012

Fried tofu ball がんもどき

Ganmodoki is one of the common items used in oden おでん. Usually I buy this ready made and  frozen but since I had 1/2 tofu left over and happened to have the other ingredients to make "ganmodoki" or "ganmo" for short, I gave it a go. Hot freshly fried ganmo is very different from what you eat as an oden item. 

Here I served it hot with grated ginger and soy sauce. (You can see a ginko nut peeking out of the cut surface.) There appear to be many theories as to the origin of the name. The corresponding kanji letter for ganmodoki is 雁擬き meaning "imitation goose" but this certainly does not resemble, in any way, shape or form, goose meat.
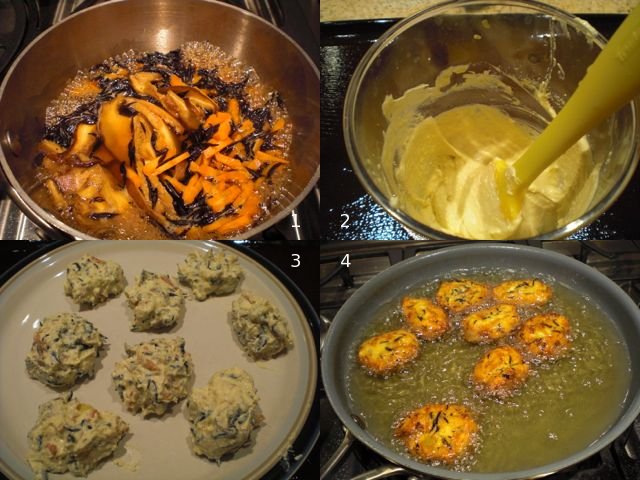
I had 1/2 a block of soft tofu to use. I wrapped it in a paper towel and microwaved it for 1 and half minutes and let it cool down, allowing the excess water to be absorbed into the paper towel. I placed the tofu and a whole egg (1 large) in a plastic blending container and homogenized using an immersion blender (#2 in the image below). You can use a food processor or Japanese mortar, suribachi すり鉢, for this as well.

Other ingredients included; dried shiitake mushroom (1 large, hydrated, stem removed and thinly sliced), black sea weed called "hijiki" ひじき (dried 1 tbs), gobou (1/4 tail end, leftover from the New Year) and carrot (1/4 medium). For hijiki sea weed, this time, I used "me-hijiki" 芽ひじき which is shorter and smaller than long hijiki or naga-hijiki 長ひじき I posted before. After hydration (with several changes of water for 30 minutes), hijiki increased in volume by almost 10 fold. I squeezed out the excess moisture and combined with shredded gobout and carrot.*  I added the soaking liquid from the shiitake (100ml) and simmered (#1 in the image below). I added mirin (2 tbs) and soy sauce (1 tbs) and further simmered on a low flame for 5-10 minutes until almost all the liquid was gone. I let it cool down and further removed any remaining liquid by squeezing. I added the mixture to the homogenized tofu and added potato starch (1 tsp or a bit more depending on the moisture level) and mixed well. Since I seasoned the vegetables, I did not add salt to the batter.

Moistening my hands with vegetable oil, I made small round disks (eight 2 inch diameter) and I also inserted ginko nuts (from a can) into the center (#3 in the image below). The batter was very soft and sticky. You could use two spoons in a manner similar to making quenelle and directly drop it in the oil.

* These were cut in  "sasagaki" ささがき. In Japanese curinary parlance, sasagaki is to shave off vegetables (mostly thin long items such as gobou) as though you are sharpening a pencil. Supposedly, the shape of the resulting pieces resembles small bambo ("sasa" 笹) leaves.
I deep fried it in 170C (340F) vegetable oil until golden (#4, turning a few times, total time of 4-5 minutes).

Homemade and hot freshly fried ganmo has an all together different taste and texture from the frozen variety we are used to. Hot and crunchy on the outside you can't go wrong. Although, we have to admit, this does not remind us of goose meat, it is quite good on is own right. A perfect drinking snack especially with cold sake.

Tuesday, February 7, 2012

Rice cake "mini" spring roll 餅のミニ春巻き

I saw this one in e-recipe. I meant to make a similar dish with cheese but I thought this was very interesting and perfect for using up the left over mochi 餅 or rice cake from New Year. I made this one weekend as a starter dish. Since I did not have spring roll wrap or skin, I used an American style square "gyoza" or wonton skin instead.
The inside has mochi wrapped in a seasoned nori sheet which was smeared with yuzu-koshou 柚子胡椒. I served the rolls on a bed of baby arugula. I poured a small amount of the peanut oil in which the rolls were cooked plus a splash of soy sauce over the arugula to make an impromptu dressing and to slightly wilt it. 
Mochi: I cut a square of mochi or kiri-mochi 切り餅 into 5 equal size sticks.
Nori: I just used a prepackaged and precut "ajitsuke-nori" 味付け海苔.
Since, the gyoza skin was a bit too small to wrap the mochi sticks or the nori, I used two together staggered like seen in image #1 below. I moistened the overlapping parts with water so that two sheets would stick together. I placed the nori on the gyoza skin (#1) and smeared Yuzu-koshou on the nori then put on the mochi stick (#2). As I rolled I moistened the overlapping gyoza skin and made tightly wrapped mochi sticks (#4).
Using a small non-stick frying pan with peanut oil (1 tbs) on low heat (#5). I turned them every 30 seconds or so initially so that all the overlapped skins got cooked evenly and held together (#5). Once all the sides were fried, I let it cook a longer time on one side (1 minute or so on each side) until the skin was brown, crispy, and the mochi was soft (total of 5-7 minutes). When I saw soft mochi starting to come out from the seam and knew it was done (see the very first picture in the beginning of the post).

This is a very nice dish. The gyoza skin was very crispy and the mochi was nicely soft but not too soft or too sticky. The nori and yuzu-koshou added some spiciness to the nice flavor. My wife could not figure out what was inside. She thought it was some kind of cheese. This is a very good way to use up left over mochi.

This dish will go with any drinks but we happened to be having Ladera Howell mountain Cab 2007. This wine was an excellent California Cab (I will give 91-92) but it is overhyped and 2007 may not be the best year for them.  At this price point, it is not cost effective (low PQR or Price-Quality-Ratio). We can have a similarly good Cali cab at 1/3 of the price for that matter.

Sunday, February 5, 2012

Soba roll sushi 蕎麦寿司

You may ask, "Why would you make rolled sushi from soba noodles?" I am not sure why but the answer may be because we can or this is a more portable form of soba. For example, you could take this one more easily than traditional soba as a lunch. In any case, I had left over seasoned kanpyou かんぴょう and shiitake mushroom 椎茸 from making "futomaki" 太巻き roll and decide to make this dish. I have made it several times in the past and have seen recipes in a Japanese noodle cook book (in English) but two crucial pieces of information or steps, in my opinion, are missing. So I decided this is a good time to share how I assemble sobazushi 蕎麦寿司. This was an endng dish one evening.
Preparing kanpyou, dried shiitake mushroom, Japanese omelet, and spinach is described in the roll sushi post.

Preparing soba noodle: I used packaged dried soba noodle (#1). The first secret is to tie off one end with bucher's twine. I left enough length of the twine on one end after making a knot. I then cooked the noodles in boiling water but I kept the end of the twine outside the pan (#2) Be careful not to set the twine on fire, though. You could put the end of the twine in the water and later fish it out. I loosened the noodles as they became more pliable using a pair of cooking chopsticks. After the noodles are cooked, I pulled the end of the twine to lift them out of the water and washed it under cold running water but took care not to break the tied end (#3). After I aligned the noodle in one bundle (#4), I squeeze the extra moisture using paper towel. The second secret is to let it sit on the cutting board loosely covered with a plastic wrap for at least 30 minutes or 1 hour before rolling it. If you try to roll it immediately, the noodles have too much water on the surface and just fall apart.
After the noodles have rested and are slightly drier, I spread the noodles on a sheet of nori (#5). I first placed the bundle of noodles on the nori sheet with the tied end still intact. Once the noodles were in place, I cut the tied end (the noodles were still dry and uncooked in the very center of the tied end) and spread it evenly leaving about half an inch of nori sheet in the far end (#5). Like regular futomaki, I placed the omelet, kanpyou, shiitake mushroom and spinach near the edge of the nori sheet (#6). Using a sushi mat, I rolled it to make sure the end of nori sheet is over wrapping. At this point, I did not take off the sushi mat but just let it sit for 5-10 minutes before removing the sushi mat so that the moisture from the noodles made the ends of nori sheet adhere (#7) and the noodles did not fall apart. I cut off both ends of the roll for a snack for my wife and I (#8). 

After slicing the roll like a futomaki, I served the pieces with a side of vinegared "gari" ginger and a dab of real wasabi. I served a dipping sauce (diluted from the bottle of a noodle sauce) in a shallow bowl with a wide-opening instead of a regular soba noodle dipping bowl. So that you could dip the roll of soba more easily.

This is definitely much easier to eat than slurping the soba noodles; granted, slurping may be an important part of enjoying soba. The combination of all the different tastes in one mouthful is kind of nice. Is it worth the effort? Maybe on certain occasions.

Friday, February 3, 2012

Hamachi tartar with miso, parmesan cheese and walnuts ハマチのなめろう

I have posted namerou なめろう made from tuna sashimi. Here I made a similar dish with some additional twists using hamachi sashimi
Ingredients included; Hamachi sashimi, scallion, fresh mint, miso, grated ginger and garlic, toasted and chopped walnuts, and grated parmesan cheese.

These ingredients were chopped together (scallion, mint leaves, and walnuts were pre-chopped). The amount of the ingredients are all arbitrary. I came up with this primarily because we did not have perilla but we did have mint. Since I was using mint, I decided to introduce more Western ingriedients such as walnuts and parmesan cheese.

This is not bad at all but my wife felt that the grated garlic was too strong and dominated the taste. The walnuts (which must be toasted to fully enhance their flavor) gave it a nice textural contrast.  The mint was not too strong and parmesan cheese gave it a subtle overtone of cheese flavor. Over all, this qualified as a success (even with the garlic). Although, next time, I will definitely omit garlic. I often have the characteristic problem of continually adding other stuff to this type of dish. Even this time, I thought about putting in lemon zest, sesame oil, Yuzu-koshou, and/or Tabasco but I refrained--next time I may not be so conservative.

Wednesday, February 1, 2012

"Futomaki" roll sushi 太巻き

For the New Year's soup, I usually make mochi kinchaku 餅巾着 or square mochi encased in deep fried tofu pouch or abura-age 油揚げ and tie it off with kanpyou かんぴょう. Since I had extra kanpyou, I decided to make a rolled sushi or "futomaki" 太巻き. Futomaki is a fat roll as compared to "hosomaki" 細巻き which is a thin roll. Futomaki uses a whole sheet of nori instead of a half sheet used for hosomaki.
The regular futomaki roll uses only one whole sheet of nori which is rolled with the rice side in. The version I did here was shown to me by a sushi chef, Hajime はじめ, who worked at a long defunct Japanese restaurant "Mikado" in Tenley town which we frequented in the early years after we moved to DC. Hajime told me that when he makes futomaki in a sushi bar, he first makes an in-side-out roll or uramaki 裏巻き and then wraps it with an additional nori sheet. He said this makes the roll more substantial and sets it apart from homemade rolls. So, I am following his suggestion here.

What should be included in the center of futomaki rolls is debatable but the must-have items include an omelet, seasoned kanpyou and shiitake mushroom. Vinegared ginger is also a usual item and traditionally red ginger or beni-shouga 紅ショウガ is used but I used "gari" or the kind which is usually served at a sushi bar. Other items may include some kind of protein such as seasoned chikuwa 竹輪 fish cake strips or grilled anago 穴子. Many more modern variations exist including using cooked meat (either pork, beef, chicken, or even Spam - not junk email but Hormel's mystery meat which is called a "luncheon meat", obviously an euphemism, in Japan for some reason). There is pink (artificially dyed) and sweet (almost pure sugar) fish meat product called "sakura denbu"  さくらでんぶ, which may be also used (not by me for sure). For greens, I often used pickled cucumber (kasu zuke) but this time I used cooked baby spinach.

Kanpyou: Kanpyou comes dried (sometimes, dried and frozen). I washed it in running cold water. I then rubbed it with Kosher salt in my hands. After washing away the salt, I soaked it in cold water over night in the refrigerator (or several hours at room temperature). If I am going to use it to tie off something, which will be later be further cooked, I do not cook the kanpyou. For a sushi roll however, I simmered it in just enough water to cover with a lid on for 10-20 minutes and seasoned it with mirin and soy sauce. I simmered it until the liquid had almost completely evaporated (another 20 minutes) and let it cool down. I then wrung out the excess liquid.

Shiitake mushroom: You must use dried mushroom, which has more "umami" 旨味 than fresh ones. For sushi roll or scattered sushi or chirashi-zushi ちらし寿司, you need to use dried shiitake. Dried whole mushrooms need to be redydrated in cold water over night or warm water with a pinch of sugar for several hours. After removing the stem, I sliced it thinly. I cooked the sliced re-hydrated mushroom in the soaking liquid for 10-20 minutes and again seasoned it with mirin and soy sauce, simmered it to reduce the liquid to almost nothing, and let it cool. You could also get pre-sliced dried shiitake mushroom, which is a bit more convenient.

Japanese omelet: This is made exactly like a dashimaki だし巻き and then I cut into long strips appropriate for a sushi roll.

Ginger: I just used vinegared ginger root like you'll see ar a sushi bar. I just squeezed out the excess liquid and cut it into strips.

Spinach: I put baby spinach in a dry wok on medium heat with a lid. I turned the partially cooked spinach over a few times until it was completely wilted and seaseon it with salt. I let it cool and squeezed out the excess moisture.

After all these preps were done, I just arranged everythig on a plate (image below #1). I also arranged everything I needed to make a sushi roll, including the sushi vinegar (I could make it from rice vinegar but I ususally use bottled sushi vinegar), "hangiri" or wooden bowl to make sushi rice (#2 right upper corner), nori sheets and sushi mat (#2).

My wife made fresh rice perfectly (slightly dry) and I could use a good amount of sushi vinegar.  She also fanned the rice while I mixed in the vinegar. I let it stand for 5-10 minutes. I placed the nori sheet with a long axis vertically and spread it with sushi rice (3#). I moistened my hands with slightly vinegared water to prevent the rice from sticking to my hand.
I ususally use a moistened tea towel to make uramaki but, somehow, we could not find it this time. So I used a plastic wrap to cover the rice side (#4). After flipping it over, I placed all the ingredients on the edge closest to me (#5) and started rolling (#6) with the help of a sushi mat and plastic wrap.

As the rice surface was about to meet the nori sheet, I grabbed the edge of the plastic wrap and lifted it as I was rolling so that the wrap will not be rolled into the sushi roll (Below image #1). Now I have an inside-out roll wrapped in plastic wrap (below image #2). I removed the plastic wrap (below image #3) and place the roll on another nori sheet and rolled it to cover (image below #4).
Here is the end product with both ends already cut off (#5, the ends were a nice snack for my wife and I). With a sharp thin blade, moistened with vinegared water, I sliced the roll (above image #6).

I recruited my wife as a photographer but she complained that I did not pause at the crucial moments for her to take good pictures. In any case, this was a shime dish on a weekend evening. This combination of sushi rice, nori, shiitake, kanpyou and omelet is somehow very comforting and satisfying. I also made a lunch box from the left over for the next day.

Monday, January 30, 2012

Marinaded Hamachi Sashimi ハマチの漬け

Since we had a block of frozen hamachi (1.6 lb), I had to come up with some other ways (besides straight forward sashimi) of enjoying it. Marinated tuna sashimi or "zuke" 漬け is much more common than marinated hamachi but "hamachi no zuke" ハマチの漬け is a very interesting dish and the effect of marination is quite different from tuna.

Here I served hamachi zuke in a bed of baby arugula.

Marinade: This is very similar to one I use for tuna sashimi. I have made several variations of the marinade for tuna. This time, I made it a bit differently. I first put an equal amount of sake and mirin in a small sauce pan (about 3 tbs each) and let it boil so that the alcohol dissipated (no lid) and the mixture reduced to nearly half. I then added, a 1 inch square of kelp and soy sauce (2 tbs). When the mixture returned to a boil, I shut off the flame and let it cool down. Meanwhile, I dry roasted white sesame (2 tbs) in a dry frying pan until fragrant. I tipped it off into a Japanese mortar or suribachi すり鉢 and coarsely ground the sesame which I added to the marinade (leaving 1-2 tbs aside for garnish). I placed the marinade in the refrigerator to completely cool. 

I sliced the hamachi sashimi rather thinly (3-5 mm) and placed the pieces in the cold marinade for 1 hour in the refrigerator. The length of marination is up to you but I marinated the pieces for  beween 15 minutes to one hour. 

I removed the hamachi pieces and put them in a separate bowl preserving the marinade. I mixed in chopped scallion. I placed the marinated hamachi on the greens, garnished with crumbled seasoned nori ("ajitsuke nori" 味付け海苔 from a package), the roasted white sesame seeds which were previously set aside, and a dab of wasabi. I also served the marinade on the side side just in case.
Although I made the marinade a bit on the sweet side for my taste (probably too much reduction of the sake and mirin), it is mellow and nice. The texture of the hamachi became firmer and really looked like a piece of beef. The taste and texture are very nice but the effects of marination are different from those of tuna. We like this very much.

Saturday, January 28, 2012

Hamachi Yellow tail and avocado sashimi ハマチとアボカドの刺身

Hamachi ハマチ or yellow tail amberjack is young buri ブリ. This is one of the fish which get promoted or "shusse-uo" 出世魚 as it grows up. There are somewhat different definitions and names according to the regions (Kantou 関東 such as in Tokyo vs. Kansai 関西 such as in Osaka) but a fully grown specimen is called "buri" 鰤 ぶり in either region. It is always difficult to find the exact English counter part to Japanese fish names. "Kampachi" カンパチ is another one belonging to the amberjack family and is a very popular sashimi item (most available here is farm raised in Hawaii. Actually, wild caught Kampachi is reportedly not suited to eat as sashimi because it is often infested with parasites). This fish may be different from Hamachi but I am not sure how similar or different taxonomically. (If this sounds confusing because it is.)  Kampachi appears to be less fatty but has a more delicate flavor. The majority of hamachi you see at sushi bars are also aqua cultured. In general, we are usually more interested in tuna and uni but this time, I got frozen sashimi block of hamachi from Catalina Offshore products.

Here is the hamachi sashimi I served with a "sashimi" avocado, Campari tomato with moromi miso もろみみそ and quickly made daikon namasu 大根なます(daikon in sweet vinegar). Wasabi is, as usual, real wasabi from the tube but this time, I had to perform a surgery (C-section) and take out the wasabi from the tube and mix the liquid and solid together to reconstitute (This is one of the problems of real wasabi in a tube--the water gets squeezed out but not the solids). It does have a nice smell and flavor very close to real grated wasabi rhizome, though.
 
Some times, Catalina does carry fresh hamachi but we have not tried it yet. This one was from Kyushu 九州, farm raised and flash frozen in minus 50C judging from what the package stated. It was treated with carbon monoxide (like a frozen tuna sashimi block) for retention of the color (it does not change the taste, is not preservative and is not harmful to your health). This package was rather large (long) and I had to soak it for several hours in the kitchen sink filled with cold water reinforced with ice cubes to thaw it. (They recommend using ice water rather than running water because, I suppose, the running water thaws the fish too quickly and unevenly). After it is thawed and out of the package the sashimi block looks like seen on the right below.
We really enjoyed this hamachi sashimi. It is as good or even a bit better than what we get in regular sushi bars (Many sushi bars also serve previously frozen hamachi). Since I did not have any other sashimi items, I also served sliced ripe avocado as a sashimi. You would be surprised at how well avocado slices go with wasabi and soy sauce. According to my wife, avocado served this way should be classified as fish.