Tuesday, August 18, 2020

Baguette in the porcelain baker 3rd try バゲットベイカー3度め

This is the 3rd try making baguette using an Emile Henry baguette baker. It came out better than previous attempts but despite generous oiling and dusting with flour the bread maker, the bread still stuck to the bottom portion of the baking dish.
I generously oiled and then dusted with flour as shown below.  
Then, I placed the dough in the baker and let it rise.
I slashed the loves with a lame and sprayed water on the surface.
The loaves came out looking good. But the bottom of all of them especially the center one, stuck to the baker,
I removed them but some crust was lost stuck to the baker.
I was frustrated and start looking for comments about this baker. Sure enough lots of people complained about the stickiness. Some people were totally irate. Some said after the 4th try it stopped sticking. So, I should try at least one more time. Despite the sticking, the baguettes had a nice texture and flavor.

Saturday, August 15, 2020

No knead olive rye bread 捏ねないオリーブライ麦パン

This is a continuation of my saga on no-knead breads. The last time, I made olive bread following the original recipe, I felt that the amount of water was too much even though it turned out to be a wonderful bread. The dough was too wet to handle easily. We also thought that the combination of salty olives with no-knead rye bread would taste even better. So this is the version I baked. It came out looking nice and rustic.
After it completely cooled down, we cut into it. This time I used half and half of Divina Kalamata and green olives.

Ingredients
300 grams Bread flour 
100 grams Rye flour
2 grams instant yeast
200 grams black and green olives (Salt brine) or all one kind, roughly chopped,
300 grams cold (52-65F) water

*changes I made from the original olive bread recipe were replacing 100 grams of flour with rye flour and reducing the water to 300grams from 350 grams.

Directions
The directions are same as for the other no knead bread.

Mix everything in a bowl with a wooden spoon.
Cover with a plastic wrap and let it rise for 12-18 hours.
Remove the dough from the bowl to a well floured board. 
Bring the outer edges into the center to make a round shape. 
Transfer it to a well floured dish towel, dust the surface with more flour and fold the towel to cover. Let it rise for 1-2 hours.
Preheat the oven with the cast iron pot inside to 450F for at least 30 minutes prior to baking.

Place the dough in the heated pot, put on the lid and bake for 30 minutes.
Remove the lid and bake an additional 5-10 minutes.
Take out the bread and let it completely cool on a cooling rack.


The dough was plenty wet and sticky despite the 50gram reduction in water from the original olive bread recipe. The texture of the bread was similar and I think this is enough hydration. Again, the burst of flavor from the salt brine olives and the addition of rye really made this bread. We think, for us, this is a better olive bread. Next plan is to make a similar bread using the "karikari koume" カリカリ小梅 I made instead of olives.

Wednesday, August 12, 2020

Watermelon ribbon salad with wasabi スイカのワサビ入りリボンサラダ

Because of Covid-19, we are having groceries delivered. This creates some problems because we can't inspect the items before we receive them as we would if we were picking them out at the store. In addition, because of substitutions, what we actually receive can sometimes be unexpected such as getting cilantro as a substitution for celery, which occurred in a recent delivery. One such case occurred this week. We ordered a small seedless baby watermelon but instead we got two quarters (actually 1/2) of a full sized melon. This was much much more watermelon than we were expecting. So, besides eating the watermelon as is, my wife made watermelon soup スイカの冷製スープ, pickled watermelon rind, スイカの皮のピクルス and watermelon ribbon salad スイカのリボンサラダ. Although the recipe for the watermelon ribbon salad shown here is basically the same as the one we posted before, my wife changed the amounts to make a smaller portion (using a 5x7 inch casserole dish instead of the usual 6x10) and wanted to record the recipe. The white layer is made of cottage cheese with a good amount of wasabi added which really makes the dish giving it a nice "zing". We served it as a first appetizer of the evening on a crane plate we got in Kyoto sometime ago.
These are the layers of the ribbon salad. Looks like nice pink and white ribbon.


Ingredients:
1/2 cup buttermilk
1/8 cup milk or cream
3/4 + 1/8 cup cottage cheese mashed
1/8 cup mayonnaise
1/8 tsp salt
1 lime or lemon squeezed
2 tsp. wasabi (or to taste)

Directions:
Puree the watermelon. Add the buttermilk and lime. Take 1/4 cup of the puree and use it to bloom the gelatin. Heat the bloomed gelatin in the microwave for 30 seconds. Add the gelatin to the rest of the puree. Pour 3/4 cup of the puree mixture into the bottom of the 5x7casserole dish and let it jell in the refrigerator until solid. (Keep the remaining puree at room temperature and it will stay liquid.)

Mash the cottage cheese using an immersion blender. Add the mayo and salt. Take some of the cottage cheese mixture, add it to a small bowl and use it to soften the wasabi. The amount of wasabi is basically to taste. I found that the cottage cheese tends to calm it down so I end up putting in a fairly large amount. Once it has been homogenized into the amount in the small bowl add it to the large bowl and stir until it is incorporated. Bloom the gelatin in the lime juice. Heat in the microwave for 30 seconds until melted. Add to the bowl of cottage cheese. Pour the cottage cheese over the watermelon layer and cool until solid.  Add the remaining 3/4 cup watermelon puree on top of the cottage cheese layer and cool until solidified.
This is a very summery refreshing salad. The wasabi in the white cottage cheese layer really works well.  The sharpness of the wasabi flavor somehow complements and accentuates the sweetness of the pink melon layer. Without the wasabi this dish would be pretty bland. We had this with chilled pink wine (always good to color coordinate whenever possible), Aix Rose 2019, Rosé from Coteaux d'Aix-en-Provence, Provence, South of France. It went perfectly.

Sunday, August 9, 2020

Almond flour doughnut muffin アーモンド ドーナツ マフィン

This another one of my wife's muffin projects. The original recipe came from King Arthur Flour website but she replaced some of the wheat flour with almond flour. I am not sure whether she just wanted to use the almond flour before it gets stale or to reduce the carb in this muffin or make it more gluten free. I am not sure why it is called "doughnut" muffin.

Wifey's response: The blueberry and strawberry muffins I made used pulverized almonds mixed with flour as their base. I have some almond flour which is past its "best by" date but it was still ok because we were freezing it. But when the available freezer space was reduced due to the demise of our main refrigerator, the flour wasn't frozen for a while. So, I had an increased incentive to use it up. I got to thinking maybe I could use almond flour along with the pulverized almonds in muffins by substituting the almond flour for some of the wheat flour. But I wasn't sure what proportions should be used for the substitution--100%? So I did a web search. According to the King Arthur site almond flour can be substituted for 25% of the flour in non yeast products. For yeast products, however, because almond flour does not contain gluten substituting it for the wheat flour would inhibit the rise. So, according to the instructions, instead of substituting for the wheat flour, you add 1/3 cup almond flour per cup of wheat flour. For example, if the recipe calls for 3 cups wheat flour you would use 3 cups wheat flour plus 1 cup almond flour.  While investigating percentages I found a whole bunch of recipes using almond flour. One of which was this doughnut muffin. They called it a doughnut muffin because apparently they thought if tasted like a cake donut. Sorry you asked? 


Nice texture and flavor.


Ingredients
4 tablespoons (57g) butter
2/3 cup sugar
2 Tbs. molasses
2 large eggs
1/4 cup (50g) vegetable oil
79.75 g almond flour, plus 239.25 g All Purpose flour (or 319 g wheat flour)
1 1/2 tsp. baking powder
1/4 tsp. baking soda
1 to 1 1/4 tsp. nutmeg, to taste
3/4 tsp. salt
1 cup (227g) milk
1 teaspoon vanilla extract

Directions
Preheat the oven to 425°F. Lightly grease a standard muffin tin.
In a food processor, cream the butter. Add the sugar and molasses and continue creaming. Add the eggs and continue creaming. With the processor running add the vegetable oil and mix until smooth. (This can also be done in a stand mixer.)
In another bowl add the flours and combine with a whisk. Stir in the baking powder, baking soda, nutmeg, salt.
Add the vanilla to the milk.
Stir the butter mixture into the flour mixture alternately with the milk mixture, beginning and ending with the flour and making sure everything is thoroughly combined.
Spoon the batter evenly into the prepared pan, filling the cups nearly full.
Bake the muffins for 15 to 17 minutes, or until they're a pale golden brown and a cake tester inserted into the middle of one of the center muffins comes out clean. Remove them from the oven, and let them cool for a couple of minutes then remove from the pan.

This is a very nice muffin. Although it included a fairly large amount of nutmeg the flavor was very mellow and pleasing. The texture was fine and tender.  Although the recipe described it as tasting just like a cake doughnut fresh out of the oil I might not go quite that far in characterizing it that way. Nonetheless this is certainly a good muffin for breakfast.

Thursday, August 6, 2020

Pesto prosciutto "udon" pasta バジルペーストとプロシュートのウドンパスタ

This was a lunch. Since we made pesto from our window sill basil harvest, we decided to use the pesto, prosciutto, which was getting old,  and the remaining rapini which I blanched previously. We thought this combination should work. Instead of spaghetti, we used thin Japanese “udon” noodles called "Ito-udon" 糸うどん which we had cooked a few days prior. I started with cooking the prosciutto in a frying pan. Then set aside the prosciutto. In the same pan, added a small amount  of olive oil and sautéed the noodle until warmed up, added  the rapini. Finally, off heat, added the pesto and prosciutto.


Since the pesto had enough parmesan cheese in it, I only added our favorite spicy Spanish olive oil.


The flavors of the pesto, slightly bitter rapini, and salty prosciutto all worked well. This was a perfect lunch for us.

Monday, August 3, 2020

Strawberry Almond muffin ストローベリィ アーモンド マフィン

This is one of my wife's muffin projects. She made a very similar muffin using blueberry but this time she used fresh strawberries.


The strawberries don't show up on the cut surface as well as the blueberries did in the blueberry version of this muffin. The strawberries lost their color but the strawberry flavor came through.


The basic muffin recipe came from “Pastry from La Brea Bakery”.

Ingredients:(for 12 muffins)
1/2 cup (3 oz.) almonds deeply toasted. (The toasting is what gives the muffins a rich flavor)
3/4 cup sugar
1 stick plus 2 tbs. (5 oz.) butter
3 large eggs

3 cups all-purpose flour
1 tbs. plus 1 tsp baking powder
>3/4 tsp. baking soda
1/2 tsp. salt

2 tsp. vanilla
1 1/2 cup buttermilk
1 cup chopped strawberries.

Directions
In the bowl of a food processor fitted with a steel blade pulse the almonds until they are the texture fine meal. Add the butter and cream until smooth. Add the sugar and process until fluffy. Add the eggs and cream until light and fluffy.


In a separate bowl mix the flour, baking powder, baking soda and salt. Add the vanilla to the buttermilk
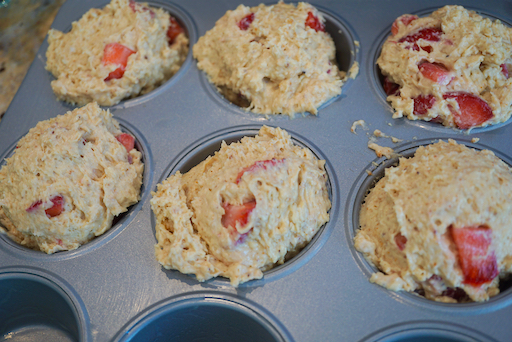
Add the butter mixture to the flour mixture alternately with the buttermilk mixture.  Fold in the strawberries (above). Put the batter into a greased muffin tin (below). Bake at 350 degree for 20 to 25 minutes.


The ground-up toasted almonds gave nice rich nutty flavor and texture to the muffin. The strawberries lost their color and shrank when the muffins were cooked leaving spaces around them. Although the strawberry flavor is there, we both agreed that if you are adding fruit, blueberry is better.

Friday, July 31, 2020

Red wine "Zuke" tuna and avocado 鮪の赤ワイン漬けとアボカド

This is part of the continuous effort to use frozen items before they get too old. In the freezer I found this sashimi tuna block which was labeled “best used by August of 2019”. (At July 2020 it was one month short of being a year past its “best by” due date—not too bad). This is one we got from the Japanese grocery store. Recently we tried a similar yellowfin tuna "saku" sashimi block from "Great Alaska Seafood" and I noticed it seemed to contain less water than the ones from the Japanese grocery store. I knew this one would have a high water content, so I thawed it on a rectangular plate lined with paper towel, uncovered, in the refrigerator. The paper towel was soaked when it finished thawing. I made "Negitoro" ネギトロ in the evening. The next evening, from the remaining half, I made this variation/combination of "Zuke" 漬け and "Tuna and avocado cubes" 鮪とアボカドの角切り. Using red wine in the marinade was inspired by the recipe I saw on-line  (In Japanese) and similar in idea to chicken liver simmered in red wine.


I garnished it with chiffonade of perilla and some white sesame.


Ingredients: (appetizers for two)
1/2 block of sashimi tuna (in our case, frozen yellowfin), thawed if frozen, cut into small cubes
1/2 ripe avocado

Marinade:
3 tbs red wine (I had an open California cab).
2 tbs soy sauce (I reduced the soy sauce from the original recipe)
1 tbs mirin
1/4 tsp dark sesame oil

Directions
In a Ziploc bag, add the marinade and tuna cubes. Remove the air as much as possible and let it marinate in the refrigerator for a few hours (in my case, it was close to10 hours).
Just before serving, take out the tuna cubes, blot off the excess marinade using a paper towel.
>Remove the stone and skin from the avocado, cut into bite-sized pieces, dress with either lemon juice or yuzu juice (to prevent discoloration, I used yuzu juice from the bottle).
Mix the tuna and avocado in a bowl ( I added a few more drops of Yuzu juice).
Serve on the perilla leaves and garnish with a chiffonade of perilla and some sesame seeds.

This was pretty good especially considering that the frozen yellowfin tuna which was passed its prime. I thought we would add soy sauce when we ate it but the tuna was nicely seasoned and there was no need to add soy sauce. Since it was marinated in red wine, this could have gone well with red wine but we had cold sake.