Sunday, May 16, 2021

Salmon "ruibe" frozen sashimi 鮭のルイベ

One evening, we wanted to have one more appetizer to go with the cold sake we were enjoying. I remembered that we had frozen sashimi-grade salmon from Catalina Offshore products in the freezer but it was a one pound piece and would take too long to defrost. Then, it occurred to me that we could have "ruibe" ルイベ which is frozen raw salmon shaven into thin pieces to eat as a kind of sashimi. This dish is supposedly derived from the way the indigenous people who lived in Hokkaido 北海道 known as "Ainu" アイヌ used to eat salmon. Since I am originally from Hokkaido, I was familiar with this dish. In the “old” days salmon harvested in the fall could be stored frozen during the hard cold Hokkaido winter without the need for modern freezers. My understanding is that the Ainu people just shaved pieces off the frozen salmon and ate the shaved pieces. (Hopefully, the long and deep freezing in the cold Hokkaido winter was sufficient to kill the parasite endogenous to salmon making it safe to eat raw.) The salmon we had was sashimi-grade and frozen, (also from Norway ??) so it is safe to eat. Thus the only question was "Could I, in fact, shave pieces off the frozen salmon?" So I tried it using a heavy chef's knife. Amazingly, I could as shown in the next picture. 


 When I served this it was still frozen but quickly melting on the edges. We dipped the slices in soy sauce with wasabi. It quickly melts when held momentarily in the mouth. Initially it is crunchy ice coldness followed by the slow unfolding of fresh salmon taste; quite a unique and interestingly pleasant sensation not previously experienced elsewhere. We found this is a very good way to enjoy salmon sashimi “on the fly” without having to thaw it ahead of time.


The one pound frozen salmon sashimi block from Catalina tends to be too big for us to eat in one sitting so once it is thawed I am hard pressed to come up with multiple ways to serve it. (Eating the whole thing as sashimi demonstrates that it is possible to have “too much of a good thing”.)  I had contemplated cutting the large piece into smaller manageable sizes but didn’t think I could cut through the block while it was still frozen. After having successfully sliced the frozen salmon for the ruibe, however, I tried to see if I could divide up the frozen salmon block. Surprising success!! Using a heavy chef's knife and warming the blade a few times in hot water, I did cut the frozen salmon into two pieces. I vacuum packed both pieces and placed them back in the freezer. This was an additional side benefit of my experiment with ruibe. Now I can divide the frozen sashimi salmon so we can thaw the amount reasonable for one sitting.

Thursday, May 13, 2021

Carrot cake with pineapple muffin パイナップル入り人参ケーキマフィン

 Recently we received two pineapples as a gift. They were probably the best pineapples we have ever had. They were certainly much better than the ones from the grocery store. They were very sweet, juicy and not fibrous except for the center cores towards the top and bottom. Although they were good, it was a lot of pineapple. Then, my wife found a recipe for carrot cake muffins in the recently re-discovered cookbook “Mostly Muffins” which uses pineapple and she went for it. This was a delicious most tender soft muffin. It did not taste of pineapple; but it must have contributed to making the muffin extra-tender. The amount of carrot that went into the batter was also quite large. Both the pineapple and the carrots basically disappeared into the muffin. This is another excellent muffin.


As usual, I ask my wife to provide the recipe.

Ingredients:
1 3/4 cup AP flour
2/3 cup light brown sugar
1 tsp. baking powder
1/2 tsp. baking soda
1/2 tsp salt
1 tsp. ground cinnamon
1/8 tsp. mace
1/2 cup crushed pineapple including juice
1/2 cup vegetable oil
1 egg, lightly beaten
1 1/2 tsp. vanilla
2 cups shredded carrots
1/2 cups raisins

Double recipe
3 1/2 cup AP flour
1 1/3 cup light brown sugar
2 tsp. baking powder
1 tsp. baking soda
1 tsp salt
2 tsp. ground cinnamon
1/4 tsp. mace
1 cup crushed pineapple including juice
1 cup vegetable oil
2 egg, lightly beaten
3 tsp. vanilla
4 cups shredded carrots
1 cup raisin

Directions:
Put the pineapple in the bowl of a food processor with a blade and puree. Shred the carrots in a food processor. Set both the pineapple and carrots aside. In a bowl mix the dry ingredients (flour thru mace). In a separate bowl mix the wet ingredients (pineapple thru vanilla). Mix the wet ingredients into the dry ingredients. Stir until just mixed then add the carrots and raisins. Mix until incorporated. Scoop the batter into 12 heavily greased muffin tins. (I used the 2nd largest scoop). Bake in a 400 degree oven for 15 to 20 minutes until a tester put into the middle muffin comes out clean. These muffins are exceedingly tender. They have to be cooled completely before attempting to take them out of the muffin tins. (The first batch I made fell apart into large crumbs when I tried to remove them from the tins soon after they came out of the oven. The second batch was fully cooled and came out just fine.)


These are really good muffins. As stated previously they are very tender with a mild cinnamon sweetness and a nice firm texture element from the raisins. Great for breakfast.

Monday, May 10, 2021

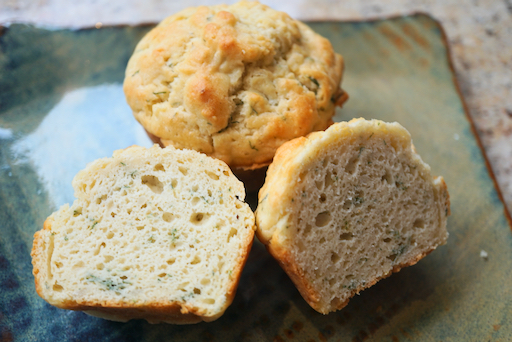
Potato dill muffin ポテトとディルのマフィン

 This is another muffin from the “Mostly muffin” cookbook. My wife made this since we had leftover mashed potatoes made from russet potatoes baked (in Weber grill with pork roast). The mashed potatoes were seasoned with buttermilk, butter, salt and pepper. This is a very nice muffin with a clearly identifiable dill flavor but also a hint of the mashed potato.


Here again, I ask to my wife to take over.


Ingredients
2 cups AP flour
1 1/2 tsp. baking powder
1/4 tsp. baking soda
1/2 tsp. salt
3/4 cup milk
1/2 cup sour cream
1/2 cup cooked mashed potatoes
1/4 cup lightly salted butter melted and cooled
1 egg lightly beaten
1/4 to 1/2 tsp. Sriracha hot sauce
1 1/2 tsp. dried onion (or onion powder or 2 Tbs. chopped scallions)
2 Tbs. dill chopped

Directions:
Mix the dry ingredients in a bowl (Flour thru salt). In another bowl mix the wet ingredients (i.e. the rest of the ingredients). Add the wet ingredients to the dry ingredients and mix until incorporated. Scoop (using 2nd largest scoop) into 12 heavily greased muffin tins. Bake at 400 degrees for 15 to 20 minutes until a cake tester in the middle muffin comes out clean. Let cool for about 5 minutes before removing them from the muffin tin.

These were very hearty muffins. The dill flavor was the most noticeable. The rest of the flavors were a bit muted. Next time I might increase the hot sauce and onion. Nonetheless this was a good muffin for breakfast or even lunch. 


Friday, May 7, 2021

Three appetizers with two new ones 新しいお通し2種

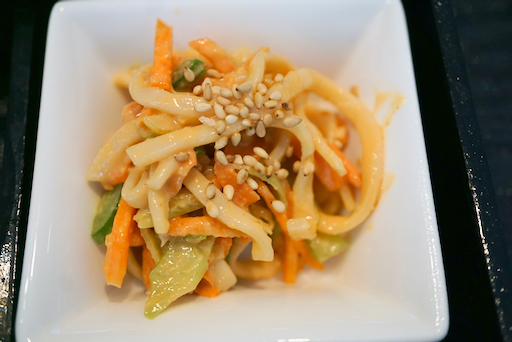
 I served these three appetizers one evening. The dish shown on the left in the first picture is my stand-by fried salmon in sweet vinegar or “salmon nanban” 鮭の南蛮漬け. The new ones are the one in the center “dried persimmon and daikon in sweet vinegar” 干し柿の大根なます and the one on the right, “udon noodle salad with peanut butter dressing” うどんのピーナッツバター和え.


The second picture is a close up of the dried persimmon and daikon in sweet vinegar sauce. This is loosely based on my compiled version of various recipes. I actually used the leftover marinade and vegetables from the previous batch of salmon nanban. (If I made this from scratch, I would make it close to the traditional New Year dish “daikon namasu” 大根なます and just add strips of dried persimmon). For a change, I also added roasted and ground sesame (fine grind but not paste) and a small amount of dark sesame oil. The combined taste of sweet and sour with added sesame flavor and refreshing daikon went well with the soft and sweet dried persimmon. Over time the persimmon got softer in the marinade. This is a good refreshing dish.


These are the ingredients and directions to make this dish from scratch (not reusing the vegetable and marinade of the salmon nanban).


Ingredients
2 dried persimmon, stem end and seeds removed and cut into strips.
1 inch segment of daikon, peeled, and cut into buttons then julienned.
Carrot and/or celery julienned (optional)
1/2 cup sweet vinegar (1/2 rice vinegar, 1/4 cup sugar or 2:1 ratio, pinch of salt, heat until dissolved. Then let it cool)
1 Tbs roasted white sesame seeds, fine ground (I used a Japanese mortar and pestle or suribachi.
1/2 tsp dark sesame oil

Directions:
Salt the daikon pieces and knead, then let it stand for 5-10 minutes.
Add all the ingredients and the sweet vinegar.
Let it marinate for at least 30 minutes in the refrigerator.

The next dish is a variation of sesame noodle salad. Since we had home-made peanut butter, instead of sesame paste or “neri-goma” ねりごま, I used the peanut butter. This was very similar but different because of the rather intense peanut flavor. I have not made the sesame noodle salad for sometime and never made it with peanut butter. This is a good salad as an appetizer, I should make it more often.


Ingredients: (amount is all arbitrary)
Cooked thin udon noodle
Carrot, julienned
Scallion, sliced thinly diagonally
Sesame seeds for garnish (or crushed peanuts)

For Dressing:
Peanut butter, soy sauce, and rice vinegar in 2:1:1 ratio
Dash of dark peanut oil
Sugar and sriracha to taste
Minced ginger and garlic to taste
Add warm water if the consistency is too thick

Directions:
Cut the noodles into 1-2 inch lengths (optional but for ease of eating)
Dress with the peanut dressing.
Garnish with sesame seeds or crush peanuts.

Tuesday, May 4, 2021

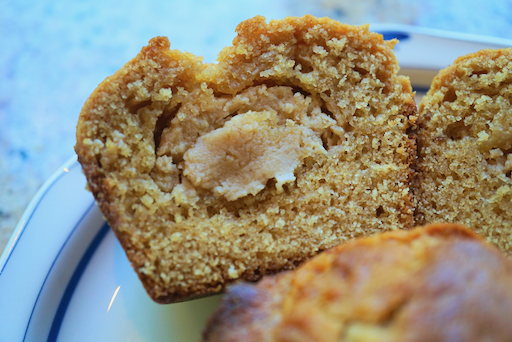
Peanut butter muffin ピーナッツバターマフィン

This is another one of my wife’s muffin projects. The original muffin recipe came from “Mostly Muffins” published in 1984 which we rediscovered recently tucked away on a bookshelf. The original recipe used peanut butter in the dough and called for a stuffing made of semi-sweet chocolate chips made into a fudge. (The peanut butter chocolate combo reminiscent of Reeses Butter Cups?) But my wife thought that a stuffing of chocolate candy would be too sweet for us so she came up with a stuffing made of a mixture of cream cheese and peanut butter. We have jars of peanuts used to feed squirrels but we did not have any peanut butter. So we ended up making peanut butter as well. (Sorry squirrelys) The muffin came out nice and very peanut-y.


Actually, although the stuffing is almost 1/2 cream cheese, it has a very strong and pure  peanut flavor.


Ingredients:
For muffin
1 2/3 cups AP flour
1/2 cup brown sugar
1 Tbs. baking powder
1/4 tsp. salt
3/4 cup milk
1/2 cup peanut butter
1/3 cup peanut oil (to accentuate the peanut flavor. Vegetable oil is OK too.)
1 egg lightly beaten
2 tsp. vanilla

for peanut butter filling
1 block cream cheese
enough peanut butter to bring the total weight of the cream cheese and peanut butter to 225 gm.
2 tsp. sugar
2 tsp. salt

For chocolate fudge filling (I did not use this but it is another alternative filling)
1/3 cup semisweet chocolate chips
1 tbs. butter

In a small saucepan melt the chocolate chips and butter until melted then set aside

Directions:
To make the peanut butter filling: Put the peanut butter (#1) and cream cheese in a stand mixer with a paddle and beat first on lower speed to incorporate. Add the sugar and salt and beat on a higher speed to whip until light and slightly fluffy. Set aside

for the Muffins:
In a bowl mix the dry ingredients (from flour thru salt). In another bowl mix the wet ingredients (i.e the rest of the ingredients) (#2). Put 1/2 of the dough into the bottom each of 12 heavily greased muffin tins (2nd smallest scoop). Top with about 16 gm of the peanut butter filling (smallest scoop). Make sure none of the filling touches the side of the muffin tin. Cover the filling with the remaining batter (#3). Bake in a 400 degree oven for 15 to 20 minutes until the surface feels firm when lightly touched. Cool 5 minutes before removing from the tins. 


These are muffins for the tried-and-true peanut butter devotee. The muffin has a tender texture and a very mild slightly sweet peanut flavor. The peanut butter cream cheese stuffing adds an additional slightly creamy texture and a very pleasant pure peanut kick. The cream cheese does a good job of making the peanut butter a manageable addition to the muffin. This is the kind of muffin where you eat the first one and say “um...pea-nutty” then, “could I have another one”?

Saturday, May 1, 2021

Homemade peanut butter 自家製ピーナッツバター

 My wife wanted to make some peanut butter muffins from a recipe she found in a long forgotten and recently re-discovered "Mostly Muffin" cookbook. We did not have any peanut butter (I can't even remember the last time we even had a jar of peanut butter in the house) but we did have jars of roasted peanuts which we keep to feed the squirrels and friendly birds. My wife suggested, "we have peanuts, we should be able to make our own peanut butter". A quick search on the internet produced many recipes/instructions on how to make peanut butter from peanuts. This is the result. It came out really well.


Ingredients and directions for peanut butter.
1 16 oz. jar of dry roasted unsalted peanuts
Place the peanuts in a food processor with a cutting blade.
Keep the food processor running. The peanuts will go from light crumb, to clumps and finally to a smooth peanut butter consistency. This will take some time and is a bit nerve wracking to have the food processor running for so long and the way it thumps and bumps through the various stages.

This peanut butter was the epitome of peanut-buttery-ness. It was characteristically sticky with a clear deep flavor of peanuts which lingered long on the tongue.  The taste evoked childhood memories of PB&J lunch sandwiches for my wife. (Not for me since peanut butter was not a childhood delicacy in Japan when I was growing up).  My wife came up with her "adult" version of PB&J; a peanut butter canapé to have with wine. 


Ingredients: for PB&J canapé
1 slice of white bread toasted and cut into 4 piece
A slather of homemade peanut butter on each piece
Top 2 with Strawberry puree (I made this with strawberries, sugar and triple sec whirred in the food processor).
Top 2 with fig puree (this was a leftover of fig stuffing my wife made for the fig muffin).

My wife declared "Yup this was prototypical PB&J all right". It was astounding at how well the peanut butter went with the red wine. Needless to say the wine component bumped it up to "adult" status. 

Wednesday, April 28, 2021

Japanse dried "hoshigaki" persimmon compote 干し柿のコンポート

 I am not sure how this came about but I asked my wife if she had ever tried dried persimmon or "hoshigaki" 干し柿 and her asnwer was "no". There are many ways to convert "shibugaki" 渋柿 or bitter/tannic persimmons to edible sweet persimmons. Certain cultivars will become sweet when ripened. Drying it to make "hoshigaki" is another way to accomplish this.  I searched the internet to see if there was a place I could buy "hoshigaki". I found an interesting site called "Japanese taste" that sold Japanese food and other items . Through this site (located in Japan), I bought "hoshigaki" and other Japanese sweets from Hokkaido, Japan 北海道 where I grew up. The hoshigaki I got was called "Ichida-gaki" 市田柿 and is produced in a specific area in Nagano prefecture 長野県.  According to their English webpage, this is produced using a very labor intensive and long process including "hand massaging" the fruit after a certain level of dehydration is reached. In any case, this arrived from Japan about 1 week after I ordered it.


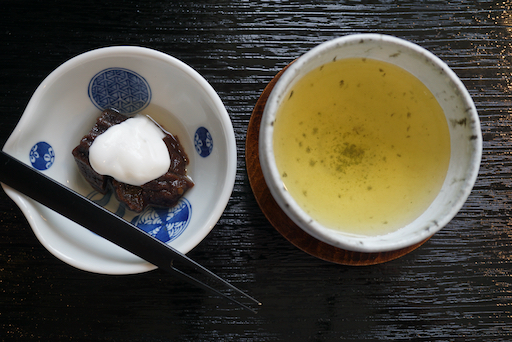
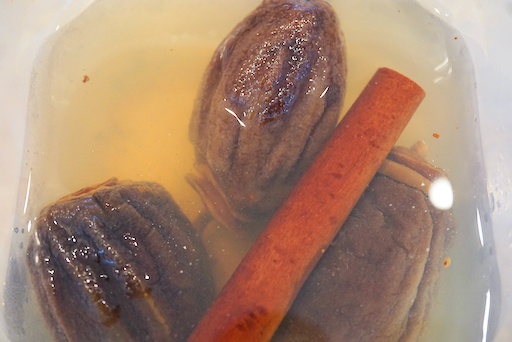
Of course, you can eat the persimmon as is but I also made a few dishes from it. The first one is called "hoshi-gaki compote" 干し柿のコンポート. The recipe came from a popular cooking program on NHK Japanese TV channel  on-line recipe . I served this with some yogurt my wife made and green tea.


The hoshigaki became softer and the cinnamon flavor is very nice. The slightly tart yogurt goes well with sweet persimmon.


Ingredients:
4 (four) Hoshigaki
1 cup water
3/4 white wine (I used French dry sauvignon blanc since I had it)
50 grams sugar
1 cinnamon stick

Directions:
Add the water, wine, sugar and cinnamon in a pot and let it boil.
Add the hoshigaki and let it come to boil again and then turn off the flame.
Let it steep and cool to room temperature and store it in the refregerator (should last 2 weeks)


This is how it looked the next day. I suppose you could serve this as is but I cut off the stem end, and cut it in half and removed the seeds.


This is certainly a better and elegant way to serve hoshigaki.