Saturday, July 3, 2021

Warm tofu with mushroom sauce 豆腐のキノコあんかけ

This was a dish I made sometime ago but somehow I did not post it. I made this dish one day to use up ingredients which need to be used quickly. I had portions of silken tofu which I kept in a sealable plastic container with water in the fridge, shimeji mushroom and fresh but pre-sliced shiitake mushroom (We specified whole fresh shiitake but we got a package of presliced shiitake mushrooms through the Instacart.) So, I came up with this dish which is a rather standard Japanese dish but I did not follow any recipe.


The sauce is thickened with potato starch slurry.  Dishes made with this kind of sauce are often called “an-kake” 餡掛け. This is a warm and soothing dish. It is basically vegetarian except for bonito in the dashi broth.


Ingredients (2 servings):
Half silken tofu divided into two portions
1 cup Japanese dashi broth (I made this from kelp and bonito flakes).
1/4 cup (or to taste) concentrated Japanese noodle sauce (from bottle)
1/2 scallion finely sliced
1 tsp potato starch or “Katakuri-ko” 片栗粉 make into “slurry” by adding 1 tbs water or sake.

Directions:
Heat the tofu in the simmering broth until warm (5-6 minutes).
Place the warmed tofu in bowels
Add the mushrooms to the broth and cook for 3-4 minutes
Add the noodle sauce and the starch slurries and thicken the sauce.
Add the scallion.
Pour the “ankake”sauce over the tofu and serve.


This is best served in cold weather but this is a very gentle smoothing dish with soft tofu and gentle taste of broth and mushrooms.

Wednesday, June 30, 2021

Hot and sour pork インドスタイルのホットサワー豚肉カレー

This is continuation of what to do with the  bone-in pork roast we have been getting. The roast is rather large and is either shoulder or thigh. After removing the bone(s), I make one large roast for cooking in the Weber grill and a smaller roast for Ni-buta 煮豚. The remaining odds and ends, I cut into small chunks for other recipes, mostly stewed dishes. We found out that once we cook the meat in chicken broth the meat tends to be much more tender and it is much easier to convert into other stewed dishes without long cooking. So, I cooked the pork in chicken broth and kept it in the refrigerator. The meat exuded collagen and the liquid congealed which is also used in the subsequent dish adding good mouth feel and flavors. In addition, if we do not have a chance to make the meat into another dish, we can reheat the meat in the broth. So this pork was 2 weeks old and re-heated once. I asked my wife to make this curry dish. She made it once before based on a recipe from her favorite Indian cookbook. We liked it but somehow we never blogged it.

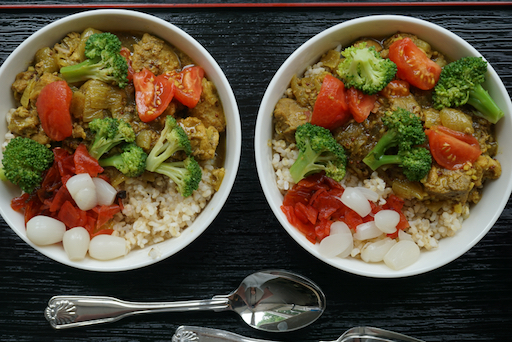
We served the curry for lunch one weekend as shown in the first picture. We served it on previously made brown rice and added skinned Campari tomatoes, cooked broccoli and Japanese pickles; rakyo ラッキョウ, fukusinzuke 福神漬け.


Ingredients:
1 tsp ground cumen
1/8 tsp cayenne
1 tsp. gound cardamon
1 tsp. cinnamon
1 1/2 tsp. black mustard seed
1 tsp. Ground fenugeek seed
1 tsp. salt
1 Tbs. brown sugar
1/3 cup sushi vinegar (recipe calls for white wine vinegar)
2 onions peeled and roughly minced
1 inch cube ginger (finely chopped)
2 cloves garlic (finely chopped)
1 Tbs. ground coriander
1/2 tsp ground tumeric
1 lb. previously simmered pork butt/shoulder trimmings

The second picture shows all the spices lined up. My wife does this to keep track of what spices she has mis en place and as you can see there are quite a few. 


Directions:
Pour the spices from cumin through brown sugar into the vinegar and stir to make a slurry then set aside. Saute the onions in a sauce pan until slightly carmelized. Add the garlic and ginger and cook until fragrant. Add the spice slurry to the onions and stir until the spices bloom (smell fragrant). Then add the coriander and turmeric stirring until they bloom too. Then add the precooked pork and mix to cover with the sauce. If there is not enough liquid add water or chicken broth. Cover and simmer for 20 minutes. The third picture shows the curry simmering in the pan. 


I think of this as not-quite a curry. It is spicy in terms of the layers of flavor of the many spice used but not particularly hot (depending on the amount of cayenne pepper). It does have a sweet/ sour undertone from the combination of the sautéed onions and vinegar which adds a brightness to the overall flavor. This is a good dish with rice or even bread.

Sunday, June 27, 2021

Panna cotta from homemade buttermilk 自家製バターミルクでパナコッタ

After my wife made buttermilk using the culture from "The culture for health" we were quite impressed with the quality of the buttermilk. My wife decide to make something using the buttermilk. Since we had some leftover blueberries she decided to use the newly made buttermilk to make panna cotta with blueberry sauce as shown in the first picture.


Ingredients
1 tsp. gelatin
1 1/2 Tbs. water
1 cup 4% milk
1/4 cup sugar
1/2 tsp. vanilla
1 cup buttermilk

For the blueberry sauce:
1 cup of blueberries
1 tsp. Of sugar

Directions:
For blueberry sauce:
Put the blueberries and sugar in a small ceramic dish and cook them at 350 degrees for 30 minutes in the toaster oven until they form a thick type of blueberry jam.

For panna cotta:
Bloom the gelatin in the 1 1/2 Tbs. of water. Put the milk and sugar in a sauce pan and heat until the sugar is melted. Remove from the heat and use several tablespoons of the warm mixture to “temper” the gelatin until it is completely dissolved. Add the tempered gelatin into the rest of the milk mixture and stir completely. Let cool to room temperature. Add the buttermilk and vanilla. Pour the mixture into the containers. Tip the containers using a muffin tin to support them in order to get the beveled appearance. Cool in the refridgerator until the mixture becomes firm. Just before serving spoon in the blueberry mixture on top of the buttermilk mixture to bring the contents of the container even with the top.


This panne cotta turned out well. It was very creamy, slightly tangy and sweet with a vanilla flavor. The blueberries added a nice fresh blueberry flavor that went very well with the vanilla.

Thursday, June 24, 2021

Homemade buttermilk 自家製バターミルク

 For the last couple of weeks we have not been able to get buttermilk particularly the brand my wife likes best. As was the case when we could not get plain yogurt at the start of the pandemic and my wife started making it, she decided to start making buttermilk too. So she ordered buttermilk starter from "Cultures for Health" (the same place she got the starter for yogurt). Unlike yogurt, however, there is little information on the internet on how to make buttermilk. Most of the entries are about what to substitute in recipes for buttermilk if you don’t have it. 

Digression alert: Buttermilk is one item that is very difficult to find or not at all in Japan even recently. When I was growing up in Japan, I never heard of it. Even in the U.S., not many people will drink buttermilk but almost exclusively use it in cooking, especially baking. It has its own unique tangy flavor which will add to the flavors of baked goods and its acidity will activate baking soda. My wife is one of the rare people I know, who enjoys drinking buttermilk. (She says, 'What's not to like? If you like sharp cheese why not buttermilk?') Originally buttermilk was the residue liquid after butter was churned. It was fermented to make buttermilk but modern buttermilk was made by inoculating and fermenting whole milk as my wife did (see below).


The resulting buttermilk (shown in the first picture) was quite thick and almost the consistency of runny yogurt but it has a very different taste... tasted like...buttermilk…actually pretty good buttermilk!


To make buttermilk

To “wake up” the culture when you first get it. 
Pour 1 quart of pasteurized milk into a glass container. 
Add 1 packet of starter culture and mix well. 
Cover the container and put in a warm spot (we use the proofing box) at 70 -77 degrees. 
Check after 24 hours to see if the buttermilk has set. If it has not leave it up to 48 hours checking every so often. 
Once it has set refrigerate at least 6 hours. (We put the container in the proofing box at 9:00 am on Friday and took it out at 8:00 PM on Saturday.) 

For subsequent batches add 1/4 cup of the previous batch to 1 quart of milk and repeat the procedure of putting it in a 70-77 degree proofing box until set. It should set in less time than the first batch, about 12-18 hours. While doing subsequent batches I realized the milk was very cold just coming out of the refridgerator and it took some time until it even reached room temperature in the proofing box. So I gently heated the milk to about 90 degrees in a pan on the stove. When it was about room temperature i.e. just warm to the touch,  I added the starter. This really accelerated the process. If the milk was started at 7:00 AM it was ready by 7:00 PM. The instructions suggest making a new batch every 7 days to keep the culture strong. It also suggests that it may take several batches for the flavor and texture to even out. 

The resulting buttermilk from our first batch, was very thick and creamy. It had a very mild flavor and even I was able to drink a little of it. 

Monday, June 21, 2021

Periodic cicadas Brood X 2021 17年周期の蝉

 Disclaimer: I want to make crystal clear, right up-front that although various recipes for cooking cicadas appeared in the local media, WE DID NOT COOK OR EAT ANY and this is not a blog on “how to serve Cicadas.” If that is what you were looking for, please move on. With that out of the way, today’s blog is not about food. It is about commemorating a wonder-of-nature that just took place in the Washington area this year; the emergence of the 17 year cicadas Brood X. 

Cicadas or "semi" 蝉 are very common in Japan. When I was growing up, my brother and I collected cicada nymphs when they emerged from the ground and started climbing the trees in the early evening. We brought them inside and let them spend the night clinging to the curtains in our bedroom. (Yes my mother was a saint). They would molt during the night and by the time we woke up the next morning, they were all dry and ready to fly.  It was this transformation that fascinated us. After observing them for some time we just let them go. The cicadas of my childhood came out every year. They had brown eyes and opaque brown wings and were called "aburazemi" 油蝉 or "Large brown cicada". They spent about 3 years under ground but their emergence was not synchronized. So every year, a batch of about the same number would appear. 

In contrast, while the area where we live now has cicada every year, it is also characterized by the emergence of "periodic cicadas". These are cicada that synchronize their emergence to come out en mass (read, in the billions) as a strategy to overwhelm any predators so enough will survive to procreate. The most impressive is the emergence of the 17 year cicada. They spend 17 years living under ground feeding on the sap of tree roots before they emerge, molt into their adult winged form, issue their deafening shrill mating call, mate, lay their eggs in trees and die. They are unique to the eastern United States. None of the other 3,400 species of cicada worldwide do this. There are three species of 17-year cicadas—Magicicada septendecim, M. cassinii and M. septendecula. They form mixed-species cohorts called broods whose members arise like clockwork on the same schedule. The broods are identified by Roman numerals. There are 12 of them identified according to the regions of the United States in which they appear. For example, Brood I, the Shenandoah brood so named because it appears in the Shenandoah valley area, or XIX the Great Southern Brood appears in the U.S. southeast. Brood X, known as the Great Eastern Brood is the largest of the 12 broods and it is the one that made it’s appearance in the Washington area this year. The cicada that appeared this year were spawned 17 years ago in 2004 when their “parents” last emerged. (This is a very long lived insect. If these were kids they would be thinking about attending college). The number in which they emerge is truly mind boggling. Their mating call is deafening. Heard from a distance it sounds unworldly—like a space ship—and it goes on for about a month. 

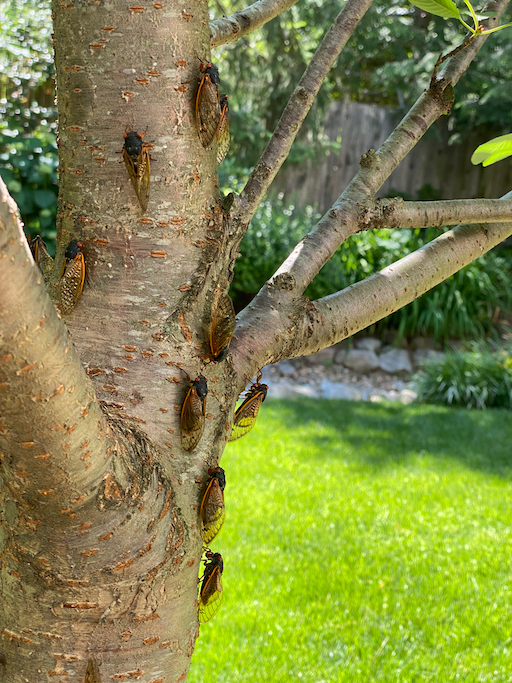
We took several pictures to commemorate the event. The first picture gives a glimpse of how they come out in droves. This is just a small segment of the continuous stream of cicada working their way up the tree from the ground. Looks almost like a cicada rush hour traffic jam up our small cherry tree which we planted about 3 years ago after our 30  some year old cherry tree was destroyed during nor easter


More cicadas are "resting" on the hosta leaves.


Brood X periodic cicada is much smaller than the cicada I am familiar with in Japan. They are also more colorful; quite the fashionista with the red colored eyes and transparent gold wings as shown in the portrait here. And check out the golden legs. 


They are harmless rather awkward flyers, bumbling into things, flipping upside down when landing, feet flailing in the air, minutes spent righting themselves, walking mechanically one leg after the other somewhat like a wound-up robot. Think about it. You spend your entire life (17 years) in the dark, underground, wingless. Then suddenly, literally overnight, you find yourself above ground, in the light, in an entirely different body, with wings no less. Is it any wonder that it takes some time for them the pass the “driving test” in these new bodies? While we were sitting outside in our backyard, they made themselves quite at home, landing and crawling all over the place. The one shown here is checking its email.


Here is one taking selfies.


This one stopped by for an espresso.


Apparently pets (especially dogs) and wild animals (rats. mice, squirrels and birds) enjoy this bounty which for them is food. We watched a resident squirrel grab a cicada, rip off  its wings, head and eat the rest all within seconds. Then eventually the squirrels became satiated. There were just too many cicada for them to eat so, in typical squirrel fashion, they started burying them. (Not sure how that helped. We pointed out to the squirrel that the next generation cicada in larva form would eventually end up underground again so burying the parent that was going to die anyway would not be helpful). Ok the recipes we saw in the media during this event were interesting in a certain intellectual sense but we were certainly not into it. We decided to leave the cicadas to the other gourmets such as the squirrels. Although this emergence of Brood X cicadas looked somewhat smaller and not as noisy or numerous than as the one 17 years ago, it was still one of the best floor shows put on by nature. 

Friday, June 18, 2021

Crumpet version 2 クランペット 第二弾

After we made blini using a newly rediscovered cast iron pan (supposedly called a "platar"), we challenged ourselves to use it to make crumpets. The last attempt at crumpets was less than successful; those crumpets did not develop the "hole-y" characteristic which makes a crumpet crumpet. This time with a new recipe and the newly rediscovered cast iron pan, we succeeded in making perfect crumpets. We served them with melted butter and a small amount of honey.


The batter is rather runny almost the consistency of pancake batter. In our previous version we used English muffin rings, as recommended in the recipe we were using, but the batter seeped out at the bottom of the ring. We had no such problem with our cast iron pan.


The new recipe had instructions as to how to control the heat to develop multiple holes as shown in the second and third pictures. You can see that while cooking, bubbles developed and then popped creating nice holes.


Ingredients:

1 times the recipe (about 14 crumpets)
300 g. (2 cups) AP flour
400 ml. (1 1/2 cups) warm water
1 tsp. Salt
1 tsp. Sugar
2 tsp. Baking powder (The recipe said baking soda doesn’t work as well)
2 tsp yeast
2 tbs. warm water

1 1/2 times the recipe (about 21 crumpets)
3 cups AP flour (2 cups AP and 1 Cup +2 Tbs. Cake flour) 
600 ml. warm water
1 1/2 tsp. Salt
2 tsp. Sugar
3 tsp. Baking powder (The recipe said baking soda doesn’t work as well) 
3 tsp yeast
3 tbs. warm water

2 times the recipe (this is the recipe I’ve been using) 
600 g. (4 cups) AP flour (or 2 cups AP and 2 cups + 1/4 cup  Cake flour) 
800 ml. (3 cups) warm water (or buttermilk or regular milk)
2 tsp. Salt
2 tsp. Sugar
4 tsp. Baking powder (The recipe said baking soda doesn’t work as well) 
4 tsp yeast
4 tbs. warm water (1/4 cup)

(Use second to largest scoop not completely filled)

Directions:
Bloom the yeast in the warm water. Put the flour, water and salt in the bowl of an electric mixer and beat on speed 5 for 1 minute until smooth paste forms. Add the yeast mixture, sugar and baking powder and mix on speed 5 for another 30 seconds. Cover with cling wrap and put in a warm place for 15 to 30 minutes. The surface should get foamy but it will only increase in volume by 10 to 15 %.

Pre-heat the platar and coat the cups with melted butter. Using a small ladle scoop the batter into the cups. Heat control is key to crumpet success. Stronger heat is needed to begin with to get the holes bubbling. Cook on the higher heat for about 1 1/2 minutes until bubbles start appearing. Then lower the heat so the crumpet cooks through without burning the base, but strong enough to make the bubbles pop. Cook on the lower heat for about 1 minute until the bubbles start popping. Bubbles will start to pop around the edges first then in the center. Finally, lower the heat further and continue cooking for 2 1/2 to 4 minutes until the surface is set and it is clear no more bubbles will be popping. (According to the recipe, at this stage the final bubbles could be popped with the help of a skewer.)  Some wisps of smoke from the butter around the rings may appear. If there is a lot of smoke it means the skillet is too hot. Flip them over to cook the other side for 20 to 30 seconds to give it a blush of color. Cool on a wire rack. 

These crumpets were much better than the first batch we made. They got even better after the second day. We tasted them just out of the pan and the outside was crunchy but the inside was kind of wet and doughy. We initially thought they may not have been cooked through. But by the next day the insides had firmed up and were nicely chewy. The flavor was nicely accented with the taste of browned butter. We toasted them in the toaster oven and served them with melted butter and some honey. Mighty fine! 

Tuesday, June 15, 2021

Sashimi from Japanese grocery store 日本食料店からのはまち刺身

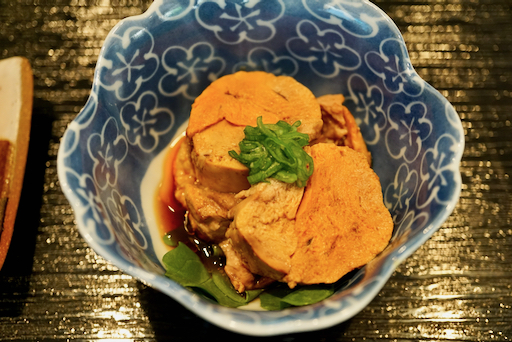
I have not physically gone to a grocery store including our Japanese grocery store for almost one year because of the COVID. We are mostly satisfied with our main grocery store delivery service but especially for Japanese or specialized  grocery items, nothing replaces shopping in person. So, now fully vaccinated for sometime, one weekend, I decided to visit our Japanese grocery store and really realized nothing replaces being there and selecting items you are buying. I got so many good Japanese food items (I got a bit carried away). After coming back from the store, we had a lunch of grilled mackerel and rice balls. They were made at the store and were still warm fresh out of their kitchen. I made a miso soup (tofu, shimeji mushroom and abra-age 豆腐、油揚げ、ぶなしめじ) to complete our lunch. This was a very satisfying meal. In the evening, we had "Hamachi" はまちの刺身 yellowtail sashimi which I have not seen  previously at our Japanese grocery store. Since we had a frozen "Ankimo" 鮟肝 which I bought at the Japanese grocery store last time I was there, over a year ago, I decide it was the time to serve it. So, we started the evening with Hamachi sashimi and ankimo with ponzu sauce. I also got a special "Sashimi" soy sauce 刺身醤油 for this.


The hamachi in the picture one serving which is half of the tray I bought. So it is a good amount.  I served cucumber in vinegar dressing and wasabi from the tube. This was quite descent yellowtail sashimi.


I usually serve Ankimo with soy sauce and orange marmalade but the jar of marmalade we had was unopened but expired several years ago. So I served it with Ponzu sauce and green part of scallion as a garnish.


We somehow feel really good that we can get Japanese food items from our Japanese grocery store again. It made us feel like there may be light at the end of this covid tunnel. We really like to start our evening with a little bit of sashimi.