Friday, December 17, 2021

Chicken onion sauce curry 鶏肉のタマネギソースカレー

This is another of my wife's curry porojects. This time, instead of the usual pork, she used chicken thighs. This one uses an onion-centric sauce with the usual Indian spices. Since we decided that we like potatoes in any curry, she added potatoes as well. We also added blanched broccoli and skinned Campari tomato while heating the curry which adds colors as well as fresh taste. I will ask my wife to provide the ingredients and directions.


Ingredients:
4 chicken thighs
2 to 3 onions diced
1 1/2 inch cube of ginger peeled and coarsely chopped
Several garlic cloves (or as many as like) peeled
1 Tbs. Ground coriander
1 Tbs. Ground cumin
1/2 tsp. Ground turmeric
1/4 to 1/2 tsp cayenne pepper
2-3 tomatoes peeled
3 to 4 small red potatoes peeled
2 tsp. Salt
Some chicken broth as needed
1/2 tsp garam masala
Several tablespoon of plain yogurt
Finely chopped parsley


Directions:
The line up of spices is shown in the first picture below. Take 1/2 of the chopped onions, the garlic and ginger put into a blender and blend to a paste. Set aside. Sauté the remaining onions in a frying pan. Cook until slightly browned. (Second picture below) Remove from pan and set aside. Add the onion/garlic/ginger paste to the pan (Last picture below) and fry until it too turns slightly brown. Add the spices (coriander through cayenne) until they “bloom” and become fragrant. Add back the sautéd onions and the tomatoes and salt. Stir until all is blended. Add in the potatoes and the chicken. If more liquid is needed add some chicken broth. Cook until the chicken is cooked and becomes tender. Finally add the garam masala and several spoonfuls of yogurt. Top with the parsley just before serving.


This is another good curry. The onions add a pervasive gentle sweetness underlying the complexities of the other spices. The cayenne pepper gives is a slight “sing” of hotness that builds slightly. The chicken becomes flavorful and tender, just falling off the bone. The potatoes also absorbs the flavors and a nice robustness. A great dish with rice or bread for lunch or dinner. 

Tuesday, December 14, 2021

PA Dutch Schnecken ペンシルバニアダッチ シュネッケン

My wife grew up in the PA Dutch area of Pennsylvania and PA Dutch food is something special for her from her childhood.  For Christmas, we usually get German-style cookies from a bakery called “Bredenbecks” which is located in Philadelphia, (historically Germantown but currently Chestnut Hill) and has been in business since 1886. According to my wife, these cookies were her grandfather’s favorite and he used to bring a large tin of them from Bredenbecks every year when her grandparents came for Xmas. So, for my wife, Bredenbecks’ cookies are associated with a good time during the holidays as a kid. Last Xmas, my wife decided to try something different in addition to the traditional German cookies. So she ordered a tin of “Schnecken” (which means “snail” in German).* As I mentioned before, I am not a “desert” person and I have to admit I am also not a charter member of the traditional German cookie fan club. For these reasons I have no problem by-passing a plate full of them without taking one. But the schnecken were great! (My wife actually caught me red-handed snarfing some directly out the tin between meals). 

*digression alert: One year my wife decided to order a stollen in addition to the traditional German cookies from Bredenbecks. While the cookies are shipped in a tin, the stollen was shipped in a light cardboard box. The goodies were delivered to the front door and quickly discovered by the resident squirrels who recognize a good thing when they smell it. They busted into the box and helped themselves to the stollen. By the time we got home the only things left were a cardboard shipping box with a large hole in it, a few large crumbs and chunks of stollen scattered all over the front porch. It was a merry holiday for some lucky squirrels. 

Recently my wife was going through one of the old PA dutch cookbooks she has when the recipe for PA Dutch schnecken jumped out at her. Knowing how much I liked the ones from Bredenbecks she couldn’t ignore the recipe and decided to surprise me with some. As shown in the picture below the schneken from Bredenbecks are little cookies and shaped more like a mini-croissant than a snail. 


As shown in the next picture, the PA Dutch schnecken my wife made is more like cinnamon a bun but as you can see, it is indeed shaped like a “Schnecken”.


The picture below shows the cut surface. Alternating layers of bread and cinnamon sugar/ butter. This version is not too sweet but very flavorful and we are enjoying them mostly as a breakfast.


I ask my wife, as usual, to share the “how-to” part.

Word of advice from wifey: in the tradition of old recipes used to make dishes for large farming families (such as the PA Dutch), doing hard labor chores the yield from this recipe is quite generous.…it makes 2 dozen schnecken! 

Ingredients:
For the dough
1 package of yeast
1/2 tsp. Salt
1/3 cup sugar
4 to 5 cups AP flour
1 1/2 cup milk (buttermilk would work too)
2 eggs beaten
1/4 cup melted butter

For the filling
1/3 cup butter softened
1/3 cup packed brown sugar
1 1/2 tsp. Ground cinnamon

Optional topping
1 egg white mixed with 1 tbs water
1/2 tsp. Sugar per muffin (more or less to taste)

Directions:
Add the dry ingredients (yeast through flour) to the bowl of a mixer with a dough hook. Mix together the wet ingredients (milk through melted butter) together and mix well. With the mixer running add the wet ingredients to the dry ingredients. Add more flour as needed to make a soft dough. Knead for 7 to 10 minutes. Cover and let rise in a warm place.

Meanwhile combine the ingredients for the filling (butter through cinnamon) into a paste and set aside.

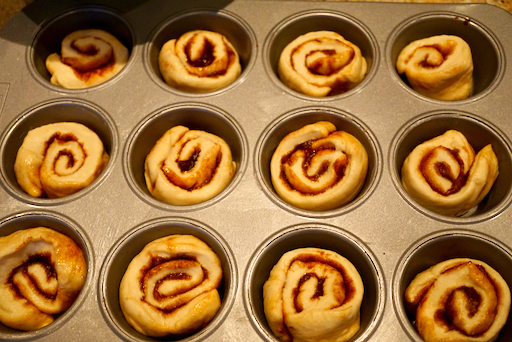
When the dough has doubled in size punch it down and divide it into two portions weighing them to make them about even in size. Roll out each portion into a rectangle of about 15 X 18 inches. Spread 1/2 the filling over each rectangle right to the edges. Roll up each “as for a jelly roll” as specified by the instructions. Cut each roll crosswise into 12 pieces. (A word of advice: to get pieces of somewhat equal size, cut the roll into thirds. Then cut each third into fourths (3 x 4 = 12). Place the slices cut side down into a well greased muffin tin. (First picture below) Cover and let rise until double. Just before baking brush each muffin with the egg wash mixture and sprinkle on the desired amount of sugar per bun. This sugar will caramelize slightly when cooked. Bake in a 375 degree oven form 18 to 20 minutes or until golden brown. (Second picture below). Another word of advice: remove the buns from the tins immediately after they come out of the oven before the caramelized sugar hardens . Once it hardens it will become extremely difficult to extract them. Also, scoop any caramelized sugar left on the bottom of the tins before it hardens and spread onto the buns.


Here are a bunch of snails. 


Imagine how nice it was to come home to the rich baking smell of butter, cinnamon and caramelized sugar. As usual my wife made a small one for me to eat immediately upon my arrival. Needless to say that one disappeared very quickly. While this is basically a cinnamon bun it is more demure than its better known cousin the sticky bun. The sweetness is just right with a gentle taste of cinnamon and a lovely soft slightly chewy dough. Only 2 dozen yield?

Saturday, December 11, 2021

Buttermilk mini pie (Tassie) バターミルクミニパイ

While my wife was browsing the Washington Post, she found several small pie (tassie) recipes for the holidays. One was called "Buttermilk chess tassie". We are not sure of the origin of "chess" but it is reportedly a classic southern pie. "Tassie" is not a word we were familiar with but it means a small pie or tart and reportedly originated from the Scottish word "tass" meaning a small goblet. In any case we will call this "Buttermilk Mini Pie". This is perfect for us since it uses buttermilk (of which we have an abundant supply since my wife started making it) and it is small. A perfect single sweet bite as a dessert.


The below was C&P (cut and paste) from WP recipe.

Ingredients:
For the crust
4 tablespoons (2 ounces/60 grams) unsalted butter, softened, but still cool to the touch
1 1/2 ounces (40 grams) cream cheese, softened, but still cool to the touch
1/2 cup plus 1 tablespoon (70 grams) all-purpose flour

For the filling
1/3 cup (65 grams) granulated sugar
3 tablespoons buttermilk
1 large egg, cold
1/2 teaspoon vanilla extract
1/8 teaspoon fine sea salt or table salt
2 tablespoons (30 grams) unsalted butter

Recipe doubled:
For the crust
8 tablespoons (4 ounces/120 grams) unsalted butter, softened, but still cool to the touch
3 ounces (80 grams) cream cheese, softened, but still cool to the touch
1  cup plus 2 tablespoon (140 grams) all-purpose flour

For the filling
2/3 cup (130 grams) granulated sugar
6 tablespoons buttermilk
2 large eggs, cold
1 teaspoon vanilla extract
1/4 teaspoon fine sea salt or table salt
4 tablespoons (60 grams) unsalted butter


Directions:
To make the crust: In the bowl of a stand mixer fitted with the paddle attachment — or, if using a hand mixer, in a large bowl — beat together the butter and cream cheese until smooth, about 2 minutes. Stop the mixer and add the flour. On low speed, mix until no streaks remain and the dough starts to come together, about 1 minute. Scrape any stray dough from the sides of the bowl, gather into a ball and flatten into a smooth rectangle or disc. Cover tightly and refrigerate for 1 hour.

Cut the cold dough into 12 equal pieces, (I did this by dividing the total weight of the dough by 12 to get the gram weight of each piece. That way they would at least be somewhat equal). Using your fingers, evenly press each piece into the bottom and up the sides of 12 mini muffin cups, making sure there are no holes. (This part was a bit tricky because it was hard to get the dough evenly distributed. Rolling the dough into a round does not work well. I found the best way was to make a small ball out of the dough, put it in the cup then using my thumb push down on the center of the ball forcing a depression in the center and the displaced dough up the sides of the cup.) Also, I wasn’t sure how easy it would be to get the little pies out of the cups once cooked so I put half of them in mini-muffin papers and the rest just in the greased cup. Turns out there is enough butter in the recipe that the papers were not necessary. Refrigerate uncovered, while making the filling.

Position a rack in the middle of the oven and preheat to 350 degrees.

Make the filling: In a medium bowl or 1-pint glass measuring cup, whisk together the sugar, buttermilk, egg, vanilla and salt until just combined. In a small skillet over high heat, melt the butter until it foams, 1 to 2 minutes. Continue cooking, stirring occasionally, until it starts to turn brown and smell nutty. Use some of the butter to temper the egg mixture. Then add the rest of the butter and stir until blended.

Retrieve the muffin pan from the refrigerator, and add 1 heaping tablespoon of filling into each dough cup, filling it almost to the top. (I used the smallest ice cream scoop).

Bake for 15 to 20 minutes, or until the crust is golden brown and the filling is set.

Transfer the pan to a wire rack and let cool completely before removing the tassies.
In any case, this was sweet smooth with some tang from the buttermilk. The browned butter gives it a rich nuttiness. I am not a dessert eater but I had no trouble “choking” this down.

Wednesday, December 8, 2021

Cabbage curry salad (or rescued caramelized cabbage) カレー味のキャベツのサラダ

Making good on her threat to rescue the somewhat less than successful “skillet caramelized cabbage” my wife transformed it into curry flavored cabbage. Getting a cue from coleslaw, she added carrots and raisins. Then she further transformed it by turning it into a salad using mayo and strained (Greek) yogurt as a dressing. I think this dish may have been inspired by a recipe in her favorite Indian cookbook by Madhur Jaffrey’s called “Quick and Easy Indian Cooking”. Even so, I am certain, the recipe would not have called for the use of failed skillet caramelized cabbage. Nonetheless this was much better than the original.


Ingredients:
1/2 head of cabbage (about 1 1/2 lbs.) (I used the previously made caramelized cabbage)
3/4 tsp. Cumin seeds
1/2 tsp. Fennel seeds
1 tsp. Sesame seeds
1 cup raisins.
1 medium or large onion diced
2 to 3 carrots julienne
1 tsp. Salt
1/8 to 1/4 tsp. cayenne pepper
1 tbs. Lemon juice (I used sushi vinegar)
1/2 tsp. Garam masala

Directions.
Put some oil in a frying pan on medium high heat. When the oil gets hot add the cumin, fennel and sesame seeds to bloom the spices. When the sesame seeds begin to pop quickly add the raisins. They will essentially fry puffing up and turning light brown. Then add the onions and sauté until they have browned a bit. Add the carrots and cook until they soften somewhat. Add the cabbage. Stir and cook until blended and the cabbage has become soft. Add the salt and cayenne. Then at the very end add the lemon juice (or sushi vinegar) and the garam masala.


This was a major improvement over the sorry caramelized cabbage dish. The spices had depth of flavor and some zing but were not too hot. The raisins gave it sweetness that contrasted well with the tangy note added by the vinegar. The garam masala gave it a bright spark at the end of the bite. I would almost go so far as to call it a coleslaw curry. It tasted great both hot or cold. Although this can be eaten hot or cold, we further morphed it to salad.

I served this dish with sweet potato croquet, French fries made from sweet potato. I think this was a small dish that went with a drink in the evening.


This was a lunch over the weekend. I served the cabbage curry dressed with the mayo greek yogurt combo. The plate included a curry flavored chicken salad, cantelope and grapes (chicken was leftover breast meat from the whole chicken we cooked on the Weber grill) and Angel biscuit.  Both salads were curry flavored but tasted quite different.


I think my wife was indeed successful rescuing the cabbage from the original dish. 

Sunday, December 5, 2021

Hiyaoroshi #2 and Uni tasting 冷やおろし#2、海水うに

This is a continuation of our exploration of the “Hiyaoroshi” sake ひやおろし we recently acquired (with a complementary uni tasting on the side.) As I mentioned before, this sake is seasonal; only available in autumn and until recently, the only way to enjoy this seasonal sake was to visit Japan in autumn. This fall, however, thanks to Tippsy sake, we could enjoy hiyaoroshi here in U.S. So far, we’ve tried 5 different hiyaoroshi sakes. All of them were “Junmai” class but the aging process really “kicked them up a notch” making them taste superior to regular Junmai sake. All the hiyaoroshi we tasted had rich savory and complex flavors with some fruity floral characteristics. We tasted (from left to right) three sakes; “Ooyama”, “Gokyo” and “Kisoji”.


1. Ooyama 大山 (meaning “big mountain”) is from Yamagata prefecture 山形県 (which is famous for many excellent and “cult” sakes including “Juyondai”  十四代). The brewery is “Katou Kahashirou” 加藤嘉八郎酒造. This sake is called “Tokubetsu junnmai” 特別純米. “Tokubetsu" means “special”. My understanding is that this designation does not have an official definition, but usually the rice is polished to 60%. This is the same level of polishing as “Ginjou” 吟醸酒. So, by definition, this type of “Tokubetsu junmai” could also be sold as “Ginjo”. It is up to the brewer to decide what to call it. Junmai is usually characterized by robust and rich flavors while ginjo is characterized by more elegant crisp fruity flavors. So, depending on the aim of the particular sake, the brewer could call it either way. We really like this sake. Quite rich and dry with some acidity.

2. Gokyo 五橋 (meaning “five bridges”  indicating a famous 5 arched bridge called “Kintai kyo” 錦帯橋 spanning Nishiki-river 錦川 in the city of Iwakuni 岩国 (where the brewery “Sakai shuzou”  酒井酒造 is located).  This is labeled as “Junmai”  but again RPR (rice polishing ratio) is reportedly 60%. The flavor profile is very similar to the previous sake; again rich, savory with hint of fruit.

3. Kisoji 木曽路 (meaning “Kiso route ” which is the mountainous route connecting Tokyo or “Edo” to Kyoto in Kiso now a part of Nagano prefecture 長野県.) (Digression alert: We have visited Kiso. It is famous for “Hinoki” trees and deep forested mountains. We brought some Hinoki products from Kiso back with us from our trip and we are still using them after all these years.) The brewery is called “Yukawa brewery” 湯川酒造. It is again “Junmai” class with RPR of 70%. However, it is made using an ancient labor intensive techniqu called “Yamahai” 山廃. This sake is probably our favorite among the five hiyaoroshi we tried.  In addition to a rich savory taste it has some fruitiness with nice crisp acidity (maybe due to the “Yamahai” process).

We are happy with any one of the hiyaoroshi sakes we tried. We hope Tippsy sake continues bring hiyaoroshi next fall. 


Of course, with such libation we needed a good food to accompany it. We got some fresh uni from maruhide 丸秀, prepared two ways. One was uni preserved in salt water or “Kaisui uni” 海水うに (on the left). The other was regular uni preserved with  potassium alum, (in the center). I thought the regular uni had a better texture but my wife tasted a hint of the alum. Of course, the salt water uni was presented as nature intended. I also served “ikura” salmon roe which was marinated in concentrated Japanese noodle sauce or “mentsuyu” 麺つゆ in a cucumber cup.


The sake and these uni (plus the ikura) were made for each other. They went so well together. What a treat!

Thursday, December 2, 2021

Sir-fried "kinpira" Astuage tofu 厚揚げのきんぴら

Atsuage or Nama-age 厚揚げ、生揚げ is a type of deep fried tofu which has only the surface fried; the center remains as basically uncooked tofu. I have posted a few dishes using Atsuage. If the quality is good, just grilling it making the surface crunchy and inside soft and hot with soy sauce and chopped scallion is the simplest and best way to cook it. This time, the atsuage I got from the Japanese grocery store was a U.S. made brand I had not used before and not being sure of its quality I came up with this quick stir-fry dish. Since I did not have the appropriate greens such as asparagus or snow peas, I used the sugar snaps I prepared.


Ingredients:
1/2 atsuage, cut into thin slices and cut in half length-wise making thin strips.
1 tsp vegetable oil
2 tsp concentrated noodle sauce or 1 tsp each of mirin and soy sauce
10 blanched sugar snaps or snow peas.

Directions:
Heat the oil on a medium flame in a frying pan. When the oil is hot, add the atsuage and stir several minutes until the surface gets crisp and the interior raw tofu parts browns slightly.
Add the seasoning, the sugar snaps and stir for an additional minute.
Garnish with chopped scallion and serve immediately.


For a quick impromptu dish, this was quite good. Since all the sides of the tofu strips are crispy and seasoned, this is better than just toasted with soy sauce.  

Sunday, November 28, 2021

Swedish cardamom buns カルダモンロール

This is one of my wife's baking projects. She saw this recipe in the "Milk Street” magazine. It is a sweet roll seasoned with ground cardamom. We were not sure whether we would like the cardamom flavor in a  sweet roll but my wife decided to try it. This was a great success. It is sweet and the sugar/cardamom mixture melted and made a nice crust especially on the bottom.


Ingredients:
For the dough:
390 grams (3 cups) AP flour
103 grams (3/4 cup) bread flour
80 grams (6 Tbs.) White sugar
1 Tbs. Yeast
1 tsp. Ground cardamom (more if you want stronger cardamom taste)
3/4 tsp. Salt
1 1/4 cup whole milk warmed to 100 degrees F.
113 grams (8 Tbs. Butter) melted and cooled
1 large egg separated (yolk for dough. White to brush on buns before baking)

For filling
170 grams (12 Tbs.) Salted butter at room temperature (maybe try less butter to keep it from running out and puddling during cooking.)
163 grams (3/4 cup) packed light brown sugar
2 tsp. Ground cardamom
27 grams (2 Tbs.) white sugar

Directions:
To make the dough: in a stand mixer with dough hook mix AP flour through salt to combine. Add together the wet ingredients (milk through egg yolk). Then with mixer running slowly add the wet mixture into the dry ingredients and mix until the ingredients form a sticky dough. Increase mixer’s speed and knead until the dough becomes smooth and elastic (about 10 minutes). Line a 9 X 13 baking dish with parchment paper (#1). Put in the dough and press it with your hand to flatten it into an even layer. Cover with plastic wrap and let rise until almost doubled in size (about 1 hour). Transfer to a refridgerator and chill for at least 2 hours or up to 24 hours. (I chilled the dough overnight.)

When ready to fill and shape the rolls first make the filling by mashing the butter through cardamom together to form a well combined paste. Set aside. Turn the chilled dough onto a large cutting board. Roll out into a 12 X 16 rectangle. Spread the filling in a even layer on the dough spreading out to edges (#2). Do a three envelope fold with the dough (fold bottom third to middle then top third over that fold (#3). 

Rotate the dough 180 degrees so the short side is facing you. Roll the dough out into a 12 X 16 rectangle and repeat the envelope fold.

To form buns: Rotate the rectangle so the long side is parallel with the counter’s edge. Cut the dough crosswise into 16 even strips (#4). Pick up one strip by the ends and gently stretch it to about 16 inches by gently bouncing it against the counter while very gently pulling on the ends. At the same time twist the ends of the strip in opposite directions while gently stretching to create a looose spiral about 16 inches long. While holding one end of the strip in place between your thumb on one side of the dough strip and index, middle and ring fingers on the other side of the strip wrap the strip around your 3 fingers (index, middle and ring) without untwisting the spiral. Then tuck the end under and up into the center while sliding the resulting turban shaped knot off your fingers (Rt. Side of #4). Using 2 cookie sheets lined with parchment paper put 8 of the buns on one sheet and 8 on the other sheet using the pattern shown in #5 below. (Using this pattern is helpful because the muffins expand and they can cook without touching.) Cover and let rise until doubled. When doubled in size add 1 Tbs of water to the egg white beat the mixture together and then brush on the buns. Top with 1/2 of the white sugar listed in the filling ingredients list. Bake each sheet one at a time in a 400 degree oven for 15 to 18 minutes until the buns are a deep brown (#6). (When the trays are cooked separately it allows the muffins to be exposed to equal heat all around and helps caramelize the sugar to make a crunchy candy like crust.) 


As shown below it is a good thing to cover the sheets with parchment paper because it is normal for some of the filling to seep out and caramelize on the baking sheet.


Once the overflow cooled it became a nice candy/caramel with crispy texture (as shown in the next picture). We enjoyed some of it as a snack.


This is a perfect roll for breakfast. It is best soon out of the oven because it is covered in a crispy light caramelized candy crust both top and bottom. While not too sweet, the crust provides a wonderful crunchy texture over the softly chewy bread inside. Although the bun tends to lose its crispy candy crust over time as it melts into the bread and  it is still extremely good. Although we were initially unsure of whether we would like the cardamon flavor, it was gentle and went extremely well with the buttery caramelized flavor coming from the sugar. This bun has everything going for it as a breakfast. 


P.S. As I was browsing a Japanese newspaper web site (Asahi Shinbun 朝日新聞), I came across a series of articles describing a number of amazing bakeries in Japan. One of the articles was about a family-run bakery in Urawa ward of Saitama city さいたま市浦和 called "Bake house Yellow knife".  Among the amazing breads they bake was Swedish cardamon rolls. It appears that this kind of artisanal bakery with dedicated bakers paying attention to every detail is becoming more common in Japan now-a-days.