Thursday, July 7, 2022

Basil cake bread バジルブレッド

My wife came up this as a variation on Mint cake. We have a forest of basil on the kitchen window sill and we are hard pressed to keep up with its production. After making a batch of mint cake my wife looked at the basil forest and thought, ‘if we can make a cake using mint how ‘bout a cake made with basil?’ This is how Basil cake came to be. 

The basil cake as shown below (sans icing) tastes very good and we were quite satisfied to eat most if it this way. 


Then my wife came up with the idea of making an icing of goat and cream cheese. This is very good too. (The icing is optional). 


Ingredients:
one 5.5 oz package of baby spinach cooked (about 1 cup when cooked and moisture drained off)
1 1/2 to 2 cups raw basil (packed)
3 eggs
1 tsp. vanilla
3/4 cup olive oil
2 cups flour
1 1/2 cups sugar
3 tsp. baking powder
1/2 tsp. salt


Icing (Optional)
4 oz of cream cheese
4 oz of goat cheese

Directions:
Sift together the flour, sugar, baking powder and salt in a bowl and then set aside. Put the spinach, basil, eggs, and vanilla, in a blender and puree. Then with the blender on a slow speed add the olive oil to make an emulsion. Add the vanilla and mix in. Add the spinach/mint mixture to the flour. Put into a greased 6" x 10" inch baking pan that has been lined with parchment paper (to made it easier to get the cake out of the pan when it is done.) Bake at 350 degrees for 25 to 30 minutes or until a tooth pick comes out clean.

For the icing. Put the two cheeses in a stand mixer bowel. Using a paddle, cream the two cheeses together. Split a piece of the basil cake in half and spread on the cheese blend

This was a very good innovative cake/bread. It has a nice moist texture. The main thing, however, is the rich robust flavor the basil brings to the show. It “sings” a note of almost meat-like umami savoriness which contrasts well with the overall slight sweetness of the cake. (I wondered if this is because when I taste basil it is generally in association with a meat rather than a sweet dish?) 

The cake tastes very good just “as-is” and after contentedly eating half of it that way my wife came up with the idea of making an icing out of cream cheese and goat cheese whipped together. A sweet icing such as the one used for mint cake would not have gone well with the robust flavor of the basil but this alternative really works because it is some what savory. Whatever, this is a great and surprising way to gain some constructive control over the basil forest. 

Monday, July 4, 2022

Apple tassie (mini pie) ミニアップルパイ

This is another version of the mini pie called “tassie”. This time my wife made it with apples so it is a mini apple pie. As with the “buttermilk mini pie”, this is a small dessert which is perfect for us. It is traditional apple and cinnamon flavors.


As usual, I will ask my wife to take over.


Ingredients: (makes 24)
For the crust
8 tablespoons (4 ounces/120 grams) unsalted butter, softened, but still cool to the touch
3 ounces (80 grams) cream cheese, softened, but still cool to the touch
1 cup plus 2 tablespoon (140 grams) all-purpose flour

For the topping:
1/2 cup (62.g) AP flour
6 Tbs. brown sugar (1/4 cup + 2 Tbs.)
1/4 tsp. salt
4 Tbs. (60 g) butter

For the filling:
12 oz. (300 g) apple grated
1/2 cup (110 g) brown sugar
2 Tbs. (30 g) melted butter
2 Tbs. cornstarch
1/2 tsp. cinnamon
1/2 tsp. ginger
1/4 tsp. nutmeg
1/4 tsp. salt

Directions:To make the crust: In the bowl of a stand mixer fitted with the paddle attachment beat together the butter and cream cheese until smooth, about 2 minutes. Stop the mixer and add the flour. On low speed, mix until no streaks remain and the dough starts to come together, about 1 minute. Scrape any stray dough from the sides of the bowl, gather into a ball and flatten into a smooth rectangle or disc. Cover tightly and refrigerate for 1 hour.

Cut the cold dough into 24 equal pieces, (I did this by dividing the total weight of the dough by 24 to get the gram weight of each piece. That way they would at least be somewhat equal). Using your fingers, evenly press each piece into the bottom and up the sides of the 24 mini muffin cups, making sure there are no holes. (This part was a bit tricky I found the best way was to make a small ball out of the dough, put it in the cup then using my thumb push down on the center of the ball forcing a depression in the center and the displaced dough up the sides of the cup.) There is enough butter in the recipe that the papers were not necessary. Refrigerate uncovered, while making the filling.

To make the topping:
Mix all the ingredients together using your fingers until they form small pea sized clumps. Set aside

To make the filling:
Grate the apple using the large holes of a grater. Add all the other ingredients mixing to distribute them evenly. Add about a tablespoon of the filling to each dough cup filling them about 3/4 full. (I used the smallest ice cream scoop to fill the cups about 3/4 full.) Top each cup with the topping.

Bake in a 350 degree oven for about 15 to 20 minutes until the crumble and crust are golden brown. Cool completely before removing from the pan.

These are wonderful little pies. Just the right amount for a sweet mouthful after a meal. Just perfect for us. The filling became almost like a thick jam which went very nicely with the crunch of the topping.

Friday, July 1, 2022

Cheese curd with Indian spices and yogurt

 This is from my wife’s new Indian cookbook called “Thali” by Maunika Gowardhan. Since my wife made cheese curd (paneer) to use up milk approaching its expiration date, she decide to try this recipe. It is called “Achari Paneer Tikka” but as usual, some of the ingredients were not available such as nigella seeds and particularly “gravy and oil” from “store-bought Indian green chili pickles”. We couldn’t even imagine how this should taste so we improvised using the pickling liquid from a jar of capers. We have no idea how this may have changed the end product but it clearly didn’t “hurt” it. Also we pan fried the paneer rather than grilling it. It came out rather nicely (below) with a brown crust.


Ingredients: (#1 below)
Paneer cut into inch size pieces (#2) below
2 garlic cloves roughly chopped
1 inch ginger root  roughly chopped
1 Tbs. coriander seeds
5 Tbs. greek yogurt
1 tsp. ground turmeric
1/2 tsp. garam masala
2 tsp. of pickling liquid from a jar of capers
salt to taste

Directions:
Blend the garlic and ginger in a small blender to make a smooth paste. (We used garlic and ginger paste from a tube.) Mix the garlic ginger and other spices into the greek yogurt (#3). Add the paneer cubes and coat them in the marinade (#4). Let them marinate for a least an hour. 

To cook: put a little oil in a frying pan. Add the paneer and marinade. Cook the pieces, turning them occasionally until the pieces get browned on the surface. 


This was a good variation on just plain paneer. The pieces had a nice crunchy, spicy crust and were soft inside. The flavor got even better over time with the pieces stored in the refridgerator. They toasted up well in the toaster oven and the crust got crispy again. 

Tuesday, June 28, 2022

Duck-fat potato Focaccia bread アヒルの脂肪入りジャガイモフォカッチャ

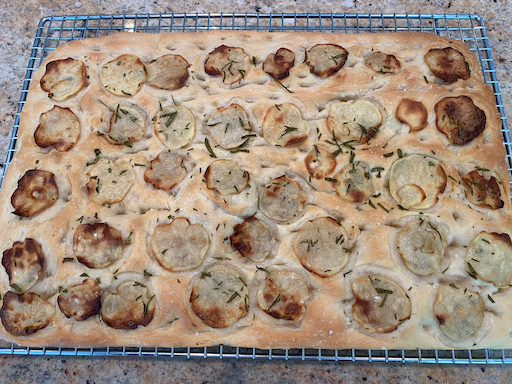
This focaccia bread is based on a recipe from a new cookbook called "A good day to bake".  We got the cookbook at the recommendation for my wife's sister. She read a good review of it in the New York Times The original recipe calls for goose fat. But we did not have goose fat. We did, however, have frozen duck fat (leftover from making duck confit). This is essentially a recipe for the standard focaccia bread but instead of olive oil, it uses duck (or goose) fat plus thinly sliced potatoes and rosemary as toppings. It came out nicely with the potato almost like potato chips (see picture below).


Ingredients:
450 g (3 and 1/4 cups) bread flour
7gram instant yeast
300 ml (1 1/4 cup of water )(or a bit more or less depending on the dough consistency)
1 tsp Kosher salt
80g duck fat or goose fat
1tsp sugar

Topping
3-4 baby red potato, eyes and skin removed and sliced thinly (I used a Japanese mandoline "Benriner")
A few sprigs of fresh rosemary, leaves removed and roughly chopped.
More duck fat to coat the potato slices.

Directions: (Since the amount of flour and water is the same as my focaccia bread, I used my usual procedure of the food processor fitted with a kneading blade instead of a stand mixer or by hand).

Add the flour, salt, sugar, yeast and duck fat in the food processor. Pulse it to roughly mix. Turn on at low speed and drizzle in the water until a dough ball forms above the kneading blade (the amount of the water may need to be adjusted). Let it stand for 5 minutes so that the moisture distributes evenly. Turn on the food processor to low speed and knead the dough for 1 minute. Take the dough out onto a floured board, and knead 5-7 minutes and make a tight ball. Put a small amount of olive oil (or duck fat) in a bowl, place the dough ball turning a few times to coat in the oil/fat. Cover the bowl with plastic wrap and let in rise until the volume doubles (1-2 hours) (I used a bread proofing box at 80 F). Place the dough on a 38x26cm(15x10 1/2 in) lightly oiled (I used olive oil but duck and goose fat can be used) baking pan, spread to fill the pan (may need 5-10 minutes rest to relax the dough). Cover it with a plastic wrap and let it rise for 45-60minutes (the baking pan did not fit into my proofing box, so I just put it on the top of the box without the lid. Preheat the oven to 375F (the original recipe calls for 435F but to me that is too hot since we do not like a hard crust).

Coat the dough surface with oil (I used olive oil) and make deep dimples using your fingers. Spread the duck fat coated potato slices and roughly chopped fresh rosemary leaves (see below).


Bake it 25-30 minutes or until the surface is brown/golden (see below picture). Take it out on the wire rack and let it cool.


Thinly sliced potato adds an interesting crunch texture almost like potato chips (but not quite that crispy). We could taste the rosemary but not the duck fat.


We had similar experience with the pan baked potato with duck fat. Somehow the duck fat does not add much of the flavor. I would rather use olive oil to reduce the amount of saturated fat. In any case, this is a good focaccia but I will make it without duck or goose fat next time.


Saturday, June 25, 2022

Quail braised in Greek style ギリシャ風ウズラ

My wife pointed out to me that we have some frozen quail. The last time we cooked quail, we baked them but we apparently did not blog the recipe. Our memory is that it was not bad but there were lots of small bones. This time we looked for other recipes and decide go with this “Greek style” recipe. The original recipe calls for braising the quail in wine, with aromatic vegetables then placing them in a Dutch oven and cooking them in an oven for 1 hour. Once they were cooked the recipe called for adding olives, artichoke hearts and capers once more warming it up again on the stove top. We did not see the point in using the oven and, instead, used our Instant pot (more about this later). The picture below shows the finished dish. The only way to eat this is using your fingers. (Necessary to separate the meat from all the minuscule bones).  It had lots of flavor ingredients (lemon, oregano, artichoke herts, black olive, caper and garlic) but the flavor was not as intense as we would have expected.


Ingredients
1/4 cup olive oil
4 to 8 quail
Salt
3 stalks celery, chopped
1 large yellow onion, sliced thin
1 head garlic, cloves peeled but whole
2 teaspoons dried oregano
1 cup white wine
3 Lemons, zest and juice
12 ounces marinated artichoke hearts
12 ounces pitted black olives
1 tablespoon capers (optional)
3 tablespoons chopped fresh parsley (we skipped this since we id not have it)
Black pepper to taste

Directions:
Using kitchen shears or a knife, cut out the backbones and ribs of the quail. The picure below is before I took of the ribs.


Salt the quail well and brown them in the oil in a frying pan, removing them to a bowl as they brown (I did brown the skin as indicated but I am not sure this is necessary).
Add the onion and celery and sauté until translucent, but not browned. 
Add the garlic cloves, the quail back into the pot along with any juices that have accumulated in the bowl.

Add the oregano and the wine. Mix well and let the wine boil for a minute.
Just barely cover the quails with water*, bring it to a simmer and add salt to taste. Add the lemon zest. 
Place the quail and vegetables in the instant pot, cut the parchment paper to fit the Instant Pot and place it as a paper lid. Pressure cook for 30 minutes with natural depressurizing. See below.


I could have continued with the instant pot but I placed the contents in a frying pan on a medium flame and added the artichoke hearts, black olives and capers and cooked for 5 minutes.
Add lemon juice and black pepper.

* This step of adding water probably works if the quail is cooked in the oven. But it does not work when cooking in the Instantpot. This is because it seems the liquid does not evaporate with pressure cooking the same as it would with oven cooking. After the quail was cooked the sauce was a bit watery. I removed the quail and put the sauce in a pan and reduced it to a gravy consistency. Next time I won’t add any water.

Later, my wife took the meat off the bone and simmered the leftovers for 30 minutes which reduced the sauce even more and further intensified the flavors. I added fresh artichoke hearts, olive and caper. This one tasted much better. Be careful of small bones, however.

Wednesday, June 22, 2022

Home-made English Muffin 自家製イングリッシュマフィン

We posted English muffin previously but have not made them for some time especially since my wife started making English muffin bread. But for some reason, my wife started making English muffins again. One of the problems in making English muffins is that the dough is very sticky and it is very difficult to handle especially if you use English muffin rings. My wife used to cut the dough using a kitchen scissors to place it in the ring. My version of "no-knead English muffin" was a bit easier. This version my wife used came from YouTube and used a lot of cornmeal as a way to handle the sticky dough. (Although this was the amount of cornmeal shown in the video, a lot less probably would have worked just fine.) The result was rather rewarding. It is definitely an authentic English muffin.


I ask my wife to continue. This recipe came of aYouTube video called "Sheldo’s kitchen". My wife painstakingly wrote down the recipe, frequently stopping the video.

Ingredients:  (12 muffins)
4 cups (560 g) AP flour
1 1/2 tsp (10 g) salt
2 Tbs. (28 g) sugar
1 tsp yeast
3/4 cup (167g) greek yogurt
325 Ml water
oil 3 Tbs. (40 g) vegetable oil.

Double recipe:
8 cups (1,120 g) AP flour
3 tsp (20 g) salt
1/4 cup (56 g) sugar
2 tsp yeast
1 1/2 cup (334g) greek yogurt
650 Ml water (milk?)
oil 6 Tbs. (80 g) vegetable oil.


Directions:
Stir to wet all the flour. Stir to further combine and knead slightly.  In the first  90 minutes, 3 sets of stretches each 30 minutes apart. Take dough and pull out one side and fold it to the middle. Do that with each of the remaining 3 sides. Let the dough rest 30 minutes and repeat stretch 2 more times for a total of 3 stretches. Leave undisturbed for 1 hour. Put covered in fridge for 10 to 48 hours. The longer it is in the fridge the better the taste. 

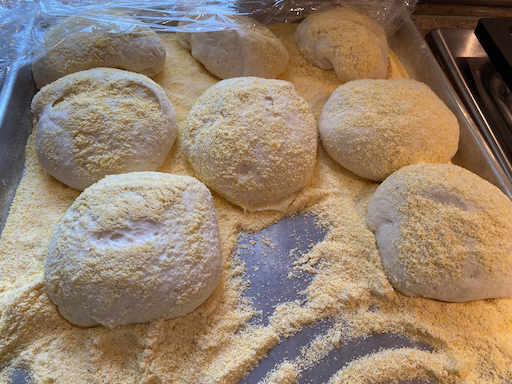
Cover cookie sheet with corn meal. (A little less cornmeal than what I used here would probably work just fine). While the dough is still cold make it into a round. Put a large hole in the middle and pull the edges out straight and stretch into a log. Divide the log into 12 portions (24 if using double recipe). Make each portion into a flat round and move the edges to the middle then roll into a ball. Put on corn meal covered tray about 2 inches apart. Dust the top with corn meal. Cover and let rise until doubled.


Using 2 spatulas lift the dough into a skillet (no butter). Flatten the top. Cover with a lid and cook 6 minutes. (After 2-3 minutes rotate so it browns evenly.) Turn over and tap the top with a spatula to flatten. Cook another 6 minutes with lid off. After they have cooked 12 minutes check temperature. It should be 200 F to be done.  


Let it cool off a bit before separating the muffin using the "fork method".


These were our idea of genuine English muffins. They toasted up nicely with lots of “little nooks and crannies” to catch the melted butter. The crusts were crunchy and had a mild taste of cornmeal which was very nice. (One of the problems was during cooking the excess cornmeal tended to burn). While very good they were a bit of work to make. Making English muffin bread is much easier. 

Sunday, June 19, 2022

Kerala-style chicken curry using drumsticks ケララ風のチキンカレー

At the start of COVID, certain grocery items became scarce. Indeed, we had a time when we could not always get chicken or pork. We turned to Instacart and got groceries from the Korean market "HMart". They appeared to have sources different from the ones used by the regular grocery stores. They were able to obtain these meats when the other grocery stores couldn’t.   So one time we got a large package of chicken "drumsticks" which is a part of the chicken we usually don’t get. But at the time we were grateful to get any part of the chicken. In any case, my wife recently found the package in our freezer and we decide the time had come to use it. We made two different dishes; I made a Japanese style simmered dish in black vinegar and soy sauce or "Kurosu-ni" 黒酢煮 in the Instant pot, and I asked my wife to make the remainder into curry. After consulting her Indian cookbooks, she decide to make Kerala-style chicken curry based on a recipe in Madhur Jaffrey’s “Curry Easy” cookbook.


As always, this was a very flavorful and satisfying dish. The recipe called for basil which we had in large supply from our window sill basil forest.* It is shown here with basil, tomatoes and a dab of greek yogurt as a topping. 

*Digression alert: This basil forest was another legacy of the covid time period. We were having trouble getting fresh herbs since we were relying on grocery deliveries. Several times the basil arrived completely rotten and we had to throw it away. Other times it was not available at all. So when a decent package of basil finally arrived from the grocery store my wife decided to root it, plant it and raise our own crop. She took some cuttings that included long stems and put them in a glass of water. About a week later the basil formed roots so she planted it in small pots of soil. As long as the basil isn’t allowed to flower it will continue producing. So over time my wife took cutting after cutting planting them is small pots and putting them in the sun on the window sill in the kitchen. The basil is quite happy there and we now have a basil forest growing. We had so much basil my wife gave away several pots as gifts. It is amazing that all of this derived from just one small plant from the grocery store. 

The picture below shows part of the basil forest.


The next picture shows a basil stem that has sprouted roots. This developed after it had been in the water for about a week. It is now ready to be planted in soil.


For the Kerala-style curry

Ingredients:
1/2 tsp whole cumin seeds
1/2 tsp. Whole brown mustard seeds
2-3 onions roughly chopped
2 Tbs. Peeled and finely chopped ginger
4 garlic cloves peeled and chopped
1/2 tsp cayenne pepper
1 Tbs. Red paprika
1 tsp. Salt
15 to 20 curry leaves (or basil leaves as a substitute.)
Several small red potatoes skinned and chopped into small similar sized pieces.

Directions:
Add some peanut oil to a frying pan and add the cumin and mustard seeds. As soon as the mustard seeds start to pop add the onions and stir until the onion is lightly browned. Add the rest of the spices stirring until they bloom i.e. become fragrant. Add the potatoes and stir them into the sauce. Then add the chicken pieces. Spoon the sauce over the chicken. Turn the heat to simmer, cover and cook until the potatoes and chicken are soft. If the sauce gets too thick and starts to scorch add some chicken broth. See the next picture below. The bright red color comes from the paprika. Just before serving add the basil leaves (shown in the last picture).


This was another good curry. It was a perfect way to use the chicken drumsticks. The potatoes again absorbed the flavors of the spices and added to creaminess of the sauce. The taste of the paprika and the basil was a nice addition.