Thursday, May 30, 2024

Focaccia Bread Baked in Breville Pizzaiolo Indoor Pizza Oven

I have made focaccia bread and its variations baked in a convection oven. We liked a thicker and breadier version which was cooked in a baking pan in lower temperature (350F) for longer time (30 minutes). 

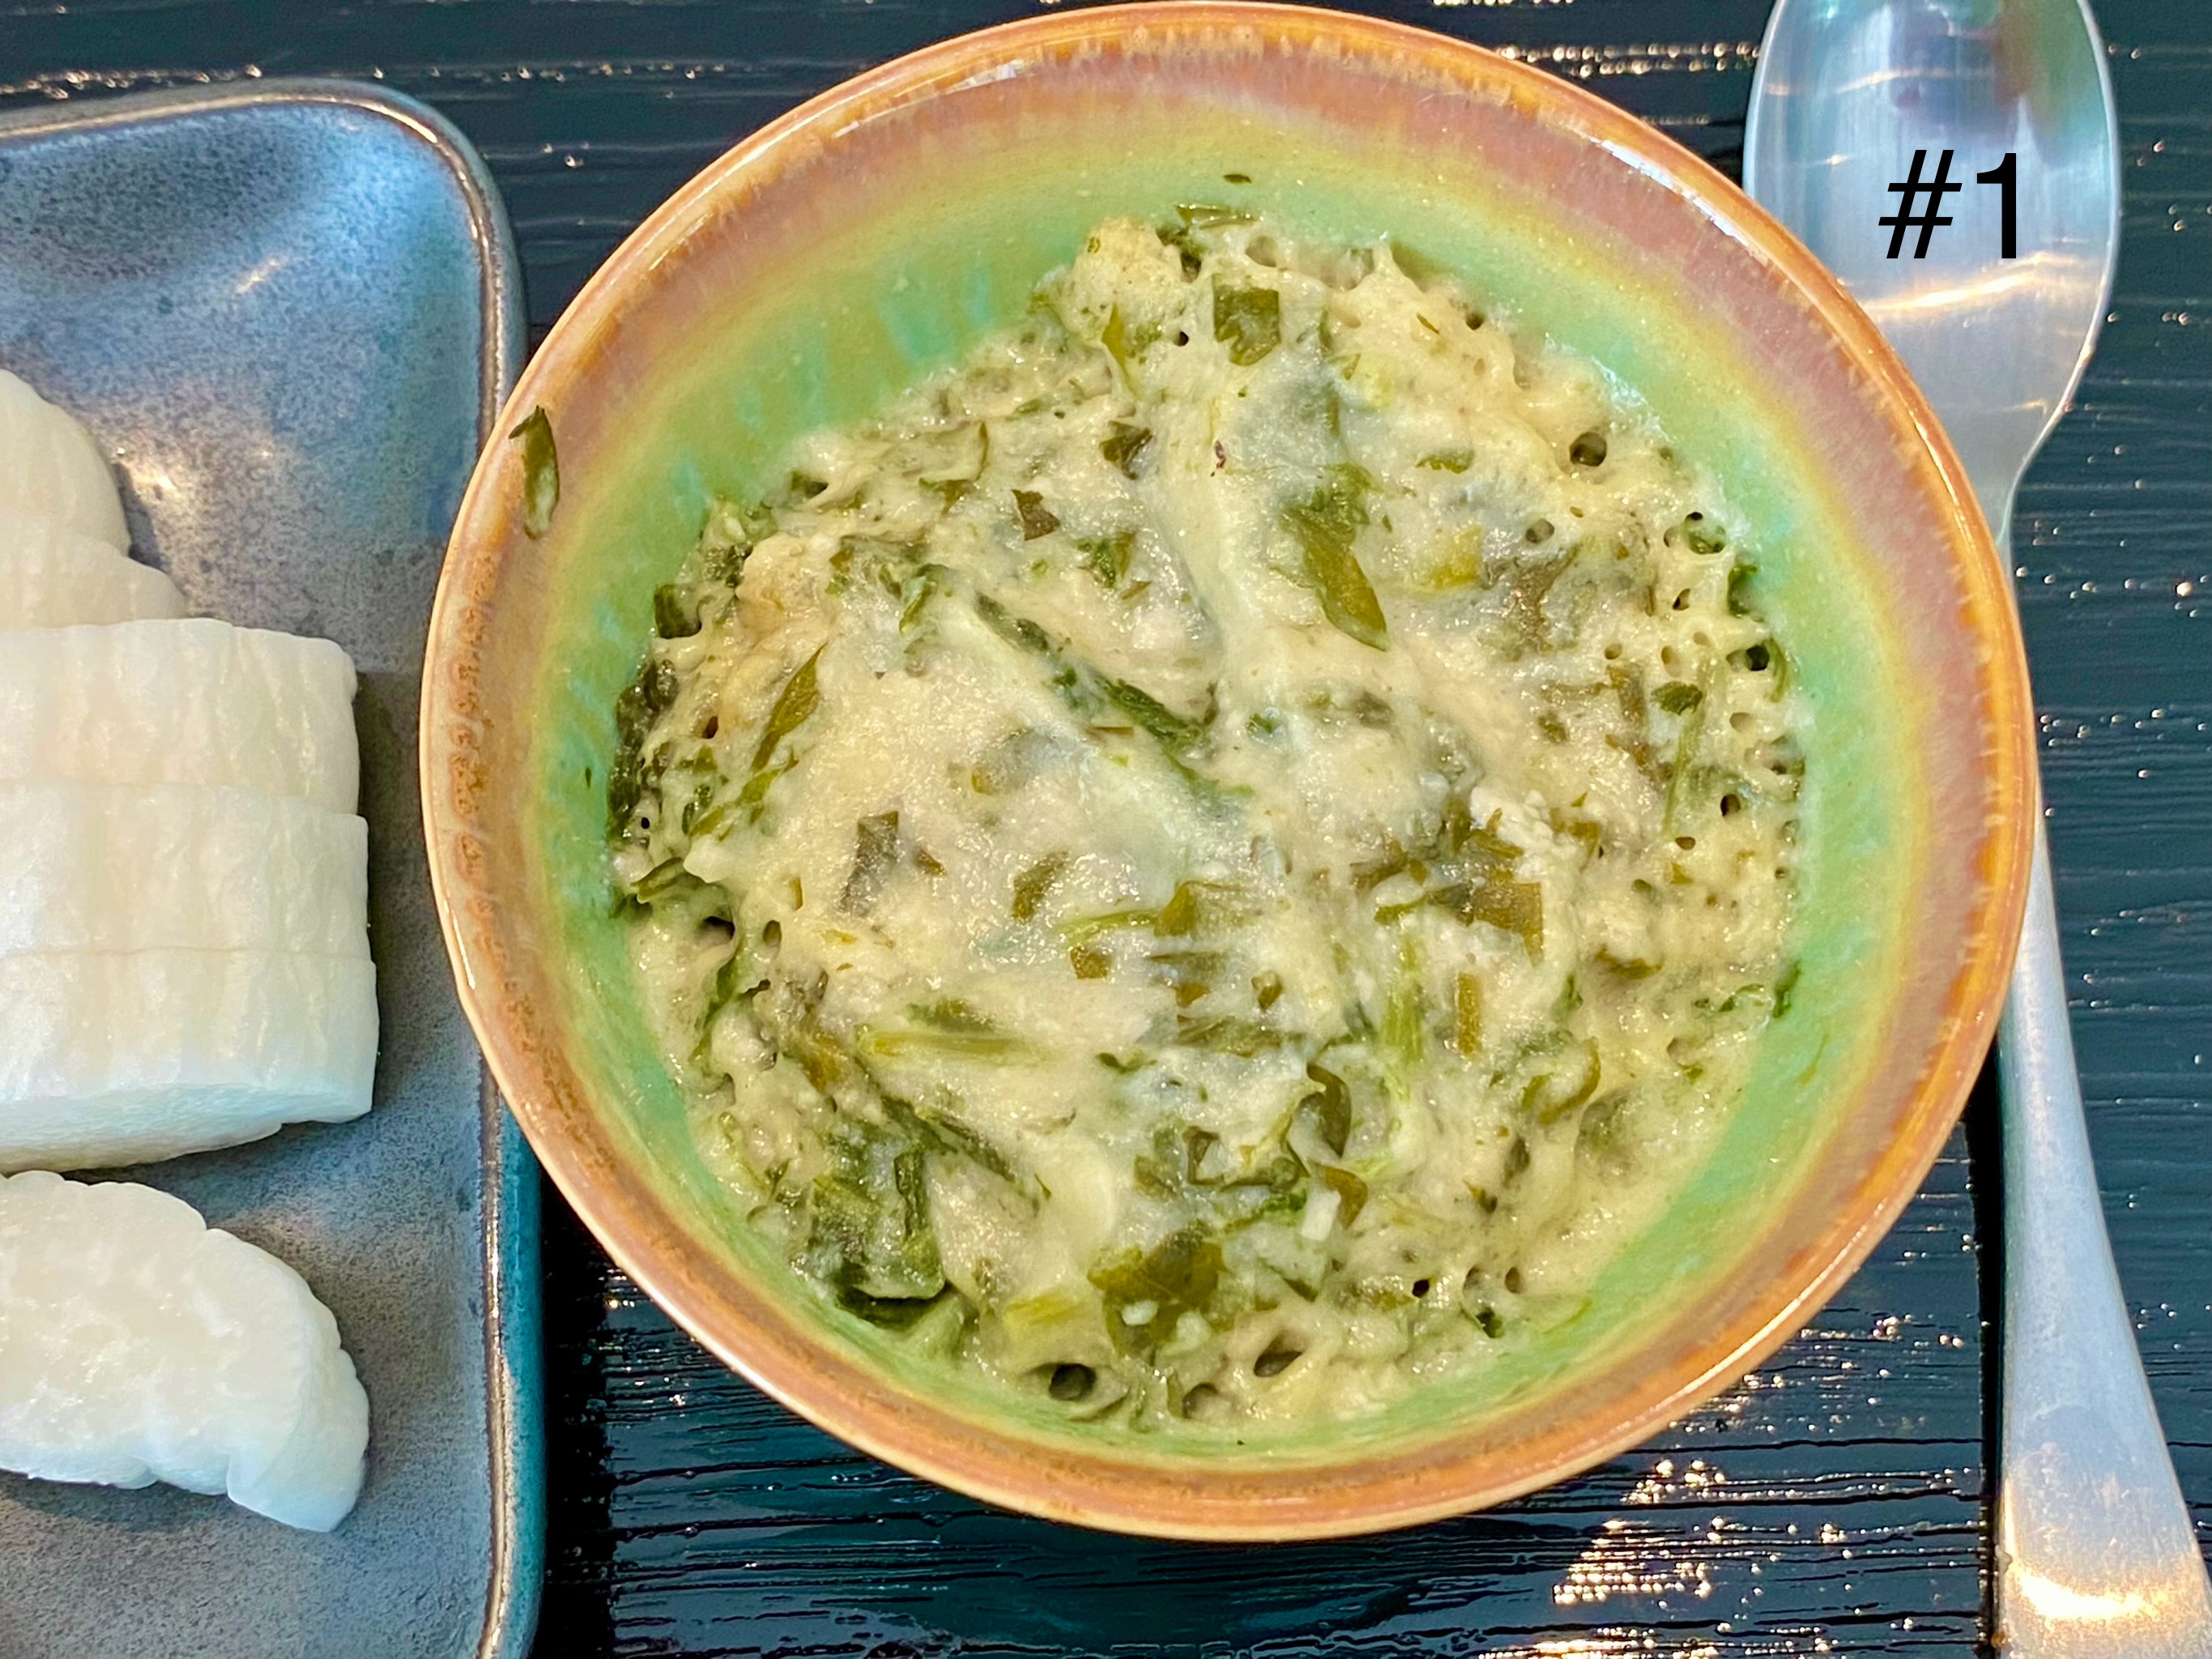
Recently, my wife gave me an indoor-electric pizza oven, Breville Pizzaiolo as a birthday gift. I am making pizza several times using different flours, dough recipes and temperatures. Generally, I am quite impressed with the quality of pizza that can be made in this oven but I am still making pizzas to find the best combination for me. Once I have enough information, that will be the subject of a separate post. This post is just to note a few things I can do to improve the focaccia. The focaccia was great albeit one side of the top was a little too high done (#1). The result of  using the top heating unit is a bit uneven for heating.


I used the carbon iron pan that came with the oven for baking the focaccia. I pre-seasoned the pan as per the instructions and it worked great. With a 30 minutes secondary rise, the bread has nice texture and flavors (#2). We really like the crusty surface and nice soft interior.


The recipe is just for my notes so that I can improve it next time.

Ingredients:
3 and 1/2 cup bread flour
2 tsp Kosher salt
2 tbs olive oil
2 tsp instant yeast
1 cup and a bit more  lukewarm water

Olives, black and green, sliced
Fresh rosemary, leaves removed and roughly chopped
4 or more tbs olive oil

Directions:
Add the flour, salt and yeast to a food processor fitted with a kneading blade. Mix briefly and pour in the olive oil in a thin stream. While the blade is turning in low-speed, add the water in a thin stream. Look carefully until a dough ball forms above the blade (the dough ball is slightly sticky). Let is stand for 5 minutes for even hydration. Turn the processor on low speed for 1-2 minutes. Turn the dough ball out on well floured board and knead for 3-5 minutes making a smooth elastic dough. Shape the dough into a  smooth round and place it in lightly oiled bowl, turning to coat. Let it rise for about 1 hour (I use a proofing box at 87F).

Deflate the dough and fold several times on well floured kneading board making a disk of dough. Cover with plastic wrap and let it rest for 10 minutes (so that the gluten relaxes and it becomes easier to stretch). Meanwhile lightly oil the carbon iron pan. Add the disk of dough in the pan and using your finger tips spread the dough to fill the pan. Add the rosemary to the olive oil and spread over the dough and scatter the olive slices. Using your finger tips, press and embed the olive (picture #3). Cover and let it rise for 30 minutes (or skip this and immediately proceed to baking*). 

*I like the fluffy texture and usually let it rise second time but baking in the pizza oven, it may better without the second rising since the top heating element is very close to the surface.

Using  the pan pizza setting (475F for 18 minutes) and the top heat in the middle (I may reduce the top heat to prevent the surface scorching too much, see picture #1).

Remove the bread from the pan using spatula and let it cool on the cooling rack.


We really like this version of focaccia bread. Compared to my usual focaccia, it has nice crust and the texture is much better. With a good flavorful olive oil with salt and a glass of good cab, we made the dinner from this bread.

Monday, May 27, 2024

Daikon Steak and Two Appetizers 大根ステーキ

This was the second set of appetizers we had one evening. From right to left are “daikon steak” 大根ステーキ, “charred broccoli” 焦がしブロッコリー and “braised spicy tofu” ピリ辛豆腐.  These appetizers are vegetarian and none of them is completely new but these versions included some changes. 


This is just notes to myself.

The daikon steak (left) was first precooked in simmering water with some raw rice grains for 30 minutes and then cooked in melted butter on both sides until the edges turned brown. I added a small (off heat) amount of soy sauce to finish.

The broccoli was parboiled (I freeze parboiled broccoli in small batches). I cooked the broccoli with the daikon steak until the sides became blackened and then seasoned it with salt and pepper.

The spicy tofu was marinated (Sriracha, soy sauce, sesame oil, rice vinegar, sake, grated ginger and garlic) overnight and then drained. This time I dredged it in flour (mixture of AP flour and potato starch) and cooked until nicely brown on four sides. The dredging process made a nice crust.

So, this was nice second set of appetizers of the evening.

Friday, May 24, 2024

Anchovy Salad アンチョビサラダ

Anchovies are not a regular item in our pantry. The canned ones are usually very salty and when I use it as a part of a seasoning I only use one or two fillets and often end up wasting the remaining canned anchovies. More recently, I use anchovy paste in a tube for this purpose. While we were at Whole Foods, my wife found a package of anchovy fillets packed in oil (not canned but in the refrigerator section picture 3#). She was curious of how this would be different from canned varieties so we got a package. Getting an idea from the picture on the package, I made a sort of salad (right in the picture #1 and #2). To keep the seafood theme, I served this anchovy salad with salmon kelp rolls (left) and marinated herring (center, the herrings came from a jar and are marinated in wine sauce. I made sour cream sauce with dill to go with the herring).


For the anchovy salad I sliced skinned Campari tomatoes and topped them with the anchovy filets and fresh basil. I dressed the salad with our favorite Spanish olive oil. I did not add salt thinking the anchovies would be salty.


The anchovies are much better than we expected. They were not too salty or fishy. All nicely filleted and no discernible small bones. We really like these anchovies.

Tuesday, May 21, 2024

Creamed Spinach with Cauliflower Puree カリフラワーピュレのクリームほうれん草

I make cauliflower puree occasionally. I modified how I make cauliflower puree mostly for my convenience. I steam the cauliflower florets for 10-15 minutes until very soft. Then I place the cauliflower in the container used for the emersion blender, add warm (in the microwave oven) milk (1/2-2/3) cup and puree first on medium speed and then on high speed until very smooth. This takes a few minutes on high speed. Then add several pats of unsalted butter and salt to taste and puree to incorporate the butter . The resulting puree can be used as is or many other ways which I have posted.  We found it is particularly good as an accompaniment to white fish. This time, we bought “baby arugula and spinach salad mix” and found out the vast majority was spinach. So instead of salad, we decide to make this into“creamed spinach using the cauliflower puree. It was quite good. This blog entry is for us to remember how we made this.

To make creamed spinach: Cook a bag of spinach in a wok without adding water with a tight fitting lid on low flame. Occasionally turn the spinach over until all wilted and cooked. Squeeze out excess moisture (I use a potato ricer to do this). Chop the spinach finely. Mix the spinach into the cauliflower puree. We also added cheeses (Gruyere and parmesan). Place the creamed spinach in a ramekin and bake in the toaster oven 350F for 20-30 minutes.


We had this as a side for “Tsukune with lotus root” 蓮根つくね, pickled daikon and cucumber 大根, キュウリの漬物.


This is a very acceptable substitution for bechamel based creamed spinach. It had a very rich flavor and creaminess.

Saturday, May 18, 2024

Braised Eggplant with Oyster Sauce 茄子と椎茸のオイスターソース炒め

This is an impromptu dish I put together to use the last eggplant we got recently from Weee. I also had a high-quality fresh shiitake mushroom also from Weee. This turned out to be quite good and my wife really liked it. I cut the eggplant a bit larger than I usually do, which made the eggplant tender but not too soft.  The thick shiitake mushroom I added, tasted almost like meat. This is not a recipe but a note to myself so that I can reproduce it.


Ingredients:
One Asian eggplant, stem end removed, cut into bite size chunks (“rangiri” 乱切り cut on bias, turn 90 degree and cut again)
3-4 fresh shiitake mushrooms, stems removed, cut into 4-6 large chunks
1 tbs juliennes of fresh ginger
1 tbs vegetable oil with a splash of dark roasted sesame oil

Seasonings
1 tbs oyster sauce
1 tsp sugar
1 tsp soy sauce
1-2 tbs sake or water

Garnish (optional)
Sesame seeds for garnish
Scallions, finely chopped

Directions:
Add the oil in the drying pan on medium heat wait until the oil simmers.
Add the eggplant and stir until browned (3-4minutes)
Add the shiitake and the ginger. Stir for another minute or two.
Add the seasonings. Stir until the sauce forms and clings to the vegetable.
Top it with the scallion and sesame seeds (optional)

Other version of seasoning
1 tbs miso
1 tbs oyster sauce
2 tsp sugar
1tbs sake
1tbs mirin
grated garlic and ginger

Topping (optional)
Scallion
Sesame seeds
Bonito flakes

This was a very good eggplant dish. It was a great combination of flavors and textures. The slightly larger cut eggplant was very similar in size to the thick mushroom and the textures of the two perfectly complimented each other.

Wednesday, May 15, 2024

Steamed Carrot Buns with Ginger Custard 人参蒸しパン生姜カスタードクリーム

When I was making our weekly grocery list, my wife asked me to include carrot juice. Apparently, she found a recipe for steamed carrot buns on the King Arthur web site. I told her we have a 5lb bag of carrots in the fridge and they were getting old. I volunteered to make fresh carrot juice using our often forgotten juicer. The carrots were growing whisker-like roots and the sprouting carrot tops were trying grow leaves but otherwise they looked ok to me so I made some juice. But when we took a taste we found it had a slightly moldy after taste. So instead of carrot juice, I added a bag of fresh carrots to the grocery list. When the carrots arrived I made the carrot juice and this time, it tasted really great. So, my wife went ahead and made these buns with ginger custard cream.


The buns have nice texture and pretty color (pictures #1 and #2) but we did not taste much of carrot. She sliced the buns and layered on the custard (picture #2). The ginger custard has a nice ginger flavor and complimented the buns.


The original recipe is from King Arthur Flour website.

Ingredients (made 12)
Custard
1 cup (227g) milk
1/2 cup (113g) heavy cream
one 1" piece (12g) fresh ginger, scrubbed and coarsely grated
6 tablespoons (74g) granulated sugar
2 tablespoons (14g) cornstarch
pinch of table salt
4 large egg yolks
1 teaspoon King Arthur Pure Vanilla Plus or King Arthur Pure Vanilla Extract

Dough
1 cup carrot juice. (The original recipe called for 1/2 cup (113g) milk, and 1/2 cup (113g) carrot juice, warm)
1 heaping teaspoon instant yeast
3 cups (360g) King Arthur Unbleached All-Purpose Flour
6 tablespoons (74g) granulated sugar
1 tablespoon vegetable oil, plus more for coating the bowl
1/2 teaspoon table salt
1/2 teaspoon baking powder

Directions
1.To make the custard: In a medium saucepan over medium- low heat, bring the milk, cream, and ginger to a bare simmer — you should see the liquid steaming with some tiny bubbles forming around the edges.
2. Meanwhile, in a large bowl, whisk the sugar, cornstarch, and salt until well-combined and lump-free. Add the egg yolks and whisk vigorously until the mixture is smooth, airy, and pale, about 1 minute.
3. When the milk mixture is hot, slowly dribble it into the egg yolk mixture, whisking constantly. This process of slowly adding hot liquid to the eggs yolks is called tempering and ensures that the eggs don’t scramble from sudden heat. After slowly adding about 1/3 cup of the hot milk, add the rest of the hot milk faster. Once it is all incorporated, transfer the liquid back into the pot, set over medium-low heat, and cook, whisking constantly, until the mixture starts to simmer and thicken to a pudding-like consistency, about 3 to 4 minutes.
4. Pour the custard through a fine-mesh sieve, pressing it through with a spatula or spoon, and into a container. Stir in the vanilla. Place a piece of plastic wrap against the surface of the custard to prevent a skin from forming, then refrigerate for at least 2 hours. While the custard chills, make the dough.

5. To make the dough: In a medium bowl, combine all the dough ingredients and knead — by hand or with a mixer — to make a soft, elastic dough, about 8 to 10 minutes in a stand mixer. Place the dough in a lightly greased bowl, cover, and let it rise for 60 to 90 minutes, until it's nearly doubled in bulk.
6. To shape the buns: Turn out the dough onto a lightly floured surface and divide into 10 equal pieces (around 68g per piece).
7. Shape each piece into a smooth, tight ball. Place the shaped buns in a layer of a steaming basket lined with parchment paper leaving plenty of room in between for the buns to expand. (I was able to fit 4 buns per steamer layer.). Transfer any buns that don’t fit onto a plate or baking sheet. Cover all of the buns and let them rise for 30 to 40 minutes, until puffy and slightly larger.
8. To steam the buns: Bring a shallow pot or frying pan of water to a boil. Place the steamer basket over the top and steam for 10 minutes. Remove the steamer basket from the water and let the buns rest, still covered, for 10 minutes. Finish steaming any remaining dough balls.
9. To fill the buns: Once the buns are cool, cut them through the center. Then use a small spoon or a pastry bag to fill the bun with about 2 to 3 tablespoons (30g to 40g) of chilled custard. Serve right away.
10. Storage instructions: These buns are best served immediately. If you’d like to fill only a few buns at a time, save the steamed, uncut buns and the extra custard in separate airtight containers in the refrigerator for up to 3 days. To reheat the buns, wrap in a damp paper towel and microwave in 15-second increments. Let cool slightly, then split open and fill with the chilled custard.

These are a very elegant bun to eat for breakfast. The steamed bun had a nice soft texture and although it was slightly sweet we did not detect a distinctive carrot flavor. But they made a great ginger custard delivery system. The custard was very sweet vanilla with an essence of ginger flavor. You can’t go wrong with this combo. 

Monday, May 13, 2024

Pickeld Micro Cucumber and Daikon 小さなキュウリと大根のピクルス

The other day while we were shopping at the near-by Whole Foods, my wife found a new item which is called “Teeny Tiny Cucumber” (picture #3). They are much smaller than “American Mini-cucumbers” and about the size of cornichons. I decide to use them to make a Japanese style pickle along with a daikon pickle. I would have used Japanese citrus “Yuzu” but we do not have any access to fresh yuzu so instead, I used Myer lemons (#1). The cucumbers were not crunchy but the daikon was nicely crunchy. It was a bit too sour/acidic for my wife so next time, I will dilute the marinade with some water.


The marinade is a standard Japanese sweet vinegar (one part rice vinegar,1/2 part sugar, small amount of salt). This is essentially a variation of “Daikon Namasu” 大根なます.

Ingredients:
1 package (9oz) teeny tiny cucumbers (picture #3)*
1/3 medium daikon, peeled, cut into 3-4 mm thick rounds and then cut into tick match sticks
1 Meyer lemon, sliced (or yuzu if available).
1 tsp of salt to “sweat” the cucumber and daikon to remove some internal moisture. 

Marinade:
1 cup rice vinegar
1/2 cup sugar
1 tsp salt
1/3 cup water (optional)*

Directions:
Mix the marinade ingredients in a sauce pan and heat on medium flame until sugar and salt melt and start the liquid starts simmering. Let it cool for 5-10 minutes.

Meanwhile, in a bowl add the cucues, daikon and salt, mix well and let it stand for 10-15 minutes until water comes out.
Drain the excess moisture that came out, add half of  the lemon slices to the bottom of a mason jar, add the cucues and daikon and top with slices of the lemon (picture #2). Pour in the marinade. Once cooled to room temperature, place the jar in the refrigerator. The pickles will be ready in 2-3 days.


* Picture #3 is the package of this tiny cucues. I am not sure if this is a special kind of cucumber or just a young and small cucumber. It is grown in Canada.


We like this pickles. The cucumbers are a bit soft and not crunchy but the daikon was nicely crunchy. Over all, this was nice refreshing dish. May be we should have eaten it raw with a dip as suggested in the package. Next time.