Showing posts sorted by date for query oven potato. Sort by relevance Show all posts

Monday, May 31, 2021

Tarako from Korean grocery store Hmart 焼きたらこ

 Lightly grilled salted "tarako" たらこ cod roe is not really a new dish as I posted it many years ago,  but it is a very common dish in Izakaya and goes perfectly well with sake. I usually get tarako (frozen) from our Japanese grocery store, but this time I got it from Hmart, the Korean grocery store, through Instacart.  The groceries were delivered while I was not at home so my wife received them. During a subsequent phone call,  she mentioned that it was not a completely successful grocery run since the three types of fresh mushrooms and the mackerel we ordered were not available. The good news was that the "tarako" did arrive. She said something was wrong, however, because it was covered with a red goopy stuff and suggested that maybe the little egg sacks had somehow ruptured spilling their contents. (Not good!) So when I got back in the evening and inspected the tarako I found it was coated with a Korean hot sauce "gochujang". We were both relieved and had a good chuckle. Since we are not into very hot spicy food, I quickly rinsed off the hot sauce. I made "Tarako" pasta たらこスパゲッティwith it and it was just fine. I made the dish shown below from the last sac of tarako. I just cooked it in the toaster oven until the surface was cooked but the insides were still raw. I served it with a Dashimaki omelet だし巻き I had made.


This was a part of several appetizers I served that evening (second picture). From left to right; Eggplant in seasoned broth 茄子のお浸し、deviled egg from pickled eggs my wife made,  salmon in sweet vinegar 鮭の南蛮漬け. The bottom right are oven-baked potato chips which my wife is in the process of perfecting and which will be subject of another post. The dish on the bottom left is a dipping sauce my wife made to go with the potato chips.


In any case, we started the evening with these small appetizers.

Tuesday, May 25, 2021

Scalloped potato with cauliflower puree

My wife came up with this dish one day. A few days before I had made my usual Cauliflower puree. Beside eating it as an “adult baby” food, we have made Mac-and-cheese using the puree instead of Béchamel sauce. I am not sure how she came up with this dish but, it is essentially scalloped potatoes made with the Cauliflower puree, cheese, onion and jalapeño pepper. This was topped with several kinds of cheese and baked.


After the servings were cut out, you could see multiple layers of thinly sliced potato with cheesy sauce. The green bits are chopped Jalapeño pepper. She ended up making a quite large amount but we managed to enjoy it all as a side for lunches and dinner and also as appetizers. Probaly not as rich as if we made this with full-fledged Béchamel sauce but it was quite good.


I ask my wife to provide the recipe. I help her by slicing potatoes, onions, and chopping up Jalapeño pepper.


Ingredients:
Two russet potatoes thinly sliced
2 onions thinly sliced
2 jalapeño pepper
1 cup of cheddar cheese grated
1 cup monterey Jack cheese grated
1/2 cup parmesian cheese grated
Several slices of smoked gouda to top.
Enough cauliflower puree to cover several layers


Directions:
Cover the bottom of an oven casserole dish with the puree. Distribute a layer of potatoes (#1) then the sliced onions, jalapeño pepper and the various cheeses (# 1&2) then the cauliflower pure (#3) Keep layering until all the ingredients have been distributed. End by putting on slices of smoked gouda (#4). Cook in a 400 degree oven covered for 30 minutes. Remove the cover and continue cooking for 30 minutes until the potatoes are tender and a knife slides in easily. Let cool for 15 minutes before serving.


This is a very comforting dish with thin layers of potatoes between custard like layers of warm cheese. The jalapeño peppers and onion give a nice flash of flavor. You would never guess that cauliflower was one of the main ingredients. It heated up nicely in the microwave. This would the a staple for any menu. 

Wednesday, February 24, 2021

Seafood nabe on a snowy day 雪降りの夕の海鮮鍋

As the weather got colder our thoughts turned to having Japanese hot pot or nabe 鍋 for dinner. This week we had some snow and our backyard was transformed to a winter wonderland; perfect time for nabe. So we decided to have one using whatever ingredients we had on hand.


We used to cook nabes on a portable gas cooker with a butene fuel canister but both the cooker and the canisters became so old we started worrying about how safe they were. Fortunately after we used up the canisters several years ago. We switched to a table top induction cooker (or Japanese will say IH or induction heater).  Making Sukiyaki すき焼き on this type of cooker works well because a sukiyaki nabe pot is usually made of cast iron but other earthenware or pottery pots or nabes won’t work. Then, we discovered an induction-cooker-compatible nabe pot. (It has a magnetic metal disk embedded in the bottom). With it,  we can do a nabe at the table without having to use a gas canister fuel source. 

I checked our freezer and refridgerator and decided we could do a sea food nabe or “kaisen-nabe” 海鮮鍋. We defrosted, scallops, cod, pacific oyster (this is the second time we used frozen Pacific oyster which worked well as a fry) and shrimp. We also had fresh shiitake and  nappa cabbage but not other green leafy vegetables. In any case, we set up our nabe feast.


I started the broth by soaking kelp in the nabe pot in cold water for several hours.  In the evening, I put the pot with the kelp in it on the induction cooker. Once the water came to a boil, I removed the kelp. I then added the shrimp shells and once the color of the shells changed I continued simmering for a few minutes, I the removed the shrimp shells.  I seasoned the broth with white dashi “Shiro-dashi” 白だしand light colored soy sauce making a very gentle broth. I started cooking the hard part of the nappa cabbage as well as the other vegetables. We also had some decent firm tofu from Whole Foods which I added. Next came daikon, carrot and potato, all precooked in the microwave oven.


Our seafood lineup is shown below (all frozen, and thawed in the refrigerator). It included shrimp, scallop (from Great Alaska Seafood), Pacific oysters (from Vital choice wild sea food and organics) and cod (from Whole foods). This was the second time we used frozen Pacific oysters. The first time I made fried oysters.  These were much better than the small fragmented fresh or pasteurized  oysters we sometimes get.


The picture below shows the vegetables which waiting to be put into the nabe; the leafy portion of nappa cabbage, tofu, shiitake mushroom, precooked daikon, potato, and carrot. 


We made sure the seafood was not overcooked. We also used  ponzu sauce as we were eating. This was a fun dinner perfect with the snowy winter outside and the steaming body warming nabe inside. We had warm sake (“Hakutsuru Ginjo 白鶴吟醸) to boot. Of course, there were leftovers. Classically, Japanese will end the nabe by adding rice or noodles into the remaining broth to make a “shime” 〆 final dish but we were too full and the next day, we made rice porridge with eggs for lunch.

Friday, May 29, 2020

Homemade yogurt 自家製ヨーグルト

We do not like low-fat or non-fat yogurt. We go for the full fat version. Our favorite is Seven Stars Farm Yogurt from Pennsylvania. The only place we can get this is at Whole Foods. Even before Covid-19, we had periods when even regular plain Dannon yogurt was not available at our grocery store. This occurred at the start of Covid-19. In the face of this shortage, my wife decided to start making her own yogurt again. This is something she did many years ago as a means of milk inventory control. She used a recipe given to her by a Palestinian friend whose family used it to make yogurt in the middle-east. Unlike other recipes which require pedantic small jars heated for a long time in a yogurt heating appliance, this recipe can make large quantities of yogurt overnight in "one sitting". This recipe uses commercial Dannon yogurt as the seed. We remembered it as a success but my wife has not made it for sometime. Nonetheless, she found the old recipe and made a batch.

According to this recipe you can use any quantity of milk with any fat content. If using low fat milk, however, add 1 1/2 cups nonfat dry milk (NFDM) for every 1/2 gallon of low fat milk. (This boosts the volume of milk solids in the milk making the resulting yogurt thicker). Bring the milk to a boil. Add the NFDM and allow the milk to cool in a bowl until it reaches 110 to 115 degrees at which point add 4 oz. of Dannon plain yogurt. (The same amount is used regardless of the quantity of milk). Wrap the seeded bowl of milk in several towels to keep it warm overnight. The next morning you have yogurt.

My wife used to heat up the milk in a dutch oven but this was the most tedious part of making yogurt since you have to continuously keep stirring it to keep it from boiling over and to prevent scorching on the bottom. She read somewhere that a slow cooker could be used to heat up the milk. So, we took our slow cooker, which we have not used for ages, out of storage. She heated the milk in the cooker set on low for three hours then turned it off. She took about a cup of the hot milk and using an immersion blender added the NFDM whipping it until all the NFDM dissolved. She then added the whipped portion to the rest of the milk and stirred it until everything was incorporated. (She did this because she found from experience sometimes the NFDM does not dissolve completely and forms an unpleasant layer in the yogurt on the bottom of the bowl). She let the milk cool for two hours until it was about 110 to 115 degrees before inoculating with the seed yogurt. She put the slow cooker bowl with the lid on into an ice chest to keep it warm overnight. The final product is shown below.


As you can see the consistency of this yogurt is quite different from the original Dannon. It is, nonetheless, quite firm and creamy. A major difference as shown by the yogurt dripping off the spoon is that it is very elastic. When the bowl is gently shaken it jiggles almost like jello. My wife made some Greek yogurt from this batch. The resulting Greek yogurt is very creamy and a dip we made using the Greek yogurt was much better than one with just strained Dannon. I also made some salmon salad and potato salad using this yogurt and it was much better and creamier than when I use the regular Greek yogurt.

My wife also learned that she was not alone in this yogurt making endeavor. While people were stuck at home during Covid-19, they were making yogurt in addition to baking bread. She read an article in the Washington Post about yogurt starters from "Culture for Health" and ordered some. The heirloom yogurt starter she got contained 4 different kinds. She used the "Viili" starter first which is described as "A Finnish yogurt variety, very mild and creamy, with a fairly thick consistency. It’s a versatile favorite that’s perfect on its own or in any yogurt recipe." According to the recipe, this starter does not require a heated environment. Following the instructions she used one cup of cold 4% milk and dissolved the starter in a glass jar, covered it with several layers of cheese cloth fastened by rubber band around the opening.

After 24 hours, it was still basically a glass of milk. The instructions said it could ferment for up to 48 hours. By then it had congealed a bit but was still basically a drink of milk rather than yogurt. She moved it to the refrigerator. The instructions recommended refrigerating it for at least 6 hours before tasting. The picture below shows the batch after a few days in the refrigerator. It firmed up a bit and had some curd. It also had a nice tangy/acidic yogurt flavor without any "off" taste. But it was way too runny.


Somewhat disappointed she fired off an e-mail to the company explaining the situation and asking for advice. They responded very quickly saying that the dried starter may take some time to fully "wake-up" to its full potential. As long as the first batch still smelled good they recommended starting a new batch using the ratio of one tbs from the 1st batch to 1 cup of cold milk. They recommended making 1 to 2 cups with that ratio (no more no less). Then they suggested she make successive batches with the most recent batch as starter until the desired consistency is attained. My wife used 2 cups of 4% milk with 2 tbs of the first batch for the second batch. After 48 hours it congealed significantly more than the 1st batch. The picture below is after 1 day in the refrigerator. It coagulated a bit more with a creamy consistency.


She then used 3 tbs from the second batch with 3 cups of milk for the 3rd batch. It was yet more solid (below picture). In addition it firmed up in 24 rather than 48 hours. We thought this consistency was not bad. She then used 4 tbs of batch 3 with 4 cups milk for batch 4. As shown below, after 24 hours this is just the right consistency and has developed a more pronounced tangy yogurt flavor. Success!


Well, now we have no shortage of yogurt. We have two options for making it and both are very good; one for low fat milk that results in yogurt that tastes like full fat and one for "high-octane" i.e. 4 % fat milk. It's a good thing we like yogurt and eat a lot of it. As long as milk is available we will no longer ever be without yogurt.

Wednesday, May 20, 2020

Buttermilk muffin with biga ビガで作ったバターミルクマフィン

My wife's baking. This is a variation of buttermilk muffin she made previously. During the Covid-19 induced yeast shortage, she made this with biga/starter to mostly to conserve the amount of yeast we had. Although the taste and texture are very similar to the original, this one appears to have a much more pronounced slightly tangy buttermilk flavor.


Ingredients:
Biga
1 3/4 cup flour
2 cups buttermilk
1/8 tsp yeast

Dough
Biga
1 tbs. sugar
2 tsp. salt
3 tbs. butter
2 1/4 cups flour or more as needed to make smooth dough
additional 1/8 tsp yeast (optional)

Directions:
In the evening mix together the ingredients for the biga, wrap the bowl in towels and leave overnight.

Next day mix the biga and other ingredients to make the dough. Rise in a bowl until doubled in size. Punch down. Measure 2 1/4 pieces of dough and form into a bun. Place buns in heavily buttered pyrex baking dish. Let rise again until buns are touching and about doubled in size. Bake in a 400 degree oven for 18 to 20 minutes or until golden and sound hollow when tapped. Remove immediately from pan to cool.

These buns were fantastic. Again the lovely biga dough resulted in a richly flavored muffin. We'll definitely be making this again.

The picture below shows a combination of baked goods we had for breakfast one day. We freeze the bread and muffins we bake. Then in the morning we just briefly microwave a selection of what we have available in the freezer in a silicon container. Left upper is buttermilk muffin made with biga, right upper is sweet potato bread with ricotta sweet potato filling and the lower is mint cake. This mint cake was made with only mint and no spinach as was used in the original recipe since spinach adds nice color but not much taste.


Of course, no monrning is complete without our cappcino (or more like latte).


This type of assorted bread/muffin is getting to be our regular breakfast on weekends.

Sunday, May 17, 2020

Japanese sweet potato muffin Version3 サツマイモ マフィン バージョン3

This is the third iteration of Japanese "Satsuma-imo" sweet potato roll/muffin. In dealing with various food shortages during the covid-19 crisis we took an inventory of the foods we had in the freezer. My wife discovered a package of prepared satsuma-imo which she had prepared in the fall but forgotten about. She immediately decided to make sweet potato muffins. She basically used the recipe for the first version of sweet potato muffin and did not rise the dough over night in the refrigerator as she did in version 2 . The good news is that we finally have regular yeast again (from Amazon, Fleischmann's instant yeast* 1 lb) so she did not use biga to make this. She used the usual amount of active yeast.

* Digression alert:
This is the largest amount of yeast we ever bought but this was the only package available. We usually buy a 4 oz jar of Fleischmann's active yeast. We are bit confused about  the differences between "active", "instant" and "rapid-rise" or "rapid-acting" yeast. This is a somewhat confusing subject but this web site appears to provide the most clear explanation. The following is what we understand from reading this article.  The only difference between "active" and "instant" yeasts is the size of the granules. The granules in "active" yeast are larger than in "instant" yeast and require "proofing" or "activating" before being mixed into the rest of the ingredients.  Because the granules in "instant" yeast are finer it can be mixed into dry ingredients without proofing. In addition, instant yeast unlike active yeast can be frozen--which we will have to do since this is such a large quantity. "Rapid-acting" and "Rapid-rising" yeasts are brand-specific names. These yeasts include additional ingredients that make rising faster and these yeasts are not suited for long fermentation such as overnight rising in the refrigerator or making over night pre-ferments.

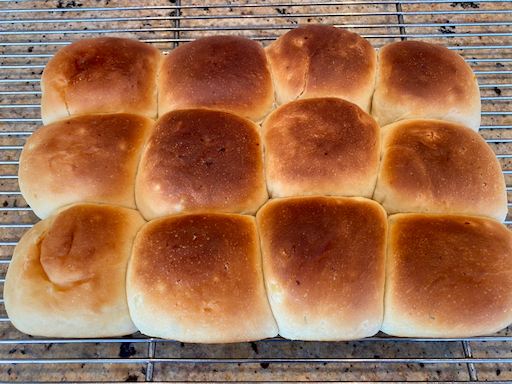
This 3rd iteration of sweet potato muffin, is basically the same as the first version. The major difference is the mixture used for the stuffing. My wife didn't have enough sweet potato to just use that in the stuffing as she did in the original version so she used a mixture of ricotta cheese and sweet potato instead. As you can see, as it cooked steam made a space over the stuffing but the muffin tasted really good. We like this stuffing better.


She brushed the top with melted butter before placing into the oven.


Ingredients:
for the bread
1 cup of processed sweet potato (1/2 cup for the bread and about 1/2 cup to use as filling in the bread)
4 1/2 teaspoons (two 1/4-ounce packets) active dry yeast
1/4 cup sugar
1/2 cup warm water (110 to 115 degrees)
3 large eggs
3 tablespoons melted unsalted butter
1 teaspoon salt
3 to 3 1/2 cups flour, plus more for the work surface
Oil, for greasing the proofing bowl.
an additional 1 tsp butter to brush on the muffins before baking

for the stuffing
1/2 cup processed sweet potato
1/2 cup ricotta cheese

Directions:
Process the sweet potato by cooking several Japanese sweet potatoes either in the Weber grill or microwave. Let cool, peel and thoroughly mash in a food mill so it is smooth. (Since we made this batch of sweet potatoes in the Weber one weekend to have with barbecued chicken it had butter and soy sauce previously added).

Combine the yeast with 1 tablespoon of the sugar and the warm water in the bowl of a stand mixer; proof for 5 minutes.  Add the eggs and beat on low speed, then add the remaining sugar, the butter and salt. Beat on low speed for about 2 minutes (no need to scrape down the bowl), then add the sweet potato and beat for about 1 minute. Add 1 cup of the flour at a time, beating to form a slightly stiff dough that has pulled away from the sides of the bowl; add flour as needed to form dough. Knead on speed 2 for 7 to 10 minutes. 

Transfer the dough to a lightly floured work surface; knead for 2 to 3 minutes. When it is smooth and springy, shape it into a ball. Use oil to lightly grease the inside of a large bowl, then place the dough in it, turning it to coat evenly. Cover the bowl with plastic wrap; let the dough rest for about 1 hour or until it has doubled in size. The dough will be ready when you can push 2 fingers into it and the indentations remain.

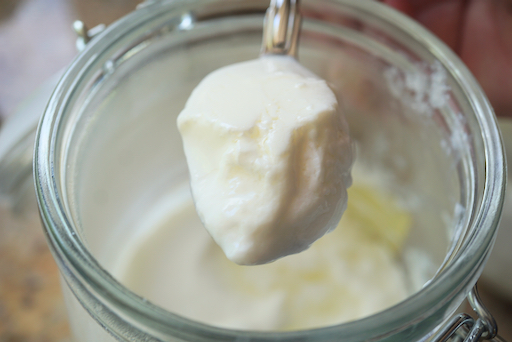
Meanwhile mix the remaining processed sweet potato and ricotta cheese in another bowl and set aside. (shown in picture below).

Punch down the dough. Cut into pieces weighing about 2 oz. each (about 56 g). Flatten the dough and put a small scoop of the sweet potato ricotta mixture in the middle. Pinch the dough around the sweet potato ball and form into a muffin. Place in a greased baking dish. Cover with plastic wrap; let the muffins rise for 45 minutes to 1 hour or until doubled in size. Just before baking brush with 1 tbs of melted butter. Cook in a preheated oven of 375 degrees for 18 to 20 minutes until golden.


These sweet potato muffins are definitely one of our favorites. They are very nice when stuffed with just excess processed sweet potato but these stuffed with sweet potato and ricotta cheese are even better. The ricotta cheese picks up the flavor of the potato and seems to accentuate it. It has a mild sweetness. In addition the filling is very smooth and creamy. This goes very well with the tenderness of the bread's texture.

Wednesday, April 29, 2020

Puff pastry loaf with roast beef, cheese and potato salad ローストビーフ、チーズ、ポテトサラダローフ

My wife invented this loaf which is a variation of egg and smoked salmon in puff pastry. She already made one variation using smoked salmon, cheese and mashed potato. This time, we were in cleaning-up-leftovers mode. Although we rarely eat beef, one weekend we made a beef roast on the Weber grill with hot smoke. We used thin slices of the roast beef for sandwiches during the week but still had some left over. In addition, I had made potato salad a few weeks ago and a good amount was still left.  (The potato salad is made with rice vinegar and strained yogurt i.e. Greek yogurt in addition to the usual mayonnaise, and these two ingredients act as a kind of preservative. As a result the potato salad lasts a long time but even so there is a limit so we had to use it up). My wife came to the rescue with this dish using roast beef, potato salad and her variation of cheese stuffing. This is like a "pasty", all inclusive--starch, veggies and proteins from the meat and cheese.


Ingredients:
sheet of puff pastry thawed

for cheese filling:
4 oz. feta cheese
3 oz smoked mozzarella cheese
2 oz. Monterey jack
5 oz. ricotta cheese
2 large eggs
sprinkle of red pepper flakes to taste

Other ingredients
roast beef cut into thin slices.
cup of potato salad (or amount needed to top the cheese filling)

Directions:
Preheat oven to 425 degrees. Crumble the feta cheese into small pieces. Grate the mozzarella and Monterey jack cheeses. Mix the crumbled and grated cheeses with the ricotta, egg and red pepper flakes. Roll out the thawed puff pastry on parchment paper. On half of the pastry dough, add layers of thinly sliced roast beef, the cheese mixture and potato salad (shown below).


Fold the other half of the pastry dough over the filling and seal the edges by painting on a mixture of water and flour and pressing the edges using the tines of a fork.  Dock or prick the top of the dough with the fork. (This lets steam escape as the loaf cooks). With the loaf still on the parchment paper place it on a rack and put the rack on a cookie sheet. (This allows the bottom to cook thoroughly). Cook for 25 to 30 minutes or until the pastry is golden brown.


Again, you can't go wrong with this combination of pastry, meat, cheese and potatoes--its a meal in itself. The potato salad was an interesting addition. It added a slight vinegar tang and the mayonnaise yogurt blended into the cheese mixture adding a creaminess. The onions and carrots in the potato salad were a nice dimension that was not present in previous versions of this loaf. The smokiness of the barbecued beef also added its "voice" nicely. (Although the roast beef was very nice, we decided that maybe we preferred the saltiness of the smoked salmon used in previous versions a bit better). Slices of the loaf heat up well in the toaster oven. This is nice to have after work with a nice glass of red wine of course.

Monday, April 20, 2020

Brined pork chops with homemade BBQ sauce ブラインドポークチョップとBBQソース

I usually do not get pork chops but, one day during the Covid19 pandemic, I could not find any other cuts of pork, so I ended up with fairly thin bone-in pork chops. After some thought about how to cook it, I decided to brine the pork (although we are not a true believer in brining). After brining I cooked the pork in a frying pan. My wife made her BBQ sauce to go with it. We served cooked baby red potatoes and sautéed green beans on the side; a classic American meat-and-potato affair.


Ingredients

Three bone-in pork chops (what I got was thin -1/2 inch-probably thick chops would be better).

For brine
2 cup water
1/3 cup Kosher salt
1/4 cup sugar
2 sprigs of rosemary, leaves removed and finely chopped
2 cloves of garlic, finely chopped

Mix the above ingredients in a pan, boil to dissolve the sugar and salt and let it cool down to room temperature.

For BBQ sauce (my wife made this)
2 medium onions coarsely diced, sautéed in olive oil until soft and caramelized (15-20 minutes).
1 cup of ketchup, added to the pan and cooked,  until the sugar in the ketchup is caramelized (the color will change from red to more dull brownish color).
 2 tbs  rice vinegar plus 1/2 cup water (or chicken broth),
1/4 cup lemon juice,
1/2 tsp paprika powder,
1 tbs Worcestershire sauce,
1/2 tsp salt,
2 tbs brown sugar
1 tbs mustard

Mix the above ingredients and simmer for about 20 minutes.

I brined the pork for 5 hours in the  refrigerator. Just  before cooking, I took them out of the fridge, rinsed and patted them dry. Using olive oil and butter, I cooked the pork chops few minutes on each side. At the end I added some of the BBQ sauce to the pan and continued to sauté for a few more minutes until the sauce covered the meat.


I think the chops were too thin to make good brined pork chops. The sauce was good but the chops were just so so. Later we cooked the leftover cooked pork chops with chicken drumsticks in the BBQ sauce in the oven in a covered casserole dish for about 1 hour or until the meat was tender. I then removed the meat from bone and hand shredded it to make something like pulled chicken and pork.

This preparation was pretty good. The tang of the BBQ sauce permeated the meat and the meat was very tender. This is probably how we would prepare pork chops in the future.

Thursday, March 26, 2020

Salmon cake サーモンケーキ

When it comes to what we eat and how we prepare it, we sometimes find ourselves in a rut. For example, almost every week I get a filet of salmon weighing 1 and 1/2 lbs; "the portion of the filet close to the head, please". I scale and remove the belly portion, and make 4 filets with the rest. I salt and dry them in the refrigerator with the skin side up for few days before cooking. This preparation results in really wonderful crunchy skin when the salmon is cooked. We snarf up the cooked skin from all the filets like potato chips and eat them along with 2 of the filets. We use the remaining filets for salmon salad which we then eat over the next week. To break this rut, I attempted to make salmon cakes from the dried cooked salmon. Since the salmon was cooked, I needed some kind of binder to make the salmon into cakes. I decide to use raw shrimp paste. The cakes held together and came out nicely. Interestingly, however, they tasted primarily of salmon without a hint of shrimp.


Ingredients:
3 small salmon filets, cooked and skin (removed) (eaten previously while still crispy after salmon was first cooked). Crush them in a Ziploc bag to make small flakes.
6 frozen raw shrimp (I used Argentinean red shrimp), thawed, shelled, and made into a paste by chopping them finely with a chef's knife.
1/2 onion, finely chopped and sautéed in olive oil until transparent, let it cool.
1 tbs chopped fresh dill
Salt and pepper for seasoning

For dredging
flour, egg water and Panko bread crumbs

Oil for deep frying

Directions:
Mix the ingredients. I was not sure if I would have to add more binders such as flour and egg but the shrimp paste worked well and I could make small cakes (#1) without much difficulty. I dredged them in flour, egg water and Panko (#2). Deep fried for a few minutes turning occasionally until golden brown and cooked through (the only ingredient that needed to be cooked was the shrimp paste) (#4).


This was a sort of proof of concept but the shrimp paste really worked well as a binder without adding strong flavor of its own. Making salmon cakes this way may be a bit of work as compared to using uncooked salmon or making salmon salad but it is another good way to use leftover cooked salmon. Drying the filets intensifies the flavor in a very good way. The cakes reheated nicely in the toaster oven making a very nice appetizer. Great snack to start the evening.

Thursday, February 27, 2020

Olive brine marinated pork tenderloin with cuscus オリーブブライン漬け豚ヒレ

This is continuation of my search for another way to cook pork tenderloins. A few days ago I used the trimmings from two pork tenderloins, I prepared to make "Pork, potato, and green bean stir fry". The next day, I made "Seared Pork tenderloin with smoked paprika and oregano 焼き豚フィレ肉、薫製パプリカ、オレガノ味" from one of the tenderloins. That left one last tenderloin. I came across this recipe in "Food and Wine" magazine. It uses the brine from a jar of olives (I suppose it is made of water, vinegar and salt with added olive flavor from the marinated olives) as a marinade for pork tenderloin. We were inspired by this recipe so we made this dish and served it with couscous. The original recipe called for white beans as the side but we happened to have a box of couscous which recently passed its "best used by" date. (Actually that date was one year ago but in our household that is "recent"). The brining did make the pork more succulent but did not add much flavor despite the addition of ground sage and lemon zest to the brine.


We added all the juice, olives and roasted garlic from the roasted pork to the couscous which made it very flavorful and moist. (We tend to avoid dry flakey couscous which we found from experience can easily become uncomfortably air borne if you happen to inhale slightly at the wrong time while eating it). Although the color could have been a bit better, we will call this dish a sucess.


Since we do not believe in "searing" the surface of the meat before baking, I skipped the searing step.

Ingredients:
One trimmed and prepared pork tenderloin
Several green olives, pitted and smashed
Several cloves of garlic, skin on
1 tbs olive oil

For marinade:
1/4 cup of brine from a jar of olives (we had sweet red pepper stuffed green olives which I use when I have a martini).
1 tbs extra-virgin olive oil
1/2 tsp ground sage
Lemon zest from one lemon using a micrograter.
1/2 tsp Kosher salt

Salt and pepper for seasning.

Directions:
Place the marinade and the tenderloin in a Ziploc bag. Removed the air, close the bag and marinate for 3 hours in the refrigerator.
Preheat oven (I used our toaster oven in convection mode) to 375F.
Remove the pork from the marinade, blot with a paper towel, coat with olive oil and season with salt and pepper. Coat the garlic cloves with olive oil.
Place the pork, olives, and garlic on a baking sheet and bake for 30 minutes or until the temperature in the thickest part of the pork registers 145F.
Let it rest for 5-10 minutes on the cutting board.

Meanwhile, we prepared a box of couscous according to the directions (we used chicken broth and pats of butter). When done, we fluffed up the couscous using a fork, added the roasted garlic by squeezing out the soft center of the clove leaving the skin behind. Then we added the olives and whatever juice from the meat that accumulated while it was resting.

Since we are not really into brining meats, this is a quick and easy way to do it. As far as we could tell the main impact of the brining was on the texture of the meat rather than its flavor. The meat was moist and nice. This is a new for us but we are not sure we will do this again.

Tuesday, February 18, 2020

Seared Pork tenderloin with smoked paprika and oregano 焼き豚フィレ肉、薫製パプリカ、オレガノ味

When I made "pork, potato, and green bean stir fry" from pork tenderloins trimmings, the two prepared pork tenderloins remained. I marinated them in sake (mostly to preserve the meat a bit longer). My default dishes for pork tenderloin are tonkatsu or hirekatsu ヒレカツ, baked in the toaster oven or scallopini. I happened to see this recipe in Milk Street magazine recently, I decided to try it for a change. It is called "seared pork tender loin with smoked paprika and oregano". My wife made PA dutch egg noodles with cream cheese and chopped chives as a accompaniment. This turned out quite good if not outstanding.


This came out just right and tender.


Ingredients: Since this was a sort of test, I only used one pork tenderloin.
One trimmed and prepared pork tenderloin, cut in half crosswise and then cut along the length of the segment leaving 1/4 inch intact (#1). Pound it lightly to flatten to 1/4 inch thick. Season with salt and pepper.
1 tbs neutral oil for searing (I used vegetable oil)

Sauce/marinade (mix all ingrediets):
3 tbs olive oil
1 tbs smoked Paprika (powder).
1/2 tsp sugar
1 tsp dried oregano

1tsp chopped fresh oregano (I did not have it so I didn't add it).

Directions:
Add the oil to a frying pan on medium high flame. When the oil is simmering/near smoking, add the pork and sear one side for 2-3 minutes without moving (#2), flip it over and sear the other side for 2 more minutes (#3), brush the sauce/marinade (I used a spoon to coat the surface with the sauce) (#4), flip again and repeat with the sauce.

I placed the pork on the plate. poured on any juice/sauce from the pan and covered with another identical pate as a lid to let the meat rest. (It could also be covered with aluminum foil for several minutes).


Although the smoked paprika flavor or oregano did not come through strongly (I am sure fresh oregano would have added good oregano flavor but I did not have it), the meat was done perfectly and was flavorful. The next day, I used the meat with avocado slices for sandwiches which was also very good. We may have to repeat this using fresh oregano. This was a different and good way to prepare pork tenderloins.

Monday, February 3, 2020

Smoked salmon, potato, cheese loaf and cheese bites スモークサーモン、ポテト、チーズローフ

We had some leftover cooked spinach, mashed potatoes and a small amount of smoked salmon so my wife came up with this. It is a combination of several recipes; "egg and smoked salmon in puff pastry", "spinach cheese loaf"and mashed potatoes with cream cheese and chives. The egg and smoked salmon recipe inspired the use of smoked salmon. The spinach cheese loaf was the basis for the center cheese and spinach layer. The mashed potato layer was a variation of gnocchi.


The layers are shown here from the bottom, the smoked salmon, cheeses mixture and mashed potato encased in puff pastry..


Since the cheese filling was too much for the loaf, my wife put the excess into small muffin tins with a small piece of smoked salmon on the  bottom to make little cheese bites (shown below).  They came out very nicely.


Without pastry shell and potato, these by themselves were quite a good small bite.


Ingredients:
1 frozen puff pastry sheet, thawed
1 cup mashed potato with cream cheese with chives
Smoked salmon, enough to cover 1/2 of the puff pastry (or whatever amount available)
6 oz. double Gloucester cheese grated (original recipe calls for Mozzarella, we did not have it).
block of feta cheese, crumbled (or to taste).
10 oz. ricotta cheese
One bag spinach (or whatever available) cooked without adding any liquid, excess moisture squeezed and finely chopped.
red pepper flakes (optional)
3 eggs (2 for cheese layer 1 for potato layer)

Directions:
On a piece of parchment paper roll out the puff pastry. Combine the cheeses and the spinach (#1). Stir in the 2 eggs (#2). Put the mashed potatoes in a bowl. Stir in the egg. Add enough flour so the spinach has the consistency of gnocchi i.e. has a firm consistency and is not runny.

Assembly: Lay the smoked salmon on 1/2 of the puff pastry. Spread the cheese and spinach layer on top (#4). Spread the potato layer on top of the cheese (#5). Fold the other half of puff pastry over the half with the cheese mixture. Seal the edges with some water and press with a fork. Dock the pastry with the tines of the fork (#6). Transfer the puff pastry on the parchment paper to a baking sheet. Bake in a 425 degree oven for 30 to 35 minutes or until the pastry is golden brown.


Directions for the cheese bites
Since there was too much cheese stuffing to go into the puff pastry my wife used it to make little cheese bites. She greased a tin for mini muffins. Put a small piece of salmon in the bottom of the cup and scooped in enough filling to fill the tin. She baked these with the puff pastry loaf at 425 for about 18 minutes. When they came out of the oven the cheese stuck to the side of the tin. She used a spatula to loosen the edges while the cheese was still hot. Luckily because of the salmon on the bottom the little bites just fell out when the tin was inverted and tapped gently on the counter top.

This was a very good variation on the "cheese-in-puff-pastry" theme. The salmon gave a salty smokiness. The ricotta spinach feta combo is always winning. The layer of gnocchi like potato on the top was a lovely surprise. The cream cheese chive flavor really came through and smooth texture of the potatoes was a nice contrast to the somewhat firmer texture of the cheese layer. The little cheese bites were also very good. Again the salmon added it characteristic salty smokiness, the cheese layer was very good but it was different from the cheese layer in the puff pastry loaf made with the same ingredients. The outside of the cheese had gotten toasted in the mini muffin tins so it was somewhat crunchy and the flavor of the toasted portion was somewhat deeper than the un-toasted portion. It made a very satisfying single mouthful. These would definitely be worth making in their own right.

Tuesday, November 19, 2019

Japanese "Satsuma-imo" Sweet potato muffin version2

My wife likes to bake bread and she also likes Japanese "Satsuma-imo" 薩摩芋 sweet potato so she is always looking for ways to combine the two. She made "sweet potato" rolls using Japanese sweet potato roasted in the Weber grill and then mashed and seasoned with butter and soy sauce. She used the mashed Japanese sweet potato in the bread dough and also as a filling. In this variation she used the recipe for "refrigerator potato bread" but substituted mashed sweet potatoes for the white potato called for in the recipe. The result was this wonderful rolls/muffin. It has a very tender delicate texture and you can definitely taste the mild sweetness of the Japanese sweet potato. This muffin does not have a sweet potato filling because all mashed the sweet potato went into the dough.


Ingredients:
1 pkg. yeast
1/2 cup sugar (plus 1/2 tsp additional to proof the yeast)
1/2 cup warm water
1 cup warm milk
1 1/2 sticks ( 3/4 cup butter softened)
2 tsp. salt
2 eggs
1 cup mashed Japanese "Satsuma-imo" sweet potatoes (make link to my potato recipe) run through a food mill to eliminate any chunks that may remain after the potatoes have been mashed #1.
4 cups bread flour (with more as needed)

Directions:
Day1:
1. Proof the yeast in the warm water and 1/2 tsp. sugar.  Warm the milk with the butter in it. Dissolve the sugar in the milk mixture.
2. Using a mixing paddle on the stand mixer add the warm milk butter mixture, eggs and mashed potatoes blend thoroughly. Add the proofed yeast and salt. Mix completely.
3. Switch to a dough hook and add the flour one cup at a time until the dough clings to the hook and is smooth and springy to the touch. Knead on speed 2 for 7 to 10 minutes.
4. Form into a ball and put into a bowl with a small amount of vegetable oil turning the dough to cover with a coat of the oil. Cover tightly and place in the refrigerator overnight (or as the recipe says up to 16 to 18 hours).

Day2:
1. Next morning punch down the dough. (It will extremely cold and dense so "punch down" may not be the process that is actually possible. Just flatten the best you can) #2. Let rest for about 5 minutes (picture below) #3. Cut off pieces weighing 2 1/4 oz. #4. Form into rolls and place in a heavily greased baking dish several inches apart so they can rise #5. Cover and let rise until doubled. Cook in a 400 degree oven for 18 to 20 minutes until they sound hollow when tapped #6.


These muffins were amazing. The slow rise overnight in the refrigerator resulted in a very fine texture. The flavor was very delicate but clearly tasted of the sweetness of the sweet potato. The combination of the delicate texture and flavor almost felt like we were actually eating fluffy cooked sweet potato rather than bread. So the substitution of sweet potato for regular potato in this recipe worked very well and the end result was equally as good but distinctly different...well worth the variation.

Tuesday, June 18, 2019

Fastnacht bread with sweet potato サツマイモ ”ファストナハト” ケーキ

My wife is a devotee of Japanese sweet potato "Satsuma-imo" サツマイモ. Whenever she sees it at our near-by Whole Foods, she will get some. The most common way we enjoy Japanese sweet potato is cooking it wrapped in aluminum foil on the Weber grill when we are cooking either chicken or pork roast (using indirect heat). She usually mashes the potato and adds soy sauce and butter. Then using the left-over mashed sweet potato, I make croquets (with ground pork, onion and shiitake mushroom) which is great (I have posted it). She has also used the mashed sweet potatoes to make gnocchi. This was a really good preparation because the sweetness combined with the saltiness of the soy sauce comes through very nicely. This time, my wife decided to make her "Fastnacht cake" using the mashed sweet potato. Her thinking was 'the recipe used regular mashed potatoes so how would it taste if I substituted the sweet potato?' She also modified the way she incorporated the " rivals*” and gave the bread a second rise which was not called for in the original recipe.

*According to the wikipedia definition of rivels, they are a type of spaetzle like small dumpling put in a soup. In the context of this fastnact cake, "rivels" are a sweet sugar crumb topping. (My wife did not make up this terminology. According to the ancient Pa Dutch cookbook she uses they specifically say "top with rivels" then give explicit instructions on another page under the heading of sugar topping. These include brown sugar topping, streusel topping and rivels. The main difference between them being the ratio of sugar, butter and flour).


The rivels are a crucial part of the cake. They are nice and crunchy and sweet. The problem is many of them fall off when they are put on the top and you end up picking up the crumbs eating them separately from the cake. She wanted the rivels to be a part of the cake. So, she decided to put a layer of rivels in the center. (pictured below). With this innovation, the rivels still come off the top and you still end up picking up crumbs (which apparently is just an inevitable part of enjoying this cake) but in addition there is now a guaranteed layer of lovely sweetness in each bite from the layer in the center of the cake.


Ingredients:
1/2 cup HOT mashed sweet potato (please note the recipe specifies HOT)
1 1/2 cup milk
1/2 cup butter
1 egg
1/2 cup sugar
2 tsp. salt
1/2 tsp. nutmeg
1 pkg active dry yeast
1/4 cup warm water if blooming the yeast
4 cups of AP flour to start, adding more as needed to make velvety dough.

Ingredients and directions for rivels (Crumb topping)
Mix together 1/2 cup sugar, 1/2 cup flour and 4 tbs. butter softened until the ingredients are completely combined and look like fine crumbs.

Directions:
Put the hot mashed potatoes into the bowl of a stand mixer. Using a mixing paddle beat in the butter, then the egg and a mixture of sugar, salt and nutmeg. Beat until fluffy. Bloom the yeast in warm water.
Beat the yeast into the potato mixture. Switch to a dough hook and alternately add the flour and milk beating well after each addition. If necessary add more flour to make a soft dough. Knead the dough on a floured surface until smooth and satiny. Put into a greased bowl. Grease the top of the dough, cover and let rise in a warm place until doubled.

Punch down the dough. Since the recipe makes two cakes split the dough into quarters so the rivals can be put into the middle of the cake. Then put 1/4 of the dough in the bottom of the pan, sprinkle on 1/4 of the rivels and top it with another quarter of dough (#1). Do this for both cakes. Brush the tops with melted butter and cover both with the remaining rivels (#2).  Let the cakes rise in a warm place for about 30 to 40 minutes while the oven preheats. Cook in a 400 degree oven for about 20 minutes or until golden brown.  The third picture shows the cake as it came out of the oven. And #4 shows the cake sliced. 


Both the use of the Japanese sweet potato, adding rivels to the center of the cakes and giving the cakes a second rise worked out well.  These were the the best fastnacht cakes ever—or at least the best my wife ever made. The sweet potato is completely substitutable for regular potatoes. The texture, however, was much better than the original recipe. It was much fluffier, more tender and slightly sweeter. The rivels in the center amalgamated into the  texture of the cake. But they also provided a moist layer of sweetness that was very pleasant. This may be the primary way my wife makes this cake in the future. 

Friday, March 8, 2019

Potato and salmon salad filled rolls ポテトとサーモンサラダ入りのパン

Since my wife had just made sweet potato bread stuffed with a mixture of Japanese sweet potato puree and ricotta cheese (which was excellent BTW) I mentioned in passing that stuffed breads (for example breads filled with curry sauce "kare-pan"カレーパン, sweet red beans "An-pan" あんぱん, custard cream "Kuri-mu-pan" クリームパン and so on) were very popular in Japan.  I even sent her the link to a recipe for potato salad filled rolls. The recipe was in Japanese but it included pictures and I verbally translated how the bread was made. To my surprise she took to the project of "stuffed bread" like a piranha.

I regularly make potato salad and salmon salad over the weekend because they are good staples to have; the potato salad as a side for any main dish or by itself as a snack. The salmon salad is great on crackers or bread as canapés or sandwiches.  I came home one day and the kitchen was filled with the nice smell of baking bread. My wife had noted that I made more potato salad than we could reasonably eat before it went bad so she put together potato salad stuffed bread as per the Japanese recipe. Then noting a similar surplus of salmon salad decided to "go for broke" and put together salmon salad stuffed bread. Based on my description of the Japanese recipe she took her favorite white bread dough as the base. The main element she learned from the recipe was to cut the top of the rolls to form a vent for the steam from the filling to escape. This would prevent the development of a large void in the bread covering the filling .

 In the picture below, the left front is the salmon salad filled and the right back is the potato salad filled rolls.


Here are the cut surfaces. The left two are the salmon salad and right two are potato salad. Probably, she could have put more fillings but this is her first try and never having made this kind of bread was not the least bit sure it would turn out.


The picture below shows the salmon and potato salad filled rolls just after they came out of the oven.


Both rolls were really great. It was amazing that the flavor of the salads remained fresh and permeated the bread. The salmon salad filled roll had the assertive salmon and dill flavor of the salad which we thought would be good for lunch or even breakfast. The potato salad filled one was a bit more subdued but this starch-on-starch approach really works. Now my wife has ideas about other fillings she could use. Did I mention that, in Japan, filled breads even made of "pasta" (such as spaghetti  or fried Japanese noodles) are very popular. The possibilities are limitless. I "tremble in fear" at the thought of what kind of filling my wife will come up next...but I will be first in line to try whatever she makes.

Saturday, February 16, 2019

Green tea cake with "Kuromame" black beans 黒豆入り抹茶ケーキ

I usually do not make deserts but this was an exception. I saw the recipe (in Japanese) in one of the food blogs I follow. The blogger is a very talented and her cooking covers a wide range of international and Japanese cuisines.  Since I had leftover "Kuromame" 黒豆 black beans from the Osechi box and green tea powder or "macha" 抹茶, I decided to make this cake. Sushitaro osechi included a similar cake one year.  Since this is not my usual area of cooking my wife advised me on several of the techniques (such as creaming sugar and butter) and even though I had a slight "hiccup" in the butter creaming department, the cake came out extremely well. We had this as an afternoon snack with "sencha" 煎茶 green tea (from Hibiki-an 響庵).


The cake is moist with a nice green tea smell and flavor. Although I did not brush the cake with brandy as suggested in the original recipe, the brandy flavor came from the black beans since they were soaked in brandy before baking. This is an excellent cake.


The below are English translation of  the original recipe in Japanese.

Ingredients: (for one loaf of 19cm x 9cm)
100g unsalted butter, room temperature
65g  sugar
50g AP flour
20g potato starch (Katakuri-ko)
40g almond flour
1/2 tsp baking powder
1/4 tsp salt
1tbs green tea powder (macha)
2 eggs, lightly beaten
3tbs plain yogurt
1tsp vanilla essence
Japanese "Kuromame" black beans in a syrup, arbitrary amount, drained and soaked in 2 tbs brandy.


Ingredients: X2 (for 2 loaves of 19cm x 9cm)
200 g unsalted butter, room temperature
130 g  sugar
100 g AP flour
40g potato starch (Katakuri-ko)
80g almond flour
1 tsp baking powder
1/2 tsp salt
2 tbs green tea powder (macha)
4 eggs, lightly beaten
6 tbs plain yogurt
2 tsp vanilla essence
Japanese "Kuromame" black beans in a syrup, arbitrary amount, drained and soaked in 4 tbs brandy.


Directions:
1. I mixed all dry ingredients (including the sugar) together and sifted to remove any crumbs.
(I made the mistake of not creaming the butter with the sugar. My wife (always helpful) pointed out that this process is very common in cake making or cookie baking. So in an attempt to recover from my mistake, I punted).
2. I added the butter and eggs to the plastic mixing container for the immersion blender. Using low speed, I mixed the butter and eggs. I added all the remaining wet ingredients and further mixed (This worked. All wet ingredients were nicely mixed).
3. I added the wet ingredients to the dry ingredients and mixed until no dry ingredients were visible (#1).
4. Since we did not have a loaf pan of the size specified in the original recipe, we used a disposable aluminum baking pan, well-buttered with the bottom lined with parchment paper  (in retrospect, we could have used a smaller pan which we did have). I placed half of the batter in the loaf pan and smoothed the surface (#2).
5. I drained the black beans soaked in brandy and mixed into the remaining batter (#3).
6. I layered the second batter on top of the first layer and smoothed the surface (#4). (This process results in the black beans being evenly distributed in the cake).
7. I baked the loaf in a preheated 350F oven for 40-45 minutes or until a bamboo skew inserted in the center came out clean.
8. After the loaf cooled down, I removed it from the pan (#5).
9. The black beans appear evenly distributed (sort of).


When the cake came out of the oven, the smell of green tea was really good. For the very first cake I ever made this is an unqualified success (thanks in part to my wife's guidance of course). We are thinking that instead of kuromame, we can make this cake without it or with nuts. We really enjoyed this cake. It is truly special.

Thursday, February 7, 2019

Refrigerator Potato Bread/muffin 冷蔵庫ポテトパン/マフィン

This is the second potato bread we made. This time my wife did everything herself from the beginning to the end. So, her arm is definitely improving as well as she is determined to accomplish what she wants to do. This is called "refrigerator" bread since it rises over night in the refrigerator. The recipe also came from "Beard on Bread" cookbook. Again, it is a nice rustic bread with integrity and perfect for toasting with butter for breakfast.


Ingredients:
1 pkg. yeast
1/2 cup sugar (plus 1/2 tsp additional to proof the yeast)
1/2 cup warm water
1 cup warm milk
1 1/2 sticks ( 3/4 cup butter softened)
2 tsp. salt
2 eggs
1 cup mashed potatoes (make link to my potato recipe) run through a food mill to eliminate any        chunks that may remain after the potatoes have been mashed.
4 cups bread flour (with more as needed)

Directions:
Day1:
1. Proof the yeast in the warm water and 1/2 tsp. sugar.  Warm the milk with the butter in it. Dissolve the sugar in the milk mixture.
2. Using a mixing paddle on the stand mixer add the warm milk butter mixture, eggs and mashed potatoes blend thoroughly. Add the proofed yeast and salt. Mix completely.
3. Switch to a dough hook and add the flour one cup at a time until the dough clings to the hook and is smooth and springy to the touch. Knead on speed 2 for 7 to 10 minutes.
4. Form into a ball and put into a bowl with a small amount of vegetable oil turning the dough to cover with a coat of the oil. Cover tightly and place in the refrigerator overnight (or as the recipe says up to 16 to 18 hours).

Day2:
1. Next morning punch down the dough. (It will extremely cold and dense). Let rest for about 5 minutes (picture below).


2. Knead vigorously until it becomes soft and pliable (about 6 minutes).
3. Shape into 2 loaves of equal size and place into 2 heavily greased loaf pans. Cover and let rise until doubled in bulk  (the recipe says this could take up to 4 hours. This bread rose in 2 hours).  Make shallow slashes using a bread lame (see picture below).


4. Bake in a 375 degree oven for 40 to 45 minutes until browned and sounds hollow when tapped.
5. Remove from the pans immediately when they come out of the oven. (When I removed the loaves they seemed a bit soft on the underside so I put the loafs back in the oven outside the pans directly on the oven rack for about 5 minutes. This made the crust nice and crunchy).


This bread has a very pleasing dense but fine texture. It has a slightly sweet taste and the taste of the cream cheese and chives used in the mashed potatoes came through adding a pleasant dimension.


We are glad that my wife is up to baking again. I am certainly benefitting from having good breads to enjoy.

Addendum (1-22-22): This bread can also be made into muffins as shown in the next picture. These muffins were weighed at 76 grams and produced a total of 23 muffins. They were cooked in a 400 degree over for 20 to 25 minutes or until golden. When turned out of the pan the underside was very soft and white so I turned them upside down on a cookie sheet and cooked them for another 5 to ten minutes until they formed a light brown crust.