Showing posts sorted by relevance for query udon. Sort by date Show all posts

Thursday, August 6, 2020

Pesto prosciutto "udon" pasta バジルペーストとプロシュートのウドンパスタ

This was a lunch. Since we made pesto from our window sill basil harvest, we decided to use the pesto, prosciutto, which was getting old,  and the remaining rapini which I blanched previously. We thought this combination should work. Instead of spaghetti, we used thin Japanese “udon” noodles called "Ito-udon" 糸うどん which we had cooked a few days prior. I started with cooking the prosciutto in a frying pan. Then set aside the prosciutto. In the same pan, added a small amount  of olive oil and sautéed the noodle until warmed up, added  the rapini. Finally, off heat, added the pesto and prosciutto.


Since the pesto had enough parmesan cheese in it, I only added our favorite spicy Spanish olive oil.


The flavors of the pesto, slightly bitter rapini, and salty prosciutto all worked well. This was a perfect lunch for us.

Tuesday, October 30, 2012

Cold Udon noodle salad 糸うどんのサラダ

This is another cold thin udon dish. In this case. This was a lunch.  We had more vegetables than noodles but although you can’t see them, they are there under the vegetables in this picture.


Vegetables: I used whatever was available. I used cucumber (American mini-cucumber, sliced into long ribbons for s change), carrot (likewise cut into thin ribbons), Vidalia onion, sake steamed chicken breast, hydrated wakame わかめ sea weed.

Dressing: I used ponzu shouyu ポン酢醤油 sauce (from the bottle) with a dash of dark sesame oil.

Especially if you already have cold udon, this is a very quick dish for lunch or ending or “shime” 締め dish. By cutting the veggies lengthwise they are similar in dimension to the noodles. And believe-it-or-not they have a slightly different consistency and taste than if they were cut the usual way.

Monday, October 19, 2020

"Udon" pasta with squid and marinara sauce イカとマリナラソースのウドンパスタ

 I ordered fresh whole squid from Hmart via the Instacart. Since there was a minimum of 1 pound for the order so I specified 1.5 pound to be safe. I was expecting one large intact squid. Instead I got a substitute; "cleaned and packaged" squid. Since this squid did not include innards 1.5 pounds translated into quite a lot of squid; three large packages, much more than I  expected. When my wife unpacked the bag she commented, "That's a lot of squid!" Since it was "cleaned" it was also more expensive per pound. I was thinking the body portion of the squid I bought would be intact so I could either stuff it or cut it into squid rings to fry. But the body portion had been opened to remove the innards. (Removing the innards even if the body has not been opened is not that hard and is what I do to prepare squid). In addition the thin skin (which is very hard to remove) and the small wings at the top were still attached. This all made it relatively easy for the person packaging the squid but not necessarily the customer left with the harder part of the prep. What I would have preferred is the body left intact but the thin skin and wings removed. Oh well, I kvetch.

I set to work and removed the wings ("enpera" エンペラ in Japanese. Supposedly, this word originated from "emperor" since the shape of the wings resembled Napoleon's hat) and removed the thin skin using a paper towel to grasp the edge of the skin and peeled it off. Most importantly, the good news was that the squid was fresh (i.e. no smell).  It was much fresher than anything we would get from Giant. It was a fairly good size with tentacles so overall I was pleased.  

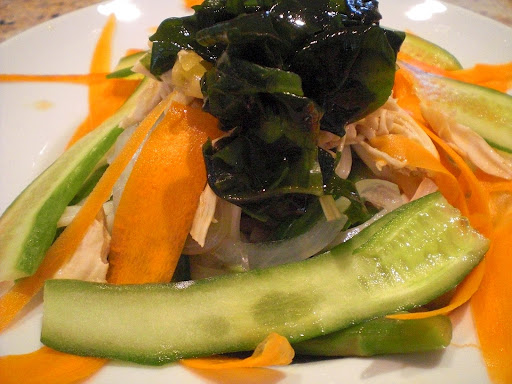
I quickly boiled the tentacles in salted water with a splash of sake. (We enjoyed these as appetizers for several evenings with cucumber and wakame seaweed dressed in "sumiso" 酢味噌 vinegar miso dressing). I shallowly scored the body in crisscross fashion and cut it into one inch by a half inch rectangles. I used about a third of the prepared squid for squid in tomato sauce "udon" pasta. The rest I froze. This was lunch on Saturday.


I thought I used a quite a good amount of squid but once it was cooked, it did not feel like a lot.


Ingredients:
1/2 lb squid, body, cleaned, thin skin removed, apply crisscross shallow cuts on one side and then cut into 1 x 0.5 inch rectangles (see picture below).
1/2 cup marinara sauce (This was my usual homemade)
Cooked pasta (I used cooked udon noodles)
4-5 fresh basil leaves, cut into chiffonade,
Garlic, finely chopped (optional)
Salt and black pepper
Olive oil


Directions:
Add the olive oil in a frying pan on medium flame. Add the garlic (if using) and stir for 1 minutes or until fragrant. Add the squid and sauté for 30-40 seconds, add the noodle and the marinara sauce. Stir and warm up for few minutes. Garnish with the basil and splash good olive oil.

This was a good pasta dish. The squid was not chewy at all. 

Monday, May 1, 2023

Four Salad Lunch 4種類サラダランチ

I made 4 different salads (not all on the same day) and had the 4 salads for lunch with a cold asparagus soup. We also had a small piece of “Not no-knead bread made with dried fruit”. We feel good about the fact that all salads, soup and bread were home-made. In the center of the four salads, I served snap peas which were blanched and then soaked in Japanese salt broth.


The picture below shows Israeli couscous with artichoke hearts and garbanzo beans with a nice lemony and dill dressing.


The pic below shows a celery, mushroom, and navy bean salad with feta cheese. The mushrooms make the salad. They gave an almost meaty texture and flavor.


The next is a curry flavored sous vide chicken salad. Since we had a nice ripe Champagne mango, I added small cubes of mango which went very well with this salad.


I made this udon noodle salad since I had left-over cooked udon noodles.  The dressing is sesame-flavored. I do make several versions of the sesame dressing (for example, using Japanese “nerigoma” ねりごま sesame paste or peanut butter) but this time I used Tahini with dry roasted white sesame seeds which I ground in a Japanese “suribachi” すり鉢 mortar. Other seasonings included soy sauce, sugar, and rice vinegar.


This was a surprisingly filling lunch. Beans, udon noodles, and couscous all contribute to this and, at the same time, we enjoyed so many different flavors and textures. We just have to make sure we finish all these salads before they go bad.

Sunday, September 9, 2018

Cold mackerel ball soup 冷製鯖のつみれ汁

We got a whole Spanish mackerel from the near-by Whole Foods and made our usual miso simmered mackerel 鯖の味噌煮. I also made mackerel fish ball soup 鯖のつみれ汁 from the meat scraped off the bone and tail tip portion of the fish. I just cooked the mackerel fish balls in dashi broth but did not season or finish the soup and placed it in the refrigerator. The next day, it was very hot and humid and my wife suggested we have this soup cold. Following her suggestion, I made this cold soup with mackerel balls, silken tofu and udon noodle as a light lunch.


I just seasoned the broth with concentrated noodle sauce from a bottle and garnished with sliced scallion and yuzu zest (frozen).


Ingredients: (this made 7 meat balls).
Scraped meat from one whole Spanish mackerel (scraped off the bone and also the thin tip of the tail portion)
Scallion, half stalk, finely chopped
Miso and potato starch 1 tbs each
Sake 1 tsp
Roasted sesame oil 1/2 tsp
Ginger root, finely chopped 1/2 tsp
Salt, scant pinch
Japanese broth, 300ml (I made this from a dashi pack with bonito and kelp).
Concentrated noodle sauce from the bottle to taste
Silken tofu and udon noodles (both cold, amount arbitrary)

For garnish
Scallion, 1/2, thinly sliced on bias
Yuzu zest

Directions:
Mince and mix the Spanish mackerel meat, scallion, miso, potato starch, sake, sesame oil, ginger root and salt.
Meanwhile heat-up the Japanese dashi broth and keep it simmering
Using two teaspoons, make a quenelle and drop it into the simmering broth
Cook it gently until all the fish balls float (4-5 minutes)
Let it cool to room temperature and place it in the refrigerator overnight.
In a small bowl, add the broth seasoned with the concentrated noodle sauce, add the fish balls, tofu and udon and garnish.

We liked the warm version but this cold one is also very good especially on a hot and humid summer day in August in Washington.

Tuesday, March 8, 2016

Toriten 鳥天

This is a dish I did not grow up with. It is essentially tempura using chicken instead of fish. It apparently was started as a local cuisine in Ooita prefecture 大分県 in the southern most island of Kyushu 九州. In the neighboring island of Shikoku 四国 and the Kansai 関西 region (Oosaka 大阪 being at its center), it is often served with udon noodles. I bought bone-in split chicken breast over the weekend. I removed the bones and tenderloins. We ate the tenderloins as an appetizer (grilled with my usual perilla and picked plum) but the breast meat remained marinated in sake (for preserving) in the refrigerator. The next weekend, the chicken was still good and I made this dish.   I think it is usually served with some kind of sauce such as ponzu sauce, tartar sauce or as a topping for udon noodles with broth called "Toriten Udon" 鳥天うどん. Here, I simply served it with wedges of lemon and green tea salt.


Although this is breast meat, it came out quite moist inside. 


Since this is not a dish I am very familiar with, I consulted a few recipes on line. Apparently different parts of the chicken can be used for this dish.  It is essentially tempura with chicken meat but I combined the good parts of several recipes and came up with the following.

Ingredients:
Chicken breast, two halves, skin and bone off.
Marinade (sake, chicken broth -from a box Swanson broth - 1 tbs each, 1 tsp of potato starch, 1/2 tsp of grated ginger and a pinch of salt)
Tempura batter (cake flour, one egg and the same amount of cold water - I used reverse osmosis filtered water from the refrigerator,  and 2 tbs Vodka)
Peanut oil for frying.

Directions:
1. I cut the chicken breasts into bite size slicing across the grain of the meat. I then pounded the slices flat using a meat tenderizer with an irregular surface. I marinated the chicken pieces in a Ziploc bag, after massaging the chicken pieces and pressing out as much air as possible. I let it marinate for a few hours (at least 30 minutes) in the refrigerator. This treatment keeps the moisture in the meat and adds flavor.

2. I heated the oil to 350F. 

3. I drained the marinade from the chicken pieces and blotted the surface using sheets of paper towel.

4. To make the tempura batter, I mixed the egg, and Vodka - alcohol prevents gluten from forming. I added cake flour - again, cake flour has least amount of gluten. I could have also added potato starch which has no gluten. I mixed being careful not to over mix. I added flour and/or water to adjust the consistency to resemble runny pancake batter).

5. I dipped the chicken pieces in the batter, shook off the excess and fried until golden and crispy turning once, less than 1 minutes total.

6. I drained the excess oil and served hot.

This was a very nice dish. Despite using breast meat, it came out very moist and succulent. The crust could have been lighter and crisper but the moisture from the meat made the crust soft if not soggy. To be honest, I like kara-age with a coating of potato starch better but this is a new dish and I got one post out of it.

P.S. The next day, I heated up the leftovers in the toaster oven and the crust became nicely crispy, although the meat got a bit drier.


Saturday, January 16, 2010

Stir fried udon noodle 焼うどん

This is another "teiban" shime dish. At home, I make this usually from leftovers. The night before, I made "Tarako spaghetti" using a Japanese "Udon" noodles and I had leftover udon. I also had the last small portion of the leftover barbecued chicken (thigh meat). This is a variation of "Yakisoba" 焼きそば.

For two small servings, I sliced onion (1, small), julienned carrot (1, small) and fresh shiitake mushrooms (4, medium). I sautéed these vegetables in olive oil (1 tbs) with a dash of dark sesame oil for 2-3 minutes and added crushed, finely chopped garlic (1 clove). Seasoned with salt and pepper. I then added hand shredded cooked chicken thigh (one thigh) and the noodles. It is important to add some kind of liquid during the cooking of this kind of dish. I added chicken broth (3 tbs) and stirred until the liquid was almost all gone. You could use a bottled "yakisoba" sauce, but I just seasoned it with mirin (2 tbs), soy sauce (1 tbs) and Worcestershire sauce (2 tsp), salt and pepper. You can experiment with any combination of sauces. I stir-fried until the liquid was almost gone and the sauce became somewhat thick and clingy. For garnish, I had thinly sliced pickled ginger root (pink stuff you get at Sushi bars), chopped chives, dried "aonori"  and roasted white sesame seeds. Very familiar dish and good.

Sunday, September 1, 2013

Perilla pesto 青じそのペスト

Aojiso 青じそ or perilla is like mint, it re-seeds itself proliferating out of control. As you can see below, the perilla in our garden is no exception. Please note the way it terraced its growth this year so “everybody” got the maximum of the available sun. The basil (barely visible in the left back corner of the perilla patch) was being choked out. So my wife decided to harvest the tall "trees" of perilla surrounding the basil.


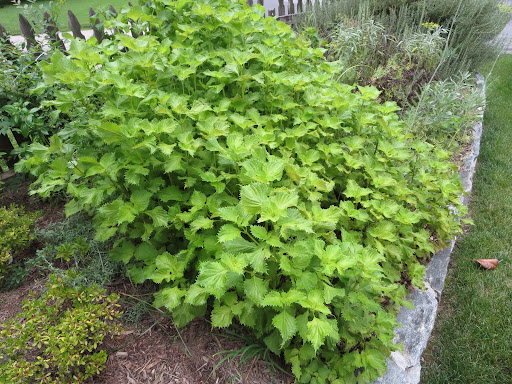
My task was to make something from the large amount of harvested perilla leaves and I decided to make "pesto". Yes I know, it is usually the basil that gets made into pesto but in an effort to rescue the basil the perilla became the prime ingredient….somewhat ironic isn’t it? By-the-way this picture was taken after my wife’s harvest which despite its large yield made hardly a dent in the total crop.

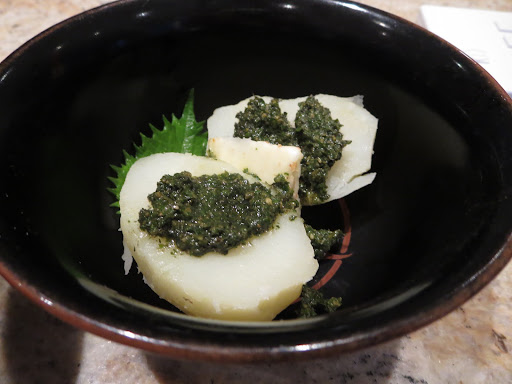
After making the pesto, we first used it on top of buttered potatoes . This was quite good.


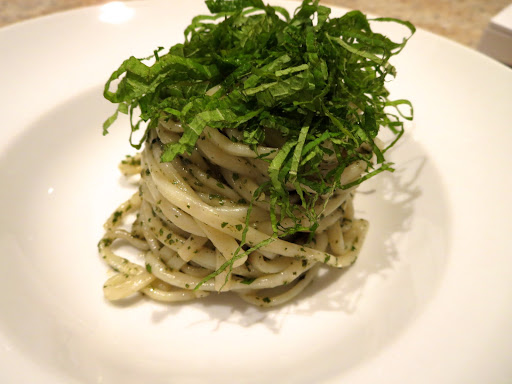
I also made pasta with the perilla pesto. Instead of spaghetti, I used thin Japanese Udon noodles. I cooked them as per the instructions on the package. I washed the noodles in cold running water. I warmed them up just before serving by soaking them in boiling water. I then drained them, and mixed in the "Aojiso" perilla pesto and garnished it with a mound of thinly julienned perilla.

Here is how I made the pesto. It is the same recipe I would use to make pesto from basil—I just replaced the basil leaves with perilla.

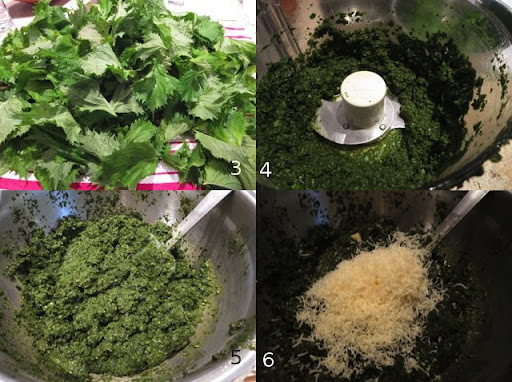
Perilla leaves and olive oil: My wife removed the leaves from the stems, washed, and dried (first using a salad spinner and then spreading on a dish towel, #3). The picture only shows a small part of the crop and, at the end, we had about 400 grams of perilla leaves (that is a lot!). I put the leaves in several small batches in the food processor. I streamed in enough extra virgin olive oil (EVOO) so that the leaves were all chopped up and a "pesto" consistency was reached (#4). I ended up using close to 750ml of EVOO (the entire bottle I opened).

Pine nuts and garlic: I used closed to 100grams of pine nuts and 6 cloves of garlic (about 30grams, skin removed and root end trimmed). I first dry roasted the pine nuts in a frying pan until the surface was very slightly browned. I placed the pine nuts and the garlic in the food processor and made a paste also adding a small amount of EVOO.

I then combined the ground-up perilla leaves EVOO mixture and the paste of pine nuts together in a large metal bowl (#5).

Parmigiano regianno cheese: I grated a wedge of P-R using a cheese grater (I used about 60grams) and mixed it in (#6). I seasoned it with Kosher salt in multiple increments as I tasted it (you can always add more later but you cannot take it back).

This pesto is very unique. The addition of olive oil, pine nuts and parmegiano cheese resulted in a taste quite different from what I would have expected from just ground up perilla. You could tell it is not basil but unless you are told you probably would not guess perilla. It has the nice fresh taste from the perilla and the other ingredients give it a complex taste dimension that is very nice and unexpected.

Using it as a topping for hot boiled potatoes (the second picture) was very good especially with the addition of butter and a bit more salt. The pasta of Japanese Udon (the third picture) was also excellent. We needed to add a bit more salt to the pesto for this dish, but addition of fresh perilla leaves as garnish made it clear that this was perilla pesto. The taste was as good as basil pesto.

We ended up with a large amount of the perilla pesto. I put a portion of the pesto in Ziploc sandwich bags, flattened them by removing as much air as possible. I then placed these in a larger Ziploc bag in layers and put it in the freezer. We had at lease 10-12 sandwich bags. Hopefully we will take it out during the winter to remember the summer bounty of our perilla…but we still have a lot of perilla left in the garden. We’ll be making pesto to last a decade.

Wednesday, November 4, 2009

Spaghetti with cod roe たらこスパゲティ


The night after making "julienned potato with spicy cod roe", we decided to make this classic Japanese pasta dish. Reportedly, it was invented in a small pasta restaurant called "hole in the wall" or 壁の穴 in Shibuya, Tokyo around 1967. (Now this restaurant has expanded into a company running multiple Italian and noodle restaurants). The original recipe was supposedly made with softened butter and lemon juice mixed with cod roe.  This was placed in the bottom of a pasta plate. Hot pasta was mixed in and finished with a garnish of nori. This dish appears to have started an entire genre of Japanases-style pastas 和風パスタ. This dish has become a favorite home cooking dish and many variations have developed. I am not sure how we came up with our own variation but I have a feeling that caramelized onion may have been my wife's idea.

My wife does not particularly care for spaghetti, which I suspect, is possibly due to the childhood "trauma" of eating canned spaghetti which many children face in the U.S. So instead of spaghetti, we use udon noodles (dried thin variety such as "sanuki" 讃岐 or "inaniwa" 稲庭) which has a nice firm texture. For us, we need only two small servings (as a last starch dish). So, we use one serving or bundle of dried udon noodles (cooked as per the package instruction) and one large sac of cod roe or tarako. After removing the roe from the sac, I mix in a small amount of lemon juice and sake to make it a smoother consistency. Meanwhile, in olive oil, I saute and caramelize one small onion cut into thin strips (this may take 10-15 minutes). I do not add salt since the tarako can be salty. I add the cooked noodles to the onions and continue sauteing to warm up the noodles. I then add the tarako mixture and remove from the heat. Mix well so that all the noodles are coated with tarako which turns white from the heat of the noodles. Taste and if needed, add salt. Plate, and garnish with thin strips of nori, perilla, and freshly cracked back pepper. Squeeze lemon on the pasta just before serving.

Saturday, March 7, 2015

Tako Yaki たこ焼き

Growing up in Sapporo 札幌, Hokkaido, takoyaki たこ焼き was not an item I encountered often. So-called "Konamon" こなもん food cultures are an Oosaka 大阪 (Kansai 関西) tradition which may include takoyaki,  okonomiyaki お好み焼き as well as noodles (especially udon). "Kona" 粉 means flour and anything made from flour may qualify as "konamon" but the exact definition escapes me.

One of the  reasons I made takoyaki was because this gave me another post but also because of my sister-in-law gave me an electric ebelskiver cooker as a Christmas present. After several of the cookers were delivered by Federal Express Ground to random locations other than our house it finally arrived last week—only 2 months late for the Christmas holiday. When I saw the cooker all I could think was Takoyaki. The size of the cooking wells and resulting product were larger than traditional Takoyaki but my wife said, “just call it American style takoyaki.

I made a takoyaki sauce and garnished with bonito flake powder and "aonori" 青海苔. For the first try, this was good with a crunchy outside and molten soft inside centered with a piece of boiled octopus leg.


Since this is not a type of food I grew up with, I looked for an authentic recipe for takoyaki. After looking through various recipes, I settled for the recipe which was written in Osaka dialect (a true sign of its authenticity).

Ingredients:

Takoyaki sauce:  A mixture of Lee and Perrin worcestershire sauce, ketchup, and honey. The ratio of the Worcestershire sauce and ketchup is about 1:2 and honey to your liking of sweetness. The authentic sauce is supposedly rather sweet. Among the pre-made commercial sauce, Otafuku brand takoyaki sauce おたふくたこ焼きソース is most popular. (left, upper).
Boiled octopus leg: I just cut into 1/2 inch or 1cm chunks (I made 12) (right lower).
Scallion: Finely chopped about 4 stalks (left lower) (1 tsp per ball).
Tenkasu*:  See picture and write up below. (1/2 to 1 tsp per ball).

In terms of the garnish,  I prepared dried "aonori" (upper right) and dried bonito powder (middle right, I made bonito powder by grinding the bonito flakes in a Japanese mortar and pestol (suribachi すり鉢) but this is not necessary (use as is).

I did not use additional items such as red pickled ginger (紅生姜) or small dried shrimp (桜エビ). According to this recipe, adding shredded cabbage is totally not authentic. If used, it should be called "Okonomiyaki" ball rather than takoyaki.


*Tenkasu: One more ingredient I needed was "tenkasu" 天かす or "agedama" 揚げ玉 a by-product of making tempura. They are the small fried tempura bits of batter that come off the main tempura while it is being cooked. They are quickly removed from the oil before they burn. Besides being used in making takoyaki and okonomi-yaki, they can be used as a topping for noodles (such as in "Tanuki" udon or soba), miso soup and other dishes.
Interestingly, in Hokkaido they are more commonly called "agedama" or "fried balls".  This is a term I prefer to Tenkatsu which literally means "wastage or scum" of tempura and does not sound particularly appetizing to me. They used to be discarded or given away free at tempura or soba restaurants but more recently, packaged commercial products can be had (some even flavored by ground up dried shrimp). I could have made this myself but for takoyaki, I bought pre-made one, as seen on the left, at my Japanese grocery store.

The advert on the package boasts of supposed health aspects of this otherwise unhealthy product. The package indicated it was healthy because it was fried in Canola oil and 0% cholesterol (same in any other vegetable oil). Maybe this is better than if they were fried in tallow but the distinction seems slim to me. I see similar amusing claims on potato chip packages touting how healthy they are. In any case, surprisingly they were not oily and had no smell or taste of oxidized oil but, by the same token, they had no flavor whatsoever, only texture. We were not sure this added anything special to our takoyaki (I added about 1 tsp per ball).

Batter: The batter is most important. I like this recipe since it was proportional based on the numbers of eggs used. The important things seem to be; 1. Use a good quality cake flour,  2. Liquid and flour ratio is 1:4 to 1:4.5 (some recipes call for 1:5 ratio), 3. Use of powdered skim milk and baking powder (They are recent additions and improve the quality of takoyaki according to this author. He referred to these additions as "progress").  I really liked this approach so I translated his chart below.
Numbers of
takoyaki
Cake flour Powdered
milk
Baking powder Sugar Salt Soy sauce Dashi
broth
Eggs
20 (12*) 70g 1 tbs 1/2 tsp 1 tsp 1/4 tsp 1 tsp 300cc
40 140g 2tbs 1 tsp 2 tsp 1/2 tsp 2 tsp 600cc 2
60 210g 3tbs 1.5 tsp 3tsp 3/4tsp 3 tsp 900cc 3
*12 using my ebleskiver maker.

I made the smallest amount (i.e. using one egg). This amount should make 20 takoyaki but with my American style takoyaki/ebleskiver cooker, I could make only 12 since the diameter of the wells are 5.5cm as opposed to either 3.5 or 4.2 cm of authentic takoyaki grills. I think the size difference is not a problem, at least for us. I used about 10cc of 1% milk since I did not have powdered skim milk and reduced the dashi by that amount. The dashi was made with kelp and bonito flakes as usual. I did not sift the flour (which is recommended) but added the cold liquid into the dry ingredients gradually as I whisked. It made a rather thin batter. I let it refrigerate for several hours before using.

Assembly: This is where the fun starts. I preheated my ebleskiver maker on "High" setting for several minutes. Using vegetable oil and paper towel, I oiled the wells and the top surface (this has Teflon coating). I poured the batter (after mixing it again) to 90% of the well (se below)


After few minutes the edges started bubbling and I added the octopus leg (below).


I then added the scallion (about 1 tsp) and the tenkatsu (1 tsp) and topped it off with more batter (see below).


Using the bamboo skewer and the special sticks came with the ebleskiver maker,  I tested if the bottom was set and started turning them over (below).


I turned them over few more times to make all the surface equally brown (see below).


The center should be still molten (as I was told) so I declared these  done.


I brushed a small amount of my takoyaki sauce (mine is not as sweet as real Osaka style but I thought it was good. My wife said the sauce made the dish.) I then sprinkled on a pinch of the bonito powder and aonori powder (the first picture).

The center was very hot and molten. My wife thought that, instead of octopus leg, we could use shrimp (which I agree but then it will not be called takoyaki—maybe ebiyaki?). Another natural variation would be the addition of cheeses. Since I made "authentic" takoyaki, I may experiment with more variations (of course, I may consider making ebleskiver as well). We made total of 12 (9 in the first batch and three more). Between two of us, we finished all 12 in no time.

Monday, April 3, 2017

Cod roe and homemade spaghetti pasta 自家製スパゲティでたらこスパゲッティ

This is a variation of cod roe spaghetti. We usually make this dish with thin Udon noodles うどん. After my wife got me a pasta machine, I have been making pasta. Since I made spaghetti and happened to have some tarako たらこcod roe, I tried this dish using the homemade "spaghetti".


Makings of spaghetti (for 2 servings):

Ingredients:
200 gram flour (I used Hodgson mill pasts flour which is a mixture of semolina and durum wheat flours).
80 gram mixture of one egg, olive oil, salt and water, well mixed. (I weighed these ingredients).

Directions:
1. I put the flour into the chamber of the machine (left upper) and turned it on.
2. I then slowly poured in the liquid.
3. It turns several minutes. It never come to one mass of dough but remains rather dry.
4. It automatically stops and reverses the direction which will feed the dough to the extruder and the pasta starts coming out (right upper).
5. The lower two pictures show the final product. It is rather dry and does not stick to each other.


For tarako sauce.

Ingredients:
One small onion, halved and sliced, caramelized in olive oil
Two sacs of "Tarako" cod roe
Sake
Olive oil, 1 tbs
Lemon juice
Perilla leaves, thinly julienned (I did not have perilla so I used baby arugula)  Nori , thinly julienned

Directions:
1. Cut one side of the roe sacs. Using the back of the knife, scrape off the roe leaving the sac.
2. Place the roe in a small bowl and add sake (small amount, probably 1-2 tsp) and mix.
3. Cook the spaghetti (I may have over cooked this).
4. Add the olive oil in a frying pan on medium flame.
5. When heated, add the cooked spaghetti, caramelized onion and mix. When the spaghetti is coated with oil and warm, add the cod mixture and quickly mix for 1-2 minutes until the roe becomes opaque (i.e. cooked).
6. Cut the heat and add the lemon juice (1 tbs).
7. Serve on the plate garnished with think strips of perilla leaves and nori.

This was a bit of disappointment. Since the fettuccini I made was  very good with nice texture but somehow became a bit mushy, I was expecting better. We decided using thin Udon noodle is much better.

Friday, May 7, 2021

Three appetizers with two new ones 新しいお通し2種

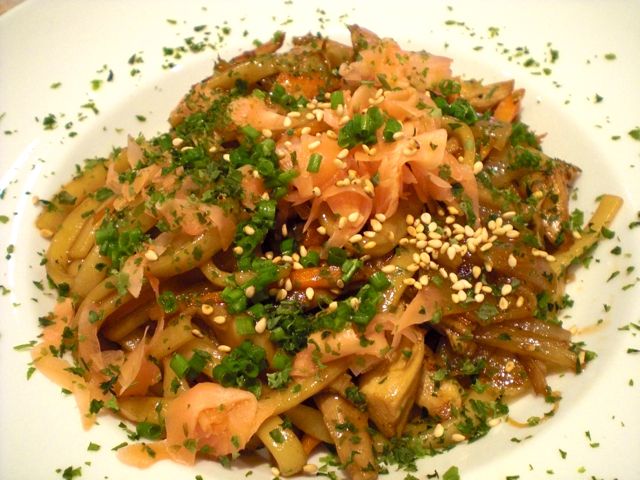
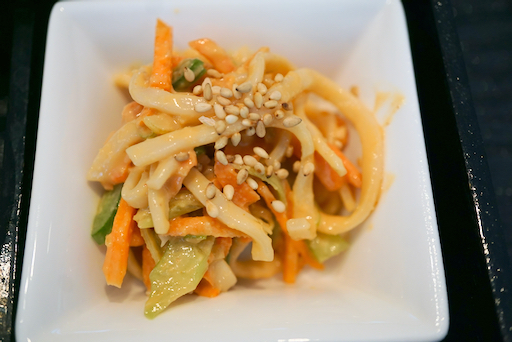
 I served these three appetizers one evening. The dish shown on the left in the first picture is my stand-by fried salmon in sweet vinegar or “salmon nanban” 鮭の南蛮漬け. The new ones are the one in the center “dried persimmon and daikon in sweet vinegar” 干し柿の大根なます and the one on the right, “udon noodle salad with peanut butter dressing” うどんのピーナッツバター和え.


The second picture is a close up of the dried persimmon and daikon in sweet vinegar sauce. This is loosely based on my compiled version of various recipes. I actually used the leftover marinade and vegetables from the previous batch of salmon nanban. (If I made this from scratch, I would make it close to the traditional New Year dish “daikon namasu” 大根なます and just add strips of dried persimmon). For a change, I also added roasted and ground sesame (fine grind but not paste) and a small amount of dark sesame oil. The combined taste of sweet and sour with added sesame flavor and refreshing daikon went well with the soft and sweet dried persimmon. Over time the persimmon got softer in the marinade. This is a good refreshing dish.


These are the ingredients and directions to make this dish from scratch (not reusing the vegetable and marinade of the salmon nanban).


Ingredients
2 dried persimmon, stem end and seeds removed and cut into strips.
1 inch segment of daikon, peeled, and cut into buttons then julienned.
Carrot and/or celery julienned (optional)
1/2 cup sweet vinegar (1/2 rice vinegar, 1/4 cup sugar or 2:1 ratio, pinch of salt, heat until dissolved. Then let it cool)
1 Tbs roasted white sesame seeds, fine ground (I used a Japanese mortar and pestle or suribachi.
1/2 tsp dark sesame oil

Directions:
Salt the daikon pieces and knead, then let it stand for 5-10 minutes.
Add all the ingredients and the sweet vinegar.
Let it marinate for at least 30 minutes in the refrigerator.

The next dish is a variation of sesame noodle salad. Since we had home-made peanut butter, instead of sesame paste or “neri-goma” ねりごま, I used the peanut butter. This was very similar but different because of the rather intense peanut flavor. I have not made the sesame noodle salad for sometime and never made it with peanut butter. This is a good salad as an appetizer, I should make it more often.


Ingredients: (amount is all arbitrary)
Cooked thin udon noodle
Carrot, julienned
Scallion, sliced thinly diagonally
Sesame seeds for garnish (or crushed peanuts)

For Dressing:
Peanut butter, soy sauce, and rice vinegar in 2:1:1 ratio
Dash of dark peanut oil
Sugar and sriracha to taste
Minced ginger and garlic to taste
Add warm water if the consistency is too thick

Directions:
Cut the noodles into 1-2 inch lengths (optional but for ease of eating)
Dress with the peanut dressing.
Garnish with sesame seeds or crush peanuts.

Friday, September 25, 2020

Mackerel ball soup with myoga flowers 鯖のつみれ汁と茗荷の花

We used to get whole Spanish mackerel 鯖 or サワラ at Whole Foods but recently it has not been available.  We discovered we could get mackerel as well as many other asian food items from a local Korean market called “HMart”.  Although their main focus is Korean food, they also carry Japanese food items that are not available elsewhere. In this time of Covid, we are using a delivery service (Instacart) to "shop" HMart and it has opened new horizons for us. 

One weekend, we got 2 lbs. of Spanish mackerel which consisted of one large and one small mackerel. As usual, I prepared the fish "san mai-in-orosu” 三枚におろす meaning into three layers i.e. two filets and the remaining bone. I removed the small pin bones from the filets.  I made most of the larger mackerel filets into miso-simmered mackerel 鯖の味噌煮. With the filets of the smaller mackerel, I made a salted and grilled mackerel dish 鯖の塩焼き(subject of a future post). 

The third and final part of the preparation involved the remaining bone. I removed the meat clinging to the bones by scraping it off using a small spoon. (This is a classic Japanese technique used mostly for tuna to make sure no meat of the fish is left behind). I made the scrapings into fish balls for our usual fish ball soup or 鯖のツミレ汁 which I served as lunch one day. I rounded out the soup by adding Japanese udon noodles (we happened to have noodles already cooked), silken tofu I got from Tako Grill (beside take-out, tako grill now sells some Japanese groceries), shiitake mushrooms and topped it with myoga flowers we just harvested and freeze dried “mitsu-ba” ミツバwhich was also from Tako grill.


Unfortunately, you cannot see the fish balls because they sank to the bottom.


Although the freeze dried mitsuba did not have much flavor, the myoga flowers did. They had the subtle bitter flavor characteristic of myoga. The only way it is possible to eat myoga flowers is getting them from myoga grown in your own backyard. The flowers are extremely perishable so once the myoga blooms, it immediately loses its commercial value. It has been some time since we have been able to experience the luxury and subtle taste of myoga flowers. 

Monday, October 3, 2016

Dashimaki with tarako wrapped in nori 海苔巻きたらこのだし巻き

Although I have posted similar dishes. this one came out rather nicely (visually). This is an example of stuffed Japanese "dashimaki" omelet だし巻き. The most famous/popular is stuffed with eel called "U-maki" 鰻巻き. This time, I stuffed it with tarako cod roe which was wrapped in a nori sheet. I bought this "tarako" たらこ code roe, to make "tarako" spaghetti たらこスパゲッティ (actually using thin udon). I had one sac left over so and few days later, I made tarako dashimaki for the evening.


I removed the tarako roe from its sac (by cutting the sac open and scraping the content using a knife blade leaving the membrane) and wrapped it with a nori sheet (cut to match the width of the rectangular Japanese omelet pan). I just rolled this into the center of the dashimaki omelet.


The tarako was just barely cooked underneath the nori.


Salty cod roe, nori and sweet omelet went so well together. This type of dish really calls for sake.

Thursday, February 8, 2024

Grated Lotus Root and Tofu Ball レンコンと豆腐まんじゅう

This is a variation of “renkon ball” (renkon manju レンコン饅頭) I posted before.  Besides grated renkon lotus root, it also uses tofu. Since I had the last of the lotus root and half of the tofu, this was a perfect dish to make. I got the idea watching one of the YouTube cook shows. This is a basic version but I could add more items to make it more interesting. I could have made some kind of broth or sauce but this was pretty good as is. Picture #1 shows the cut surface with small chunks of tofu. This has nice soft interior and crunchy crust. When I made this dish I also made “nagaimo” fries which turned out really good and will be the subject of separate post (picture #1 right lower).


Ingredients:
200 grams lotus root, peeled and grated, moisture drained out naturally
300 grams tofu, moisture drained
3 tbs Potato starch
1/2 tsp grated ginger
1 tsp miso (original recipe calls for 1/2 tbs soy sauce, I used miso since the dough was bit runny)
Flour for dredging.
Oil for deep frying.

Directions:
Add the grated lotus root, tofu, potato starch, ginger and miso and mix well until smooth. Add more starch if too watery/soft.
Using the ice cream scoop, make equal sized balls, dredge in the flour and deep fry at 160-180F oil for 3-4 minutes turning a few times until the outside is nicely brown (picture #2).


Initially, I served these hot but it can be heated up nicely in the toaster oven. It is seasoned but you could add soy sauce with grated ginger or some type of hot broth. If I make this again I could add chopped scallion, cut up shrimp, ginko nuts, mushrooms etc to make it more interesting.

A few days later, I tried to make a dish (soup) with the leftover renkon balls (picture #3). I made this for lunch. I made it a few hours ahead and re-heated just before serving. The idea was good but the execution was not so great. While the renkon balls were sitting in the broth they absorbed the broth and mostly disintegrated as you can see in the picture #3. It still tasted good.


This is mostly leftover control and there is no recipe but this is how I made it.

Ingredients: (for the soup)
4 Renkon balls, cut in half
Half package of brown shimeji mushroom, root end removed and separated
1 inch daikon, peeled and drained
1 spring onion, finely chopped
Cooked udon noodle, amount arbitrary, this was leftover

For broth:
2 cup Japanese broth (from dashi pack)
1 tbs each of  sake and mirin
1/4 cup of x4 concentrated Japanese noodle sauce (or taste)

Directions:
Add the ingredients for the broth in sauce pan and heat to simmer
Add the grated daikon, renkon balls and mushroom and simmer.
Add the noodles and scallion
Serve while hot*

* as I mentioned, I made this ahead of time and reheated before lunch. That was a mistake, the renkon balls absorbed the broth and mostly disintegrated. Nonetheless it tasted good and the addition of grated daikon added flavor and cut the oily taste from the renkon ball.

Saturday, November 27, 2010

Nabemono 鍋物

Nabe 鍋 means "pot". Nabemono is an all inclusive term of any hot pot dish but often the dish itself is called "nabe". Any dish you cook (usually on the table) in a pot (most often earthenware) with broth is called "nabe" or "nabemono". Sukiyaki  すき焼き, shabu-shabu しゃぶしゃぶ and oden おでん may be considered types of nabe in a broad sense but I do not think it is appropriate to include them in "nabemono". Depending on the ingredients and seasoning of the broth, you have many variations and many names of "nabe". Whatever the name, in cold winter days, nabemono is one of the most comforting  and warming dishes. The types of broth seasonings could be;

1) Dashi without seasoning; When your broth is not seasoned, you use a dipping sauce such as ponzu. Tarachirinabe タラちり鍋. Mizutaki 鶏の水炊き, and Yudoufu 湯豆腐 are three such examples.
2) Dashi and soy sauce based; Yosebabe 寄せ鍋 is the best example.
3) Dashi and miso based; Chankonabe  ちゃんこ鍋, Ishikarinabe 石狩鍋, and Dotenabe 土手鍋 are three such examples.

Since other ingredients will impart lots of flavor to the broth, the starting broth is usually a simple kelp broth. In terms of the ingredients, you could limit them to only a few items (like yudoufu in which only tofu or tofu and nappa cabbage are usually used) or you could add anything including sea food, meat, vegetables, tofu, fish cake and more, as is done in chankonabe and yosenabe. There are no rules (although there are some guide lines). The name of the nabe changes based on the ingredients, locality, and types of broth.
Here is one example I made one evening in a small one person pot. I am not sure what I should call this. A type of yosenabe but I used mostly vegetables and at the very end decided to add shrimp. I first made dashi from kelp and a "dashi pack". This is like a tea bag but instead of tea, combination of pulverized bonito flakes, dried fish and kelp (there are several different kinds) are placed in the bag. It is much better than granulated instant dashi but still very convenient. I seasoned the broth with mirin, sake and soy sauce (to taste, since I did not measure). I started with the ingredients which take the longest time to cook. In my case, I added daikon (halved and thinly sliced) and carrot (sliced a bit thicker than the daikon) first, then after 10 minutes or so, I added the white part of Nappa cabbage or Hakusai 白菜, tofu 豆腐, followed by (after 5 minutes) maitake mushroom 舞茸, green parts of Nappa, scallion, and finally shrimp.

The ingredients I could have added include fish (usually a white meat, hardy fish such as cod), chicken (cut up thigh meat), fish cakes, and shell fish. As a condiment, I used seven flavored Japanese red pepper powder 七味唐辛子. To finish the meal, I could have added cooked rice to make porridge, or noodles such as udon noodles but I was too full just eating the items I cooked. Traditionally, warm sake is the choice of drink but we like cold sake even in winter and with nabe.

Monday, March 28, 2016

Egg and avocado tempura 卵とアボカドの天ぷら (1,000th post!)

In the Kansai 関西 area, udon noodles are often topped with or accompanied by interesting tempura such as soft boiled egg tempura 半熟卵の天ぷら or vinegary red ginger slices tempura 紅生姜の天ぷら or chicken tempura 鳥天. Some years ago, when we visited a Kyoto izakaya "Kurakura" 蔵倉, we also had avocado tempura アボカドの天ぷら.  So, I decided to make it an "unusual tempura" evening. I rounded things out by adding sweet potato tempura which is a very "usual" but never boring tempura item.


I only made half the avocado into tempura for two. I served this with green tea salt.


The soft boiled egg tempura had a very runny yolk as seen below. I served the egg with a small amount of rice to absorb the yolk. We also added a bit of soy sauce. 


Ingredients (for 2 small servings):
Soft cooked eggs, two (see below)*
Avocado, thin wedges from half avocado
Sweet potato, two rounds, 1/3 inch thick.


*Soft boiled eggs:
There are a few things to keep in mind about making soft boiled or "cooked" eggs with runny yolks.
1. Use pasteurized eggs, either home pasteurized or Davidson's commercial ones. Although salmonella contamination of eggs in the U.S. appears to be low, it is still a possibility.
2. The best way to make soft "cooked"  eggs is the method from America's test kitchen in which you use a small amount (1/2 inch deep) of boiling water on medium flame, with the eggs directly from the refrigerator placed in the water using tongs, then covered with a lid. For soft cooked eggs, I cooked them for 6 minutes and 30 seconds. I did not believe this method would work initially but it really does! The small amount of water recovers its temperature quickly and the eggs are cooked evenly by steam not by boiling water. The timing doesn't change even if you cook more eggs.
3. I placed the eggs in ice water immediately to stop the cooking and let them cool completely (about 10 minutes).
4. I peeled the eggs and placed them in a sealed container in the refrigerator until I was ready to make the tempura.

Tempura batter:
There are so many different versions I have tried. This time I went simple and used ice cold water and cake flour (without egg and without Vodka). I made it to the consistency of runny cake batter without over mixing.

Frying Oil: 
I used fresh peanut oil heated to 350F.

For the sweet potato I cooked for 2 minutes total time turning once.  For the avocado, I cooked for 1 minute or less turning once. For the soft boiled eggs, I cooked only 20-30 seconds until a light crust was formed (below).


We really liked the tempura eggs. The yolk was warm but runny and surface had a light and crunchy thin crust. The egg tasted great on the rice with a splash of soy sauce. The avocado tempura was also good but the sweet potato could not go wrong.

P.S. We started our blog in September 2009. This post is the 1,000th post. We are not sure how much longer we can continue but we had fun coming up with the recipes and writing about them. It has also proved to be a useful personal diary of the various meals we made and the many special occasions on which we enjoyed them.