Tuesday, November 15, 2011

Sautéed scallops two ways; with nori and egg yolk 帆立貝の黄金焼き、海苔焼き

Hokkaido is famous for scallops among other sea food and I am partial to it but, come to think of it, I have not cooked scallops that often. So, I decided to make this dish one weekend.

I thought I would make a standard scallop dish called a "Golden grilled" scallop. This dish uses only an egg yolk which leaves the egg white behind. So I also made "nori coated scallop" or "Seashore grill" 磯辺焼き using the egg white.

I got medium sized "dry" sea scallops. In an ideal situation, you would like to get fresh ones with roes (liver) and membrane ("himo" 紐 in Japanese) attached but the ones I got were just the muscle. I removed the hard small bundle of muscle from the main muscle. I washed and patted dry. I salted the scallops but did not use any marinade this time.

I separated a pasteurized egg into the yolk and white. I mixed a small amount of mirin (less than 1 tsp) and salt into the egg yolk.

I tore the nori into small pieces. I dipped half of the scallops into the egg white and then rolled them in the nori to coat. The remaining scallops and the nori coated scallops were then sautéed in melted butter on medium high heat until both side were nicely brown turing once for 1 minutes or so depending on the thickness of the scallops. (Do not over cook). I took out the ones I was using for golden scallops before they were completely cooked. I left the nori coated ones for another 30 seconds to complete cooking.

For the golden scallops, I placed the sautéed scallops on a metal tray in a toaster oven on grill mode. I brushed the egg yolk mixture over the grilling scallops several times until a golden crust formed (2-3 additional minutes).

In the same sauté pan I used to cook the scallops, I added green asparagus (skin peeled and the bottom portion cut into several pieces on a slant) and snow peas. I cooked them for a few minutes in the remaining melted and browned butter seasoned with salt and pepper.

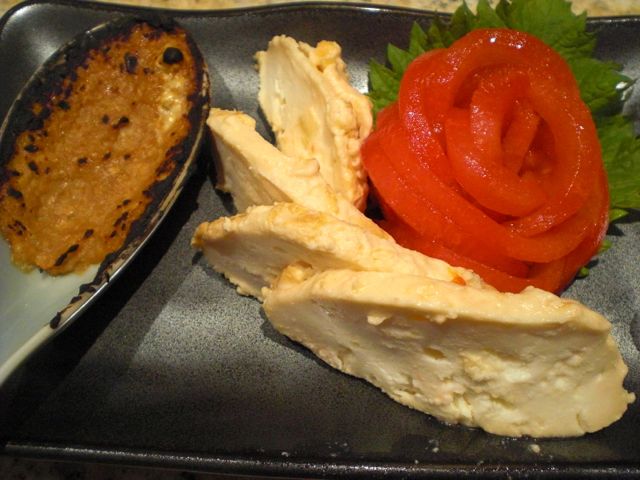
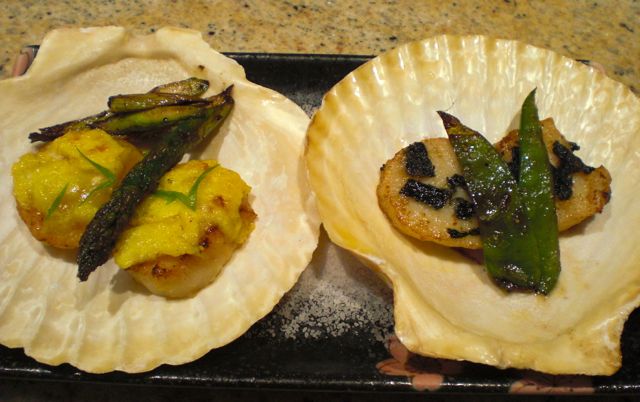
I placed scallop shells on the plate covered with a layer of Kosher salt to make the shells stable. I garnished the golden scallops with the green part of a scallion cut in a decorative shape and served with a side of asparagus. For the nori-coated scallops, I added a garnish of snow peas.

This is a perfect drinking snack. Both recipes have some variations. For golden scallops, you could add miso and sugar to the egg yolk. For Isobe scallops, you could marinade the scallops in a mixture of mirin and soy sauce before grilling or sautéing and instead of small pieces of nori, you could use a larger rectangle of nori to wrap the cooked scallops.

Sunday, November 13, 2011

Sake steamed chicken and avocado 酒蒸し鶏肉とアボカドのピリ辛和え

This is another padding post but is a quick and nice drinking snack in the true spirit of Izakaya food as long as you have a cooked chicken and ripe avocado. As I mentioned in another post, roast pork tenderloin and microwaved sake steamed chicken are regulars in our refrigerator.

The idea for this dish came from tuna and avocado cubes.  I just sliced the cooked chicken breast with skin attached and quartered the avocado slicing it into pieces on the slant. 

For sauce, I mixed grated garlic (1 small clove), garlic chile paste (1/4 tsp), sesame oil (1/2 tsp), ponzu shouyu (1 tsp) and semi congealed liquid from the container where the chicken breast was kept (1 tbs).

I am really fond of microwave sake steamed chicken breast. It is so easy to make and is a nice thing to have in the refrigerator which can be used many different ways. The sauce really makes this dish come alive. The spiciness combined with the tender texture of the chicken juxtaposed to the texture and taste of the avocado makes this dish much more than the sum of its parts.

This dish will go well with any drink but we were having cold sake with this.

Friday, November 11, 2011

Nagaimo pancake トロロ焼き

Since we do not have easy access to an Izakaya, I check Izakaya blogs to get vicarious enjoyment out of their reports. I saw this dish called "tororo-yaki" in one such Izakaya blog that the author found when drinking in an "Okonomiyaki" place. ("Tororo" is the name for grated yamaimo or nagaimo). Japanese pancake or "okonomiyaki" お好み焼き is not one of our favorites. For us, it tends to be too heavy and with so many ingredients all mixed together the taste is muddy--like the color you get when you mix all the colors in the paint box together. But, this one looked very interesting and I decided to try it. While the aforementioned blog, described the dish and included pictures of the final product including each step showing how to cook it, the blog did not include the recipe per se. So if I wanted to taste the dish I just had to come up with the recipe--as I imagined it must have been made.


The first pictures above shows the final product. I topped it with cheese (picture directly above) and added dried bonito shavings or "katsuobushi" 鰹節 (top picture). I served it cut into 4 pieces using a pizza cutter and with a little of soy sauce.

I surmised the original recipe may have used "mountain yam" 山芋 but I only had the domesticated version called "Nagaimo" 長芋. Since nagaimo is not as sticky as yamaimo and a bit more watery, I decided to mix in an egg.

I grated the nagaimo (about 1 cup) and mixed in soy sauce (1 tsp) (#1). I then added one beaten egg and poured it in a non-stick frying pan with a small amount of vegetable oil (1 tbs) on a medium flame (#2). When the bottom was set, I spread finely chopped scallion on top (3 stalks) (#3). Using a spatula, I started folding the edges toward the center all around (#4). After several minutes, I flipped the pancake until both sides were brown (#5). I placed three slices of smoked aged cheddar cheese on top (my wife's choice) and put the lid on for another 1-2 minutes until the cheese melted (#6).

I placed the pancake on the bed of baby arugula and spread shaved bonito flakes with a bit of soy sauce.

This is a very interesting dish--in a good way. The center was still soft and the scallion flavor was well integrated. It had the mouth feel of the most tender-delicate french omelet you've ever tasted and yet it was very clearly not an omelet.  My wife's choice of smoked cheddar added depth of flavor and almost a sense of barbecue that went surprisingly well with the bonito. We really liked this dish and cold sake was the perfect choice.

Wednesday, November 9, 2011

Microwave sake steamed chicken with black vinegar gelée and myouga マイクロウェイブ酒蒸し鶏胸肉とミョウガの黒酢ジェレー

This is another nothing quick dish but a perfect Izakaya food. Recently, I have been making sake steamed chicken breast by microwaving chicken in a silicon steamer for microwave. I usually do not cook anything in the microwave (just re-heat), so this is new development for me. But if precisely timed and allowed to rest for 10 minutes or longer, the chicken comes out perfectly and cleaning up is much simpler.

Here is how I do it. I usually get bone-in and skin-on split chicken breasts. I remove the bones (do not leave the wish bone behind) and tenderloins (use for another dish). I remove any excess skin and fat but I keep the skin. Keeping the skin makes the chicken moist during the microwaving. If you like the skin, you could leave the skin or remove the skin after cooking. After removing excess fat from the cooked skin, I cut it in thin strips and use it in salad etc but this is totally up to you.

In any case, I placed two half breasts in a silicon microwave steamer after somewhat liberally salting both sides.  I then added slices of ginger root, and scallion (two stalks lightly bruised). I poured sake (3-4 tbs) (image below left) and put on the lid (image below right) and microwaved it for 5 minutes and 30 seconds (Mine is 600W, please adjust the time depending on the power of your microwave).

I let it steam in the container with the lid on after I remove it from the microwave. Some times, as it cools, the silicon container may buckle since the lid is rather tight. I place the container on a plate to prevent possible spillage (Spillage has not happened to me so far). When the chicken cools down enough so that you can handle it safely (10-15 minutes), you can use it in whatever dish you like.

This time, I had fresh myouga 茗荷. So I halved and thinly sliced the myouga. I also made jabara cucumber. I sliced the chicken after removing the skin. I scraped off any excess fat from the back of the skin and cut it in thin strips. I put the strips of skin on the top of the chicken slices resting on a base of baby arugula. I sprinkled yuzu-souyu sauce (from the bottle) and garnished with small chuncks of black vinegar/soy sauce gelee (top image).

I think the chicken turned out better than the conventional way of sake steaming. Few important tips include finding out the exact timing, getting equal sized half breasts which will snuggly fit in the silicon steamer, and letting it steep in the container with the lid on until cool. Before I got the timing right, I undercooked and overcooked it few times. Now this is so easy and quick to make. Once I made the chicken this way, I keep it in a sealed container in the refrigerator and make small Izakaya dishes and sandwiches. The liquid left in the container is also very flavorful and lightly congeals in the fridge. You coudl just coat the slices of chicken with it or add it to you sauce, which adds wonderful mouth feel and flavor.

Monday, November 7, 2011

Soba Salad そばサラダ

This is not really a "dish" but nice small drinking snack or even a small "shime" 締め ending dish. This also was leftover control. There is no recipe but this is how I put it together,


The amount is for two small servings. I had leftover flat iron steak which I used for several other dishes. I thinly sliced across that grain (4-5 slices per serving). I then marinated it with a small amount of concentrated (x2) bottled Japanese noodle sauce called "mentsuyu" 麺つゆ from the bottle without diluting. Of course, you could make your own.


I cooked half a serving of dried soba noodles. The one I had was called "yamaimo-iri" meaning containing mountain yam as a binder. This soba was nicely firm after cooking as per package instruction. I threw in sugar snaps (hand full, may be 10) toward the end of cooking the soba. I had to fish them out and put them in cold water before the soba finished cooking. If you time it correctly, you could drain the sugar snaps together with the soba. I washed the soba in cold running water.

I placed the soba noodle in the bottom of a small bowl, placed the steak slices, sprinkled Japanese 7 flavored red pepper flakes 七味唐辛子 on the top, and garnished with sugar snaps, chiffonade of perilla, and nori. Other garnish choices may include scallion and dried bonito flakes.

For sauce, I simply diluted "mentsuyu" and poured it over from around the sides (not too much).

This is a very decent dish. We really liked this type of soba noodle. It has nice firm texture but not too brittle. For my usual instant preparation, this is indeed in keeping with the spirit of Izakaya food.

Saturday, November 5, 2011

Baked marinated tofu redux ピリ辛豆腐のオーブン焼き 第2弾

When I posted baked marinated tofu, I promised I would try it with frozen and thawed tofu. Here is the dish.

Tofu: I used firm tofu and froze it 24 hours in a freezer without taking it out of the package. The next day, I moved the frozen tofu to the refrigerator. It took two days to completely thaw. After that, I drained any excess moisture as I did with a regular tofu.


The result? I do not like the very dry and spongy texture that results from this method. The texture is different from more authentic freeze dried tofu called "shimidoufu" 凍み豆腐 or "kouyadoufu" 高野豆腐. My wife liked this version more than I did. Certainly I do not think this is worth the effort.

Thursday, November 3, 2011

Japanese Insalata Caprese 日本風カプレーゼサラダ

The title is a bit of stretch. This is a combination of miso marinated fresh mozzarella cheese, thin slices of tomato, perilla leaves and grilled miso.

The mozzarella cheese was marinated for a week (we just forgot we had this) in the mixture of miso and mirin as described before. I scraped off the miso marinade and sliced it.

I used a sharp knife to remove the tomato skin (but I could have blanched it first). To make it more attractive, I made it to a "rose". If you are interested in making a tomato rose or flower, here is the instruction with pictures (in Japanese).

Grilled miso: I simply smeared the miso marinade in a thin layer in a porcelain spoon and held it over the gas fire for few minutes until the surface became brown and the miso was fragrant.

We smeared a bit of the grilled miso on the slice of cheese and layered it with a small piece of perilla and a slice of tomato like insalat caprese. We really liked this combination of flavors. My wife really liked the miso and even ate a portion of miso I did not eat. That night, however, she was very very thirsty.