Saturday, February 12, 2022

Smothered chicken with miso and bourbon

We saw an interesting recipe for chicken that used a sauce made of miso and bourbon.  With such an eclectic combination of ingredients particularly the use of miso, we had to try it. We first saw the recipe in Milk Street which led us to the cookbook by Edward Lee called "Smoke and Pickles". The sauce is made of miso, soy sauce and orange juice and also included bourbon during the cooking. I used the Instant pot for the pressure cooking but not the sauté function. Instead I used a regular frying pan for that function. The smell of bourbon comes through very clearly but unless you were told you would not even know there was miso and soy sauce involved. This is a good dish.

We made this with chicken thighs. Since we did not have any orange juice, we used mandarine orange sections cut up into small pieces. Since we believe in adding potatoes in this kind of dish, we added potatoes and omitted thickening the sauce with corn starch.

Ingredients:
2 medium onion, thinly sliced
3 garlic cloves, peeled and finely chopped
2-3 shiitake mushrooms, caps thinly sliced
3 mandarine oranges, peeled, separated and cut into small chunks (original recipe calls for 1/2 cup orange juice).
2 tbs miso and 3 tbs soy sauce
2 tsp olive oil for sautéing the vegetables.
2/3 cup bourbon (we used Early times).
1 cup water (we used chicken broth)
4 chicken thighs, skin on and bone in, excess skin and fat trimmed.
4 small red potatoes, peeled and cut into bite sized pieces (see the second picture below).

Directions:
Mix the miso, soy sauce (and orange juice if using) in a small bowl and set aside.
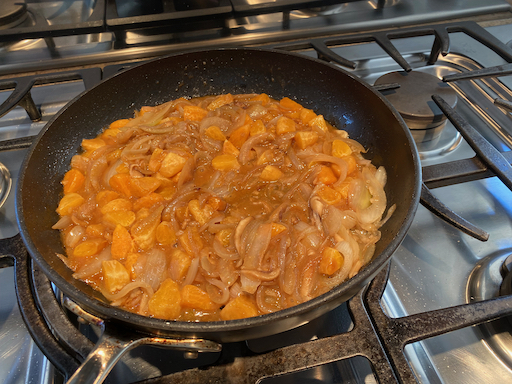
Sauté onion in the olive oil for 5-7 minutes until soft and edges slightly browned add the garlic, mushroom, and mandarin oranges and sauté for 4-5 more minutes.
Add the bourbon (turn down the flame and be careful since the alcohol in the bourbon may cause a flare up), cook for several minutes or until the bourbon almost entirely reduces.
Add the soy sauce and miso mixture and cook for a few more minutes (see pictures below).

Add this mixture to the Instant pot, arrange the chicken thighs, skin side down, add the chicken stock.
Put on the lid, make sure venting is sealed, set to manual, high pressure and 15 minutes. I let it de-pressurize naturally (15-20 minutes).

The original recipe calls for thickening the sauce with corn starch and garnishing it with chopped scallion which we skipped.


The potatoes are our addition.

We served this with rice, blanched broccoli and skinned Campari tomato. Before eating, we mashed the potatoes to make the sauce thicker. This was a quite good dish. The chicken was tender and had a distinctive aroma of bourbon. The miso and soy sauce flavors did not come through strongly. We both felt that compared to the different versions of curries my wife makes this was a bit bland.

Monday, February 7, 2022

Mayonnaise muffins マヨマフィン

 I am wondering if I should change the name of the blog since my wife’s baking is more frequent than my Izakaya dishes these days. In any case, here is another of my wife’s baking projects. This is an installment of what she is now calling her new series “cooking with mayonnaise” which evolved after she made the mayo/miso peanut butter cookies logged onto the Hellmans mayonnaise web site and found more baking recipes.** This is a mini muffin. It has a relatively dense texture and sweet taste including the topping. We think it makes a nice sweet mouthful as a desert rather than as a breakfast As usual I ask my wife to provide us with "how-to"s.

**Note: we just found out this mayo is called Hellman’s in the eastern U.S. and Best Foods in the western U.S. 


Ingredients: Makes 24 mini muffins
For the muffin
1 cup AP flour
1 cup sugar
1/2 cup mayonnaise
2 eggs
1/2 tsp. Vanilla

For the topping
(Original recipe) (I recommend reducing the amount of topping. See below)
1/2 cup AP flour
1/3 cup sugar
1/4 cup mayonnaise
1/2 cup toasted walnuts finely chopped
1/4 tsp. Cinnamon

Half quantity of topping
1/4 cup AP flour
1/6 cup sugar
1/8 cup mayonnaise
1/4 cup toasted walnuts
1/8 tsp. Cinnamon

Directions:
To make the topping, combine all the topping ingredients in a bowl. Using your fingers mix into crumbs and then set aside. For the muffin, beat together the sugar through vanilla until completely combined. Whisk in the flour until combined. Pour into greased muffin tins (I recommend using mini muffin papers. It will make it much easier to get the muffins out of the pan.) Top with the prepared crumbs. Cook in a 350 degree oven for 20 minutes or until a toothpick inserted in the centers comes out clean. Cool 5 minutes in the pan. Remove from the pan an cool further on a wire rack.


The next picture shows the muffins right out of the pan. 


I recommend reducing the amount of crumb topping because the next picture shows what happened to the topping when I tried to take the muffins out of the tin. It mostly all came off and went all over everything. But not to despair. I did not throw it away. I gathered it up and I am using it as a topping for yogurt in the morning which is working out well. Maybe because of the flour/mayo combo the crumbs don’t dissolve in the yogurt and they add a nice sweet crunch. 


I see why the recipe calls for making these as mini rather than full sized muffins. They are very rich and sweet.  A full muffin could easily be “too much of a good thing”. The muffin has a moist dense texture and pleasant vanilla flavor. The topping adds a nice crunch element and the nutty flavor of the toasted walnuts. The combination makes the perfect desert bite. 

Friday, February 4, 2022

Uni appetizers two kinds 雲丹の前菜2種

As I mentioned previously, Maruhide 丸秀 is the best place to get consistently high-quality uni and uni products. I wanted to get some fresh uni for the New Year. Although I checked the web site regularly fresh uni was not available for some time. So when I saw it became available recently, I could not resist and ordered fresh uni (both regular and in salt water or "Kaisui-uni" 海水うに). I also ordered some "uni shuto " ウニ酒盗 which is preserved and frozen and lasts longer than fresh uni. This is second best (compared to fresh uni) but among the class of "preserved" uni, this is the best by far. We had an uni tasting the evening the uni arrived. It consisted of regular uni and uni in salt water. We also included some ikura like we did before. We finished the evening with a small uni and ikura "donburi" rice bowl 雲丹いくら丼. 

The next evening, I made a small uni appetizer dish. Although it is hard to see in the picture, I put cubes of avocado dressed in lemon juice in the bottom of the bowl then topped them with uni, "kinshi-ran" 金糸卵 golden thread egg and nori strips or "kizami-nori" 刻み海苔. I added wasabi-jouyu わさび醤油 (mixture of wasabi and soy sauce just before serving). Since the texure of avocado resembles fatty tuna sashimi, this combination went very well together. The avocado really complemented the uni.


The next evening I served the last of the salt water uni “as is” garnished with a small dab of wasabi and the finely chopped green part of scallion.  I included a small "cucumber and wakame seaweed salad" dressed with "sumiso" 酢味噌 dressing. Again, I added wasabi-jouyu just before serving.


As before both the regular and salt water uni were excellent. Just a bit of uni and cold sake, the flavor lingers in the mouth. This is such a luxury.

Sunday, January 30, 2022

Octopus rice 瀬戸内海蛸めし

 We have been getting Japanese rice from the New York Rice factory. It may be hard to believe (we our selves are somewhat incredulous) that there could be such a difference in something as subtly flavored as rice but the rice from the rice factory is really good. It is hard to identify what sets it apart from the rice we used to get but in general we really like the texture, the taste and especially how well it can be reheated and still tastes like it just came out of the rice cooker.

 Whenever I order rice from the rice factory I usually supplement the order with other items. In the past, we got a kit to make “red snapper rice” or “taimeshi” 鯛めし, a type of seasoned rice famous in the Japanese inland sea area or "seto-naikai" 瀬戸内海.  Another time I ordered a similar seasoned rice kit made with octopus called “seto-naikai tako-meshi” 瀬戸内海蛸めし. After I bought it, however, the kit sat in our pantry for some time. When I checked the expiration date, it had expired the previous month, so I decide it was time to make it as a shime 〆 or ending dish one weekend. The kit came in several pouches; one with seasoning sauce, one with small bits of octopus, one with freeze dried items. It also included a rectangle of kelp. I made the octopus rice according to the instructions. I served it with a side of simmered Japanese root vegetables I had made and salted cucumber, daikon and nappa cabbage or "oshinko" お新香.


The octopus was in really small pieces as you can see on the top of the rice in the next picture. I used a one to one mixture of glutinous “mochi” rice 餅米 (called "Hakucho" はくちょう or swan from Hokkaido and regular "uruchi" rice うるち米 called "Yumepirika" ゆめピリカ also from Hokkaido. (These two rice varieties came from the Rice Factory.) 


The simmered vegetables included shiitake 椎茸 (from dried and hydrated), "renkon" レンコン lotus root, "gobou" ごぼう burdock root, carrot, small bamboo shoot "or sasatakenoko" 笹筍 and konnyaku or konjack 蒟蒻.


The next picture shows the modified "oshiko" salted cucumbers and other vegetables I made. I modified the original recipe by increasing the salt from 2% to 3% weight of the ingredients and adding a small amount of Vodka. As a result this dish lasts much longer than when I made the 2% salt version.


This octopus rice was ok but we thought the tai rice 鯛めし was better (the octopus pieces were really  very minuscule). My wife said that the seasoned rice I make including chestnut rice 栗ご飯 and matsutake rice 松茸ご飯 are better and there is no reason to buy seasoned rice kits. In any case, this was a nice "shime" dish.

Thursday, January 27, 2022

Breakfast croissant casserole クロワッサンキャセロール

 One day my wife decided to make this croissant casserole dish she saw at an on-line recipe site. It is a cross between quiche and French toast but closer to a crustless quiche. It is the usual milk, egg, and cheese mixture but instead of a pie crust or regular bread this dish uses croissants. Although this was entitled "breakfast croissant casserole", we had this as a lunch with cucumber tomato salad.


She cut the recipe in half and used small store bought croissants. This is a good quiche-like breakfast dish but I was not too crazy about it especially knowing how much bacon, egg and cheese went in. I will let my wife to provide the ingredients and directions.


Ingredients: This is a reduced recipe amount because we weren't feeding a crowd)
4 strips of bacon (crisped and then crumbled)
2 onions chopped
3 eggs
1 cup whole milk
1 tsp. Dijon mustard
1/2 tsp salt
1 cup grated cheese (I used smoked gouda and cheddar)
3 croissants

Directions:
Crisp the bacon. Set aside. Using the bacon drippings saute the onions until slightly brown. Cool slightly. Mix the eggs, milk, Dijon, salt, crumbled bacon and cheese together. Arrange the croissants in the baking dish. Pour the liquid egg mixture over the croissants making sure they are submerged. Cover and put in the refrigerator overnight. The next morning cook in a 375 degree oven for 30 minutes until golden brown. (I used the small blue pyrex baking dish and cooked it in the toaster oven).

This turned out to be an entirely ho-hum form of savory bread pudding. The croissants seemed to dissolve into the pudding like egg mixture which contributed to the quiche like consistency. Don't get me wrong it was quite good and makes an interesting egg alternative to an omelet.

Monday, January 24, 2022

Mayonaisse biscuit マヨネーズビスケット

This is another one of my wife's baking projects. When she made the mayonaisse/miso/peanut butter cookies, using the recipe in the freebee cookie cookbook we got from the grocery store, she saw an advertisement for Hellmann’s mayo beside the recipe. It stated “great cakes take Hellman’s”. She knew this to be true because many years ago a friend gave her a recipe for chocolate mayonnaise cake and it was a great hit. Further down the page she saw the following: “for this recipe and many more, visit Hellman’s.com. Intrigued she logged on and found a goldmine of recipes. This one for mayonnaise biscuits caught her eye particularly after making two versions of butter milk biscuits. So this was a “must bake”.


As usual she took the original recipe as advisory and made her own alterations


Ingredients:
2 cups all-purpose flour
1 Tbs. baking powder
1 Tbs. Sugar
1/2 tsp. salt
1/2 cup mayonnaise
3/4 cup milk (I used butter milk)
1 cup cheddar cheese grated

Other optional additions:
1/2 tsp. Dried basil
1/2 tsp. Dried dill weed
2 Tbs. Finely chopped onion
1/3 cup pepper jack cheese

Directions:
Preheat oven to 450°.
Combine flour, baking powder and salt in medium bowl. In another bowl combine the mayonnaise and buttermilk (#1). Shred the cheese (#2). Stir the mayo/buttermilk mixture and shredded cheese into the dry ingredients. On a baking sheet, lined with parchment paper, drop the batter by 1/4 cupfuls (#3). (I used a medium size ice cream scoop) .
Bake 10 minutes or until slightly golden (#4).


These are amazing biscuits. They have an outside “crust” that almost has the consistency of a very well made very thin pie crust. It gives the biscuit a very pleasing crunch. The inside is very soft and moist. It took a little while for the cheddar cheese flavor to come through but when it did it added another pleasing dimension of flavor. These are so easy to make they could be done at the drop-of-a hat or at the drop-of-an-ice-cream-scoop full. 

Friday, January 21, 2022

Tasting of plum wine made in 1997 and 1998 梅酒飲み比べ.

In the past we used to regularly make plum wine 梅酒 with the plums we harvested from the Japanese plum tree we planted in our back yard. It has been some time however, since we made any plum wine There are several reasons for this: 1: Initially the plum tree was very productive and over the years we accumulated quite a stash of plum wine, 2: Then, about 10 years ago our plum tree, as well as most of the ornamental plum trees in the neighborhood got some kind of fungal disease. Many of the trees died of the disease, but we transplanted ours to a different location in the yard and severely trimmed back the diseased portion. We were not sure if it would survive and certainly during this period it did not produce any fruit. So we did not make any plum wine. Miraculously it not only survived but in the past few years, it started producing fruit again. It is a much smaller tree than it was at its peak and the plum yield is much less. We have been judiciously harvesting the plums to make a type umeboshi or slated plum. 

In any case, I recently stumbled across two bottles of plum wine labeled as started in 1998 (bottled in 1999) and 1997 (bottled in 1998). Both bottles had some cloudiness or precipitate, probably something to do with plum pulp. Both are made of 40% proof Vodka so I was not worried that the “plum wine” may have gone bad. In any case, using a filter paper for filtering cooking oil, I filtered out the sediment and re-bottled the wine in smaller bottles (picture below). The 1997 vintage (one on the right) is much darker probably indicating more oxidation.


So, it was very natural to do vertical tasting.


Both are quite mellowed out and quite good. They almost tasted like aged port. Interestingly, both had their own distinctive flavor and character. The 1997 vintage had a slightly more complex taste. Besides tasting the plum wine straight, we also diluted it with carbonated water which served us as a substitute for Champagne to celebrate New Year’s eve. It did not taste like Champagne but looked exactly like it and provided a refreshing alternative libation.