Showing posts with label Egg. Show all posts

Saturday, January 1, 2022

Happy New Year 2022 明けましておめでとう 2022.

Happy New Year 2022! The pandemic still persists with the Omicron variant making it debut and spreading so quickly just when we thought things were starting to come under control and using a quote from the movie Jaws "it was safe to go back in the water again".  In any case, both my wife and I took all the precautions; being vaccinated and boosted. We sincerely hope we can get past this soon.

This is the year of tiger according to Chinese/Japanese zodiac signs. We thought we had a larger tiger figurine but these are what we had. The two shown below look somewhat like cats rather than tigers.


The one shown here really looks like a tabby cat. It is made of carved wood and is one of a full set of the 12 zodiac figures we got in Kyoto on one of our trips to Japan. This year, I decided not to get "Kagami-mochi" 鏡餅 new years decoration since we generally do not finish the round mochi inside. 


When it comes to traditional Japanese New Year food, we look forward to and revel in the routine (or some may call it a rut) that we've developed over the years. First off is the expectation of the wonderful goodies contained in the Sushi Taro Osechi 寿司太郎お節 on 12/31/21 or "oomisoka" 大晦日 in Japanese.  Picking it up on New Year eve is an excursion we generally look forward to, although it is a bit of an arduous drive going into town and back. It was especially so this year when we discovered various parts of the route were closed to cars that day and only open to bike traffic. But it was worth it. We will be hitting the Osechi box this evening. We established the tradition of having our usual breakfast with cappuccino and the choice of various holiday breads such as stollen or panettone for the first day of the new year or "Gantan" 元旦. Then, for lunch, we have the more traditional Japanese New Year soup or "Ozouni" お雑煮 as well as some of the auspicious foods served for the New Year as shown in the next picture.


The next picture is a close-up assortment of "good luck" foods I served.


Some came from the Osechi box such as the fish cake 紅白蒲鉾 (#3) (since I did not get any red and white fish cakes this year), small fish じゃこの有馬煮 (#1), shrimp 小海老甘露煮 (#2) and black beans 黒豆 (#5). This year I was lucky to be able to get salted herring roe or Kazuniko 数の子 from the grocery section at Tako Grill. The amount was not too much and just right. I prepared kazunoko marinated in sake lee and miso かずのこの粕味噌漬け(#4). I also served salmon kelp rolls 鮭の昆布巻き and the datemaki 伊達巻 New Year's omelet roll (#7) I like to make based on my Mother's recipe. I also served salmon "Russian" marinade 鮭のロシア漬け which again was something special my mother used to make. I made it some days ago, so it had cured enough to eat. I also served simmered root vegetables including the symbolic "renkon" lotus root, "kobo" burdock root, bamboo shoot and carrot (#9).


Now the "ozouni" New Year soup. New Year is the rare occasion when I use this genuine Japanese lacquerware bowl that my mother gave us many many years ago.


Although you can not see it, the "mochi" 餅 rice cake is placed in a deep fried tofu or "abura-age" 油揚げpouch. I usually seal the pouch with a kanpyo 干瓢 (or gourd peel) tie. But in recent years I have not been able to find kanpyo and I used up what I had for the salmon kelp rolls. So this year, I had to improvise by blanching a whole scallion and using that to tie the tofu pouch. Other items in the soup included shrimp (from Great Alaska seafood), chicken tenderloin from some sous vide chicken breast I made, and vegetables including shiitake mushroom, daikon, gobo, and carrot. For the green, I used rapini flower buds. The shrimp was particularly good. I poached them gently in the broth with the shells on for a few minutes, took them out and shelled them before placing them on the top of the soup.


As usual, I served "daikon namasu" 大根なます with "ikra"  salmon roe いくら and a slice of boiled octopus leg 茹蛸.


Another salmon dish is sautéed salmon in sweet vinegar or 鮭の南蛮漬け.


Although this was lunch, no New Year feast is complete without the symbolic libation of sake (Koshi-no-homare hiyaoroshi 越の誉 冷やおろし). We toasted 2022 with one glass each to commemorate the New Year. This was a good New Year lunch covering many good luck foods. Let's hope it portends similar fortune for the rest of the year.

Saturday, October 16, 2021

Tofu and egg stir fry 炒り豆腐もどき

 I have been making small Izakaya dishes recently but nothing new to post for a while. One evening, we wanted one more small dish. When I surveyed the fridge, I found somewhat fragmented silken tofu which was leftover from  making “Age-dashi tofu” 揚げ出し豆腐 the other day. Also I found the remainder of “name-ko” ナメコ mushroom after I made “nameko and tofu miso soup”なめこの味噌汁. So, I came up with this dish.  I got the idea from a standard Japanese tofu dish called “Irido-fu” 炒り豆腐 but added an egg and the seasoning is more for drinking snack than a side dish you have with rice.


It came out better than I expected. I topped this dish with chopped chive since I had some. 


Ingredients:
1/2 silken tofu, water partially pressed (fragmented tofu works)
1 egg, beaten
Mushroom, arbitrary amount, sliced large ones such as shiitake (any mushrooms will work such as shimeji, shiitake but I happened to have name-ko mushroom from a can. I rinsed them in a colander to remove viscous liquid).
1 tsp neutral oil such as Canola.
1/4 tsp salt
1 tsp concentrated noodle sauce (or soy sauce)
1/4 tsp grated ginger root
1 tbs chopped chive

Directions:
In a frying pan, add the oil and tofu. Stir. The tofu will further fragment and get somewhat dry (at least no exuding moisture), add the salt and the egg and the mushroom, stir until egg is cooked. Add the ginger and noodle sauce and stir until no liquid remains. Serve with the chopped chive immediately. If not adequately seasoned add soysauce or more noddle sauce,

The consistency of the tofu and scrambled egg is similar and the tofu assumes the taste of the egg. This is  a good way of enjoying egg taste without much egg. This went rather well with cold sake we were enjoying.

Saturday, July 31, 2021

Nagaimo dressed in cod roe 長芋の鱈子和え

I started going back to our Japanese grocery store again. The last time, I got a fairly good hamachi sashimi. This time, I hit the jack pot! I knew that the Japanese grocery store gets sashimi bluefin tuna or “hon-maguro” or “kuro-maguro” once a month but I did not try to find out when and never went specifically to get sashimi maguro. Just by happenstance I went just a day after they got the maguro. So I had a choice of chu-toro or akami maguro sashimi. I chose a package of “akami” with two good sized portions and also, as an added benefit, some hamachi. That evening, we had a combination sashimi feast of tuna 鮪, hamachi はまち, vinegar cured mackerel しめ鯖 (frozen). I also made imitation “negitoro” 擬制ねぎとろ from this tuna sashimi because the tuna portions were not regular “saku” 柵 blocks for sashimi and I ended up with some odd pieces after slicing the sashimi pieces.  Compared to our usual imitation negitoro which I make from a frozen block of yellofin tuna, this was much much better.  I did not take any pictures, however. Next evening, I served the remaining sashimi, deep fried fish cake or “satsuma-age” さつま揚げ which I also got at the Japanese grocery store (heated in the toaster oven served with soy sauce and grated ginger). I also made a sort of new dish from cod-roe and nagaimo.


Here is the close up of the sashimi dish which I served with dashimaki だし巻き Japanese omelet and sugar snap in salt broth スナップ豌豆の塩びたし.


The next picture shows the “new” nagaimo dish I made. I did this because I had thawed “tarako” たらこ cod roe and found out the membrane in the back was already broken. So, I removed the roe from the remaining sac, mixed it with a small amount of sake, although I did not have a firm idea at the time of what I would make from it. I then remembered that we had a small segment of  nagaimo 長芋 in the refrigerator which had to be used soon. So I just combined the two.  I garnished it with a chiffonade  of perilla and nori. This was a good dish. This tarako was a bit on the salty side but the addition of sake in combination of the crunchy refreshing nagaimo, really worked.


Ingredients:
1 inch segment of nagaimo, skinned, sliced and cut into fat match sticks.
1 tsp sake
One sac of salted tarako, cod roe
Perilla leaves and nori chiffonade for garnish

Direction:
Soak the nagaimo sticks in water with a splash of rice vinegar and gently wash to remove surface sliminess. Blot dry using a sheet of paper towel.
Remove the roe from the sac using the back of the knife and mix it with 1 tsp of sake. Taste and if not salty enough, add soy sauce (mine was salty enough).
Dress the nagaimo and garnish it with the perilla.

So every time I go to our Japanese grocery store, we have a number of  “goodies” for dinner that evening.

Tuesday, July 27, 2021

Chashu egg v2 チャーシューエッグ

 Chashu pork or “yaki-buta” 焼き豚 can be made from different cuts of pork. I used to make it from pork loin but it tends to be too dry since it does not contain enough fat. I also made it from pork belly which is good but it is a bit excessively fatty for this type of preparation. Because of the COVID, we started having groceries delivered. They come directly from the warehouse (I suppose) rather than the retail store so some items are different from what is available in the store. One of them is pork shoulder/butt. This is a cut we have never seen at the store. It is a large portion; either shoulder or butt but it is always called “shoulder”.  The butt is composed of a  portion of butt (naturally) including thigh down to the knee joint. Sometimes the skin is intact. The shoulder cut contains a good portion of scapula and surrounding meat. It is quite a large amount of meat. The only way to cook this cut as a whole piece is probably “true” Southern style barbecue, cooked for long time at low temperature. Since we are not equipped/skilled to do such a preparation, I reduce the piece into more manageable portions by removing the skin (if present), and bone, then dividing the meat into three potions;  the largest roast for cooking in our Weber grill, the smaller roast for Chashu and the rest cut in to small chunks for stew or curry. This time we got  butt and the portion I made into Chashu was a perfect mixture of fat and meat. So I made Chashu egg  which is the combination of sunny-side-up egg (I used home pasteurized egg) with a thick slice of Chashu.


I think this is the perfect combination. The chashu is not too fatty or dry. You could eat or not eat the outside rather thick fat rind. Although it is a bit of work to prepare this big bone-in cut of pork, it is very reasonably priced and the meat we get out of it is quite good.

Saturday, July 24, 2021

Buttermilk ice cream バターミルクアイスクリーム

Since my wife started making heirloom buttermilk, she has been exploring recipes to use the buttermilk she makes. One of the reasons is that since this is "heirloom", the prior batch is used to inoculate and make the next batch. She was worried if she does not make the next batch in a reasonable amount of time (few weeks??), the inoculant may get too weak to make the next batch. So she is trying to use the buttermilk at a regular rate. She made several varieties of buttermilk panna cotta. This time, she made buttermilk ice cream.


She topped the ice cream with peach puree. The ice cream was very good with a nice mild buttermilk flavor and the peach puree went well with it. (the original peach was too hard and the puree was much better).


We mentioned our old (then) ice cream maker with a compressor (self-freezing) in a blog in 2017. After that post, we again completely forgot about the ice cream maker until now. We got it out of the basement. I first tested it with just water to see if the compressor still worked. Amazingly, it did! The bottom of the chamber got cold and formed ice in a few minutes. Then, I tested the churner. It worked as well. This machine must be close to 30 years old and we are amazed that it still works. In any case, my wife was “good to go” for making buttermilk ice cream.


Ingredients:
1 cup (200 g) sugar
3 Tbs. (20 g) cornstarch
1/8 tsp. (0.5) Kosher salt
2 large eggs (100 g). I used pasteurized eggs.
1 cup (225 g) heavy cream
1 1/4 cups (285 g) buttermilk

Directions:
In a sauce pan mix together everything except the buttermilk. (I used a double boiler to reduce the risk of having the mixture curdle.) Keep stirring on medium heat until the mixture starts to thicken. According to the instructions, when the mixture starts to bubble keep stirring for at least a minute to neutralize the starch-dissolving enzyme found in egg yolks. Remove from the heat and strain the mixture to remove any lumps that may have formed. When the mixture has cooled to room temperature stir in the buttermilk. Refrigerate the the mixture until it is about 40 degrees. (I used an ice bath to reduce the temperature of the mixture.) Churn the mixture according to the instructions for the ice cream maker. The final product is shown in the following picture.


This was a wonderful ice cream. It was smooth and creamy. It had a nice bright flavor with an interesting tanginess (from the buttermilk ?) that kept it from being cloying or boring. It also had a somewhat vanilla flavor (even though no vanilla was added). Unlike most recipes for buttermilk ice cream, some of which call for as many as 6 egg yolks, this one contained only two whole eggs. The recipe said that the addition of the cornstarch replaced the need for so many egg yolks to achieve its smooth creamy texture. Having replaced the egg yolks with cornstarch we would like to think that this ice cream was better for us than the other egg yolk based recipes. (Although, in all honesty we would have to admit that the amount of heavy cream used may negate whatever “brownie points” we may have gotten in the health department for the reduction in egg yolks.) Even though, as I have mentioned before, in general, I do not like buttermilk, I had absolutely no trouble eating more than my share of this ice cream. And again, I am astounded that the ice cream maker still works. 

Sunday, June 6, 2021

Raised Buckwheat Blini cooked in a “platar”

After making the blueberry buttermilk pancakes, my wife was leafing through the pancake section of the newer (1997 version) “Joy of Cooking” (JOC) cookbook when she found a reference to something called a “platar”. It was accompanied by a drawing of the device and the description; “a platar is a cast iron flat pan with seven round indentations each about 3 inches wide and 1/2 inch deep especially for making blini or other small pancakes”. A bell went off in her head. She immediately recognized the platar as the cast iron pan that has been floating around with our other cast iron griddles and frying pans for years. (Shown in the picture below.) 


We have had it for so long we are not sure how we acquired it and had no idea how it should be used. We vaguely thought it could be used to make biscuits but after some experimentation years ago we discovered that didn’t work. So it resided, taking up room, at the bottom of the stack of various sized cast iron frying pans in a drawer under the stove. She was absolutely delighted to finally find the purpose of the pan as well as the blini recipe on the next page of the cookbook. So this was our project one weekend.


Digression alert: At one time, we were into caviar and we made blini many times. We already had our platar at that time but obviously we did not know its purpose so we made the blini in a frying pan. By-the-way, we looked up (=Googled) the word “platar” and the only reference we could find was a listing in a forum where somebody who, like us, had read the section about platar in JOC asked what it was. The answers appear to suggest nobody knew. Although we could not find anything with the word “platar”, we did find a cast iron skillet that lookedexactly like our platar at Amazon.It was called “SIMLAY CO. Cast Iron Baking Pan”. The advertisement said it could be used to make many things; muffins, biscuits, eggs. Spoiler alert: We tried that years ago...somewhat less than successful. 

We did not have caviar the weekend we used the platar, but we did have "Ikura" salmon roe so we used that to top the blini. (We do not stock caviar but we do try to keep a supply of "Ikura' in the freezer).  The second picture shows the final (blini, sourcream, egg, ikura) dish with a garnish of chopped chives and marinated strawberries that we served that day for lunch. 


We had this with our usual second cup of coffee for the day; "macchiato". (The first cup was cappcino or more like cafe latte). 


I am sure there must be many interpretations of macchiato but our interpretaion is a single shot of espresso topped with 1 tsp. of frothed cream.


As usual my wife made the batter for the pancake and I cooked it. Since I have never used a platar, it was a learning experience. The blini came out better in the later batches. I ask my wife to provide the recipe.


Ingredients:
For Blini (makes about 21 blini)
1 1/2 cup milk
4 Tbs. (1/2 stick) butter
2 tsp. yeast
2/3 cup AP flour
2/3 cup buckwheat flour
2 Tbs. sugar
1 tsp. salt
3 large eggs, lightly beaten

For Blini (recipe X2) (mix in the 6 cup pyrex mixing cup so the batter can be poured rather than scooped into the cooking cups.) 
3 cup milk
8 Tbs. (1 stick) butter
4 tsp. yeast
1 1/3 cup AP flour
1 1/3 cup buckwheat flour
4 Tbs. sugar
2 tsp. salt
6 large eggs, lightly beaten

For topping (everything is to taste and depends on the number of pancakes being served. Also anything can be used. This is just what we came up with.)
sour cream (to taste)
2 eggs, scrambled
1 Tbs. Ikura (salmon eggs) or caviar
Chives finely chopped

Note: Use smallest ladle, Don’t make them too thick.  (Or conversely make them thick enough that they can be cut in half horizontally. That will shorten the cooking time).


Directions:
For the Blini: Melt the butter in the milk. Let it cool to about 105 to 115 degrees. Mix the dry ingredients (yeast through salt) in another bowl. Pour the cooled milk mixture over the dry ingredients mixing until just combined. Cover the bowl with plastic wrap and let it rise in a warm place until doubled in volume (about 1 hour) (#1 in the 3rd group of pictures). Once it has risen either make the pancakes immediately or refridgerate covered for up to 24 hours. (We made the batter after dinner and refridgerated it over night). If refridgerated let it stand at room temperature for 20 minutes (#2). Then deflate the batter and whisk in the  eggs lightly beaten.

Now, I am providing the details of how I cooked blini in the platar. This is for our future reference because this requires some finesse. First, I took out the planar and washed it with hot water (no soap), dried it by heating it on the stove and coated each of the 7 wells with olive oil using a paper towel (#3). I preheated the pan on low flame for 5 minutes then used a small ladle (second smallest ice cream scoop) add the batter, half filling the wells (#4). I continued to cook until the surface of the pancake showed bubbles and looked dry (5-7 minutes). Then came the challenge of flipping them. According to my wife,  the directions in the JOC said flip the pancakes over using a skewer. But that proved entirely too simplistic. After some experimentation I came up with a method of loosening the blini by running the tip of a dinner knife around the perimeter of the well, then inserting the knife tip under the bottom of the blini to pry it loose. Then with the knife under the blini and a bamboo skewer inserted into the top I flipped it (#5). As I repeated the process I got better and could flip the pancake without damaging the side. But I noticed that the 6 wells surrounding the center well had uneven heat and only the outer half got browned (#5). So with the next batch, I released the blini before they were ready to flip and turned them180 degrees in the well then cooked them for a few more minutes before flipping them over. In the next batch, the first side was more evenly browned (#6).  In any case, when all was said and done, we had at least a few perfect blinis (#7= top and #8=bottom).


I topped one of the “perfect” blini (#1) in the 6th set of pictures, with sour cream (#2), scrambled eggs (#3), "Ikura" salmon roe and finely chopped chives harvested from our herb garden (#4). 
 

This is the height of decadence. The blini had a soft thick texture and a very pleasing robust rustic flavor from the combination of buckwheat flour and yeast. The sour cream, eggs and salmon caviar were an excellent combination with complementary creamy texture. The burst of saltiness from the ikura at the end of the bite was a perfect finale. This is how we will be making blini in the future. Next stop crumpets in the platar. 

Sunday, April 25, 2021

Four appetizers in new small bowls 御通し4種類と新しい小鉢

We have a good number of small Japanese-style bowls and plates but for some reason my relationship with breakable dishes ends up with them getting broken every-now-and-then. So I am always on the look out for potential replacement small Japanese style dishes/bowls. (Also, since enjoyment of food is visual in addition to taste, I just like different bowls in which to present what I make to complete the entire experience). I found these small bowls on Amazon. They came in four different patterns/colors in a set of four (i.e. total of 16 bowls) . I ended up getting all 4 sets. So, this is the first time I used this set to serve 4 appetizers. The first picture, from left to right, are "salmon nanban" 鮭の南蛮漬け, "hijiki seaweed stir-fry" ひじきと油揚げの炒めのも and Japanese "dashi-maki" だし巻き卵 omelet, "Wood ear"* mushroom, cucumber and wakame seaweed sunomono" キクラゲ、ワカメ、胡瓜の酢の物, and  "shredded chicken tenderloin and asparagus in sesame dressing" 鳥のささみとアスパラの胡麻和え. 

*Wood ear mushroom is so-called because it grows out of the surface of wood like an ear sticking out. Japanese call it "ki-kurage" meaning "jelly fish of the wood" because the crunchy texture is similar to dried and salted edible jelly fish. It is interesting, however, when it is written in "kanji" ideograms, it is  木耳 which means wood 木 ear 耳. There is no way you can pronounce 木耳 as "ki-kurage" but the meaning of these two ideograms indeed mean "wood ear".


The second picture is the salmon dish I usually make, fried and marinated in sweet vinegar with vegetables. In order to serve multiple appetizers, it is necessary to pre-make a number of them and have them last long enough to serve over several days. Due to the vinegar this dish lasts a few weeks in the refrigerator. So this salmon dish is a good one to serve as an appetizer. Perfect with sake but not with wine. The pattern of this bowl is not classic Japanese but nice—also the color complements the color of the salmon.


The third picture of hijiki seaweed is a dish that also lasts for some time in the fridge. I served it with Japanese "dashimaki" omelet which goes well with the seaweed dish both visually (yellow and black) and by taste (sweet and salty). The pattern of the bowl is classic Japanese wave pattern.


This is a variation of my usual "sunomono" dish. Besides cucumber and wakame, I used wood ear mushroom. We can get this mushroom usually dried. One of the problems with hydrating the dried items like this is after hydration, the volume increases much more than expected. This was a case here and I used wood ear in several dishes including fried rice for lunch one day. In any case for this dish, I cut the wood ear into thin strips like jelly fish. I also added ground sesame and sesame oil in the dressing. The wood ear really adds crunch exactly like jelly fish.


I froze sous vide chicken breast a few months ago and decided to thaw one. It came out exactly like it was just cooked. I made the chicken salad I usually make which was really good but I kept the tenderloin part of the sous vide chicken for this "goma-ae" 胡麻和え dish. I tore the tenderloin along the meat fibers to make thin strands. I dressed this with sesame dressing ("nerigoma" 練りごま sesame paste, roasted and ground sesame, sugar, rice vinegar and soy sauce. I kept this dressing in the fridge which made it stiff. So I added small amount of warm water to loosen the dressing) with blanched asparagus (stem cut into thin pieces at a slant and garnished with tips of the asparagus). The meat was so juicy and tender.


These small dishes are nothing special but I make slight variations which make it interesting and adds to the enjoyment of sake.

Sunday, September 13, 2020

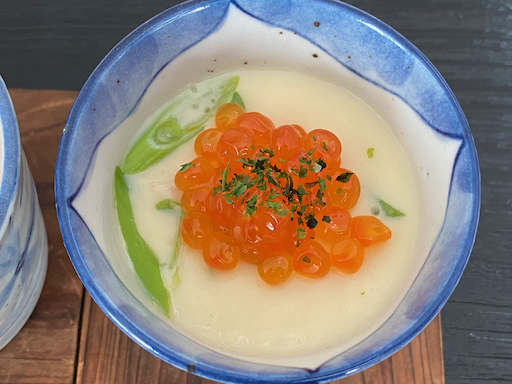
Chawan-mushi with “ikura” salmon roe 冷製茶碗蒸しイクラのせ

 This is not a new dish but it was the second appetizer for the evening when we had the tuna caprese as the first dish. This is a cold chawan-mushi which I made in the morning.  I topped it with “ikura” salmon roe and garnished with “ao-nori” 青海苔 a type of dried green seaweed called laver.


For this version of  chawan-mushi , I used shrimp, chicken and scallion since I did not have the other items I usually use.


Ingredients: (for 6 small cups such as the sized container shown above)
3 large eggs (150-170 ml)
Broth, three times volume of the eggs (450- 520ml). Any broth including chicken broth will do. I used a mixture of bonito and kelp broth from a dashi-pack and broth I made from shrimp shells. I seasoned the broth with mirin, light colored soy sauce and salt.

6 large frozen shrimp, shell on, thawed, salted, let it stand for 5-10 minutes, shelled and cut into bite sized pieces.
1 cooked chicken tenderloin, shredded.
1/2 scallion, sliced on bias.

Directions
In 6 small bowls, add the shrimp, chicken, and scallion. Mix the eggs and seasoned cold broth, pour the egg mixture through a fine sieve. Steam (I used an electric wok) on high stream for 10 minutes and then lowered the steam and keep steaming until the egg mixture was set (another 10-15 minutes or more).

Instead of eating this hot, I let it cool to room temperature and refrigerated it. I served it cold with Ikura and dried “ao-nori” on top.

Since I did not have other items such as shiitake mushrooms, I used whatever was available. This simpler approach worked very well for this cold chawan-mushi. The addition of the ikura salmon worked very well. It provided a nice texture with a delicate pop in the mouth followed by a  burst of fresh sea saltiness. After this we had another tuna dish.

Tuesday, June 16, 2020

Kitsune Udon and Inari-sushi 狐うどんといなり寿司

When our refrigerator went kaput, some of the Japanese frozen items thawed almost completely. One of them was "Abura-age" 油揚げ or deep fried tofu pouches. These were rectanglar-shaped full sized ones called "Ganko-oyaji-no-abura-age" がんこおやじの油揚げ (meaning "stubborn old man's abura-age*"). I decided the best way to save them was to cook them in soy sauce and sugar or/or mirin which is called "Ama-Kara" 甘辛 meaning "sweet and salty". Once cooked, they would last longer and also could also be used to make "Inari-sushi" 稲荷寿司 (right below)  and "Kitsune udon" 狐うどん (left below) which I did a week or so later and served as a lunch one weekend. I served Inari-sushi (or more accurately, Inari-zushi) with cucumber "asazuke" 浅漬け and sweet vinegar-dressed ginger (store-bought).

*This is a Japanese way of saying that this product was made with a stubborn determination of an old man who upholds a tradition of making the best product without any compromises.


Classically, Kitsune Udon is simply topped with seasoned abura-age and chopped scallion (this is a famous dish in Osaka 大阪 and they typically used the green part of the scallion as opposed to Tokyoites who uses only the white part. Since I made home pasteurized eggs in that morning, I added a poached egg as well. That makes this as "Kitsune Tsukimi udon" キツネ月見うどん. "Tsukimi" 月見 means "moon gazing" and the egg yolk is equated with the moon.


Cooking and seasoning Abrura-age:
2 rectangular abura-age, thawed, intentionally (or otherwise), if frozen, cut in half (square).
Place the abura-age in a colander and pour boiling water over it to remove any excess oil (this process is called "abura-nuki" 油抜き).
Place four squares in a single layer in a pan and add the seasoning (Japanese broth 100ml, mirin 20ml, and 20ml, add sugar if you like it sweet).
Place a "otoshi-buta" on top and simmer for 15-20 minutes until only a small amount of seasoning liquid remains on the bottom. Then let it cool.

I did this some days prior to using them and kept them in a sealed container in the "back-up/emergency" fridge.

Making "Kitsune udon"
Soup: Heat Japanese broth made from a dashi pouch (kelp and bonito), seasoned with sake, mirin and light colored soy sauce. I seasoned  it lightly and added the seasoned abura-age pouch to warm. The seasoning from the pouches leak out into the soup and when I tasted it the soup was just right.

Udon noodle:
I had cooked dried thin udon noodle. I warmed them up in boiling water for 30 seconds, drained and put it into bowls.

I poured in the warm soup, topped it with the seasoned abura-age, poached egg and thinly sliced scallion.

Assembling Inari-zushi (four square pouches):

Filling the pouches with cooked rice: the simplest would be sushi rice, which is what I basically used,  but the rice can be mixed with other ingredients such as seasoned gourd peel or "kanpyo" カンピョウ and shiitake mushsooms 椎茸. The variations are endless. I used frozen white rice (this happened to be rather expensive Japanese grown "Koshihikari" コシヒカリ rice). I microwaved it to warm it up and dressed it with sushi vinegar. I did not mention it earlier but among the thawing victims of the refrigerator's demise were two small packages of small whitebait fish called "shirasu" しらす. (At the same time I rescued the abura-age I braised these fish in mirin, sake and  soy sauce until almost dry and placed them in a small sealed container in the "emergency" fridge.) I mixed this seasoned "shirasu" into the sushi rice mixture. I prepared the pouches to be filled with the rice by pressing the abura-age pouches between two identical plates to remove any excess liquid. I then stuffed them with the rice mixture. Since the seasoning of the pouches and "shirasu" were essentially similar, this combination worked very well.


I cut the stuffed pouches in half to serve. Here you can see small fishy mixed into the rice.


For impromptu lunch with "Inari" theme**, this was quite good.

** Digression alert!:
"Inari" 稲荷 is a Japanese deity (or one of many Japanese gods) who promotes industrial and agricultural prosperity. There are some 30,000 Inari shrines that exist throughout Japan. These Inari shrines are guarded by statues of foxes (wearing red bibs for some reason). Although the fox is often confused to be the God, it is not. It is simply the Inari god's messenger. In addition, these foxes are said to be very fond of "abura-age". So, any dish made with abura-age is called "Inari" or "Kitsune (fox)".

This picture was taken by my wife when we were traveling in Kyoto 京都 and visiting  "Fushimi Inari Taisha" 伏見稲荷大社 in 2015. This is famous for numerous red torii gates 赤鳥居. This is the main or "parent" Inari shrine among the many in Japan.

When we visited there, it was very crowded. Later, we learned that visiting there at night may be less crowded.

Thursday, May 14, 2020

Three "otoshi" appetizers お通し3種

There is nothing really new in this line up. These are the three starters we had one evening.


The left and below are Fried salmon in sweet vinegar 鮭の南蛮漬け.  I added salt-broth soaked snap peas スナップ豌豆の塩びたし.

Digression alert: because of social distancing during the covid-19 crisis I have not been able to go to the Japanese grocery store and I was running short of rice vinegar. I bought what I thought was rice vinegar at the regular grocery store but it turned out to be basil and oregano flavored rice vinegar (?!!) I used it in this dish anyway and it actually added a very nice flavor dimension that was an interesting twist on the traditional. We actually liked it. I may have to stock in basil flavored rice vinegar...heaven forbid.


In the dish below I used brazed crunchy cauliflower モンパルナスのカリフラワー炒め, blanched broccoli with sesame sauce ブロッコリの胡麻よごし, and Japanese style omelet with "aonori" 青海苔入りだし巻き.


This dish is braised cabbage, onion, and strips of agura-age or deep dried tofu pouch seasoned with soy sauce and mirin, I posted similar ones with daikon green.


All simple Izakaya affairs but perfect opening of the evening with cold sake.

Monday, May 11, 2020

Hybrid Katsu-don "fried pork" bowl 煮カツ丼ソースカツ丼ハイブリッド

When we get pork tenderloins, we most often make, at least a main portion of it, to "ton-katsu" トンカツ or "hire-katsu" ヒレカツ. We then make "Katsudon" カツ丼 from the leftover tonkatsu. I have made some variations of it depending on what ingredients are available but there are two main variations. The most common one is onion and tonkatsu simmered in soy sauce-based broth then topped with a lightly beaten egg (most people like the egg to be semi cooked) and then placed on the top of cooked white rice. The other is sometimes called "so-su katsudon" ソースカツ丼 . In this variation "tonkatsu sauce" or some other Japanese-Western style sauce such a mixture of catsup and Worcester  sauce is used. The tonkatsu is either simmered or dipped in the sauce or is topped with it. I made a hybrid of the traditional and the so-su katsudon then topped it off with a poached egg made from pasteurized eggs. This was a lunch. I served it with salted cucumber and daikon or "asazuke" 浅漬け.


Since I did not have any shiitake mushrooms which I usually use for this dish I used frozen "maitake" 舞茸 or hen of the woods. I also had blanched broccolini florets so I added that mostly for color.


Ingredients: (for two servings).
Cooked rice (freshly cooked is the best but microwaved frozen rice will do).
2 hire-katsu or pork tenderloin cutlets (if you fry them just before assembling the dish, that will be the best but that never happens in our household).
1 medium onion, halved and thinly sliced
Some mushrooms, I often use fresh shiitake but this time I used frozen maitake, amount arbitrary.
1/4 cup Japanese broth (made of kelp and dried bonito flakes)
1 - 2 tsp concentrated "mentsuyu" めんつゆ noodle sauce or mirin and soy sauce
2 pasteurized eggs
Some greenery such as snow peas, I added blanched broccolini (optional)

Directions:
1. In a small frying pan, I added olive oil and sautéed the onion and maitake (still frozen) until slightly soft (optional step, you can skip this and go to #2)
2. Add the broth and mentsuyu, when it starts boiling, turn the heat down and simmer with a cover on for 5-minutes or until the onion and mushroom are cooked and the sauce is slightly reduced.
3. Meanwhile, Put the rice in two bowls and microwave to warm it up.
3. Since this is leftover tonkatsu, I reheated it in our toaster oven using the toasting function, which is almost like re-frying. The crispy crust comes back. Cut into bite-size strips.
4. Start making poached eggs 4-5 minutes before everything comes together. The yolks should still be very runny.
5. Using a perforated spoon, place the cooked onion and mushroom on the rice (only small amount of sauce remains in the pan. I reserve this in a small serving bowl just in case my wife needs more sauce)
6. Place the sliced and reheated tonkatsu, broccolini and poached egg on the top.
7. I topped everything off with some tonkatsu sauce.

We like this hybrid katsudon. Since I poached the eggs, it is much easier to consistently get a runny yolk and cooked egg white compared to the traditional method of topping with lightly beaten eggs which often results in overcooked yolk and undercooked white. Because I do not cook the tonkatsu in the liquid, the crust remains crispy.

Thursday, April 23, 2020

Pickled grapes with Japanese style curry ブドウのピクルス添え日本風カレー

In order to use up some cooked pork tenderloin before it went bad I decided to make a Japanese style curry but I did not have any commercial Japanese style curry roux. So I "winged it" and made my own curry roux. In addition I also didn't have the usual Japanese curry condiments, so continuing the "winged-it" theme I made "pickled" grapes and served them on the side.


The pickled grapes have a sweet-sour taste with cardamon flavor which really made the whole thing special.


To make the dish a bit more decadent, I topped the curry with a sunny side up fried egg (using pasteurized egg).


Pickled fruit (This is from Milkstreet magazine).


Ingredients:
1 1/2 cups rice vinegar (unseasoned)
3/4 cup white sugar
1 tbs kosher salt
6 wide strips of lime zest plus 1 1/2 tsp lime juice
4 wide strips of lemon zest plus 1/4 cup of lemon juice
3 white cardamon pods

Directions:
I did not have any lime so I did not use it. Put everything in a pan and heat to boil and dissolve the sugar and salt. Cool it to room temperature.  I only added grapes but  the original recipe also suggested the following fruits could also be pickled; apple, melon, pineapple, plum, and strawberry. Leave the mixture at room temperature  for 48 hours then refrigerate.

Japanese curry (my short cut method, makes about 4 small servings)


Ingredients:
Cooked pork, cubed (whatever amount you have, this is leftover control).
1 medium onion, small dice
1 clove garlic, finely minced
1 small piece of ginger root, peeled and finely minced
2 parsnips, peeled and cut into bite-sized cubes (or more traditionally potato)
2 medium carrots, peeled and cut into cubes
10 green beans (I happened to have blanched green beans), cut into 1 inch segments
1/4 cup of AP flour
2-3 tbs olive oil
2 tsp Garam Masara
Salt to taste
2-3 tsp Japanese curry powder (I used S&B)
2 cups chicken stock (or more depending on the thickness of the curry)

Directions:
In a pot on medium flame, add the olive oil, onion, garlic and ginger and sauté until fragrant and onion slightly caramelizes (5-7 minutes). Add the flour and sauté until the bottom of the pan develops a brown crust, add the curry powder and keep sautéing for several more minutes. Add the chicken broth and using a silicon or wooden spatula, mix well trying to dislodge the brown crust on the bottom until, the sauce thickens. Add the pork, carrot, parsnip and simmer (This is usually cooked in a broth, before adding the curry roux, I am taking a shortcut). Simmer for 30 minutes until the vegetables are soft. Just 4-5 minutes before serving, add the garam masala, season with salt and pepper and add the green beans.

To make it more luscious, I topped this with a sunny side up fried egg with runny yolk (using pasteurized eggs). For a quick shortcut curry for leftover control, this was pretty good. The pickled grapes also added, a sweet and sour tang with a subtle but lovely cardamon flavor which really made the pickles something special.

Wednesday, March 4, 2020

Hijiki stir fry and other otoshi ひじきの炒め物と他2品

This is a starter line-up for one evening. Nothing is particularly new. From left to right are "aji-tsuke-tamago" 味付け卵 marinated soft boiled egg, hijiki seaweed and fried tofu stir fly ひじきと油揚の炒め物, and salt-broth soaked sugar snap スナップ豌豆の塩びたし.


Over the years I changed the way I make aji-tsuke tamago a bit (made it simpler and easier). As usual, I use pasteurized eggs. For some time, I have been using "boil-steam" cooking method for boiled eggs which works much better than just submerging eggs in water and boiling. I use just enough water to come half way up the sides of the eggs. (The eggs are cooked by steam). I pierce the eggs first and place them in the water that is boiling rapidly on medium high flame. I put on the lid and cook for 6 minutes 30 seconds for soft boiled eggs with runny yolk (I usually ask Siri to time the 6 1/2 minutes). I cool the eggs using cold running water and then further cool them down using ice water. This appears to make peeling the egg easier (I think). I then put the peeled eggs in a small Ziloc bag and just pour in a small amount of concentrated "men-tsuyu" めんつゆ noodle sauce from the bottle. I remove the air as much as possible and seal. I let it marinade for a few days in the fridge changing the position whenever I open the fridge door. After a few days, the runny yolk jells into an almost custard consistency. To serve I cut one in half and sprinkle with salt. This is usually a topping for ramen noodles but it is also great as an appetizer.


The dish shown below is very similar to what I posted before. I made this because I hydrated too much hijiki when I made the takoyaki variation. This is made of just hijiki, julienned carrot and thinly cut "abra-age" deep fried tofu pouch, stir fried with sesame oil, mirin and soy sauce. This can be a good condiment for rice or as we did here, a great snack.


The dish below has become our favorite way to have sugar snaps. Just blanched sugar snaps are nice but this extra step of trimming both ends of the pods and soaking in salt seasoned Japanese "dashi" broth makes it much better. The only caution is when you bite into them the salt broth that migrated into the sugar snap while it was soaking may squirt out.


So these three items with cold sake nicely started the evening. This home Izakaya is not bad if I say so myself.