Thursday, July 6, 2023

Sous Vide Chicken Breast with Red Pepper Sauce 低温調理鶏胸肉のロースト赤パプリカソース添え

In my book, the best way to cook chicken breast is using the sous vide method. As I posted before, skin-on and bone-in split chicken breast appears to work best. Sometimes this type of chicken breast is hard to come by since most people seem to prefer skin-less and bone-less chicken breast. So when skin-on bone-in chicken breast is available, we like to stock-up. This time we got a “family” pack which contained 4 large chicken breasts. I sous vide all of them and froze three. I prepared one of the sous vide breasts into three dishes. I hand shredded the tenderloin and dressed it with sesame/mayo sauce. I made half of the main breast meat into curry-flavored chicken salad and I served the rest sliced with roasted red pepper sauce.  I served this dish at lunch with two salad sides; celery mushroom feta salad (right upper) and corn, red pepper, edamame and bacon salad (right lower).


When we made corn, red pepper, edamame and bacon salad, we had an excess of roasted red peppers since we got a bag of 6 red peppers. So, I made a roasted red pepper sauce. The sauce went well with sous vide chicken shown here with mayo and blanched broccoli added to the plate.


I am sure there are many ways to make roasted red pepper sauce, but the one shown below is my improvised sauce.

Ingredients:
Two roasted red peppers, stem end and skin removed, seeds and ribs removed, cut into small size (for pureeing)
1/2 sweet (Vidalia) onion, finely chopped
1 tbs caper
1 tbs lemon juice
3-4 tbs olive oil
Salt and pepper to taste

Directions:
Add all the ingredients except the salt and pepper in a cylindrical container for an emersion blender.
Puree on high-speed until smooth. Taste and add salt and pepper

This sauce went very well with the sous vide chicken breast. The chicken cooked this way is very moist and tender but can taste a bit bland. The sauce really added a nice slightly tangy flavor. We still have a lot of sauce left so there will be more to come.

Monday, July 3, 2023

Matcha Almond Pancakes, 抹茶アーモンドパンケーキ

We like pancakes as a breakfast. Our all time favorite is buttermilk blueberry pancake when blueberries are in season. Another one we like is a green pancakes made with spinach and mint. We decided that the flavor comes from the mint but not the spinach so we modified the recipe to use just mint. We like the flavors as well as the striking “verdant”  green color. Recently, we saw a recipe for “matcha almond pancakes”. We both thought ‘we have to make this’. So here they are. A stack of matcha almond pancakes


They were quite good. We had this as a breakfast sitting outside on the patio with a cup of cappuccino and mango yogurt made with home-made yogurt with pureed and small cubes of champagne mango mixed in. These pancakes reminded us of the “Matcha green tea cake” we made a few times before.


Ingredients: (The original recipe indicated it makes 8 pancakes but we doubled the recipe and got only 7 pancakes)

1/2 cup plus 1 tablespoon (68 grams) whole-wheat pastry flour or all-purpose flour
1/2 cup (60 grams) almond flour
2 teaspoons baking powder
1/4 teaspoon fine salt
1 tablespoon matcha
1 cup (240 milliliters) whole, reduced-fat or plant-based milk
1 large egg
1 tablespoon neutral oil, such as avocado or canola
2 teaspoons vanilla extract
Maple syrup, for serving

Directions:
In a medium bowl, thoroughly whisk together the pastry flour, almond flour, baking powder and salt until combined. Sift the matcha into the mixture and whisk again to thoroughly combine.

In another medium bowl, whisk together the milk, egg, oil and vanilla until combined. Add the milk mixture to the flour mixture and stir just to combine. Do not overmix; it’s okay if there are some small lumps. Let the batter hydrate for 5 to 10 minutes. (The batter will initially appear quite watery but over the 5 to 10 minutes the flours thoroughly hydrate and it becomes thicker. Nonetheless it was still runnier than our usual pancake batters.)

Heat a large nonstick skillet or griddle over medium-high heat until hot. (To test, drop a dime-size amount of batter into the skillet and if it starts to bubble and brown right away, the pan is ready.)

Working in batches as necessary ladle the batter onto the skillet. Cook until bubbles form on top and the underside is nicely browned, about 2 minutes, then flip and cook until browned on the other side, and cooked through, 2 minutes more. Adjust the heat as necessary to prevent the pancakes from browning too fast before they’re cooked through. Transfer the pancakes to a plate and repeat with the remaining batter.

Serve with maple syrup.

These pancakes were quite good but not great. They were fairly thin in texture. The macha flavor really came through though. They reminded us of the macha cake we made previously. Next time we want a macha pancake we will try just adding some macha to our favorite buttermilk pancake recipe.

Addendum:Culinary grade vs. drinking/sipping matcha:


We have taste tested “Culinary” and “Drinking” grade matcha. Since we are not connoisseurs of matcha, we could not tell the difference. We bought the large can of “culinary matcha” from “Matcha Love” which is run by a Japanese tea company called “Ito-en” 伊藤園. For this type of cooking, this is quite good and reasonably priced.

Friday, June 30, 2023

Corn, Roasted Ped Pepper, Edamame and Jalapeño Pepper Salad 玉蜀黍、ロースト赤パプリカ、枝豆とべーコンサラダ

Although it is not quite local corn season, fresh corn is available and on our last trip to Whole Foods my wife celebrated the season by stocking up on corn. She used it for various dishes and this is one of them. In addition, we got a bag of 6 red peppers. (Turns out it was much cheaper to buy the bag of peppers than to buy several peppers individually). My wife looked up corn salad recipes which used roasted red pepper on the internet. This dish is an amalgamation of the various ingredients used in those recipes with our own ideas mixed in. It has a nice color combination and tasted great.


Ingredients:
1 roasted red pepper, skin, ribs and seeds removed and cut into small squares
2 ears of fresh corn on cob, microwaved wrapped in wet paper towel for 2 minutes or more until cooked
1 sweet (Vidalia) onion, finely chopped
2 strips of bacon, cooked to crisp and crumbled
1 large jalapeño pepper, seeded, deveined and finely chopped
1 cup of boiled edamame, shelled (or lima beans)

For dressing:
1 tbs Dijon mustard
1 tbs honey
2 tbs rice vinegar (or any vinegar)
8 tbs or more fruity olive oil
salt and pepper to taste

Directions:

For roasted red pepper
I roasted them at 450F in the toaster oven on convection mode for 20 minutes turning a few times so that all the surface was cooked/charred. I then put them in Ziploc bags to steam for 30 minutes. Once cooled down, remove the stem end, skin, ribs, seeds and peel. (The skin will come off easily).

Combine all the ingredients, add the dressing and stir well.

This is a great salad. The corn adds and lovely sweetness and crunch. Although I initially protested when my wife suggested using bacon, it adds a salty, smokiness and crunch which is really a great addition and a “must-have” for this salad. In addition to adding to the color the roasted red peppers adds a slightly spicy bite. The edamame yields yet another crunch dimension. The dressing adds a bright tart note. We will be making this one again.

Tuesday, June 27, 2023

Mini Apple Spiced Muffins アップルシナモンミニマフィン

We occasionally get a free cook booklets from Giant grocery store when we receive a grocery delivery. One of these include small “bites” type recipes. Since my wife is a devotee of “small bites” dishes, she decided to make one of these recipes. This is a kind of apple-cinnamon mini-muffin. This is very nice as a part of breakfast with nice classic apple-cinnamon flavors.


Ingredients: (makes about 24 to 30 mini-muffins)
1 apple, cored, skinned and cut into small pieces
1 cup bran cereal (we used Kellogg Special k,  since that was only cereal we had)
3/4 cup AP flour
1/4 cup brown sugar
1 tps baking soda
3 tbs unsalted butter, melted
1 large egg
1 cup Greek yogurt (we used home-made and strained kind)
1 tsp ground cinnamon
1tsp vanilla extract

Directions:
Preheat the oven to 350F
Place the cereal in food processor and grind it to a fine texture. In a bowl, combine the cereal, flour, baking soda, and sugar.
In a separate bowl, mix the egg, butter, yogurt, cinnamon and vanilla.
Mix the wet and dry ingredients (do not over mix)
Fold in the apple
Add the batter in a greased mini muffin pan and bake 13-15 minutes.

For a freebee cookbook recipe, this is really good. My wife further expanded her repertoires. This is just the right size if you want a little added-something with your usual breakfast repertoire.

Saturday, June 24, 2023

“Atsu-age” Fried-tofu with Mapo Eggplant 厚揚げの麻婆茄子かけ

“Atsu-age” 厚揚げ or “Nama-age” 生揚げ is fried tofu with a surface like “Abura-age” but the inside remains as soft tofu. We used be able to get good quality atsu-age from our japanese grocery store. I have posted quite a few dishes I made with this but the best dish, as far as we are concerned, and particularly if the quality of the atsu-age is good is simply grilled (in the toaster oven) served with soy sauce and chopped scallion. But, for some reason, the ones we have gotten recently are not really good.  This was the case with the one I got the other day. I decided to make something different using this not-really-good atsu-age. Since I had leftover mapo eggplant, I decided to use it as a topping for the atsu-age.


Because of the spicy mapo eggplant sauce, the atsu-age was more palatable but still not great.


I first cut the atsu-age into cubes and heated it up in the toaster oven on high toast mode.


This ws not bad and made a nice appetizer but I hope at some point we can get better quality atsu-age.

Wednesday, June 21, 2023

Mapo Eggplant 麻婆茄子

When I stopped by our Japanese grocery store, they had some genuine Japanese eggplants and I got two. I asked my wife what I should make, she requested “Mapo eggplant” 麻婆茄子. In the past I used to make this dish but I do not think I posted the recipe. I made it exactly like Mapotofu 麻婆豆腐 but instead of tofu, I used eggplant. Since I had some chicken thighs, I removed the meat from one of the thighs and hand chopped it into small pieces to use as a protein for this dish. The final dish was mildly spicy with the nice soft texture of eggplant. The chicken really added nice taste and texture. This is great as it is or over rice.


Ingredients:
2 small Japanese egg plants
One chicken thigh, skin and bone removed and chopped in small pieces or ground chicken
2-3 tbs peanut oil and 1 tsp dark sesame oil
1 tbs ginger root, skinned and finely chopped
1 tbs garlic, chopped
1 small shallot, finely chopped
3 stalks of spring onion
1 tsp Doubanjian 豆板醤
1 tsp Tenmenjian 甜麺醤
1/4 cup chicken broth
1/2 tsp potato starch+2tbs sake or water to make potato starch slurries

Directions
Remove the stem end, peel skin in stripes (to reduce the bitterness the skin may have) and slice into 1/4 inch thick pieces.
Heat up a wok and add 2 tbs peanut oil and 1/2 tsp sesame oil. When the oil is almost smoking, add the eggplant and stir fly until the oil is absorbed and the eggplant slightly browned (see below).
Remove the eggplant from the wok and set aside.


Add 1tbs peanut oil and 1/2 tsp sesame oil in the wok. When the oil is hot, add the shallot, ginger and garlic and stir for few minutes. Add the doubanjian and stir until fragrant for 1 more minute. Add the chicken and stir until cooked (2-3 minutes). Add the eggplant, tenmenjian, chicken broth and mix and cook for a few minutes. Add the spring onion and the potato starch slurry and cook on high flame until the sauce thickens. If desired finish with sesame oil and powdered sansho pepper.

You just can’t beat the taste and texture of Japanese eggplant. This dish was homey and comforting. The eggplant had a soft texture and the chicken added a firm contrast. It is hard to get the right level of spiciness. It can either be too hot or too bland. This version was perfect.

Friday, June 9, 2023

Cold Marinated Eggplant 冷製レンジなすのポン酢漬け

We recently got Japanese (or Asian) eggplant from Weee. Although  I posted quite a few dishes using eggplant, we have not had eggplant for a long time. We really love “grilled eggplant” or Yakinasu 焼きなす, it requires a charcoal fire to make it correctly, however. I decided to take a short cut and cook the eggplant in the microwave oven. I then marinated the cooked eggplant (see below) overnight in the refrigerator.


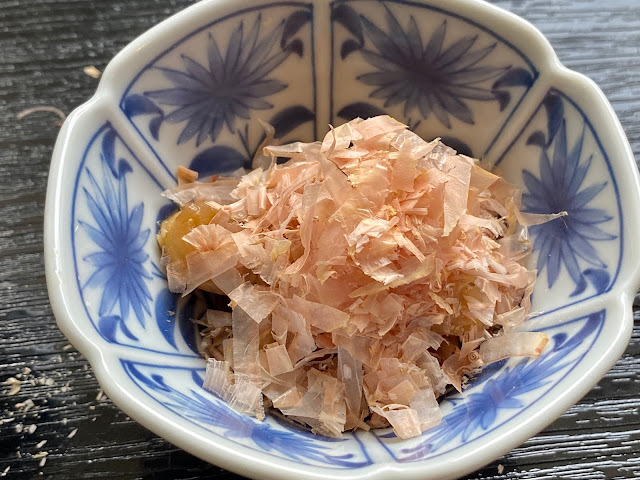
Just before serving, I topped it with “katusobushi” 鰹節 bonito flakes. This is very easy to make and tasted pretty good. This is loosely based on a recipe I read on line sometime ago but I could not find the original recipe so I made the dish from memory.


Ingredients:
One Japanese eggplant (picture below).
3 tbs ponzu shouyu ポン酢醤油
1/2 tbs or more to taste, x4 concentrated Japanese noodle sauce
1/4 tsp dark sesame oil
2 stalks of scallion, finely chopped


Directions:
First make the marinade mixing the ponzu, noodle sauce, sesame oil and scallion.
Cut off the stem end of the egg plant and peel the skin
Since it was too long to fit into the silicon microwave container, I cut it into two pieces and microwaved it 2-2.5 minutes until cooked and soft (in the picture below, I made the indentation when I pressed it to see if it was done).
I cut the cooked eggplant in to long strips and then cut crosswise into bite sized pieces
I placed the hot eggplant into the marinade
I sealed the container and refrigerated it for a few hours or overnight (I like overnight marination)


Just before serving, top the eggplant with bonito flakes.

This is a very easy to make and tastes pretty good. Its a perfect small appetizer dish to go with sake.