
Monday, January 1, 2024
Table of contents 2024
January 2024
January 1, Happy New Year 2024 明けましておめでとう2024
January 5, Tomato and Egg Stir-fry with Wood Ear and Natto 納豆、トマト、木耳の卵炒め
January 22, Goat Cheese Scallion Muffin ゴートチーズと青葱マフィン
January 25, White "Pineberry" and Red "Koyo" Stawberries 白いイチゴと昂揚イチゴ
January 28, Beef with Kon-nyaku and Vegetable "Kimpira" Stir Fry 牛肉と蒟蒻の金平
February 2024
February 3, Chestnut Brown Butter, Sage Muffin 栗の粉とセイジマフィン
February 8, Grated Lotus Root and Tofu Ball レンコン豆腐饅頭
February 11, Sweet Onion Bread Pudding 玉ねぎのブレッドプディング
February 15, Shad Roe from South Carolina 南カロライナからのシャドロウ
February 18, Cranberry Camembert Cheese Bites クランベリーソース、カマンベールチーズ バイツ
February 21, Simmered Shad Roe with Vegetables シャドロウの煮付け
February 24, Shad Roe Pasta シャドロウパスタ
February 27, Pickled Cucumber キュウリの漬物
March 2024
March 1, “Maitake” Hen of the Woods Mushroom in Brown Butter and Sage 焦がしバターとセイジ風味舞茸
March 4, Instant Pot BBQ Baby Back Ribs バーベキューベイビーバックリブ
March 7, Salted Oatmeal Cookie 塩味オートミールクッキー
March 10, Lobster Salad ロブスターサラダ
March13, “Roman” Gnocchi ローマンニョキ
March 22, Duck Tender Cutlet and Arancini 鴨ささ身のカツレツ
March 25, Mary Walsh’s Currant Cake マリーウオルシュのカラントケーキ
March 28, St. Patrick’s Day Dinner, Lamb Chops and Cabbage with bacon セントパトリックのディナー
April 2024
April 6, Pumpkin “Kabocha” salad カボチャのサラダ
April 10, Mini Fruit Galettes ミニフルーツガッレト
April 21, Spinach Soufflé (easy version) ほうれん草のスフレ
April 30, Frangipane Rolls フランジパンロール
May 2024
May 13, Pickled Micro Cucumber and Daikon 小さなキュウリと大根のピクルス
May 15, Steamed Carrot Buns with Ginger Custard 人参蒸しパン生姜カス...
May 18, Braised Eggplant with Oyster Sauce 茄子と椎茸のオイスターソース炒め
May 21, Creamed Spinach with Cauliflower Puree カリフラワーピュレのク
May 24, Anchovy Salad アンチョビサラダ
May 27, Daikon Steak and Two Appetizers 大根ステーキ
May 30, Focaccia Bread Baked in Breville Pizzaiolo Indoor Pizza Oven
June 2024
June 2, Steak and 2004 Joseph PhelpさんInsignia ステーキディナーと2004 インシグニア
June 5, Gyoza made with New Round Gyoza Skin 日本風の餃子の皮で作った餃子
June 8, Filled Wool Bread 毛糸のパン
June 11, Shrimp Shumai 海老焼売
June 14, Pumpernickel Boule ドイツ黒パン
June 17, Ice Breaker “Summer” Sake 玉川アイスブレイカー酒
June 20, Carrot Panna Cotta 搾りたて人参ジュースのパナコタ
June 23, Miso-marinated Firefly Squid ホタルイカの味噌焼き
June 26, Wood Ear Mushroom and Wakame Salad 木耳とわかめの和物
June 29, Nine “Otoshi” Appetizers お通し九種類
July 2024
July 2, Egg roll 春巻き
July 5, Red and Green Udon “Pasta” with Prosciutto 生ハムのせ赤と緑のうどんパスタ
July 8, Pizza Made in Indoor Electric “Pizzaiolo” Pizza Oven
July 11, Garlic Chive Dumpling ニラ頭饅 or 韮菜万頭
July 14, Mitsuba ミツバ
July 17, Dassai 45 and Dassai blue comparison 獺祭45とDassai Blue 50 飲み比べ
July 28, Cucumber in soy sauce 胡瓜の醤油漬け
July 31, Tofu, Egg and Garlic Chives Stir Fry 豆腐ニラ玉、木耳入り
August 2024
August 9, Home Coffee Roasting 緑コーヒー豆の自家焙煎
August 12, Icelandic Pumpernickel (Rye) Bread アイスランドのライ麦パン
September 2024
September 2, Smelt Fry シシャモフライ
September 5, Pesto Blini ペストビリニ
September 8, Yakitori de le Canard 鴨ささみで焼き鳥
September 11, Vegetables in Cold Broth 冷製のトマトの煮浸し
September 14, Pesto Blini Prosciutto Cheese Sandwich ペストビリニの生ハムチーズサンド
September 17, Chicken Tender Fry with Salted Plum Sauce and Perilla ささみの梅大葉揚げ
September 21, Simmered Dried Daikon Threads 切り干し大根の煮物
September 24, Fresh Corn Blini コーンビリニ
September 27, Stir-fried Eggplant and Shiitake in Oyster Sauce 茄子と椎茸のオイスターソース炒め...
September 30, Mashed Potato Blini マシュポテトのビリニ
October 2024
October 3, Five appetizers お通し5品
October 10, Hen-of-the-Woods Grilled Cheese 舞茸のチーズ焼き
October 13, Strawberry Blini いちごビリニ
October 16, Enoki mushroom frittata エノキ オムレツ/フリッタータ
October 19, Kabocha salad カボチャサラダ
October 22, Matsutake (from Weee) Touban-yaki 松茸の陶盤焼き
October 25, Black Cod Marinated in Saikyo miso 銀鱈の西京(味噌)焼き
October 28, Egg-wrapped Kabocha カボチャの黄金焼き
October 31, Almond Olive Oil Cake アーモンドオリーブオイルケーキ
November 2024
November 3, Hiyaoroshi Sake Dewanoyuki “Sho-nai Bijin” 出羽ノ雪 冷やおろし庄内美人
November 6, Hiyaoroshi Sake “Shichi Hon Yari” 七本槍 純米ひやおろし
November 9, Prosciutto-wrapped Haddock 生ハム巻きハドック (コダラ)
November 12, Marinated Chicken Tender Cutlet 鳥のささみのカツレツ
November 15, Crispy Enoki Mushroom エノキのパリパリ焼き
November 18, Bagel ベーグル
November 21, Chestnut Apple Soup クリとリンゴのスープ
November 24, Norwegian Mackerel Teriyaki 冷凍ノルウエイ鯖の照り焼き
November 27, “Imo-ni” Stew famous in Yamagata 芋煮庄内風
November 30, Matsutake and beef cooked in an Aluminum Foil Pouch 松茸と牛肉のフォイル焼き
December 2024
December 8, Chestnut olive oil bread 栗とオリーブオイルケーキ
December 11, Marinated Tofu and Egg Sir fry 味付け豆腐の卵炒め
December 16, Braised daikon with carrot, wood ear, and fried tofu 大根と人参の炒め物
December 19, “Taco Carnitas”-ish タコ カルニタもどき
December 21, Tofu in Warm Broth ミニ湯豆腐
Sunday, December 31, 2023
Classic Pumpernickel Bread 伝統的パンパニッケル パン
We used to get Pumpernickel boule at Whole Foods. We used it for certain sandwiches such as beef tongue and Lebanon Bologna. We did not see Pumpernickel boule or Russian rye bread at Whole Foods for some time and my wife asked if they had any. The answer was that they are not making them any more. When we asked, “Why” they didn’t give us an answer. (Subsequently, we went to two other of our local grocery stores and found they didn’t have any rye breads either). So since we had recently gotten pumpernickel flour from King Arthur we resorted to making pumpernickel bread ourselves. This time I volunteered. It was by far the most convoluted bread I’ve ever made. The recipe also came from King Arthur and is titled as “classic” Pumpernickel. The recipe also warned that this bread was dense and suggested slicing it thinly. I decided to make this as a baseline. Indeed this is dense but very flavorful bread.

Next day when the loaf was completely cooled, I sliced it. It is very dense. As you can see below. I sliced it thinly and tasted. It has lots of flavors and the inside is moist.

The recipe is from King Authur. I followed the recipe weighing the ingredients. Exception was mashed potato. Since we found that all our potatoes were sprouted, we used Japanese sweet potato instead. Some of the instructions appear to be missing the details. Maybe this recipe was meant for an experienced baker. (With common baker’s knowledge-CBK- I added a few extra steps and details in notes to myself).
Ingredients
1 1/2 cups (340g) water
1/2 cup (71g) yellow cornmeal
1/4 cup (85g) molasses
1 tablespoon butter
1 1/2 teaspoons (9g) table salt
2 teaspoons granulated sugar
2 teaspoons caraway seeds
1 tablespoon unsweetened cocoa, Dutch-process
2 1/2 teaspoons instant yeast
3 cups (319g) King Arthur Organic Pumpernickel Flour
1 cup (113g) King Arthur Whole Wheat Flour
1 cup (170g) cooked, mashed potatoes
Instructions
Combine 1 cup of water (the other 1/2 cup was supposed to be used to proof the yeast) * with the cornmeal in a saucepan and cook over low heat until thick, stirring often (about 5 minutes). Remove the pan from heat and add the molasses, butter, salt, sugar, caraway seeds and cocoa powder. Stir to combine and set aside to cool to lukewarm.
*I missed this instruction and used all 1 1/2 cups (or 340 grams) of water for making the cornmeal mixture but since we used “instant yeast” which does not require proofing, this worked out fine.
Add the cornmeal/molasses mixture and mashed potatoes in the bowl of standing mixer fitted with a dough hook. Stir in the pumpernickel and whole wheat flours. Mix and knead the dough at medium speed for 10 minutes.
*To make the dough ball cling to the dough hook, I had to stop the mixer and push the dough toward the hook a few times and I also added a small amount of additional water.
Transfer the dough to a floured kneading board, quickly knead and make a ball (sticky but very dense dough). Transfer to a greased bowl, turn the dough ball to coat all surfaces. Cover the bowl, place in a 85Felectric proofing box. Let rise until the dough is not quite doubled; about 1 hour.
Shape the dough into a loaf and place in a greased (used butter) 8 1/2" x 4 1/2" loaf pan.
*Although no second rising was suggested, based on (CBK) I did place the loaf pan back in the proofing box and let it rise for 40 minutes (I am not sure this made any difference).
Slash the top*.
*As per instruction I did this but totally not needed. Only time this may make sense is for a decorative purpose after flouring the top of the loaf
Bake in a preheated 360 F oven* for 55 to 65 minutes, until the center measures 200°F when measured with an instant-read thermometer.
*Since I used my convection oven, again based on CBK, I reduced the temperature from the suggested 375F.
Remove from the oven, tip out of the pan, and cool on a rack completely before slicing.
As mentioned, this is a very dense bread but the inside is moist and very flavorful. Thinly sliced and cut into smaller squares, this may be good for making canapé but may not be appropriate to make a full sandwiches. Nonetheless it was extremely flavorful lightly micro-waved to warm it slightly for breakfast. We saw another recipe at the King Authur site called “Pumpernickel boule”. This may be very similar to what we used to get from Whole Foods. We (either my wife or I) will try this recipe next.
Friday, December 29, 2023
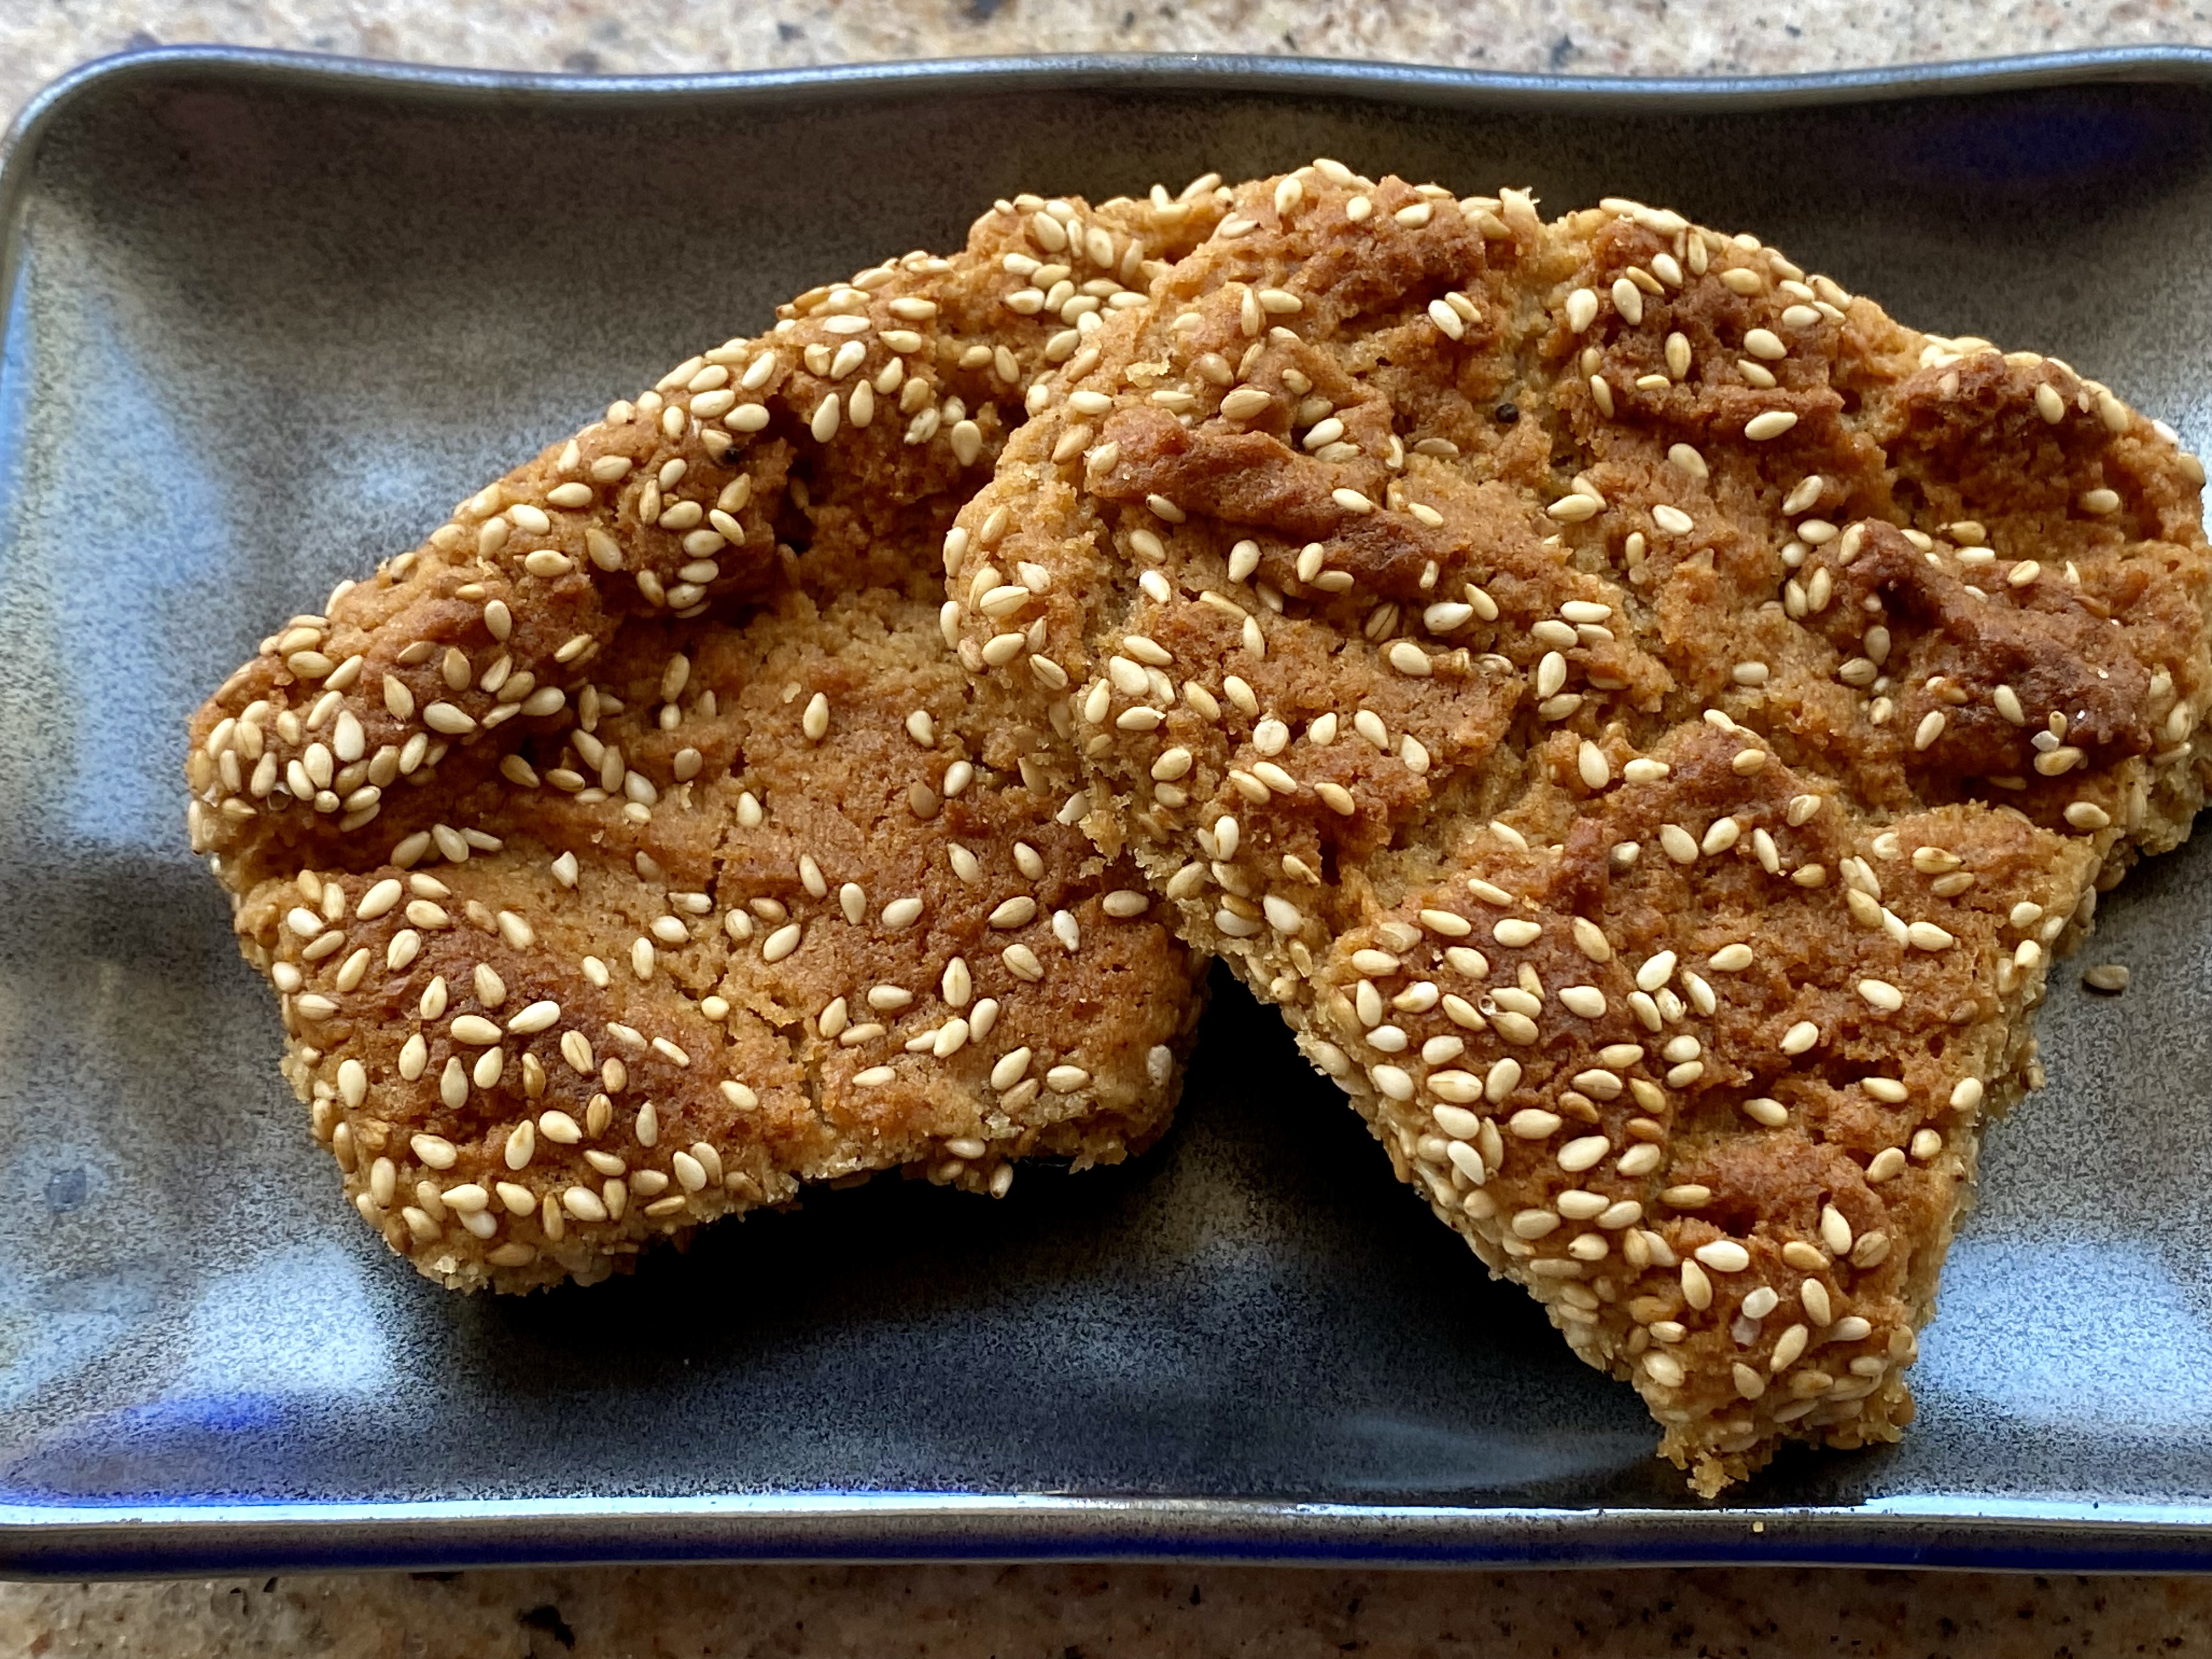
Tahini- Miso Cookies タヒニと味噌クッキー
As we mentioned before we are big fans of “savory” cookies which will go well with wine rather than as a dessert. My wife has made a few in this category before. Recently she I found her searching for savory cookie recipes. During this search, she came across “Tahini-Miso cookies” at a website called “kitchen stories”. Since we had tahini and miso, it was a “no brainer” to try making these. This recipe uses a lot of white sesame seeds. Good thing I just got a large jar of white sesame from Weee. The cookies are great with a taste of saltiness from the miso and nuttiness from the tahini and sesame seed coating the surface of the cookies.

I will ask my wife for how this was made.
Ingredients (shown in the picture below)
225 g flour
¾ tsp baking soda
½ tsp baking powder
115 g butter (room temperature)
220 g brown sugar
100 g sugar
80 g white miso paste
80 g tahini
1 egg
1½ tsp vanilla extract
100 g sesame seeds

Directions:
Add flour, baking soda, and baking powder a bowl and mix to combine, then set aside. Add butter, brown sugar, and sugar to a separate bowl and beat with a hand mixer until very light and fluffy, approx. 5 min.
Add miso and tahini to the butter-sugar mixture and mix until combined. Scrape down the sides of the bowl and mix again. Add egg and vanilla and mix just to combine, then add some of the flour mixture and mix in on low speed. Add remaining flour and mix just until combined.
Add sesame seeds to a bowl. Use an ice cream scooper to scoop some of the cookie dough, then add to the bowl of sesame seeds and cover the ball with the sesame. Transfer to a parchment-lined baking sheet. Repeat until all the cookie dough is gone, (first picture below). Then cover the baking sheet with plastic wrap and chill dough for at least 2 hours, or overnight.
Preheat oven to 350F. Remove some cookies from the baking sheet so there’s enough room for them to spread out while baking. Bake the cookies for approx. 8 min., then use a fork to gently flatten them a bit. Continue baking for 8 - 10 more mins. Let cool completely.

I did not remove any of the cookie dough from the baking sheet as advised in the instructions. They seemed evenly spaced even if they spread a bit. In addition, the instructions said to flatten them with a fork half way through which implied they needed that additional step to spread at all. I tried flattening them as instructed but it was a complete waste because the soft dough just stuck to the tines of the fork making a mess of the cookie so I stopped and just put them back in the oven to finish cooking. At the correct time I opened the oven door and…SURPRISE! The cookies had flattened into an almost solid mass as shown in the picture below; completely unexpected. (Why in the world did the original recipe require flattening them during cooking when they would do this on their own?)

Nonetheless I was able to break them apart into irregular cookie like shapes. Despite the shapes they tasted pretty good. These were not really savory cookies but they also were not as sweet as a desert cookie. They had a slightly chewy texture and deep rich flavor from the miso and tahini. The sesame added an additional nuttiness but they tended to continually fall off the cookie creating a bit of a crumby mess. I’m not sure I will use them next time.
Tuesday, December 26, 2023
Blue Cheese Walnut Cookies ブルーチーズと胡桃のクッキー
This is an additional installment in the continuing tale of “we are big fans of “savory” cookies which go well with wine.” My wife saw this recipe for “blue cheese walnut cookies” in the Washington Post website and decided she had to make it. We used Cambozola cheese which is a mild blue cheese; sort of a cross between blue (Gorgonzola) and Camembert cheeses. The cheese tastes better than it smells and while the cookies were baking in the oven, the entire house was filled with the smell of the cooking cheese which was not totally pleasant. In any case, the end result is worth it. The cookie is a bit crumbly with a mild cheesy and walnut flavor.

I ask my wife to take over.
Ingredients
3 1/2 ounces good-quality, mild blue cheese (we used Cambozola cheese)
3 tablespoons unsalted butter, at room temperature
1/2 cup flour
1/4 cup cornstarch
1/4 teaspoon coarse salt
1/8 teaspoon freshly ground black pepper (we used cayenne pepper)
1/3 cup walnuts, finely chopped
Directions
Preheat the oven to 325 degrees. Line a baking sheet with parchment paper. Combine the flour, cornstarch, salt and pepper in a bowl and set aside.Combine the blue cheese and butter in the bowl of a food processor; pulse until thoroughly blended. We also added the walnuts to the mixture in the food processor and pulsed until they were cut up too. According to the instructions at this point we were to add the flour, cornstarch, salt and pepper into the cheese mixture and mix until a moist dough was formed. Since the food processor we were using was pretty small, we transferred the contents of the food processor to the bowl of dry ingredients to make the dough. Gather up the dough into a flat disk. Roll out the dough to a thickness of 1/4 inch. Use 2-inch cookie cutters to cut out shapes (We just cut the dough into 1 inch squares using a knife).
Transfer to the baking sheet, spacing the cookies 1 inch apart. Bake for 12 to 14 minutes until lightly golden on the edges. Transfer to a wire rack to cool completely before serving or storing.
As I mentioned earlier blue cheese cooking in the oven is not a pleasant smell. We were a little afraid of what the cookie would taste like after smelling it cook. (Not only did it smell bad but the smell permeated the entire house). Luckily the cookie tastes much better than it smelled. Initially the cheese taste was s bit strong but over time it mellowed into a tangy flavor that went very well with the included walnuts and above all goes well with the red wine we were having.
Saturday, December 23, 2023
Arancini and Mini-Scotch Egg アランチーニとミニスコッチエッグ
My wife ordered some small appetizers from Harry and David. We were already going to order dried fruit medley from them to make fruit cakes and bread. So she added an assortment of small frozen appetizers to the order which included “arancini” among the other items. I told her that arancini is typically made from left-over risotto and I could make it very easily as long as we had left-over risotto. We tried the arancini we had ordered. During the heating, the cheese came out and it was ok but not great. Since we had made shiitake risotto a few days earlier, my wife took me up on my boast about how easily I could make arancini as long as we had left-over risotto and challenged me to make some. So with my feet accordingly held to the fire by this challenge I made arancini from the risotto. Since I would need hot oil for frying to make the arancini, I decided to also make mini-Scotch eggs from quail eggs and ground chicken. The picture below is not a great presentation—the arancini with the melted mozzarella in the center is shown on the left and the scotch egg with the quail egg in the center is shown on the right. We ate this immediately hot out of the oil with some Tonkatus sauce. Both the arancini and Scotch eggs had fresh shiitake in them and both were great. The arancini had the melted mozzarella cheese in the center, a crunchy outer shell and soft risotto with a strong shiitake flavor.

For arancini
Ingredients: (made 8 arancini as seen below, the round ones are arancini and oval ones are mini-Scotch eggs)
Shiitake risotto (left-over) about 2 cups
Mozzarella cheese, 10 small cubes, low-moisture
Flour, egg, and Panko bread crumbs for breading
Oil for deep frying (I used peanut oil)
Directions:
Moisten your hands and make a ball about 1 and half inches in diameter and insert the cheese and encase it completely. If needed lightly squeeze to make sure the cheese is completely encased.
Bread the balls as usual; first coat with flour, then egg water and then with Panko bread crumbs (see picture below).

Deep fry in 180C (350F) oil for 2-3 minutes or until the surface is golden (everything is already cooked inside). See below picture.

The arancini I made were great straight out of the hot oil but they also warmed up nicely in the toaster oven. I would say the ones I made were much better than the store-bought and accordingly my wife has conceded that I met her challenge and has now commissioned me to make arancini whenever we have left over risotto.
Wednesday, December 20, 2023
Beef Barley Soup 牛肉と大麦のスープ
We really like beef tongue which is not popular in general, not widely available in US and requires some “courage” to try it. But we like it very much either boiled and sliced for a sandwich or made into stew. Recently, we found that our Asian grocery delivery service “Weee” had frozen beef tongue so we got it. My wife suggested to have it instead of the usual turkey for Thanksgiving. So, we thawed the tongue and cook it up. For the dinner we had thick slices of boiled beef tongue, which were extremely tender and flavorful, with red wine cranberry sauce I made and a side of stuffing balls made by my wife, and blacked Brussel sprouts. This really “hit the spot” and as far as we are concerned is much better than ham or turkey for sure. Using the remaining beef tongue and the liquid in which the tongue was cooked, we made beef tongue stew which we really enjoyed. Still half of the boiling liquid remained which has the nice flavors of the beef and aromatics. So we decided to make “Beef and barley soup” from it. We made this soup/stew with meat from a beef chuck roast. It turned out to be an excellent soup. We looked at a few recipe on line but, at the end, we just made it our own way (not standard way) and this post is just for our own record.

The chunks of the beef were very tender and the barley gave the soup a nice unctuous texture.

We ended up with a quite large amount of soup, probably a bit over 3quarts (or 12 cups).
Ingredients:
2.3 lb package of bone-less chuck roast, seasoned with salt and pepper, seared on both sides and then cut into about 1 inch cubes
4 cups liquid from cooking the beef tongue (the liquid)
3 cups chicken broth
1/2 box (8oz) medium pearled barley, toasted in the toaster oven, rinsed and then cooked in the 4 cups of liquid from cooking beef tongue for 1 hour
2 large carrots, peeled and cut into half inch cubes
2 onions, cut into large dices
3 ribs of celery, cunt into 1/4 inch thick
2 bay leaves
salt and pepper to taste
2-3 tbs vegetable oil
Directions:
Add one cup of the liquid and cubes of the beef in Instant pot, cook for 25 minutes under high pressure and naturally depressurize (we used 2/3 for the soup and 1/3 was added to the tongue stew to supplement the tongue)*
Add the oil in the dutch oven on medium flame. Add the onion and celery and sauté for 5 minutes, add the carrots. Add the cooked beef and barley with their juice. Add 3 cups of chicken broth, the bay leaves and cook for 30-40 minutes
Season with salt pepper to taste
*We cooked the beef one day prior. Placed the liquid and meat in a plastic container and refrigerated. Next day, we removed layers of congealed fat from the surface before using the meat and juice.
This is a very hearty and filling soup. The barley adds a creamy texture and a slight nuttiness from being toasted. The combination of broth used to cook the tongue and the broth used to cook the supplementary beef adds an unctuous and very meaty flavor. Another great soup for lunch on a cold winter’s day.
Sunday, December 17, 2023
Burdock Root and Mushrooms 牛蒡とキノコの煮物
This is another dish I made to use up the mushrooms (Shimeji and shiitake しめじ、椎茸). I also had “gobou” 牛蒡 burdock root. I got the idea of cooking burdock root and mushroom together from a recipe I saw on line but I just made it in my own way. Burdock root can be very fibrous but this was a good one and the the combination of simmered burdock root and mushrooms worked very well. The shimeji was good but the shiitake caps worked well imparting very meaty texture and nice flavor.

The gobou gave a very distinctive flavor and nice crunchy texture but not fibrous. I seasoned it on the light and slightly sweeter side (than I usually do) and is a perfect drinking snack. As a side dish for rice, I would season it more strongly.

Ingredients: (The amount is arbitrary, I just used up all the mushrooms I had left)
10 inch long, medium-sized (diameter wise) “gobou” burdock root, skin scraped off using the back. of the knife, slice on angle 1/4 inch thick and immediately soak in acidulated water for 5- 10 minutes.
I package (100 gram) of shimeji mushrooms
4 caps of fresh shiitake mushrooms, quartered
300-400 ml Japanese dashi broth
2 Tbs. mirin
3 tbs x4 concentrated Japanese noodle sauce (or soy sauce with 1 tbs mirin)
Directions:
Drain the gobou and cook in a fresh water for 10 minutes and drain again
In a pan on medium low flame, add the broth, seasonings, the gobou, mushrooms and with a silicon otoshibuta, simmer for 20-30 minutes
Let it cool to the room temperature in the simmering broth
Serve at room temperature or warmed in a microwave oven especially after the refrigeration.
This is quite a robust dish. The mushrooms give it an almost meaty context. Especially the shitake mushroom which were very thick but tender and well seasoned. They tasted like a tender piece of meat. The burdock root was very tender and its distinctive flavor really came through. This is perfect for a cold evening with a warm cup sake.
Subscribe to:
Posts (Atom)