Saturday, May 18, 2024

Braised Eggplant with Oyster Sauce 茄子と椎茸のオイスターソース炒め

This is an impromptu dish I put together to use the last eggplant we got recently from Weee. I also had a high-quality fresh shiitake mushroom also from Weee. This turned out to be quite good and my wife really liked it. I cut the eggplant a bit larger than I usually do, which made the eggplant tender but not too soft.  The thick shiitake mushroom I added, tasted almost like meat. This is not a recipe but a note to myself so that I can reproduce it.


Ingredients:
One Asian eggplant, stem end removed, cut into bite size chunks (“rangiri” 乱切り cut on bias, turn 90 degree and cut again)
3-4 fresh shiitake mushrooms, stems removed, cut into 4-6 large chunks
1 tbs juliennes of fresh ginger
1 tbs vegetable oil with a splash of dark roasted sesame oil

Seasonings
1 tbs oyster sauce
1 tsp sugar
1 tsp soy sauce
1-2 tbs sake or water

Garnish (optional)
Sesame seeds for garnish
Scallions, finely chopped

Directions:
Add the oil in the drying pan on medium heat wait until the oil simmers.
Add the eggplant and stir until browned (3-4minutes)
Add the shiitake and the ginger. Stir for another minute or two.
Add the seasonings. Stir until the sauce forms and clings to the vegetable.
Top it with the scallion and sesame seeds (optional)

Other version of seasoning
1 tbs miso
1 tbs oyster sauce
2 tsp sugar
1tbs sake
1tbs mirin
grated garlic and ginger

Topping (optional)
Scallion
Sesame seeds
Bonito flakes

This was a very good eggplant dish. It was a great combination of flavors and textures. The slightly larger cut eggplant was very similar in size to the thick mushroom and the textures of the two perfectly complimented each other.

Wednesday, May 15, 2024

Steamed Carrot Buns with Ginger Custard 人参蒸しパン生姜カスタードクリーム

When I was making our weekly grocery list, my wife asked me to include carrot juice. Apparently, she found a recipe for steamed carrot buns on the King Arthur web site. I told her we have a 5lb bag of carrots in the fridge and they were getting old. I volunteered to make fresh carrot juice using our often forgotten juicer. The carrots were growing whisker-like roots and the sprouting carrot tops were trying grow leaves but otherwise they looked ok to me so I made some juice. But when we took a taste we found it had a slightly moldy after taste. So instead of carrot juice, I added a bag of fresh carrots to the grocery list. When the carrots arrived I made the carrot juice and this time, it tasted really great. So, my wife went ahead and made these buns with ginger custard cream.


The buns have nice texture and pretty color (pictures #1 and #2) but we did not taste much of carrot. She sliced the buns and layered on the custard (picture #2). The ginger custard has a nice ginger flavor and complimented the buns.


The original recipe is from King Arthur Flour website.

Ingredients (made 12)
Custard
1 cup (227g) milk
1/2 cup (113g) heavy cream
one 1" piece (12g) fresh ginger, scrubbed and coarsely grated
6 tablespoons (74g) granulated sugar
2 tablespoons (14g) cornstarch
pinch of table salt
4 large egg yolks
1 teaspoon King Arthur Pure Vanilla Plus or King Arthur Pure Vanilla Extract

Dough
1 cup carrot juice. (The original recipe called for 1/2 cup (113g) milk, and 1/2 cup (113g) carrot juice, warm)
1 heaping teaspoon instant yeast
3 cups (360g) King Arthur Unbleached All-Purpose Flour
6 tablespoons (74g) granulated sugar
1 tablespoon vegetable oil, plus more for coating the bowl
1/2 teaspoon table salt
1/2 teaspoon baking powder

Directions
1.To make the custard: In a medium saucepan over medium- low heat, bring the milk, cream, and ginger to a bare simmer — you should see the liquid steaming with some tiny bubbles forming around the edges.
2. Meanwhile, in a large bowl, whisk the sugar, cornstarch, and salt until well-combined and lump-free. Add the egg yolks and whisk vigorously until the mixture is smooth, airy, and pale, about 1 minute.
3. When the milk mixture is hot, slowly dribble it into the egg yolk mixture, whisking constantly. This process of slowly adding hot liquid to the eggs yolks is called tempering and ensures that the eggs don’t scramble from sudden heat. After slowly adding about 1/3 cup of the hot milk, add the rest of the hot milk faster. Once it is all incorporated, transfer the liquid back into the pot, set over medium-low heat, and cook, whisking constantly, until the mixture starts to simmer and thicken to a pudding-like consistency, about 3 to 4 minutes.
4. Pour the custard through a fine-mesh sieve, pressing it through with a spatula or spoon, and into a container. Stir in the vanilla. Place a piece of plastic wrap against the surface of the custard to prevent a skin from forming, then refrigerate for at least 2 hours. While the custard chills, make the dough.

5. To make the dough: In a medium bowl, combine all the dough ingredients and knead — by hand or with a mixer — to make a soft, elastic dough, about 8 to 10 minutes in a stand mixer. Place the dough in a lightly greased bowl, cover, and let it rise for 60 to 90 minutes, until it's nearly doubled in bulk.
6. To shape the buns: Turn out the dough onto a lightly floured surface and divide into 10 equal pieces (around 68g per piece).
7. Shape each piece into a smooth, tight ball. Place the shaped buns in a layer of a steaming basket lined with parchment paper leaving plenty of room in between for the buns to expand. (I was able to fit 4 buns per steamer layer.). Transfer any buns that don’t fit onto a plate or baking sheet. Cover all of the buns and let them rise for 30 to 40 minutes, until puffy and slightly larger.
8. To steam the buns: Bring a shallow pot or frying pan of water to a boil. Place the steamer basket over the top and steam for 10 minutes. Remove the steamer basket from the water and let the buns rest, still covered, for 10 minutes. Finish steaming any remaining dough balls.
9. To fill the buns: Once the buns are cool, cut them through the center. Then use a small spoon or a pastry bag to fill the bun with about 2 to 3 tablespoons (30g to 40g) of chilled custard. Serve right away.
10. Storage instructions: These buns are best served immediately. If you’d like to fill only a few buns at a time, save the steamed, uncut buns and the extra custard in separate airtight containers in the refrigerator for up to 3 days. To reheat the buns, wrap in a damp paper towel and microwave in 15-second increments. Let cool slightly, then split open and fill with the chilled custard.

These are a very elegant bun to eat for breakfast. The steamed bun had a nice soft texture and although it was slightly sweet we did not detect a distinctive carrot flavor. But they made a great ginger custard delivery system. The custard was very sweet vanilla with an essence of ginger flavor. You can’t go wrong with this combo. 

Monday, May 13, 2024

Pickeld Micro Cucumber and Daikon 小さなキュウリと大根のピクルス

The other day while we were shopping at the near-by Whole Foods, my wife found a new item which is called “Teeny Tiny Cucumber” (picture #3). They are much smaller than “American Mini-cucumbers” and about the size of cornichons. I decide to use them to make a Japanese style pickle along with a daikon pickle. I would have used Japanese citrus “Yuzu” but we do not have any access to fresh yuzu so instead, I used Myer lemons (#1). The cucumbers were not crunchy but the daikon was nicely crunchy. It was a bit too sour/acidic for my wife so next time, I will dilute the marinade with some water.


The marinade is a standard Japanese sweet vinegar (one part rice vinegar,1/2 part sugar, small amount of salt). This is essentially a variation of “Daikon Namasu” 大根なます.

Ingredients:
1 package (9oz) teeny tiny cucumbers (picture #3)*
1/3 medium daikon, peeled, cut into 3-4 mm thick rounds and then cut into tick match sticks
1 Meyer lemon, sliced (or yuzu if available).
1 tsp of salt to “sweat” the cucumber and daikon to remove some internal moisture. 

Marinade:
1 cup rice vinegar
1/2 cup sugar
1 tsp salt
1/3 cup water (optional)*

Directions:
Mix the marinade ingredients in a sauce pan and heat on medium flame until sugar and salt melt and start the liquid starts simmering. Let it cool for 5-10 minutes.

Meanwhile, in a bowl add the cucues, daikon and salt, mix well and let it stand for 10-15 minutes until water comes out.
Drain the excess moisture that came out, add half of  the lemon slices to the bottom of a mason jar, add the cucues and daikon and top with slices of the lemon (picture #2). Pour in the marinade. Once cooled to room temperature, place the jar in the refrigerator. The pickles will be ready in 2-3 days.


* Picture #3 is the package of this tiny cucues. I am not sure if this is a special kind of cucumber or just a young and small cucumber. It is grown in Canada.


We like this pickles. The cucumbers are a bit soft and not crunchy but the daikon was nicely crunchy. Over all, this was nice refreshing dish. May be we should have eaten it raw with a dip as suggested in the package. Next time.

Tuesday, April 30, 2024

Frangipane Rolls フランジパンロール

My wife’s sister sent this recipe from King Arthur Flour to my wife knowing my wife is a fairly accomplished baker (challenge???). It appears to be a very fancy recipe and the “frangipane” was even a separate recipe. In any case, my wife rose to the challenge. Being a King Arthur recipe, the original recipe called for their “Raspberry and orange jammy bits” in the filling which we would have had to buy. She skipped this and just used the “frangipane”. The thin layer of frangipane added a nice and distinct almond flavor and the rolls had a nice texture and slightly sweet taste (picture #1). It took some work for my wife but she said it was worth it. 


Frangipane recipe (makes about 360 gram which is perfect for the frangipane rolls recipe below)

Ingredients
6 tablespoons (85g) unsalted butter, at room temperature
1/2 cup (99g) granulated sugar
1/4 teaspoon table salt
1 cup (96g) King Arthur Almond Flour
3 tablespoons (23g) King Arthur Unbleached All-Purpose Flour or King Arthur Gluten- Free Measure for Measure Flour
1 large egg, at room temperature
2 teaspoons almond emulsion or almond extract

Directions:
1. In a medium bowl or the bowl of a stand mixer, beat together the butter, sugar, and salt until pale and fluffy, about 1 minute on medium speed.
2. Stir in the flours, egg, and almond flavoring. Mix until just combined.
3. Use the frangipane as desired: fill tart shells, pipe into croissant dough, top slices of Bostock, or come up with your own way to use this flavorful, nutty filling. Bake the frangipane as directed in your recipe or until it’s golden brown and smells nutty.
4. Store leftover unbaked frangipane in the refrigerator, covered, for up to 1 week or freeze for up to 2 months.

Frangipane roll recipe:

Ingredients: (doubled the original recipe)

Tangzhong (starter)
6 tablespoons (86g) water
6 tablespoons (86g) milk, whole preferred
4 tablespoons (28g) King Arthur Unbleached Bread Flour

Dough
5 cups (600g) King Arthur Unbleached Bread Flour
1 cup (226g) milk, whole preferred
2 large eggs
8 tablespoons (114g) unsalted butter, softened
1/2 cup (100g) granulated sugar
2 tablespoon (18g) instant yeast
2 teaspoon (12g) table salt

Topping
2 tablespoons (28g) milk,whole preferred
2 tablespoons (25g) granulated sugar, optional

Directions:
1.To make the tangzhong: 
In a small saucepan, combine all the ingredients and whisk until no lumps remain.
2.Place the saucepan over medium heat and cook the mixture, stirring regularly, until thickened, paste-like, and the spoon or spatula leaves lines on the bottom of the pan. This should take 2 to 4 minutes, depending on the strength of the burner.
3.Remove the tangzhong from the heat and transfer it to a large mixing bowl, the bowl of a stand mixer, or the bucket of a bread machine (wherever you plan to knead the dough).

4.To make the dough: 
Weigh the flour; or measure it by gently spooning it into a cup, then sweeping off any excess. Place the flour into the bowl with the tangzhong and add the remaining dough ingredients. Mix to combine, then knead — by hand, mixer, or bread machine — until a soft, smooth dough forms, about 8 to 10 minutes on medium-low speed of a mixer. (The dough may be tacky and stick to the sides of the bowl slightly; that's OK.)
5.Shape the dough into a ball, place it in a lightly greased large bowl or standard dough rising bucket, cover, and refrigerate for 12 to 24 hours. The refrigerated rise will make the dough much easier to handle and shape
6.To assemble: On a lightly floured surface, gently deflate the dough, divide it into four pieces and shape each piece into a ball.
7.Cover the dough and let it rest for 10 minutes.
8. Prepare a square pan with a parchment sling or reusable silicone liner. Lightly grease any exposed sides of the pan.
9. Working with one piece of dough at a time, roll it into an 8" square. If the dough begins to snap back during rolling, set it aside and begin rolling out the second piece. After a couple of minutes, return to the first piece to continue rolling it to the full size (this gives the gluten a chance to relax).
10. Portion one quarter of the filling onto the top half of the square. 
11. Starting at the top, spread the filling across the entire width of the square and down about 4", leaving the bottom 4" bare (#1). If the filling is difficult to spread, warm it in the microwave for 15 seconds and stir; check the consistency. Repeat, if necessary, until it's easily spreadable.
12. Using a bench or chef’s knife, cut the uncovered dough at the bottom into very thin strips (anywhere from 1/8" to 1/4" wide) (#2).
13.Starting from the filling-covered top and rolling toward the uncovered strips, roll the dough into a log about 8" long.
 14. Lightly press the strips into the rolled log to secure. Cut the log into four 2" pieces and then place them, seam-side down, in a row and in alternating orientations in the pan (#3).
15. Roll, fill, and shape the remaining pieces of dough, placing the rolls into the pan to form 4 rows of 4 buns, each row in an alternating pattern (#4 & #5). Cover the rolls and let them rise for 60 to 75 minutes, until puffy.
16.While the rolls rise, preheat the oven to 350°F.
17.To finish and bake the rolls: Gently brush the rolls with milk, being careful not to deflate the delicate dough, and sprinkle generously with granulated sugar.
18. Bake the rolls for 30 to 35 minutes, until the tops are golden brown; a digital thermometer inserted into the center should read at least 190°F (#6).
19. Remove the rolls from the oven and cool in the pan until you can transfer it safely to a rack to cool completely, at least 15 minutes. Serve the rolls slightly warm or at room temperature.
20. Storage information: Store leftover mini wool rolls, well wrapped, at room temperature for several days.


These rolls have a very delicate flavor accented mostly by the frangipan which provides a delicate slightly sweet almond flavor. The bread has the texture and flavor of a milk bread while the frangipan provides a slightly custard like filling interspersed through out the bread. This is definitely a very sophisticated bread.

Sunday, April 21, 2024

Spinach Soufflé (easy version) ほうれん草のスフレ

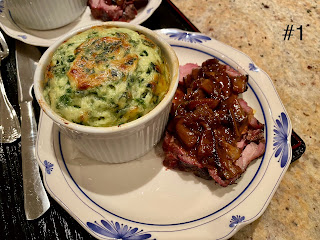
My wife is partial to spinach soufflé. Previously I made it the traditional way by separating the egg yolks and whites. Then making a béchamel sauce in which I put the egg yolks. The whites are whipped before being incorporated into the béchamel sauce too. Then we learned from Jacques Pepin that there are two simpler ways to make souffle. One is to just use a whole egg rather than separating it. The other was to make  a corn soufflé  without even making a béchamel by using fresh corn pure instead. Those two methods were much easier. Recently we tried a variation of another soufflé recipe from Pepin which he called (Maman’s cheese soufflé recipe). We saw the recipe presented on YouTube. Again we used whole eggs rather than separating the yolks and whites. Although we adopted the idea of using a whole egg in the souffle, we did not make Maman’s cheese souffle instead we tailored the recipe to make spinach souffle by adding spinach and onion. It did not rise as much as we expected but it was pretty good. We served it with roasted lamb with mushroom port wine sauce (picture #1).


We cooked it in small but deep ramekins (picture #2). If we used shallower and wider opening vessels like one used by Pepin, it may have risen more but this was just fine and tasted really great.


Again, we modified the recipe in several ways. One modification is that I used much less butter than is used in classic Béchamel sauce; in the classic the same amount of butter and flour is used. I add finely chopped onion and/or mushrooms in addition to the butter. The flour coats the surface of the fat covered onion and makes the resulting Béchame without lumps. This is not a precise recipe but just a note for myself.

Ingredients: (made two large ramekins full, 2 inches in diameter)
1 medium shallot, finely chopped
2 tbs unsalted butter
3 tbs Ap flour
1/2 cup or more milk
1/4 cup spinach, cooked and moisture squeezed, finely chopped (I cooked it without added water in a wok with a lid and then squeezed out any remaining moisture using a ricer).
1/2 cup Gruyere cheese, grated
3 large eggs, well beaten
Back pepper, salt and nutmeg for taste

Butter and grated parmesan cheese to lightly grease the ramekins.

Directions:
In a frying pan, melt the butter and cook the shallot for a few minutes, add the flour and mix for one minute after the dry flour disappears
Add cold milk at once and mix using a silicon spatula until well mixed and thickened. Add the cheese and mix (adjust the thickness by adding more milk)
Add the spinach and seasonings and let it cook for 5 minutes then add to the beaten eggs and mix.
Pour the mixture into the prepared ramekins (70% full) (as per Pepin, this can be stored in the refrigerator for a few days before cooking).
Bake for 30-35 minutes in a preheated 375F oven (I used our toaster oven in convection mode).

It did not rise as much as our previous soufflé but it did rise and tasted great with good texture. This is much easier to make. My wife was quite satisfied with it.

Wednesday, April 10, 2024

Mini Fruit Galettes ミニフルーツガッレト

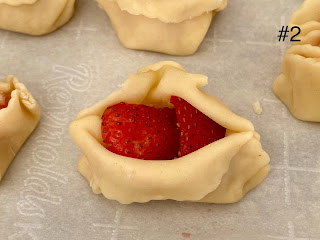
We had an excess of strawberries which were nonetheless pretty good. So how to use them? My wife happened to come across a recipe for “Mini fruit galettes” in the Washington Post. Although the original recipe involved making a crust from scratch, she had some pie dough in the freezer which was a bit old so she decided to take a short cut and use that instead. While this rendition was more than adequate and quite good for a small but not too sweet desert there is room for improvement. Since the dough was fairly old it was a bit dry and kept opening up. (As shown by the little pie on the left in the picture). Also, a bit more strawberry filling would have been helpful.


Ingredients:
Two Pillsbury refrigerated pie crusts   
1/2 cup plain dried breadcrumbs (I used panko)
1/4 cup granulated sugar
1/4 cup cornstarch
2 cups strawberries (or tart pitted cherries and/or peeled, diced peaches as per the original recipe)
2 tablespoons fresh lemon juice
2 tablespoons Grand Marnier, another orange-flavored liqueur (we used Triple Sec) or 1/2 teaspoon almond extract
2 teaspoons cold unsalted butter, each cut into equal pieces
1 large egg
1 tablespoon water
1/8 teaspoon kosher salt
About 1/4 cup sparkling sugar or turbinado sugar, for sprinkling

Directions:
Line a baking sheet with parchment paper.
Cut the dough into two inch round portions using a biscuit cutter. (A slightly larger size might work a bit better). Roll out the dough a bit thinner. Scatter 1 tablespoon of the dried bread crumbs across the center, leaving a margin all around. (In the upper left hand corner of the picture #1, a crust with the crumbs on it is just visible.) (These bread crumbs are extremely important. They soak up any excess juice and make a nice almost jelly like filling.)


Stir together the granulated sugar and cornstarch in a mixing bowl. Add the fruit, lemon juice and Grand Marnier (Triple Sec) or almond extract; stirring well to coat the fruit. Scoop out a scant spoon full and put in the center of the piece of dough. Working quickly, lift the outside of the dough edge and pull it up and slightly over the filling, leaving the fruit in the center exposed. (This proved more difficult than we expected. Although we moistened the edges of the dough, it kept opening with the filling spilling out. But with some effort we made it work).

Work around each galette, folding the dough over on itself and forming a series of pleats to make a snug package. Use the outside edge of your hands to cup the edges of the galette and gently press the dough into the fruit. Snuggle one small cube of butter into the center opening. Place the galette on the baking sheet. Repeat with the remaining dough rounds, filling and butter.


Freeze them, uncovered, for 30 to 45 minutes, until firm.

Preheat oven to 400 degrees. Lightly beat the egg, water and salt in a small bowl. Brush the folded edges of each galette with the egg wash, then sprinkle them with the sugar. Bake for 20 to 25 minutes, until deeply golden brown with bubbling filling.
Cool for a bit before serving.

The crispy buttery pie crust was a nice contrast and went well with the strawberry jellly-like filling. The egg wash with the sugar coating caramelized and made a sweet crunch to bite into. The bread crumbs in the center of the dough is a technique to keep in mind for other baked pie goods. Because they soaked up the excess juice the pie crust did not get soggy and remained nicely crispy. My wife said she will make this again with improvements; one of which is the use of dough that is not quite so dry (old).

Saturday, April 6, 2024

Pumpkin “Kabocha” salad カボチャのサラダ

We regularly get Japanese/Asian groceries from Weee. This time we got a Japanese “Kabocha” かぼちゃ squash. It was larger than usual. I made my usual simmered kabocha and pottage かぼちゃの煮物とポタージュ but some still remained. I thought about tempura but that was too much work for such a small piece. So I decided to make this “kabocha salad”. I did not follow any particular recipe but sort of combined two different recipes. This is curry flavored and turned out to be quite good highlighting the natural sweetness of the kabocha.


This is just a note for myself.

Ingredients:
Kabocha squash, seeds removed, skin shaved off (optional), cut into half inch cubes
Raisins

For the dressing
Greek yogurt
Mayonnaise
Curry powder
Salt and pepper to taste

Directions:
Boil the kabocha in salted water for 5-7 minutes until cooked but not too mushy
Mix the ingredients for the dressing (about the same amount of mayo and yogurt, the amount of curry powder is to your liking)

For an impromptu salad, this was much better than I expected. The natural sweetness of the kabocha was complemented by the curry flavor. The mixture of the yogurt, mayo and kabocha made a nice creamy texture with some tartness. I will make this again.

P.S. Hawk joins us for Hanami 花見!
This year was a bit unusual for the cherry blossoms. The trees bloomed early and the blooms lasted for a long time. Since we have three trees with different bloom timing, we had a very long time to enjoy cherry blossoms or “Hanami”. One afternoon, a hawk joined us for Hanami! We looked out the window and there he was in all his magnificence sitting not ten feet from the window on the railing of the deck. We marveled at the image of such an awesome creature juxtaposed to the delicate loveliness of the cherry blossoms.